- Move Mouse — имитируем активность пользователя
- Углубляемся в C++: move семантика и rvalue
- Введение в move
- rvalue и lvalue
- Универсальные ссылки
- Свёртывание ссылок
- Copy/move elision
- Не включаются расширения gnome-shell
- Top 20 GNOME Extensions You Should Be Using Right Now
- Best GNOME Extensions
- 1. Appfolders Management extensions
- 2. Apt Update Indicator
- 3. Auto Move Windows
- 4. Caffeine
- 5. CPU Power Management [Only for Intel CPUs]
- 6. Clipboard Indicator
- 7. Extensions
- 8. Frippery Move Clock
- 9. Gno-Menu
- 10. User Themes
- 11. Hide Activities Button
- 12. MConnect
- 13. OpenWeather
- 14. Panel OSD
- 15. Places Status Indicator
- 16. Refresh Wifi Connections
- 17. Remove Dropdown Arrows
- 18. Status Area Horizontal Spacing
- 19. Steal My Focus
- 20. Workspaces to Dock
- Honorable Mentions: Dash to Dock and Dash to Panel
Move Mouse — имитируем активность пользователя

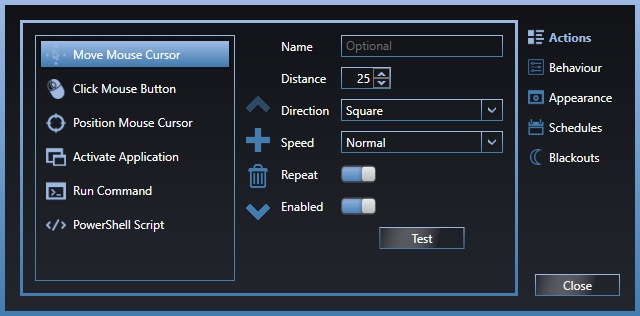
Move Mouse служит для имитации присутствия пользователя за компьютером за счёт движения курсора мыши и нажатия её кнопок. Кроме того ею можно воспользоваться для запуска каких-то программ, выполнения команд или скриптов PowerShell. Активироваться утилита может вручную или автоматически, при отсутствии активности пользователя и по расписанию, тоже самое касается и прекращения заданных операций.
Для каждой из операций арсенала программы доступны дополнительные опции, позволяющие задать дистанцию и направление движение мыши, выбрать кнопку, нажатие которой будет имитироваться, указать аргументы для команды или скрыть окно консоли. Все действия могут повторяться (с настраиваемой паузой) или выполняться один раз.
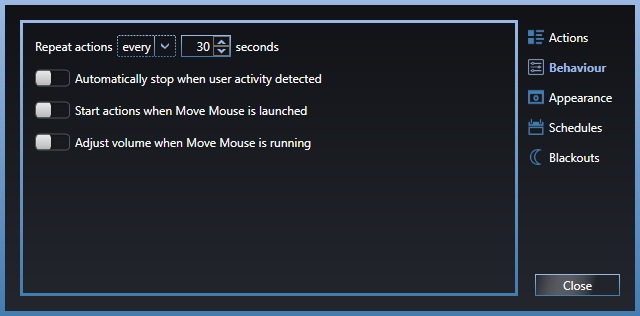
Кроме автоостановки и автозапуска, о которых мы уже упоминали, в настройках поведения Move Mouse доступна опция автоматического изменения громкости звука, скрытия окна программы с рабочего стола, кнопки и иконки с панели задач, миниатюры из диалогового окна ALt+Tab и перезаписи заголовка. Последние опции помогут скрыть следы ей присутствия и использования на компьютере, если кому-то это потребуется.
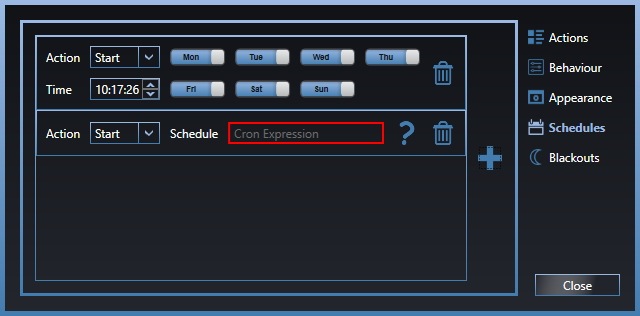
Настроить расписание активации действий можно как при помощи простейшего планировщика, позволяющего выбрать день недели и время запуска или остановки программы, так и более продвинутого, поддерживающего ввод выражений Cron. По расписанию Move Mouse может и приостанавливать свою деятельность, длительность «блэкаута» также изменяется.
Распространяется программа бесплатно, язык интерфейса в текущей версии доступен только один — английский. Воспользоваться Move Mouse можно на компьютерах и планшетах с Windows 10. Судя по всему, после публикации программы в Магазине Windows, от распространения через другие источники разработчик отказался.
Углубляемся в C++: move семантика и rvalue

В этой статье разобраны основные преимущества и нюансы move семантики в C++11 и старше. Всё описанное в этой статье было проверено на компиляторе Clang 6.0.1 с библиотекой libc++ на x86, GNU/Linux.
Введение в move
Move семантика позволяет переместить объект вместо его копирования для увеличения производительности. Проще всего понять семантику перемещения на примере. В качестве этого примера будет использоваться класс String :
При передаче объекта этого класса в функцию, принимающую его по значению, — назовём её by_value() — произойдёт следующее:
Получается 4 обращения к аллокатору, что достаточно накладно. Но если объект String больше не понадобится, а функцию by_value() менять нельзя, то можно переместить объект, а не копировать. Для этого необходимо написать конструктор перемещения для класса String :
Параметр конструктора перемещения other , во-первых, неконстантный, т.к. конструктор его изменяет; во-вторых, является rvalue -ссылкой ( && ), а не lvalue -ссылкой ( & ). Об их отличиях будет сказано далее. Сам конструктор переносит Си-строку с other на this , делая other пустым.
Конструктор перемещения в общем случае не медленнее, а зачастую даже быстрее конструктора копирования, но ничего не мешает программисту поместить sleep(10’000) в конструктор перемещения.
Для вызова конструктора перемещения вместо конструктора копирования можно использовать std::move() . Теперь пример выглядит следующим образом:
Количество обращений к аллокатору уменьшилось вдвое!
rvalue и lvalue
Основное отличие rvalue от lvalue в том, что объекты rvalue могут быть перемещены, тогда как объекты lvalue всегда копируются.
22–25 апреля, Онлайн, Беcплатно
Это «могут быть» лучше всего демонстрируют следующие два примера:
Этот код работает не так, как от него ожидается. std::move() всё ещё конвертирует lvalue в rvalue , но конвертация сохраняет все модификаторы, в том числе и const . Затем компилятор выбирает среди двух конструкторов класса String самый подходящий. Из-за того что компилятор не может отправить const rlvaue туда, где ожидается non-const rvalue , он выбирает конструктор копирования, и const rvalue конвертируется обратно в const lvalue . Вывод: следите за модификаторами объектов, т.к. они учитываются при выборе одной из перегрузок функции.
Второй пример демонстрирует правило: аргументы и результат функции могут быть как rvalue , так и lvalue , но параметры функций могут быть только lvalue . Аргумент — это то, что передаётся в функцию. Он инициализирует параметр, который доступен непосредственно внутри функции.
Хотя параметр string функции f() и имеет тип rvalue -ссылки, он является lvalue и требует явной конвертации в rvalue перед передачей в функцию g() . Этим и занимается std::move() .
Универсальные ссылки
Универсальные ссылки могут быть как rvalue -, так и lvalue -ссылкой в зависимости от аргументов или результата функции. Используются в шаблонах и в auto&& :
Компилятор на основе этого шаблона генерирует 2 функции, одна из которых принимает lvalue , другая — rvalue , если они будут использоваться. Если программист хочет использовать перемещение для rvalue -ссылки и простое копирование для lvalue -ссылки, то он может использовать std::forward() , который приводит свой аргумент к rvalue только тогда, когда его тип является rvalue -ссылкой. std::forward() требует явного указания шаблонного параметра даже с автоматическим выводом шаблонов в С++17.
Универсальная ссылка обязана быть шаблонным параметром (отсюда такое странное определение шаблона функции в примере) в формате T&& . Например, std::vector && уже не универсальная, а rvalue -ссылка.
Свёртывание ссылок
На самом деле разницы между rvalue -ссылкой и универсальной ссылкой нет. Универсальная ссылка — лишь удобная абстракция над rvalue -ссылкой, которой многие пользуются. Но как тогда rvalue -ссылка превращается в lvalue -ссылку при lvalue аргументе? Всё дело в свёртывании ссылок.
При вызове template_func(string) компилятор генерирует следующий заголовок функции:
И получается ссылка на ссылку! Вручную так сделать нельзя, но шаблоны могут. Далее компилятор свёртывает ссылку на ссылку. Свертывание производится по следующему правилу: результатом свертывания будет rvalue -ссылка только тогда, когда обе ссылки являются rvalue -ссылками.
Именно из-за этого безобразия проще использовать абстракцию универсальных ссылок.
Подробнее о move семантике и rvalue можно узнать из книги С. Мейерса «Эффективный и современный С++: 42 рекомендации по использованию С++ 11 и С++14» ISBN: 978-5-8459-2000-3.
Copy/move elision
Copy/move elision — это оптимизация, при которой компилятор может убрать некоторые вызовы конструктора копирования и деструктора, но в данный момент только при возврате объекта из функции, и только если тип возвращаемого объекта полностью совпадает с типом функции.
Поэтому при возврате из функции использование std::move() может снизить производительность, ограничив компилятор в Copy elision оптимизации, ведь отсутствие конструктора быстрее, чем конструктор перемещения.
Здесь std::move() только замедляет код, добавляя лишний вызов String(String&& other) и
В C++20 copy/move elision может быть расширен, благодаря чему в некоторых случаях использование std::move() также снизит производительность. Подробнее о расширении copy/move elision можно узнать из видеозаписи со встречи рабочей группы по стандартизации С++ в московском офисе Яндекса.
Не включаются расширения gnome-shell
Ни одно расширение не работает. При включении в браузере (chromium, firefox), ползунок включения расширения возвращается в состояние выключено через пару секунд.
gnome-shell 40, работает на XORG. chrome-gnome-shell установлен.
В gnome-tweak-tool вкладка расширения отсутствует.
Проверку на версию включал и отключал, не влияет
gsettings set org.gnome.shell disable-extension-version-validation false
Такая ситуация возникла после загрузки gnome-shell на wayland и последующей загрузкой сеанса gnome-shell на XORG
Каким образом вернуть работоспособность расширений?

Удалить да перезагрузить
Удалить что?
Если Вы про gnome-shell-extensions chrome-gnome-shell, то удалял и устанавливал заново, не влияет. Настройки явно какие то где то остаются, но где не ясно.
Если у тебя уже бета гном 40 то я не знаю не пользуюсь пока жду возврата что бы док можно было выставлять в любом угле , может там все в только чтение встало ? В новой версии лучше ставить все в папку /usr/share/gnome-shell/extensions что бы не было двоевластия с .local и работало железно либо никак
Расширения есть у меня, но не включаются.
ll /usr/share/gnome-shell/extensions/
и в looking glass смотри что происходит.
Если у тебя уже бета гном 40
Какя бета? Релизнулся 40 уже давно.
В gnome-tweak-tool вкладка расширения отсутствует.
Вообще-то Gnome Extensions для управления расширениями. В нем можно увидеть ошибки, если что-то не так.
Там в 40-м гноме, вынесли расширения в отдельное приложение из Gnome-tweak, я тоже вчера не разобрался сразу, но потом увидел. Немного есть там, но многие пока ещё под 40 не написали, тот же GPaste. Ну и с mpv, тоже обновлённым аудио видео плеером я разбирался несколько неординарно, пришлось несколько кодеков пока откатить и заэксклюдить от обновления. Теперь всё работает. А вот с расширениями — я выше написал. Сложного ничего, но пока 40-й сыроват и не привычен. Однако работать можно уже.
Какой дистрибутив? В fedora например многие из твоего списка можно поставить через пакетный менеджер и они работают, в отличие от установленных через extensions.gnome.org
Да я пробовал хорошая бета , но еще не совсем готовый продукт. Потому что там нету в шелле вот этого https://youtu.be/r0ki7MUEv7o?t=47 3.38.5 хотя эта уже версия 40.0! 40.0! https://youtu.be/BNrL1aVWM9Y
Я предлагаю там через петицию сделать эту систему лучшей и если все удачно проидет в тч это голосование и дистрибутив заинвестируют то шелл 40 будет готов еще быстрее , так же дистрибутив заинтересует тех кому нужен рабочий webgl в сессии вайланд во всех других работать не будет потому что это евро поделки , как проверить да очень просто зайти из ваиланд сессии на этот саит https://www.shadertoy.com/view/3lsSzf
Да сейчас и OpenSuSe Tumbleweed вчера подтянулась. Всё нормально, я её быстро освоил и побором неудобства. Толко вот одно расширение из реп ставится пока для 38 гнома и в 40 не работает, это GPaste, но я думаю вопрос времени. Смешнее с их плеером totem новым, он лезет всегда в прграм менеджер, теперь и такой там есть магазинчик с флетпаками и не только. Хотя всё нужное стоит. А потом выводит только звук а видео нет. Но тут на выручку приходит свежая сборка mpv плеера, хоть и пишет что работа в гноме не гарантирована, но у меня воспроизводит все мыслимые аудио и видео форматы на ура. Ну и остальное юзабельное, сегодня весь день на нём. Дискомфорта не заметил. А расширения допилят. Вопрос времени, раз уже в стольки дистрибутивах он есть штатно. А ещё в скольки не штатно, но люди и в Каноникал занимаются. Всё сделают. Вспомните начало тригномов вообще 🙂 А 1-ый был хорош 🙂 Потом пришол второй и вызывал недовольства, потом 3-й, теперь вот 40-й 🙂
OpenSuSe Tumbleweed Смешнее с их плеером totem новым, он лезет всегда в прграм менеджер, теперь и такой там есть магазинчик с флетпаками и не только. Хотя всё нужное стоит. А потом выводит только звук а видео нет.
Выходит, в suse тоже криворукие мейнтейнеры. Я думал это только в убунту все через жопу собирают.
Спасибо. Теперь ясно стало куда все делось и почему не включались расширения.
Так вот и я удивился этому магазину приложений в openSuSe Tumbleweed. Может кому-то и нравится, но я YasT то в терминале и консольный использую. Многолетняя привычка. А на убунту да, стало очень похоже. Ну зря же в Ubuntu можно сейчас zypper установить из реп прямо 🙂
Top 20 GNOME Extensions You Should Be Using Right Now
Last updated October 13, 2019 By Phillip Prado 52 Comments
Brief: You can enhance the capacity of your GNOME desktop with extensions. Here, we list the best GNOME shell extensions to save you the trouble of finding them on your own.
GNOME extensions are a major part of the GNOME experience. These extensions add a lot of value to the ecosystem whether it is to mold the Gnome Desktop Environment (DE) to your workflow, to add more functionality than there is by default, or just simply to freshen up the experience. In other words, you can customize GNOME desktop with these extensions.
With default Ubuntu 17.10 switching from Unity to Gnome, now is the time to familiarize yourself with the various extensions that the GNOME community has to offer. We already showed you how to enable and manage GNOME extensions. But finding good extensions could be a daunting task. That’s why I created this list of best GNOME extensions to save you some trouble.
Best GNOME Extensions

The list is in alphabetical order but there is no ranking involved here. Extension at number 1 position is not better than the rest of the extensions.
1. Appfolders Management extensions
One of the major features that I think GNOME is missing is the ability to organize the default application grid. This is something included by default in KDE‘s Application Dashboard, in Elementary OS‘s Slingshot Launcher, and even in macOS, yet as of GNOME 3.26 it isn’t something that comes baked in. Appfolders Management extension changes that.
This extension gives the user an easy way to organize their applications into various folders with a simple right click > add to folder. Creating folders and adding applications to them is not only simple through this extension, but it feels so natively implemented that you will wonder why this isn’t built into the default GNOME experience.

2. Apt Update Indicator
For distributions that utilize Apt as their package manager, such as Ubuntu or Debian, the Apt Update Indicator extension allows for a more streamlined update experience in GNOME.
The extension settles into your top bar and notifies the user of updates waiting on their system. It also displays recently added repos, residual config files, files that are auto removable, and allows the user to manually check for updates all in one basic drop-down menu.
It is a simple extension that adds an immense amount of functionality to any system.

3. Auto Move Windows
If, like me, you utilize multiple virtual desktops than this extension will make your workflow much easier. Auto Move Windows allows you to set your applications to automatically open on a virtual desktop of your choosing. It is as simple as adding an application to the list and selecting the desktop you would like that application to open on.
From then on every time you open that application it will open on that desktop. This makes all the difference when as soon as you login to your computer all you have to do is open the application and it immediately opens to where you want it to go without manually having to move it around every time before you can get to work.

4. Caffeine
Caffeine allows the user to keep their computer screen from auto-suspending at the flip of a switch. The coffee mug shaped extension icon embeds itself into the right side of your top bar and with a click shows that your computer is “caffeinated” with a subtle addition of steam to the mug and a notification.
The same is true to turn off Caffeine, enabling auto suspend and/or screensave again. It’s incredibly simple to use and works just as you would expect.
5. CPU Power Management [Only for Intel CPUs]
This is an extension that, at first, I didn’t think would be very useful, but after some time using it I have found that functionality like this should be backed into all computers by default. At least all laptops. CPU Power Management allows you to chose how much of your computer’s resources are being used at any given time.
Its simple drop-down menu allows the user to change between various preset or user made profiles that control at what frequency your CPU is to run. For example, you can set your CPU to the “Quiet” present which tells your computer to only us a maximum of 30% of its resources in this case.
On the other hand, you can set it to the “High Performance” preset to allow your computer to run at full potential. This comes in handy if you have loud fans and want to minimize the amount of noise they make or if you just need to save some battery life.
One thing to note is that this only works on computers with an Intel CPU, so keep that in mind.

6. Clipboard Indicator
Clipboard Indicator is a clean and simple clipboard management tool. The extension sits in the top bar and caches your recent clipboard history (things you copy and paste). It will continue to save this information until the user clears the extension’s history.
If you know that you are about to work with documentation that you don’t want to be saved in this way, like Credit Card numbers or any of your personal information, Clipboard Indicator offers a private mode that the user can toggle on and off for such cases.

7. Extensions
The Extensions extension allows the user to enable/disable other extensions and to access their settings in one singular extension. Extensions either sit next to your other icons and extensions in the panel or in the user drop-down menu.
Redundancies aside, Extensions is a great way to gain easy access to all your extensions without the need to open up the GNOME Tweak Tool to do so.

8. Frippery Move Clock
For those of us who are used to having the clock to the right of the Panel in Unity, this extension does the trick. Frippery Move Clock moves the clock from the middle of the top panel to the right side. It takes the calendar and notification window with it but does not migrate the notifications themselves. We have another application later in this list, Panel OSD, that can add bring your notifications over to the right as well.
9. Gno-Menu
Gno-Menu brings a more traditional menu to the GNOME DE. Not only does it add an applications menu to the top panel but it also brings a ton of functionality and customization with it. If you are used to using the Applications Menu extension traditionally found in GNOME but don’t want the bugs and issues that Ubuntu 17.10 brought to is, Gno-Meny is an awesome alternative.

10. User Themes
User Themes is a must for anyone looking to customize their GNOME desktop. By default, GNOME Tweaks lets its users change the theme of the applications themselves, icons, and cursors but not the theme of the shell. User Themes fixes that by enabling us to change the theme of GNOME Shell, allowing us to get the most out of our customization experience. Check out our video or read our article to know how to install new themes.


11. Hide Activities Button
Hide Activities Button does exactly what you would expect. It hides the activities button found a the leftmost corner of the top panel. This button traditionally actives the activities overview in GNOME, but plenty of people use the Super Key on the keyboard to do this same function.
Though this disables the button itself, it does not disable the hot corner. Since Ubuntu 17.10 offers the ability to shut off the hot corner int he native settings application this not a huge deal for Ubuntu users. For other distributions, there are a plethora of other ways to disable the hot corner if you so desire, which we will not cover in this particular article.


12. MConnect
MConnect offers a way to seamlessly integrate the KDE Connect application within the GNOME desktop. Though KDE Connect offers a way for users to connect their Android handsets with virtually any Linux DE its indicator lacks a good way to integrate more seamlessly into any other DE than Plasma.
MConnect fixes that, giving the user a straightforward drop-down menu that allows them to send SMS messages, locate their phones, browse their phone’s file system, and to send files to their phone from the desktop. Though I had to do some tweaking to get MConnect to work just as I would expect it to, I couldn’t be any happier with the extension.
Do remember that you will need KDE Connect installed alongside MConnect in order to get it to work.

13. OpenWeather
OpenWeather adds an extension to the panel that gives the user weather information at a glance. It is customizable, it lets the user view weather information for whatever location they want to, and it doesn’t rely on the computers location services. OpenWeather gives the user the choice between OpenWeatherMap and Dark Sky to provide the weather information that is to be displayed.

14. Panel OSD
This is the extension I mentioned earlier which allows the user to customize the location in which their desktop notifications appear on the screen. Not only does this allow the user to move their notifications over to the right, but Panel OSD gives the user the option to put their notifications literally anywhere they want on the screen. But for us migrating from Unity to GNOME, switching the notifications from the top middle to the top right may make us feel more at home.
15. Places Status Indicator
Places Status Indicator has been a recommended extension for as long as people have started recommending extensions. Places adds a drop-down menu to the panel that gives the user quick access to various areas of the file system, from the home directory to serves your computer has access to and anywhere in between.
The convenience and usefulness of this extension become more apparent as you use it, becoming a fundamental way you navigate your system. I couldn’t recommend it more highly enough.

16. Refresh Wifi Connections
One minor annoyance in GNOME is that the Wi-Fi Networks dialog box does not have a refresh button on it when you are trying to connect to a new Wi-Fi network. Instead, it makes the user wait while the system automatically refreshes the list. Refresh Wifi Connections fixes this. It simply adds that desired refresh button to the dialog box, adding functionality that really should be included out of the box.
17. Remove Dropdown Arrows
The Remove Dropdown Arrows extension removes the arrows on the panel that signify when an icon has a drop-down menu that you can interact with. This is purely an aesthetic tweak and isn’t always necessary as some themes remove these arrows by default. But themes such as Numix, which happens to be my personal favorite, don’t remove them.
Remove Dropdown Arrows brings that clean look to the GNOME Shell that removes some unneeded clutter. The only bug I have encountered is that the CPU Management extension I mentioned earlier will randomly “respawn” the drop-down arrow. To turn it back off I have to disable Remove Dropdown Arrows and then enable it again until once more it randomly reappears out of nowhere.
18. Status Area Horizontal Spacing
This is another extension that is purely aesthetic and is only “necessary” in certain themes. Status Area Horizontal Spacing allows the user to control the amount of space between the icons in the status bar. If you think your status icons are too close or too spaced out, then this extension has you covered. Just select the padding you would like and you’re set.
19. Steal My Focus
By default, when you open an application in GNOME is will sometimes stay behind what you have open if a different application has focus. GNOME then notifies you that the application you selected has opened and it is up to you to switch over to it. But, in my experience, this isn’t always consistent. There are certain applications that seem to jump to the front when opened while the rest rely on you to see the notifications to know they opened.
Steal My Focus changes that by removing the notification and immediately giving the user focus of the application they just opened. Because of this inconsistency, it was difficult for me to get a screenshot so you just have to trust me on this one. 😉
20. Workspaces to Dock
This extension changed the way I use GNOME. Period. It allows me to be more productive and aware of my virtual desktop, making for a much better user experience. Workspaces to Dock allows the user to customize their overview workspaces by turning into an interactive dock.
You can customize its look, size, functionality, and even position. It can be used purely for aesthetics, but I think the real gold is using it to make the workspaces more fluid, functional, and consistent with the rest of the UI.

Honorable Mentions: Dash to Dock and Dash to Panel
Dash to Dock and Dash to Panel are not included in the official 20 extensions of this article for one main reason: Ubuntu Dock. Both extensions allow the user to make the GNOME Dash either a dock or a panel respectively and add more customization than comes by default.
The problem is that to get the full functionality of these two extensions you will need to jump through some hoops to disable Ubuntu Dock, which I won’t outline in this article. We acknowledge that not everyone will be using Ubuntu 17.10, so for those of you that aren’t this may not apply to you. That being said, bot of these extensions are great and are included among some of the most popular GNOME extensions you will find.
Currently, there is a “bug” in Dash to Dock whereby changing its setting, even with the extension disabled, the changes apply to the Ubuntu Dock as well. I say “bug” because I actually use this myself to customize Ubuntu Dock without the need for the extensions to be activated. This may get patched in the future, but until then consider that a free tip.
So there you have it, our top 20 GNOME Extensions you should try right now. Which of these extensions do you particularly like? Which do you dislike? Let us know in the comments below and don’t be afraid to say something if there is anything you think we missed.
Like what you read? Please share it with others.


