- Автоматическое монтирование диска в Linux Ubuntu / Mint
- Шаг 1. Узнаем идентификаторы подключенных разделов
- Шаг 2. Оповещаем систему о новом разделе
- Шаг 3. Завершаем дело
- Шаг 4. Гуляем смело
- Вариант 2. Gnome Disk Utility
- Проблемы с удалением в корзину?
- HOW TO CONFIGURE AUTOFS (AUTOMOUNT) IN LINUX
- Introduction
- Difference Between /etc/fstab and Autofs (AutoMount)
- Follow the below Steps to configure Autofs
- Step : 1 Requires Packages
- Step : 2 Configure /etc/auto.master
- Step : 3 Create and Configure /etc/auto.sharedfs
- How To Automount File Systems on Linux
- Step 1: Get the Name, UUID and File System Type
- Step 2: Make a Mount Point For Your Drive
- Step 3: Edit /etc/fstab File
- Some Explanation
- Can’t Mount Your Disk Drive?
Автоматическое монтирование диска в Linux Ubuntu / Mint
Так уж повелось, что по умолчанию Ubuntu монтирует только свой системный раздел, называя его «файловой системой». Остальные разделы (кроме флэшек и других подключаемых устройств) придется монтировать вручную. Нас такой расклад не устраивает и мы хотим иметь доступ к нашему второму (третьему, четвертому. ) разделу сразу после загрузки ОС.
Каждый раздел имеет свой UUID (Universally Unique Identifier), и мы будем подключать разделы с помощью него.
Шаг 1. Узнаем идентификаторы подключенных разделов
Получаем что-то примерно такое:
/dev/sda1: UUID=»b2098d42-3e3d-470c-8ddb-76f74f0f6d44″ TYPE=»ext4″
/dev/sda3: LABEL=»ntfs» UUID=»6798491F3EB8CFC8″ TYPE=»ntfs»
/dev/sda5: LABEL=»FAT32″ UUID=»1D7D-F985″ TYPE=»vfat»
/dev/sda6: LABEL=»ext3″ UUID=»a4f6af01-786f-4bdf-9405-d340fded6580″ TYPE=»ext3″
/dev/sda7: LABEL=»ext2″ UUID=»4b2c5e07-97db-4a65-9147-e6b0dceb1353″ TYPE=»ext2″
/dev/sda8: LABEL=»ext4″ UUID=»b74143c3-6679-4a3a-9a20-b608ba085170″ TYPE=»ext4″
Если Вашему разделу задан Label, то всё отлично, поиски необходимого не займут много времени. Например, нам нужен раздел «ntfs» с UUID «6798491F3EB8CFC8». Для определения UUID для раздела без Label придется воспользоваться программами типа gParted или стандартного менеджера дисков, здесь Вам помогут обозначения /dev/sdaX.

Если же Вам лень искать UUID, то можно воспользоваться порядковым номером: /dev/sda3. Минус такого подхода — порядковый номер может измениться при добавлении или переставлении дисков.
Шаг 2. Оповещаем систему о новом разделе
Вся информация по монтируемым разделам хранится в fstab:
sudo gedit /etc/fstab
Если у Вас не установлен gedit, то можете воспользоваться nano или любым другим текстовым редактором. В этом файле добавляем в конец строку:
UUID=»6798491F3EB8CFC8″ /media/isergium/ntfs ntfs-3g defaults,uid=1000 0 0
Монтировать разделы желательно в /media — так они продолжут распознаваться некоторыми проводниками (например, Nemo) как разделы. Для удобства все разделы можно монтировать в одну папку, например /media/*username* .

Приведённый выше формат действителен для NTFS. Обязательно убедитесь что пакет ntfs-3g установлен в Вашей системе. Он даёт много преимуществ перед использованием обычного ntfs , поэтому просто используйте его. Для других файловых систем рекомендованы другие параметры и обозначения:
| NTFS | ntfs-3g | ntfs-3g defaults,uid=1000 0 0 |
| FAT16, FAT32 | vfat | user,auto,fmask=0111,dmask=0000 |
| Apple HFS | hfsplus | user,auto,file_umask=0177,dir_umask=0077,uid=1000 |
| ext2 | ext2 | defaults |
| ext3 | ext3 | |
| ext4 | ext4 |
Не забудьте подставить свои значение UUID и путь монтирования.
Шаг 3. Завершаем дело
Осталось перезагрузиться или смонтировать несмонтированные диски:
Шаг 4. Гуляем смело
Вот и всё. Отныне для доступа к необходимым файлам не придется вручную монтировать разделы с ними.
Вариант 2. Gnome Disk Utility
В комментариях был предложен более удобный способ автоматического монтирования с помощью стандартной программы «Диски» (gnome-disks). Вот пример работы с ним на Elementary OS Freya (дистрибутив основан на Ubuntu 14.04):


Выбрать диск, выбрать раздел, нажать на кнопку с шестерёнками, в появившемся меню выбрать «Изменить параметры монтирования» («Edit Mount Options»). В настройках выключить верхний переключатель «Параметры автоматического подключения» («Automatic Mount Options»), включить «Подключение при запуске» («Mount at startup») и «Показывать в интерфейсе» («Show in user interface»). В «Идентифицировать как» («Identify as») лучше выбрать что-нибудь связанное с UUID. По желанию можно задать Тип файловой системы («Filesystem Type»), Точку подключения («Mount Point») и что-нибудь ещё.
После сохранения соответствующая запись появится в /etc/fstab:
UUID=3C1D4F9C296DA92C /mnt/3C1D4F9C296DA92C auto nosuid,nodev,nofail,x-gvfs-show 0 0
После перезагрузки и каждого следующего включения диск будет примонтирован автоматически:

Если программа «Диски» не была найдена, то её можно запустить из консоли:
Установить её можно из исходников или командой:
sudo apt-get install gnome-disk-utility
Проблемы с удалением в корзину?
Если при удалении файлов со смонтированных дисков выдаются ошибки вроде «не удалось переместить в корзину», «невозможно удалить в корзину» и подобные, то достаточно добавить в параметры монтирования параметр uid=1000 .
UUID=»6798491F3EB8CFC8″ /media/isergium/ntfs ntfs-3g defaults,uid=1000 0 0
Этот параметр устанавливает владельца примонтированного раздела, по умолчанию это (зависит от файловой системы) либо root, либо владелец процесса. Если Ваш UID иной (что маловероятно), то можете поискать свой в /etc/passwd и прописать его.
Вместо uid можно использовать gid — этот параметр установит группу владельцев. Обычно это тоже 1000, проверить можно в /etc/group.
Источник
HOW TO CONFIGURE AUTOFS (AUTOMOUNT) IN LINUX
by Balamukunda Sahu · Published February 4, 2017 · Updated April 15, 2017
CONFIGURE AUTOFS (AUTOMOUNT) IN LINUX
Introduction
Autofs also referred as Automount is a nice feature in linux used to mount the filesystems automatically on user’s demand. There are two ways available in linux by which we can mount the file system i.e. /etc/fstab and another one is Autofs. /etc/fstab is used to mount the filesystems automatically at when system bootsup and Autofs is also doing the same thing.
Difference Between /etc/fstab and Autofs (AutoMount)
You might thinking that if both are doing the same thing then why to use Autofs (Automount) instade of /etc/fstab. and what is the difference between /etc/fstab and Autofs. Here I am going to explain you what is the exact difference between /etc/fstab and Autofs.
As we know that /etc/fstab is used for permanent mounting of file systems but it will be useful only if you have less mount points connected to your /etc/fstab file but if you are working on a large organisation and have so many mount points linked to your /etc/fstab file then in that case your overall system’s performance will be get effected.
But Autofs mounts the file systems on user’s demand. Bydefault the mount point’s configured in Autofs is in unmounted state till the user access the mount point, once user try to access the mount point it will mount automatically and if user dont use the mount point for some time then it will automatically go to unmount state.
For example if we have Two NFS (Network File System) exported share drives and configured in Autofs to automatically mount in directory named /myautoshares for users. In that case till the user didnt access to the mountpoint it will be on unmounted state and you unable to see any mounted filesystem in /myautoshares directory, once user access the mount point it will automatically get mounted and will be in mount state till user uses that mountpoint. once user stop using that mount point it will unmount automatically. Here we are using Autofs to mount the NFS exported shares automatically.
Note : We can set time for after what time the filesystem unmount automatically once user stop using the mountpoint.
Follow the below Steps to configure Autofs
Step : 1 Requires Packages
Before we start the configuration of Autofs we have to install required packages. The main package we have to install is autofs.xxx.xxx.rpm. you can check if the packages is already installed or not by using below command.
Install the autofs packages by using yum command as shown below.
As we can see the autofs package installed successfully, we can confirm the autofs packages installation status by using below command.
Step : 2 Configure /etc/auto.master
Here we are going to use NFS exported shares with Autofs to automatically mount it. To check the NFS exports just run the below command.
As we can see above we have two NFS exports i.e. /package and /database. Now create a directory for Autofs to mount the filesystems.
The main configuration files of Autofs is /etc/auto.master where we can link the file in which we are going to mention all NFS mount points. The syntax to enter in /etc/auto.master file is shown below :
Note : It is not mandatory to mention timeout syntax in /etc/auto.master configuration file but It is recomended to do so.
Configuration part is Highlighted in Blue Color.
Where :
- /myautoshares – This is the directory where Autofs will mount the filesystems
- /etc/auto.sharedfs – In this file we have to mention the file systems which will automatically mounted by Autofs
- –timeout=35 – This is states that if user will don’s use the mount point for 35 Seconds, then it will unmounted automatically.
Also Read :
Step : 3 Create and Configure /etc/auto.sharedfs
Now we have to create /etc/auto.sharedfs file which we have mentioned in /etc/auto.master file to mention the file systems.
Just copy the /etc/auto.misc file as /etc/auto.sharedfs as shown below. /etc/auto.misc file is the sample file which is created automatically after autofs package installation.
Now just edit the /etc/auto.sharedfs file and mention the filesystems to be mount, the Syntax shown below :
Note : Configuration Part are Highlighted in Blue Color.
We are done with configuration part, now let’s go ahead and start the autofs service using below command.
Now it’s time for testing. So let’s list our Autofs mount point i.e. /myautoshares using ls -l command.
As we can see above currently there is no active mounts are available because as i explained earlier till user don’t access the mount it will be in unmount state.
Now let’s go ahead and access our first NFS export i.e. /packages by using below command.
As we can see above we able to access the NFS mount successfully. Now let’s again list our mount point i.e. /myautoshares and I am sure it will definitely show the NFS mount points shared by Autofs. Refer the Output below.
Now let’s access our second NFS export i.e. /database.
As we can see on the output below we able to access our both NFS Exported shares.
Now if user don’t use access this NFS shares for 35 Seconds it will be automatically unmounted.
So this is how we can configure Autofs (Automount) in Linux, If you found this article useful then Please Like Us, Subscribe Us or If you have something to say then feel free to comment on the comment box below.
Источник
How To Automount File Systems on Linux
Today I’m going to show you how to automatically mount a drive at boot time in Linux. My laptop has one SSD and one mechanical drive. I install operating systems on SSD and store files on the mechanical drive. So oftentimes I need to mount the mechanical drive in the file manager manually to access my mp3 and video files. Mounting drive manually is just a waste of time. So I’m going to show you an easy way to automount drive in Linux.
Step 1: Get the Name, UUID and File System Type
Open your terminal, run the following command to see the name of your drive, its UUID(Universal Unique Identifier) and file system type.
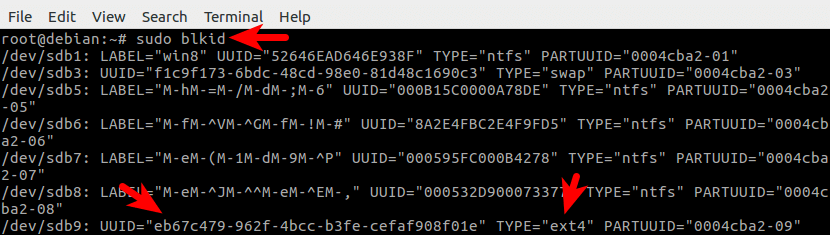
In the output of this command, the first column is the name of your drives. The second column is the label of the drive (if you set a label for it) and the third column is the UUID of your drives.
First, you need to know the name of the drive that is going to be automatically mounted. For example, the name of the drive that is going to be automatically mounted on my computer is /dev/sdb9 .
Then you need to know its UUID and file system type. As you can see the UUID of /dev/sdb9 is eb67c479-962f-4bcc-b3fe-cefaf908f01e and the file system of /dev/sdb9 is ext4 which is the standard file system in Linux.
Step 2: Make a Mount Point For Your Drive
We are going to make a mount point under /mnt directory. Enter the following command,
For example, I issued the following command:
Step 3: Edit /etc/fstab File
Run the following command to edit the /etc/fstab file. Nano is a command-line editor on Linux.
We need to append one line of code at the end of the file. The format of this line of code is as follows:
Note that you need to separate these items with Tab key. For example, I added the following line to the end of /etc/fstab .

If you want to automount an NTFS file system, here is an example.
If you want to automount a Btrfs file system, then change the file system type to btrfs.
Save and close the file. Then run the following command to see if it works.
So that’s how you automount a file system in Linux.
Some Explanation
For swap partitions, the mount point field should be specified as none.
The defaults mount option will give users read and write access to the file system.
The value of the dump field is usually zero.
The pass field is used by the fsck program to determine the order in which filesystem checks are done at reboot time. As you can see in this file, the value of the pass field for the root file system is 1. Swap partitions do not need to be checked and the value for them is zero. All other file systems should have a value of 2. So I set the pass value to 2 for my drive.
Can’t Mount Your Disk Drive?
If you see the “can’t read superblock” error when trying to mount your disk drive, please follow the tutorial below to fix this error.
Источник


