- Где находится папка «Автозагрузка» в Windows 10
- Расположение каталога «Автозагрузка» в Виндовс 10
- Способ 1: Прямой путь к папке
- Способ 2: Команда для окна «Выполнить»
- Управление автозагрузкой приложений
- Заключение
- How to Access the Windows 10 Startup Folder
- How to Access the Windows 10 Startup Folder
- The Startup Folder In The Start Menu
- Two Windows 10 Startup Folders
- Accessing The Windows 10 Startup Folder
- Enabling and Disabling Startup Programs
- To access Startup using the Task Manager:
- To access Startup using via Windows Settings:
- The Launch Order For The Windows 10 Startup Folder
Где находится папка «Автозагрузка» в Windows 10

«Автозагрузка» или «Startup» — полезная функция Windows, предоставляющая возможность управления автоматическим запуском стандартных и сторонних программ вместе с загрузкой операционной системы. По своей сути это не только интегрированный в ОС инструмент, но и обычное приложение, а значит, у него есть свое расположение, то есть отдельная папка на диске. В нашей сегодняшней статье мы расскажем, где же находится директория «Автозагрузки» и как в нее попасть.
Расположение каталога «Автозагрузка» в Виндовс 10
Как и полагается любому стандартному инструменту, папка «Startup» находится на том же диске, на котором установлена операционная система (чаще всего таковым является C:\). Путь к ней в десятой версии Windows, как и в предшествующих ей, является неизменным, отличается в нем лишь имя пользователя компьютера.
Попасть в директорию «Автозагрузки» можно двумя способами, причем для одного из них даже не потребуется знать точное расположение, а вместе с ним и имя юзера. Рассмотрим все более подробно.
Способ 1: Прямой путь к папке
Каталог «Startup», содержащий в себе все программы, которые запускаются вместе с загрузкой операционной системы, в Виндовс 10 располагается по следующему пути:
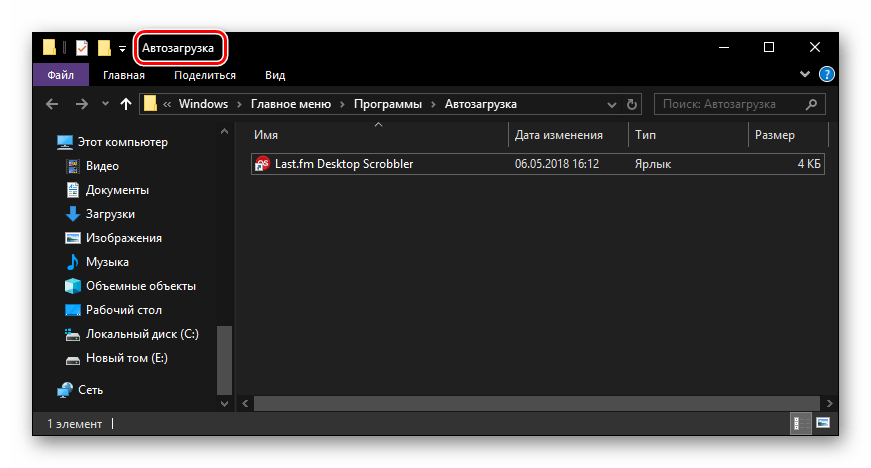
При этом важно понимать, что буква С – это обозначение диска с установленной Windows, а Username – директория, название которой должно соответствовать имени пользователя ПК.
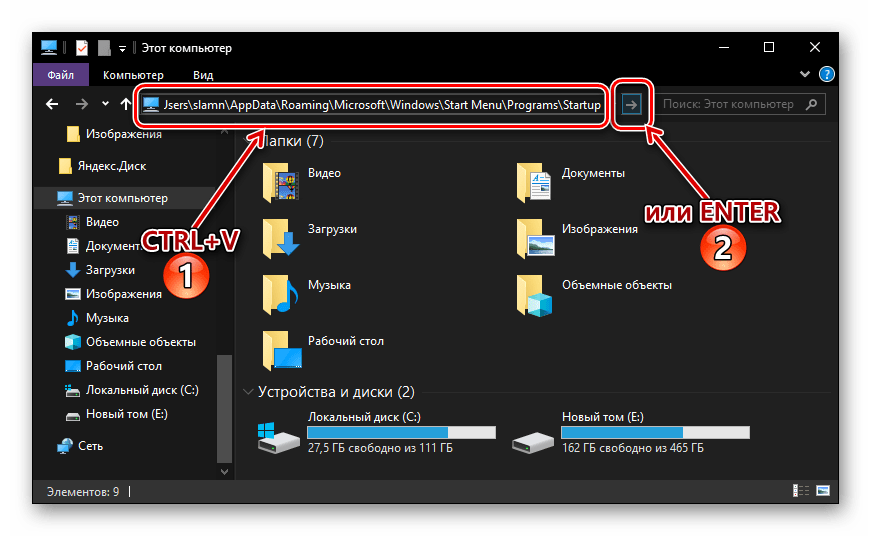
Для того чтобы попасть в данный каталог, подставьте в указанный нами путь свои значения (например, предварительно скопировав его в текстовый файл) и вставьте полученный результат в адресную строку «Проводника». Для перехода нажмите «ENTER» или указывающую вправо стрелку, расположенную в конце строки.
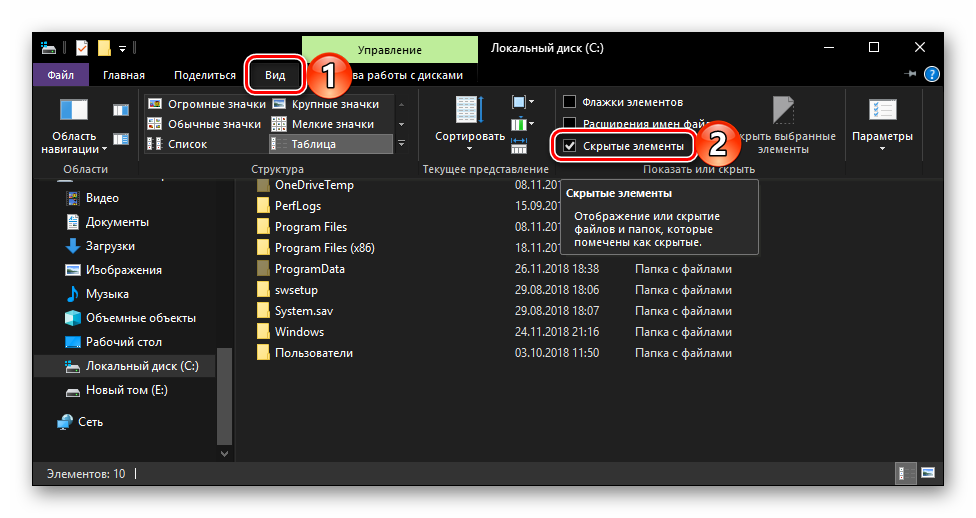
Если же вы захотите самостоятельно перейти в папку «Автозагрузки», для начала включите отображение скрытых файлов и папок в системе. О том, как это делается, мы рассказывали в отдельной статье.
Если же вы не хотите запоминать путь, по которому располагается директория «Startup», или считаете такой вариант перехода к ней слишком сложным, рекомендуем ознакомиться со следующей частью данной статьи.
Способ 2: Команда для окна «Выполнить»
Получить мгновенный доступ к практически любому разделу операционной системы, стандартному инструменту или приложению можно посредством окна «Выполнить», предназначенного для ввода и выполнения различных команд. К счастью, существует и возможность быстрого перехода в директорию «Автозагрузки».
- Нажмите «WIN+R» на клавиатуре.
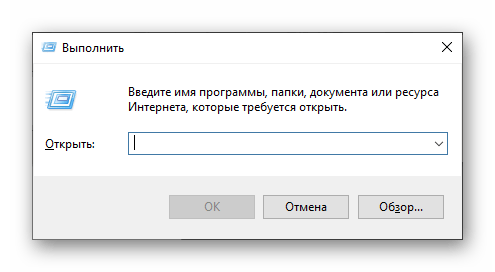
Введите команду shell:startup , после чего нажмите «ОК» или «ENTER» для ее выполнения.

Папка «Startup» будет открыта в окне системного «Проводника».
Используя стандартный инструмент «Выполнить» для перехода в каталог «Автозагрузки», вы не только экономите время, но и избавляете себя от необходимости запоминания довольно длинного адреса, по которому он располагается.
Управление автозагрузкой приложений
Если же поставленная перед вами задача заключается не только в переходе к директории «Startup», но и в управлении данной функцией, наиболее простым и удобным в реализации, но все же не единственным, вариантом будет обращение к системным «Параметрам».
- Откройте «Параметры» Windows, нажав левой кнопкой (ЛКМ) мышки по значку шестеренки в меню «Пуск» или воспользовавшись быстрыми клавишами «WIN+I».

В окне, которое появится перед вами, перейдите в раздел «Приложения».

В боковом меню кликните ЛКМ по вкладке «Автозагрузка».
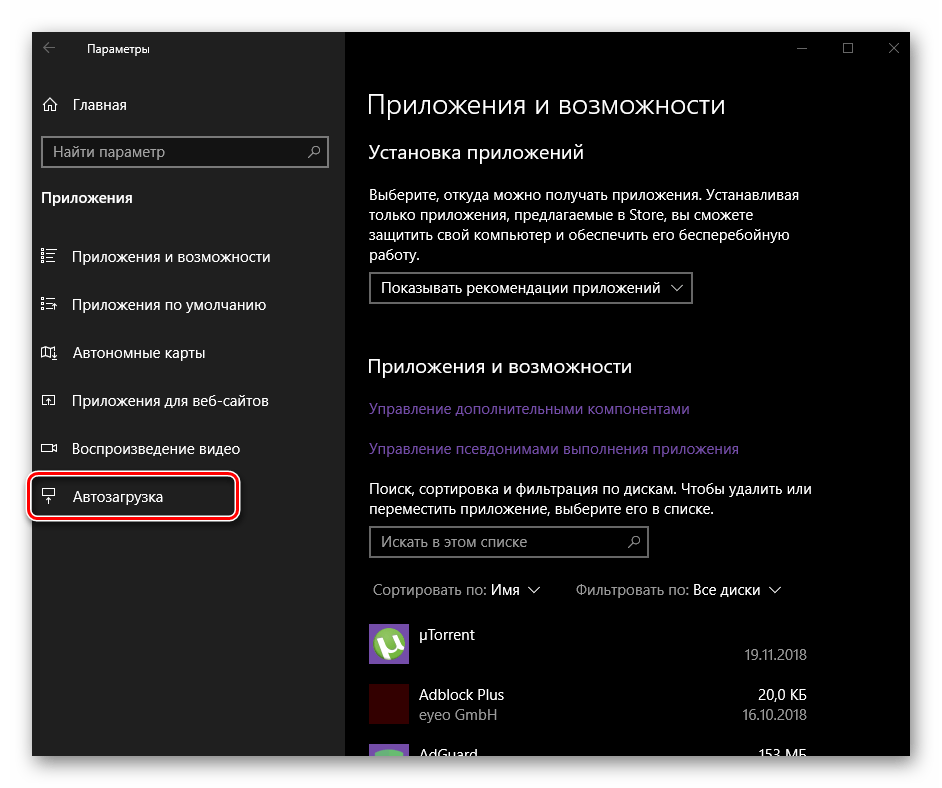
Непосредственно в этом разделе «Параметров» вы можете определить то, какие приложения будут запускаться вместе с системой, а какие нет. Узнать более детально о том, какими еще способами можно настроить «Автозагрузку» и в целом эффективно управлять этой функцией, вы можете из отдельных статей на нашем сайте. 
Заключение
Теперь вы точно знаете, где находится папка «Автозагрузка» на компьютерах, работающих под управлением Windows 10, а также знаете и о том, как можно в нее максимально быстро попасть. Надеемся, данный материал был полезен для вас и по рассмотренной нами теме не осталось вопросов. Если же таковые имеются, смело задавайте их в комментариях.
How to Access the Windows 10 Startup Folder
Plus how to disable or enable programs
The Windows Startup Folder was an important folder that was easily discoverable via the Start Menu in Windows versions past. It began as far back as Windows 95 and any programs located within the Startup Folder would boot up and run anytime the computer was powered on.
It used to be that whenever you booted up your Windows operated computer, it would seek out and execute a batch script called autoexec.bat. Anyone with knowledge of Power DOS could use a text editor to modify this script in order to add their favorite programs to boot up, along with the Windows operating system. This made it so that everything you wanted to use was already loaded once the computer booted.

The use of autoexec.bat continued all the way through the Windows NT years, but Microsoft was intent on moving users away from a scripted, command-line environment. It instead wanted to encourage the use of the graphical interface model with windows, files, and folders, and, in doing so, made all subsequent versions of their operating systems not require autoexec.bat.
They would eventually do away with it entirely, however, the Windows 10 Startup Folder can still be found today.
How to Access the Windows 10 Startup Folder
Back before Windows 95, batch scripts and command-line interfaces were essential in getting your computer to do anything at all. All of the clickable icons you take for granted today didn’t exist. Instead, to run something like Microsoft Word, it required that you opened a command-line interpreter and typed winword.exe.

Windows 95, though it still allowed for users to perform nearly every important task using a command line, such actions were easier through the graphical user interface. You could click on the Program Files folder and find icons labeled with the program you wanted to run. All that was needed was a quick double-click and the program was launched.
Windows 95 was the first step in changing how we access programs. Today, clicking a program to have it launch is commonplace. It feels as if this is how it has always been. Barely anyone uses commands to open programs anymore. However, interestingly enough with Windows 10, we’ve actually seen a small surge in the revival of command line access via the use of PowerShell.
The Startup Folder In The Start Menu

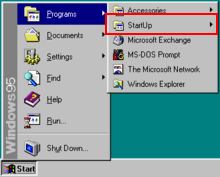
The Start Menu was first created in Windows 95 and slightly resembles the Start Menu we have today in Windows 10. It’s that little flyout menu that pops out when you click the Start or Windows icon in the lower-left corner of your desktop. In Windows 95, this is where you’d find the Startup Folder.
When Windows 8 was launched, Microsoft decided to eliminate the Start Menu. Even though all of the functionality was still present in the operating system, it was much harder to locate everything. Microsoft wanted users to go a different way with scheduling programs for automatic execution.
Much to Microsoft’s dismay, the pushback from the user community was so great that the Start Menu was quietly brought back in with Windows 10.
The Windows 10 Startup Folder is similar to the one found in Windows 7. However, it’s no longer accessible the same way. The Windows 10 Startup Folder no longer pops up in the Start Menu as it once did. The functions are still there, although some of the operational details have changed. Now, accessing the Windows 10 Startup Folder takes a bit of navigation.
Two Windows 10 Startup Folders

When it comes to the Windows 10 Startup folder, it can be found in two different locations. One Windows 10 Startup folder operates at the system level and is shared among all user accounts (All Users folder), while the other operates at a user level and is unique to that user’s account (Current User folder).
The second one only really matters if you have multiple accounts on your Windows 10 computer. Each account will contain a unique Startup Folder in addition to the universal Startup Folder.
Understanding the distinction between the All Users and Current User Startup Folders is important when it comes to troubleshooting. Attempting to understand why a certain application isn’t opening, or when working with applications that feature user-based licensing or access restrictions will require you know which Startup Folder to configure.
There is one area that enables you to interact with the Startup function, which contains all of the programs found inside of the folder. The only difference is that programs cannot be added or removed. You can only enable or disable those currently inside of the Startup folder. This location is the Windows Task Manager.

Accessing The Windows 10 Startup Folder
There are a few ways in which to access the Windows 10 Startup folder. To access the Windows 10 Startup folder, the first option is through File Explorer.
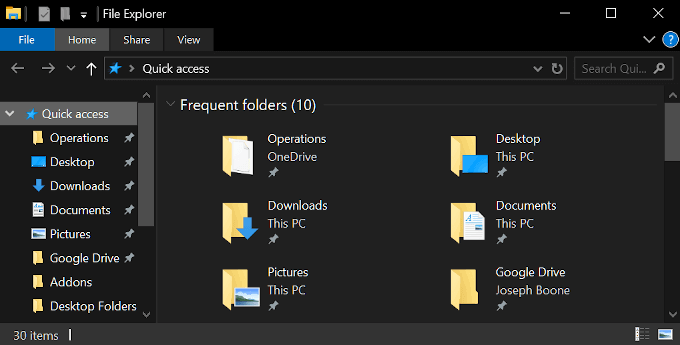
You’ll need to enable the “Show Hidden Files” option in order to see certain folders in the path. Open the File Explorer and drop one of the following paths into the Quick access bar.
- The All Users Startup Folder is located at the following path:
- C:\ProgramData\Microsoft\Windows\Start Menu\Programs\StartUp
- The Current User Startup Folder is located here:
- C:\Users\[User Name]\AppData\Roaming\Microsoft\Windows\Start Menu\Programs\Startup
From these locations, you can add or remove programs that you want executed whenever you boot up your Windows 10 computer.
An alternative way to do this is to jump directly to each folder with a Run command.
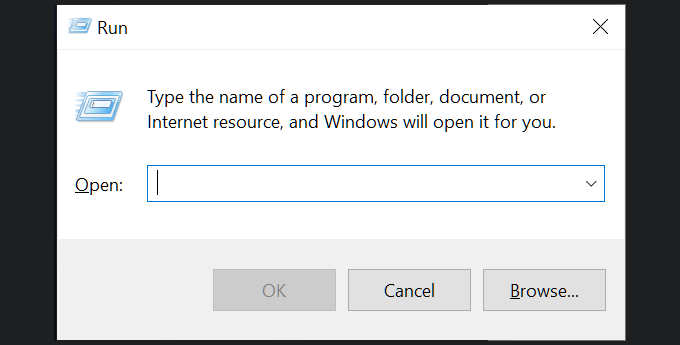
Open the Run function dialog box by pressing the Windows key + R key simultaneously.
- The All Users Startup Folder requires the following path:
- Shell:common startup
- The Current User Startup Folder requires:
- Shell:startup
These will take you directly to the folder containing the startup programs pertaining to the specified folder.
Enabling and Disabling Startup Programs

If all you want to do is enable or disable certain programs within the Windows 10 Startup folder, you can access this functionality through both the Windows Task Manager or Settings window.
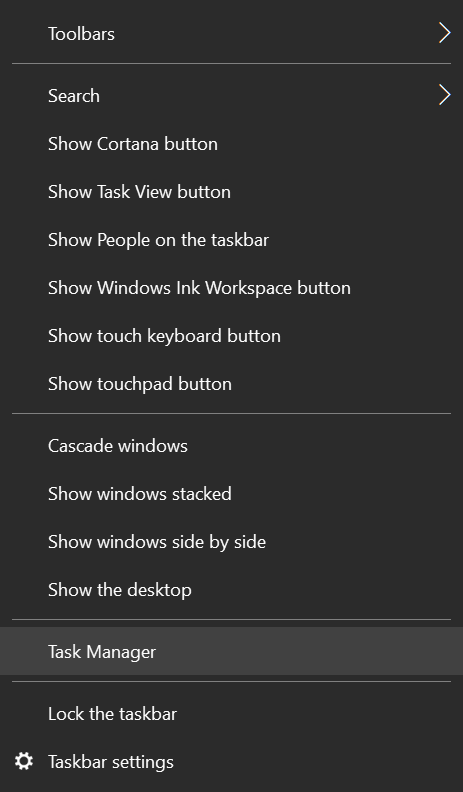
To access Startup using the Task Manager:
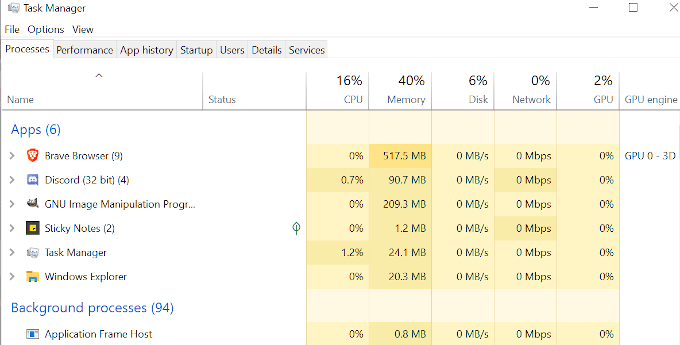
- Right-click the Taskbar and from the menu that pops up, select Task Manager.
- In the Task Manager window, click over to the Startup tab to see the programs.
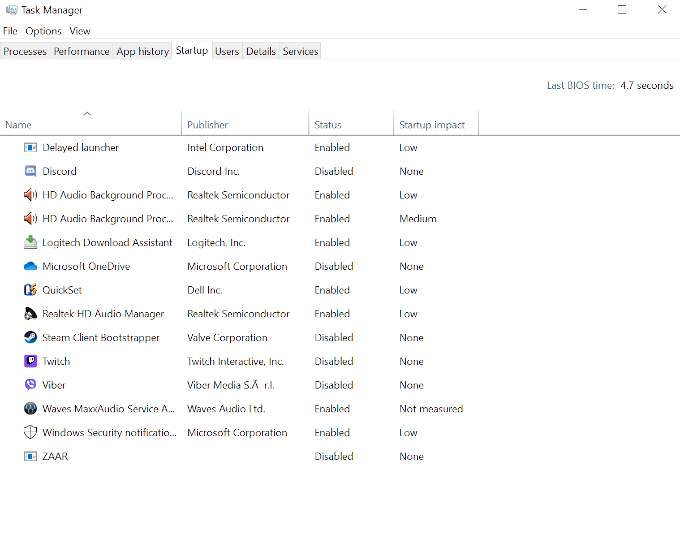
- Right-click a program. In the pop-up, select either enable or disable.
- The program will now adhere to the status set on your next boot up.
To access Startup using via Windows Settings:
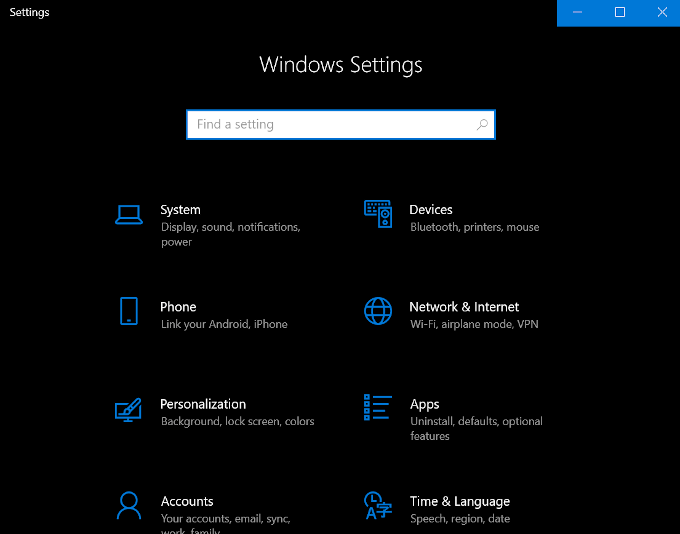
- Open the Start Menu by clicking the Windows icon in the lower-left portion of your desktop.
- From the menu, select Settings (Cogwheel icon).
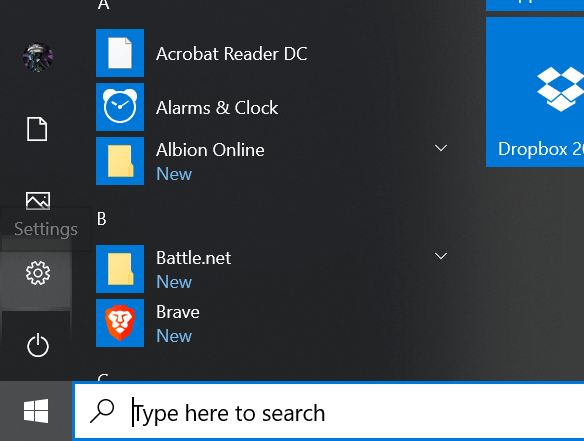
- Choose Apps.
- On the left side menu, select Startup.
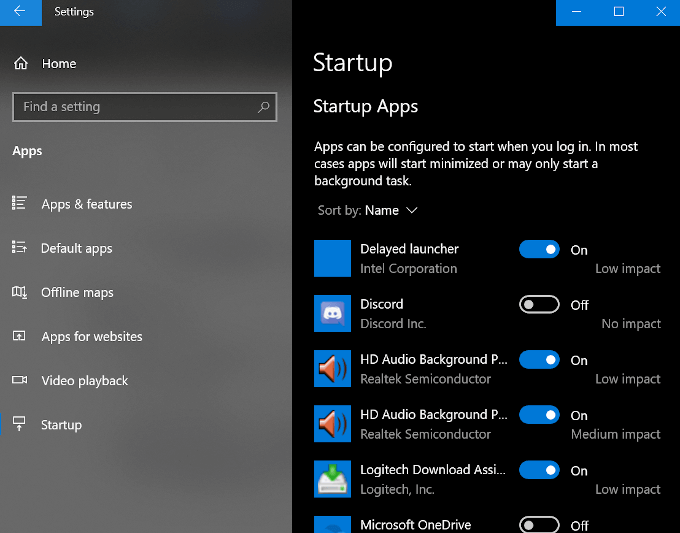
- In the main menu, click the toggles of those programs you want to enable or disable, to On or Off.
The Launch Order For The Windows 10 Startup Folder

Any item placed in either of the Startup Folders will not launch immediately upon login as it did back in the days of Windows 95. Instead, Windows 10 launches programs in a very specific order beginning with necessary system processes and any items in the Task Manager’s Startup tab. The programs you’ve added to the Startup Folders will follow after.
This usually doesn’t take long, but if you have lots of first- and third-party applications and services already configured to launch at boot, it could take a few minutes depending on the processing speed of your computer.
Too many programs in the Windows 10 Startup folder may run the risk of extensive downtime, slowing your computer to unworkable speeds while it attempts to launch each program. It’s a good idea to ensure that you only place necessary programs in these folders and keep the overall count to a minimum.
Former US Army IT communications specialist who began his online blogging career in 2016. Joseph has over 10 years experience in the IT industry as both an analyst and communications expert. He’s a night owl and an avid Red Bull consumer who spends most of his downtime enthralled by online gaming and website building. Read Joseph’s Full Bio


