- Arduino.ru
- Arduino and C++17 ( AVR-GCC 8.x)
- AVR-GCC 10.1.0 for Windows 32 and 64 bit
- Included tools
- Downloads
- Upgrading the Arduino IDE
- Known Issues
- Build Script
- History
- Avr-GCC with Arduino
- 2 Answers 2
- Программируем Arduino на чистом Си
- avr-gcc 4.9.2 and avr-libc 1.8.1 compiled for Windows
- Dependencies
- Download the package
- How to install and use it
- Eclipse integration
- Arduino Integration
- Step 1: Backup the old tools
- Step 2: Drag and drop the new tools
- Enabling C++11 support
Arduino.ru
Arduino and C++17 ( AVR-GCC 8.x)
- Войдите или зарегистрируйтесь, чтобы получить возможность отправлять комментарии

Всем привет, удавалось ли кому обновить GCC в ардуине от древнего 4.9 до более менее свежего 8.x ?
Поставил билд отсюда http://blog.zakkemble.co.uk/avr-gcc-builds/
Но, при компиляции выдает ошибку «. /ar.exe: unable to rename . core.a’ ; reason: File exists»
Запускал из-под админа, антивирусы отключены, менял папки, менял версии IDE ( 1.8.x 1.9 . ) Win7_32 и Win10_64 везде эта ошибка.
Кто обновлялся, подскажите пожалуйста. Спасибо 🙂
- Войдите или зарегистрируйтесь, чтобы получить возможность отправлять комментарии

- Войдите или зарегистрируйтесь, чтобы получить возможность отправлять комментарии
- Войдите или зарегистрируйтесь, чтобы получить возможность отправлять комментарии
И в чем смысл этой затеи?
- Войдите или зарегистрируйтесь, чтобы получить возможность отправлять комментарии
например, теперь могу делать так:
inline static int n = 1;
раньше я статические члены мог инициализировать только в .cpp файле вдали от определения класса, что сильно раздражало
- Войдите или зарегистрируйтесь, чтобы получить возможность отправлять комментарии
Так это и раньше было можно, если опции которые с IDE идут поменять.
В 17 С++ есть гораздо блее интересные вещи!
- Войдите или зарегистрируйтесь, чтобы получить возможность отправлять комментарии
Занятно, это какие конкретно опции надо было поменять в IDE ?
- Войдите или зарегистрируйтесь, чтобы получить возможность отправлять комментарии
Не помню, но из общих соображений — выключить строгую поддержку ISO и включить поддержку С++ 11. Но точно можно было, я как-то пробовал. И описатель auto, кстати, тоже вполне себе включался.
- Войдите или зарегистрируйтесь, чтобы получить возможность отправлять комментарии
Есть файл : . \Arduino\hardware\arduino\avr\platform.txt
в нем можно включить поддержку C++14 ( C++11 и так включена по-умолчанию и «auto» в некотором виде там уже есть)
вот так включается C++14: compiler.cpp.flags=-c -g -Os
Arduino, даже последняя бета содержит максимум GCC 5.4.0, а Inline variables появились только в GCC 7.x и никакими «опциями которые с IDE» из GCC4 GCC7 не сделать 🙁
AVR-GCC 10.1.0 for Windows 32 and 64 bit
This is where I’ll be uploading builds of AVR-GCC for Windows 32 and 64 bit, which will also include Binutils, AVR-LibC, AVRDUDE, Make and GDB. I’ll be trying to keep the builds up to date with the latest tool releases when I can.
The binaries are built from source on a Debian 10 virtual machine with MinGW (GCC 9.1.0 and older were built on an Arch Linux VM), apart from AVRDUDE where the pre-built binaries are obtained from the official download area. Both 32 bit and 64 bit Windows binaries are provided. There’s probably no benefit from using the 64 bit stuff, but all the cool kids are doing it so why not.
A bash script for building AVR-GCC, AVR-Binutils, AVR-LibC and AVR-GDB from source is also provided below, making it super easy to build these tools for yourself.
Included tools
| Tool | Version |
|---|---|
| GCC | 10.1.0 |
| Binutils | 2.34 |
| AVR-LibC | SVN with extras |
| GDB | 9.2 |
| AVRDUDE | 6.3 (Not included in Linux release) |
| Make | 4.2.1 (Not included in Linux release) |
Downloads
Upgrading the Arduino IDE
Upgrading the Arduino IDE is pretty easy, though there could be some incompatibilities with certain libraries. Only tested with Arduino 1.8.13.
- Download and extract one of the downloads above
- Navigate to your Arduino IDE folder
- Go to [hardware/tools]
- Move the [avr] folder somewhere else, like to your desktop (renaming the folder won’t work, Arduino has some auto-detect thing which sometimes gets confused)
- Move the extracted folder from earlier to the [tools] folder and rename it to [avr]
- Copy [bin/avrdude.exe] and [builtin_tools_versions.txt] files and [etc] folder from the old [avr] folder to the new one
- Done! Open up the Arduino IDE, load up the Blink example, upload it to your Arduino and make sure the LED is blinking!
Known Issues
Build Script
This build script will install the required packages, create directories and build the tools from source. This should work on Debian 8+, Ubuntu 16.04+, CentOS 7 and maybe Arch.
Building takes about 1 hour 45 minutes on an Debian Linux virtual machine with 4 cores i5 2500K @ 4GHz and 2GB RAM.
History
2020-06-15
CURRENT RELEASE
AVR-GCC updated to 10.1.0
Binutils updated to 2.34
Added GDB 9.2
2019-09-07
AVR-GCC updated to 9.2.0
AVR-LibC updated to SVN with extras
2019-05-19
AVR-GCC updated to 9.1.0
2019-02-28
AVR-GCC updated to 8.3.0
Binutils updated to 2.32
2018-09-06
AVR-GCC updated to 8.2.0
Binutils updated to 2.31.1
Issues:
GCC 8 and binutils seem to be having some problems when dealing with library archives, you’ll get error messages like “unable to rename ‘core.a’; reason: File exists” when adding to library archives and “file not recognized: file truncated” linker errors.
2018-05-07
AVR-GCC updated to 8.1.0
Issues:
GCC 8 and binutils seem to be having some problems when dealing with library archives, you’ll get error messages like “unable to rename ‘core.a’; reason: File exists” when adding to library archives and “file not recognized: file truncated” linker errors.
2018-03-02
AVR-GCC updated to 7.3.0
Binutils updated to 2.30
Added Linux release
2017-08-22
AVR-GCC updated to 7.2.0
Binutils updated to 2.29
2017-07-09
AVR-GCC 7.1.0 (R3)
2017-07-09
AVR-GCC 7.1.0 (R2)
Issues:
This release was missing libwinpthread-1.dll in a second location
2017-05-23
AVR-GCC 7.1.0 Built
Issues:
This release was missing libwinpthread-1.dll
2016-04-30
AVR-GCC 6.1.0 Built
Issues:
When compiling with -ffunction-sections and any optimization level other than -O0, strings passed to a function will be stored in flash instead of RAM even though PSTR() hasn’t been used.
A work around is to the store the string in a variable then pass that to the function:
[More info here]
Another work around would be to add -fno-merge-constants to the compiler options.
Avr-GCC with Arduino
How can I program my Arduino in C on Ubuntu. I’ve heard of avr-gcc but all online tutorials seem extremely tedious and don’t have options for an AVR chip with the Arduino bootloader. Can anyone help me with an easier way to install avr-gcc on Ubuntu and get started programming in C for the Arduino?
2 Answers 2
I recommend the following set of command line options for compiling:
And for linking:
- -c means «compile to object file only, do not link»
- -std=gnu99 means «My code conforms to C99 and I use GNU extensions»
- -Os means «optimize for executable size rather than code speed»
- -Wall means «turn on (almost) all warnings»
- -ffunction-sections -fdata-sections is necessary for the -Wl,—gc-sections optimization
- -mmcu=m328p means «the MCU part number is ATmega 328P»
- -DF_CPU=16000000 means «the clock frequency is 16 MHz» (adjust for your actual clock frequency)
- -Wl,—gc-sections means «tell the linker to drop unused function and data sections» (this helps reduce code size).
In order to actually compile your code, you would first issue the avr-gcc command with the «compile only flags», like this:
Then you would repeat this for all of your source files. Finally, you would link the resulting object files together by invoking AVR-GCC in link mode:
This generates an ELF file, which isn’t directly executable by your MCU. Thus, you’ll need to extract the useful part (the raw machine code) from it in the Intel Hex format:
Finally, you will need AVRdude to upload the contents of the hex file to the MCU:
Программируем Arduino на чистом Си
В жизни ардуинщика рано или поздно наступает момент, когда в штатной среде разработки становится тесно. Если скетчам перестает хватать памяти, требуется жесткий реалтайм и работа с прерываниями или просто хочется быть ближе к железу — значит пришло время переходить на C. Бывалые электронщики при упоминании Arduino презрительно поморщатся и отправят новичка в радиомагазин за паяльником. Возможно, это не самый плохой совет, но мы пока не будем ему следовать. Если отбросить Arduino IDE и язык wiring/processing, у нас в руках останется прекрасная отладочная плата, уже оснащенная всем необходимым для работы микроконтроллера. И, что немаловажно, в память контроллера уже зашит бутлоадер, позволяющий загружать прошивку без использования программатора.
Для программирования на языке C нам понадобится AVR GCC Toolchain.
Windows:
Устанавливаем WinAVR, который содержит все необходимое.
Debian и Ubuntu:
sudo apt-get install gcc-avr binutils-avr avr-libc
Также нам потребуется установленная Arduino IDE, т.к. она содержит утилиту avrdude, которая нужна для загрузки прошивки в контроллер. CrossPack тоже содержит avrdude, но версия, идущая с ним, не умеет работать с Arduino.
После того, как все установлено, создадим наш первый проект. Для начала напишем Makefile. Он позволит нам избежать ввода длинных команд вручную при каждой компиляции и загрузке прошивки.
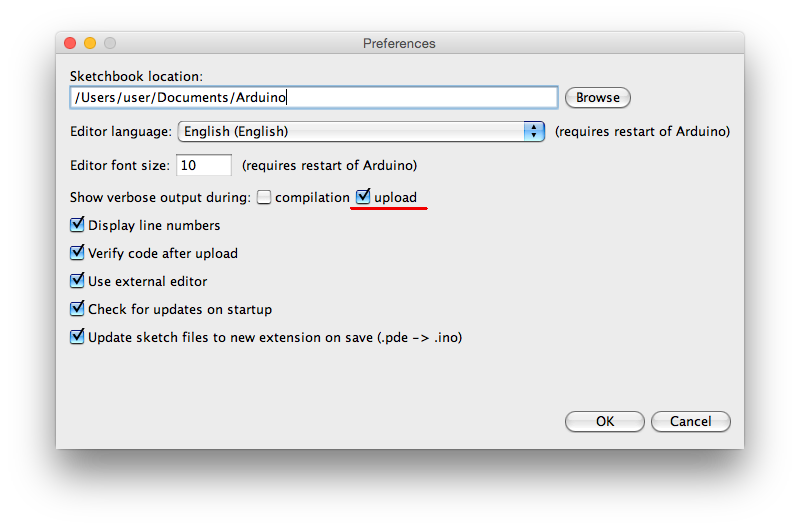
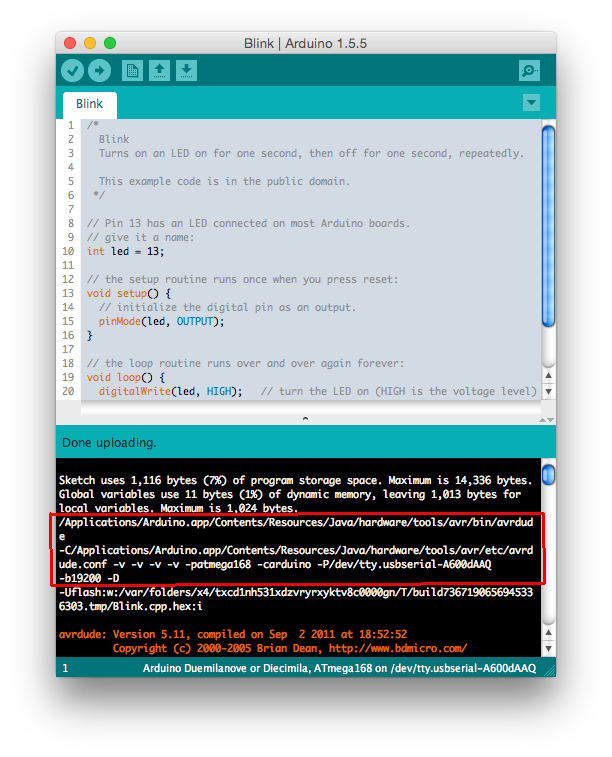
В этом файле нам нужно вписать свою команду для запуска avrdude. На разных системах она будет выглядеть по разному. Чтобы узнать свой вариант, запускаем Arduino IDE и в настройках ставим галочку «Show verbose output during upload».
Теперь загружаем в Arduino любой скетч и смотрим сообщения, выводимые в нижней части окна. Находим там вызов avrdude, копируем все, кроме параметра -Uflash и вставляем в Makefile после «AVRDUDE = ».
Небольшое замечание: все отступы в Makefile делаются символами табуляции (клавишей Tab). Если ваш текстовый редактор заменяет эти символы пробелами, команда make откажется собирать проект.
Теперь создадим файл main.c — собственно текст нашей программы, в которой традиционно помигаем светодиодом.
Наш проект готов. Откроем консоль в директории нашего проекта и введем команду «make»:
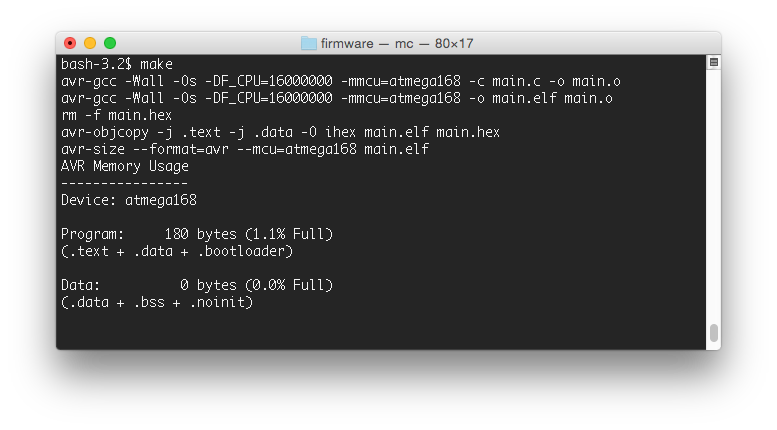
Как видим, размер получившейся прошивки составляет всего 180 байт. Аналогичный ардуиновский скетч занимает 1116 байт в памяти контроллера.
Теперь вернемся к консоли и введем «make flash» чтобы загрузить скомпилированный файл в контроллер:
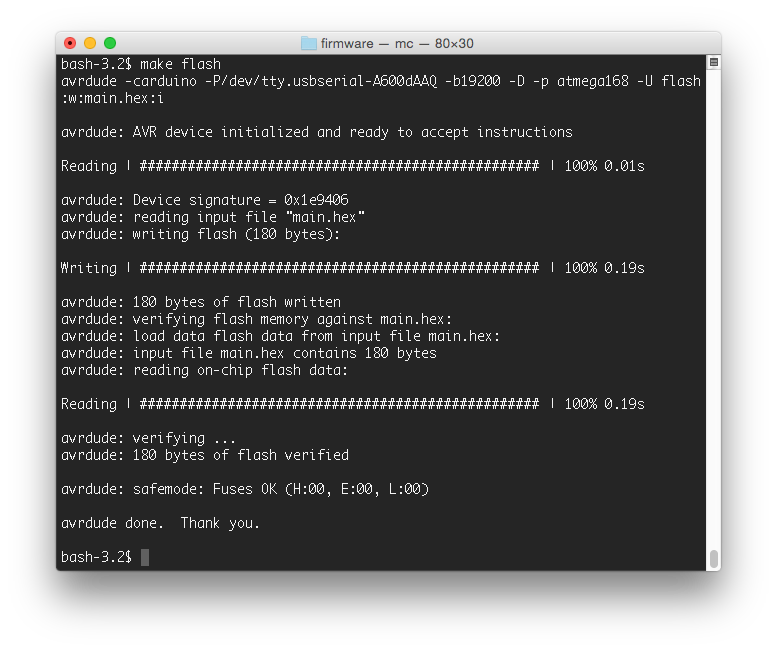
Если загрузка прошла без ошибок, то светодиод, подключенный к 13 контакту платы, радостно замигает. Иногда avrdude не может найти плату или отваливается по таймауту — в этом случае может помочь передегивание USB кабеля. Также, во избежание конфликтов доступа к плате, не забудьте закрыть Arduino IDE перед командой «make flash».
Возможно многие вещи, описанные в этой статье, покажутся очевидными матерым разработчикам. Я постарался описать процесс максимально понятным для начинающего ардуинщика языком и собрать в одном месте информацию, которую мне удалось добыть в различных источниках, и проверенную опытным путем. Может быть кому-то эта статья сэкономит пару часов времени.
avr-gcc 4.9.2 and avr-libc 1.8.1 compiled for Windows
Posted on Mar 8, 2015 in arduino
It’s been about 3 years now since I last compiled up avr-gcc and avr-libc for Windows and it proved surprisingly popular with you so I’m now bringing you the latest, as of March 2015, versions of avr-gcc and avr-libc. I’ve also included avrdude 6.1 for completeness even though I didn’t build that one from source.
The binaries are 32-bit and are all built from source using mingw/msys. Here’s the version list:
| Tool | Version | Configuration |
|---|---|---|
| avr-gcc | 4.9.2 | –prefix=/c/avr-gcc –target=avr –enable-languages=c,c++ –disable-nls –disable-libssp –with-dwarf2 –disable-shared –enable-static –with-gmp=/usr/local –with-mpfr=/usr/local –with-mpc=/usr/local |
| avr-libc | 1.8.1 | –prefix=/c/avr-gcc –build= –host=avr –disable-shared –enable-static |
Dependencies
There is one dependency, libiconv-2.dll . It’s included in the avr-gcc/bin directory so you shouldn’t need to know about it but if you plan to relocate any of the gcc binaries then be aware of this dependent dll.
Download the package
Go to my downloads page and download it from the Arduino section.
How to install and use it
Since you’re here and displaying an interest in a set of command-line tools I’m going to assume that you’re already up and running with a command-line development environment such as cygwin or to a lesser degree, mingw.
- Extract the zip file to a location on your hard disk. These command-line tools are not happy to see pathnames with spaces in them so I recommend that you extract to the root directory of your C: drive. That will result in everything being installed into c:\avr-gcc .
- It’ll be most convenient to add c:\avr-gcc\bin to your PATH environment variable.
Eclipse integration
Your new toolchain can be integrated into your Eclipse projects if you’re using the AVR Eclipse Plugin.
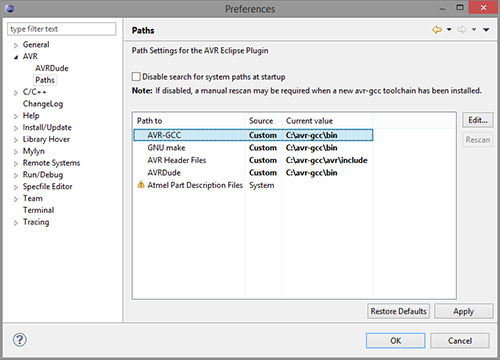
Simply open up the Eclipse preferences editor, locate the AVR/Paths section and change the paths to point to your new directory as shown in the image above.
Arduino Integration
It’s scarcely believable that we’re in 2015 and the Arduino IDE, despite it’s runaway popularity is still using gcc 4.3.2 from back in 2008. I do strongly advise you to migrate away from the IDE to a makefile or Eclipse-based development environment but I know many people are perfectly happy with the simplicity of the Arduino environment and would like to do this upgrade so here we go.
If you’d like to integrate your new toolchain into the Arduino IDE then you can do it but you have to treat this advice as experimental because obviously I haven’t checked out the whole Arduino ecosystem to verify that they all compile OK. I tested this procedure using version 1.0.6 of the Arduino IDE.
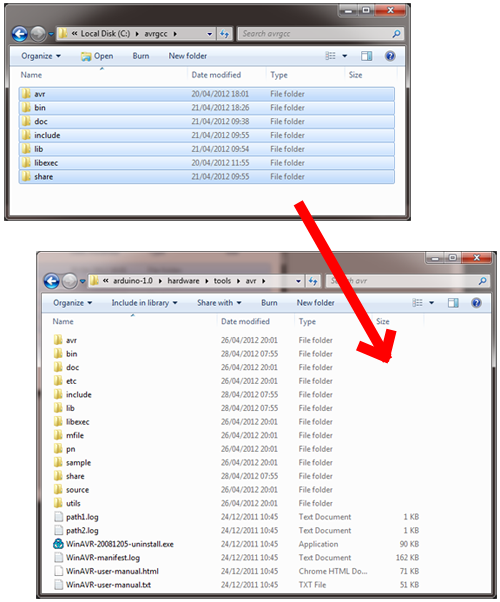
Step 1: Backup the old tools
Navigate to the hardware/tools subdirectory of the Arduino installation and make a copy of the avr subdirectory like this.

Make a backup
Step 2: Drag and drop the new tools
- Navigate into the c:\avr-gcc directory and select everything in it.
- Navigate a new window to the arduino-1.0\hardware\tools\avr subdirectory.
- Drag and drop the entire contents of the avr-gcc directory as a copy (not a move!) into the arduino directory. Say yes to all prompts from Windows about merges and overwrites.
Enabling C++11 support
One of the primary reasons to be upgrading to this new version of gcc is so that you can get to use all the exciting new features offered by C++11. To enable these features you need to pass the -std=c++11 option on the gcc command line. Believe it or not the Arduino IDE offers no way to customise the compiler options so we’re going to have to hack it.
Our hack will be to create a simple forwarding program that takes the place of avr-g++.exe and simply prepends -std=c++11 to the command line before passing the call to the real avr-g++.exe executable. Here’s the source code to the forwarding program:
I’ve done the work of compiling this with Visual Studio and have uploaded it in a zip file for you to use. Here’s how to install it into the IDE.
- Download the avr-g++-forwarder archive from my downloads page.
- Navigate to C:\Program Files (x86)\arduino\arduino-1.0.6\hardware\tools\avr\bin and rename avr-g++.exe to avr-g++-real.exe .
- Copy the fake forwarding avr-g++.exe from the zip file that you downloaded in step (1) into the bin directory.
That’s it. You should be able to compile C++11 programs in the Arduino IDE but really I hope that all this hackery has gently nudged you towards adopting a real development environment for your projects.
Just gave a quick look at your post. Thanks for the job !
I would suggest to modify the following code so that the generated binaries are not « yet another attack vector »
buf=(char *)malloc(40000);
lstrcpy(buf,”-std=c++11″);
lstrcat(buf,lpCmdLine);
#define THOSE_ARGS “-std=c++11”
buf=(char *)malloc(strlen(lpCmdLine)+strlen(THOSE_ARGS)+1);
lstrcpy(buf,THOSE_ARGS);
lstrcat(buf,lpCmdLine);
Thanks George, sadly I guess you can’t be too safe these days.
Hi there! Thanks for such a great resources!! Looks like there is a problem with pictures, it doesn’t show one with paths 🙂 I’m not sure if I set correct paths, target MCU list is empty 🙁
Hi Karolis. Thanks for letting me know about that – there were syntax errors in the HTML that I have now fixed.
Thanks! Looks like paths were set as yours… I’ll try to uninstall Atmel Studio and WinAVR20100110 directory.
enabling c++11-features is far more easy than that! it works allready with the shipped gcc (arduino 1.6.x). Look into your hardwareboards.txt and add a single line (last line in this example):
pro.name=Arduino Pro or Pro Mini (C++11)
pro.bootloader.tool=avrdude
pro.bootloader.unlock_bits=0x3F
pro.bootloader.lock_bits=0x0F
pro.build.board=AVR_PRO
pro.build.core=arduino
pro.build.variant=eightanaloginputs
pro.build.extra_flags=-std=c++11
Hi Andy, any idea about “The program can’t start because libintl-8.dll is missing from your computer” on a fairly clean Windows 10 machine? The dependency is for make.exe, but I suspect it’s for other executables as well. On the off chance that “intl” means “international” and thus locality is somehow relevant, I’m in the US.
It’s just a dependency for make.exe which I picked pre-built from MinGW without noticing that they’d compiled it requiring shared libraries. What I’ll do is update the package with a newer make.exe build from msys2 along with its dependent shared libraries. I should have that done in a few days and will reply again here when it’s ready.
It’s a part of GNU ‘iconv’ and can be found in these downloads. I’d probably go for the statically linked versions:
Hello, a year later – are there please some news about the libintl-8.dll?
Thanks
Greetings and thanks for providing a great AVR resource here! I’m a new to AVR programming and trying to get libc integrated with Atmel Studio 7. I am getting absolutely spanked. I am still unable to link a simple vector despite spending an embarrassing amount of time searching for answers and playing with project settings. Can anyone point me to integration instructions for avr-gcc 4.9.2 + AVR-Libc1.81 and Atmel Studio 7? Something like the eclipse plugin how-to above would make my day. Anything better than the Atmel Studio Help documentation would be appreciated.


