- AX88179 Drivers for Big Sur 11.0
- Answers
- AX88179 Drivers for Big Sur 11.0
- Answers
- Адаптер CABLETIME USB 3.0 Ethernet 1000Mbps — ASIX AX88179, под Win, Mac, Android, Nintendo Switch
- Зачем мне этот адаптер
- Доставка и упаковка
- Спецификации
- Внешний вид
- Проверяем работоспособность
- За узкими рамками форточек
- Достоинства и недостатки
- Итого
AX88179 Drivers for Big Sur 11.0
Answers
The beta drivers for Big Sur from ASIX require users to disable System Integrity Protection (SIP). That is not a very good workaround. It’s actually a very bad idea as SIP provides a much needed layer of security.
I can confirm that the steps I took below can get the previous drivers working without having to disable SIP. Also, it works with the newer driver v2.18.0. I’m going to stick with this approach for now.
Got it working on Big Sur Public release.
You need the older version, I got v2.16.0 installed and working with this steps.
The newer beta release from ASIX (v2.19.0) did not have the pop up from the system privacy and would need you to disable kext.
Resolved:
Download new driver from asix revision v2.18.0 and install
Boot MacBook in recovery mode
In Terminal: /usr/sbin/spctl kext-consent add 5RHFAZ9D4P
Start MacOs X and accept pop up in system preferences/security and privacy. All works.
I tried V2.19.0 Beta2 in Big Sur Public Release(11.0.1) Still is not working 🙁
What exactly is the root cause of this problem? Why is it so hard to release a driver?
I have a Ugreen adapter and these steps worked for me (copied from ASIX guide):
Note: If your OS is macOS11 above, please follow below step1 to disable System Integrity Protection firstly, before install the driver.
Step 1: Disable System Integrity Protection.
From the Apple menu select Restart.
As your Mac restarts, press and hold down the Command + R keys immediately upon hearing the startup chime. Hold the keys until the Apple logo appears to get the computer in Recovery mode. The computer is now in Recovery mode.
From the Apple menu select Utilities -> Terminal
Run the command: csrutil disable
From the Apple menu, select Restart.
I have a solution for those who tried to re-enabled System Integration Security (SIP) after successful driver installation.
(my OS version is: macOS Big Sur version 11.0.1)
1- Unplug your USB-Ethernet device.
2- Get the latest version and discard all advices about using older versions. Get version 2.19 (beta2) which is currently available. Do NOT install driver now !
3- Uninstall old driver first using the uninstaller that comes with the latest driver. You will have to restart.
4- Wait your screen to be off due to Restart, then directly. (next point)
5- Keep holding Command+R wile your PC is booting. Keep holding until the Apple logo appears. (If you fail to enter recovery mode, shut down and repeat this point).
6- Select your account and enter password.
7- Choose Utilities > Terminal.
8- csrutil disable
9- /usr/sbin/spctl kext-consent list
10- If 5RHFAZ9D4P is not in the list, enter: /usr/sbin/spctl kext-consent add 5RHFAZ9D4P . Otherwise, skip this point.
11- Restart you mac.
12- This is the critical point which you might miss from all other instructions available: Remove Allow permission you provided earlier to asix team (5RHFAZ9D4P). This is important to let your OS accept the device again. Follow these steps carefully:
sudo su
(enter your password if prompted), then.
sqlite3 /var/db/SystemPolicyConfiguration/KextPolicy
delete from kextloadhistoryv3 where teamid=’5RHFAZ9D4P’;
delete from kextpolicy where teamid=’5RHFAZ9D4P’;
.quit
13- Install driver.
14- Now you will be prompt to Allow this driver in System Preferences -> Security & Privacy.
15- Connect your USB-Ethernet device.
16- Your USB-Ethernet device should work by now. Ensure you have ethernet connected to router/Switch to verify.
17- If it does not yet work, try running this in terminal: sudo kextload -b com.asix.driver.ax88179-178a
Thanks IbrahimMD1!
It started to show popup and work.
On 12th step were provided wrong table name and field due to message formatting.
Should be like this:
Thanks to IbrahimMD1 and volodymyrk 🙂
it works, what a relief !
@IbrahimMD1 putting on 12th point:
delete from kextloadhistoryv3 where teamid=’5RHFAZ9D4P’;
delete from kextpolicy where teamid=’5RHFAZ9D4P’;
it says: sh: delete: command not found
Revised instructions to install AX88179-179A USB-Ethernet driver on Mac OS 11 (Big Sur)
Thanks for all who confirmed these instructions actually works even with scenarios that one find himself stuck like after re-enabling SIP using csrutil enable in recovery mode. Point 12 solves this particular issue. However, everybody should follow all these instructions including point 12. Thanks volodymyrk for correction.
Follow these instructions carefully:
1- Unplug your USB-Ethernet device.
2- Get the latest version and discard all advices about using older versions. Get version 2.19 (beta2) which is currently available. Do NOT install driver now !
3- Uninstall old driver first using the uninstaller that comes with the latest driver. You will have to restart.
4- Wait your screen to be off due to Restart, then directly. (next point)
5- Keep holding Command+R wile your PC is booting. Keep holding until the Apple logo appears. (If you fail to enter recovery mode, shut down and repeat this point).
6- Select your account and enter password.
7- Choose Utilities > Terminal.
8- csrutil disable
9- /usr/sbin/spctl kext-consent list
10- If 5RHFAZ9D4P is not in the list, enter: /usr/sbin/spctl kext-consent add 5RHFAZ9D4P . Otherwise, skip this point.
11- Restart you mac.
12- This is the critical point which you might miss from all other instructions available: Remove Allow permission you provided earlier to asix team (5RHFAZ9D4P). This is important to let your OS accept the device again. Follow these steps carefully:
sudo su
(enter your password if prompted), then enter these four lines by sequence:
Источник
AX88179 Drivers for Big Sur 11.0
Answers
As a foul workaround, I can only suggest to disable system integrity protection in parts for allowing third party kernel extensions;
It worked for my AX88179 based adapter using drivers from ASIX.
Boot MacBook in recovery mode
In Terminal: /usr/sbin/spctl kext-consent add 5RHFAZ9D4P
Start MacOs X and accept pop up in system preferences/security and privacy. All works.
You need check developer ID
(An example based on ASIX ELECTRONICS CORPORATION)
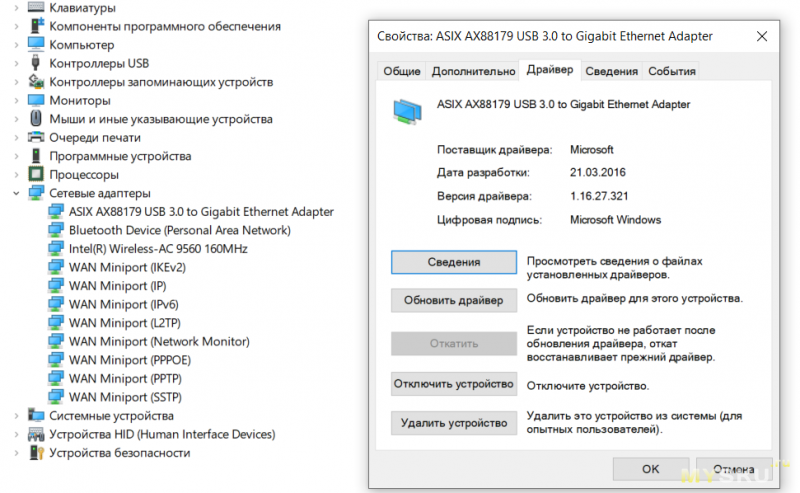
Install driver and check if it exists kext in: /Library/Extensions/AX88179178A.kext
In terminal: sudo su — (type your password)
In terminal install kext:
/usr/sbin/spctl -a -vv -t install /Library/Extensions/AX88179178A.kext
/Library/Extensions/AX88179_178A.kext: accepted
source=Notarized Developer ID
origin=Developer ID Application: ASIX ELECTRONICS CORPORATION (5RHFAZ9D4P)
3. Next boot MacBook in recovery mode
4. In Terminal add developer ID: /usr/sbin/spctl kext-consent add 5RHFAZ9D4P
5. Start MacOs X and accept pop up in system preferences/security and privacy.
6. In terminal check added developer ID: /usr/sbin/spctl kext-consent list
Allowed Team Identifiers:
5RHFAZ9D4P
7. In terminal, check driver loaded: kextfind -report -b -loaded |grep com.asix.driver.ax88179-178a
I’ve downloaded the last version of drivers on Asix website (v2.18) but not sucess.
Try to follow all the steps bellow but on the step 5 doesn’t show any pop up and step 7 is showing:
You need check developer ID
(An example based on ASIX ELECTRONICS CORPORATION)
Install driver and check if it exists kext in: /Library/Extensions/AX88179178A.kext
In terminal: sudo su — (type your password)
In terminal install kext:
/usr/sbin/spctl -a -vv -t install /Library/Extensions/AX88179178A.kext
/Library/Extensions/AX88179_178A.kext: accepted
source=Notarized Developer ID
origin=Developer ID Application: ASIX ELECTRONICS CORPORATION (5RHFAZ9D4P)
3. Next boot MacBook in recovery mode
4. In Terminal add developer ID: /usr/sbin/spctl kext-consent add 5RHFAZ9D4P
5. Start MacOs X and accept pop up in system preferences/security and privacy.
6. In terminal check added developer ID: /usr/sbin/spctl kext-consent list
Allowed Team Identifiers:
5RHFAZ9D4P
7. In terminal, check driver loaded: kextfind -report -b -loaded |grep com.asix.driver.ax88179-178a
I did everything mentioned in the previous replies but, it didn’t work.
Then I found this article, I installed the drivers provided in it and it worked after the restart. The drivers are primarily for Catalina but they worked with my BigSur beta install on the MacBook Pro 13 (2018)
I followed the instructions, but the extension is still not loaded 🙁
In the systemreport / software / Extensions/ the status of AX88179178A is not loaded.
After reboot kextfind -report -b -loaded showed «com.asix.driver.ax88179-178a no»
/usr/sbin/spctl -a -vv -t install /Library/Extensions/AX88179178A.kext/
source=Notarized Developer ID
origin=Developer ID Application: ASIX ELECTRONICS CORPORATION (5RHFAZ9D4P)
I have successfully got the adapter working in Big Sur 11.0.1 Beta (20B5022a). This is the first version of Big Sur I have attempted to install. I’m not sure if a clean install makes a difference.
The workaround involves a few extra steps. But here is exactly what I did.
Go to the Asix support page asix.com.tw/en/product/USBEthernet/Super-SpeedUSBEthernet/AX88179?utmsource=ASIX.Youtube&utmmedium=video&utm_campaign=ASIX .
Click the Downloads tab.
Click the Software & Tools link.
Download the Apple macOS 10.9 to 10.15 Drivers Installer v2.18.0 2020-08-04 3.0 MB.
Proceed to install the driver.
At this point, you will be prompted to reboot. Upon reboot the driver won’t work. This is fine. Proceed to follow the previous instructions by kraczynski:
/usr/sbin/spctl -a -vv -t install /Library/Extensions/AX88179178A.kext
/Library/Extensions/AX88179_178A.kext: accepted
source=Notarized Developer ID
origin=Developer ID Application: ASIX ELECTRONICS CORPORATION (5RHFAZ9D4P)
. Next boot MacBook in recovery mode
4. In Terminal add developer ID: /usr/sbin/spctl kext-consent add 5RHFAZ9D4P
5. Start MacOs X and accept pop up in system preferences/security and privacy.
6. In terminal check added developer ID: /usr/sbin/spctl kext-consent list
Allowed Team Identifiers:
5RHFAZ9D4P
When you get to step 7, you will notice that macOS reports no instead of yes. That is ok. That happened to me too.
7. In terminal, check driver loaded: kextfind -report -b -loaded |grep com.asix.driver.ax88179-178a
Now, go to the Plugable website. Download and install v2.16.0 of the drivers from here: plugable.com/2019/10/04/usb-ethernet-adapter-not-working-after-macos-catalina-10-15-update-we-can-help/
This time, during installation you’ll be prompted to allow the extension and the install should fully succeed. After rebooting, your network adapter should be enabled and working again.
I am not sure if driver versions make a difference. I suspect that I will be able to upgrade to v2.18.0 of the drivers and they will begin to work. I’ll report back if that is the case. But for the time being I wanted to report the precise steps I took to get everything to work.
Источник
Адаптер CABLETIME USB 3.0 Ethernet 1000Mbps — ASIX AX88179, под Win, Mac, Android, Nintendo Switch

- Цена: $11.99 (13.99 — 2 по купону на сайте)
- Перейти в магазин
USB-Ethernet адаптеров — море. Этот — компактный, металл снаружи, ASIX AX88179 внутри. Честный гигабит, работа из коробки с ноутбуком на Win 10 и моим Андроид 10 телефоном тестируются ниже. Про остальные платформы не могу проверить лично — но гуглинг подтверждает.
Зачем мне этот адаптер
Признаться, ноутбуки я недолюбливаю. Глаза уже не те, экран лучше бы побольше, к клаве привык огромной от MS и т.д. Но на фоне пандемии все же оказался у меня новый ноут. Выбрал DELL Vostro 7590-3269. Ссылка на nix, кому интересно, хотя брал не там — но там традиционно лучшие в рунете описания. И вроде все я предусмотрел из своих не вполне обычных капризов — VT-x+VT-d на процессоре и Thunderbolt и питание возможно через Power Delivery и портов USB полно, и HDMI выведен и место аж под три накопителя есть и разбирается довольно просто… И это не говоря о фичах, которые всех интересуют. Но все же на практике нашелся и изъян — нет проводного Ethernet. Пролюбил, когда выбирал 🙁 Я понимаю, что нормальному пользователю он особо и не нужен. Но как-то мне с десятками терабайт в домашней сети и гигабитом по всей квартире не кузяво… Думал, обойдусь — но когда дочке стал скачивать с NAS мульты понял — не то.
Так-то у меня есть комбайны на TypeC — с USB хабами и HDMI на выход. Но ноутбук — это мобильность. И таскать лишнее с собой — глупость. Поэтому в идеале — голый USB-Ethernet, без дополнений, полегче бы и посимпатичнее. Желательно в тон компу. Cabletime — сколько тестировал их приблуд — всегда радовали технически. Дизайн серый металл с черным пластиком мне тоже близок. Человек в магазине отзывчивый, английский у него свободный. Ну и я ему за время знакомства немало мозг массировал. Мозг — лучшее, что есть в человеке. Это знают все мозголюбы 😉 Так что написал ему — прислал быстро.
Доставка и упаковка
Заказ 14 августа 2020, получено на почте 29 августа, посылка отслеживалась
Транспортная упаковка была групповая — белый конверт из пупырки
Коммерческая упаковка — картонная коробка фирменного стиля с инструкцией на обороте 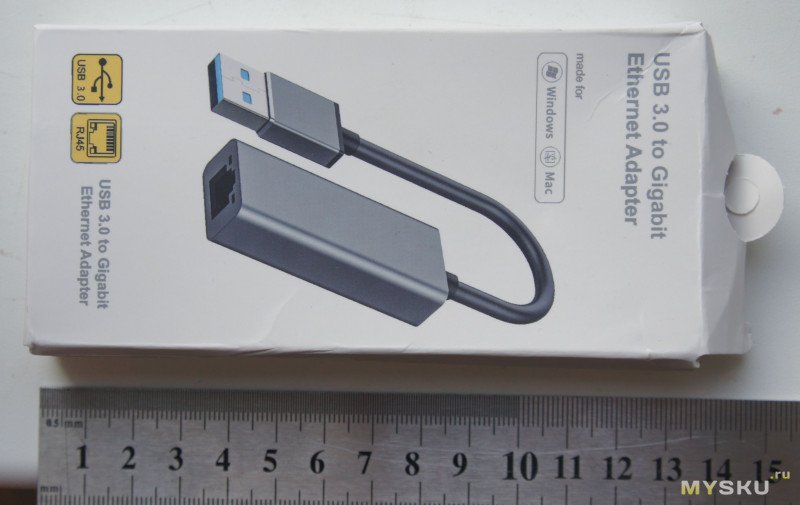
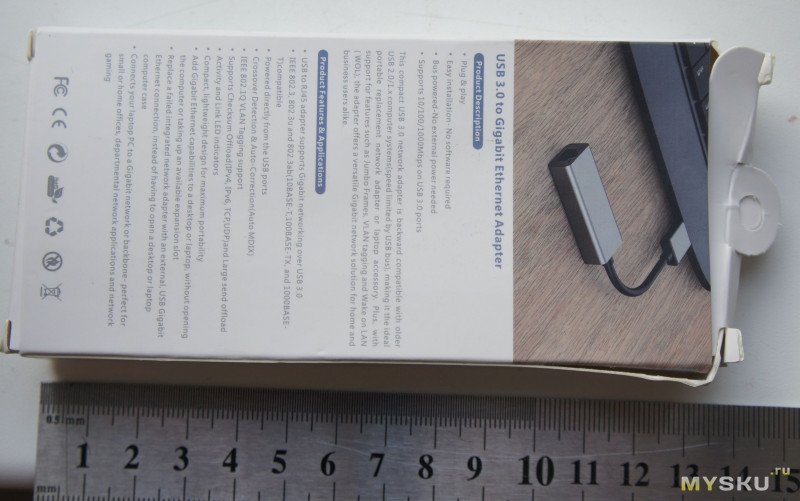

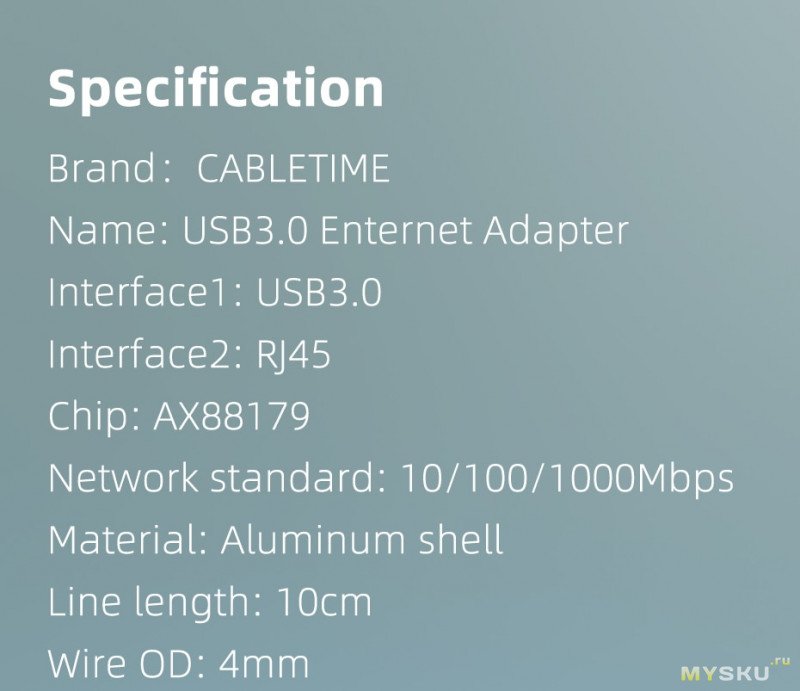
Спецификации
Внешний вид
Лаконичный. Корпус — анодированный алюминий, торцы черный пластик 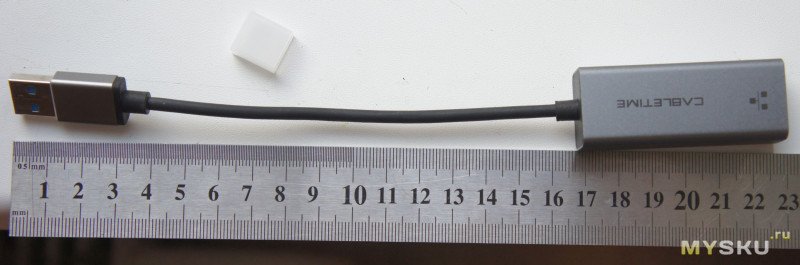
На разъеме лого SuperSpeed USB — то бишь 3.0 
RJ-45 разъем, светодиоды при наличии лини работают, нет — погашены 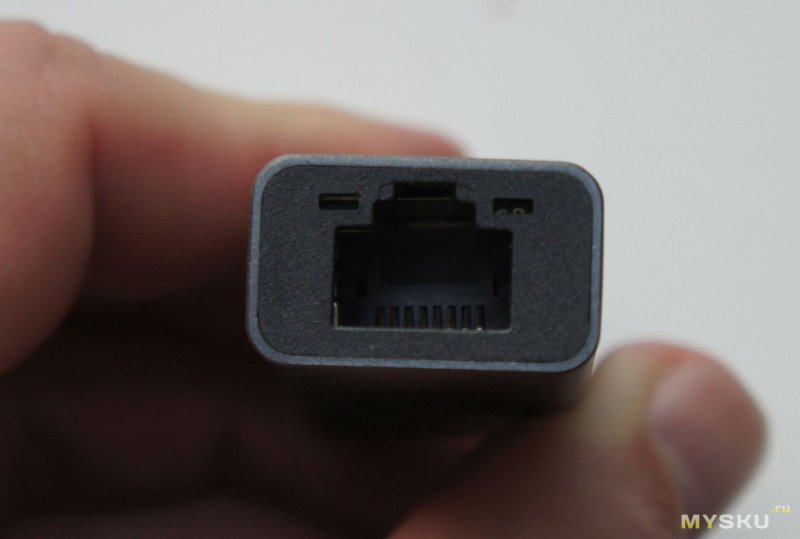
USB 3.0 — как и положено на синем разъеме, но как не всегда бывает у китайцев. 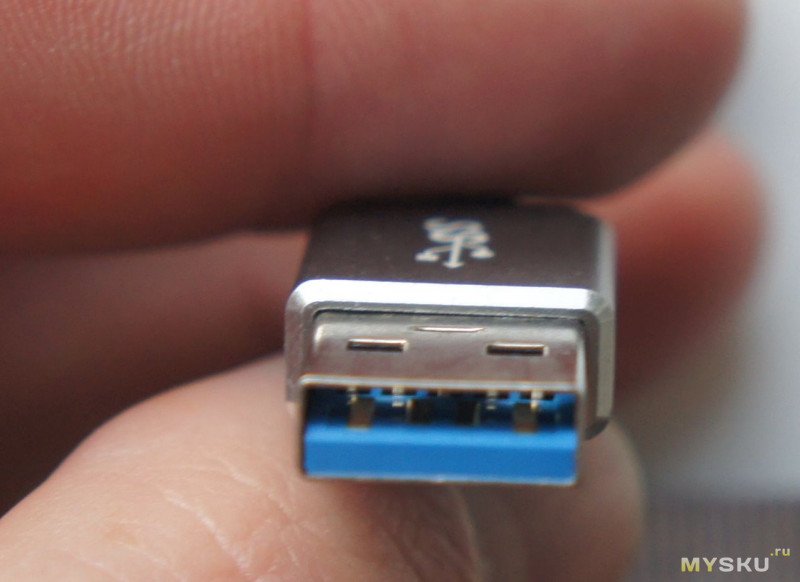
Кстати, тем кому нужно иногда и Type С — есть в комплекте с их же переходником, я его как-то обозревал отдельно — годный переходник. Есть и сразу с TypeC разъемом — но это уже другие лоты. 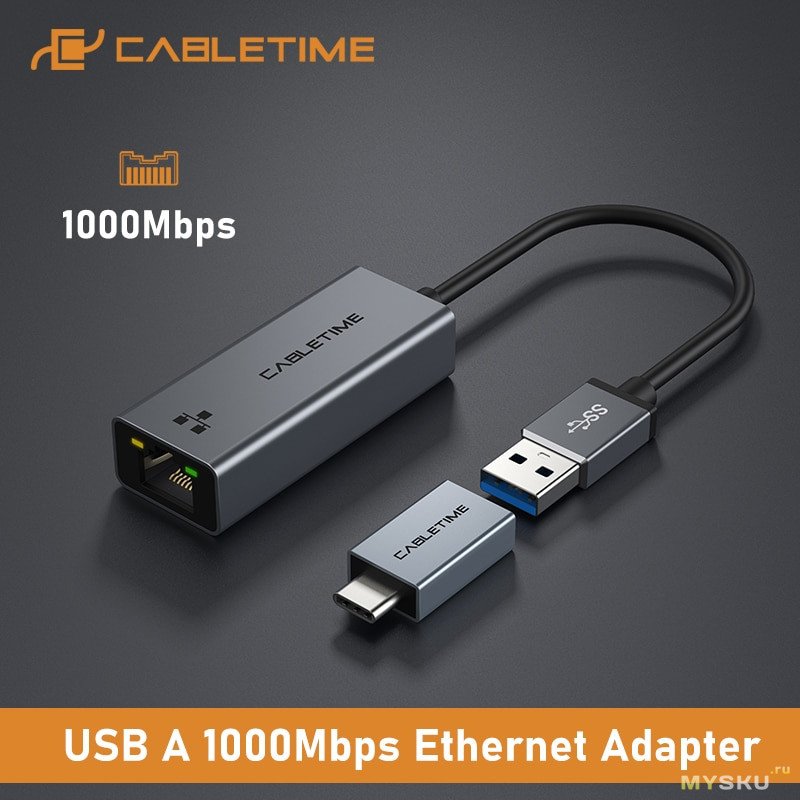
Продают и вариант на 100 мегабит, если кому нужно именно такой.
Проверяем работоспособность
Вставляю в USB 3 порт, Win 10 — дров не просит, работает из коробки 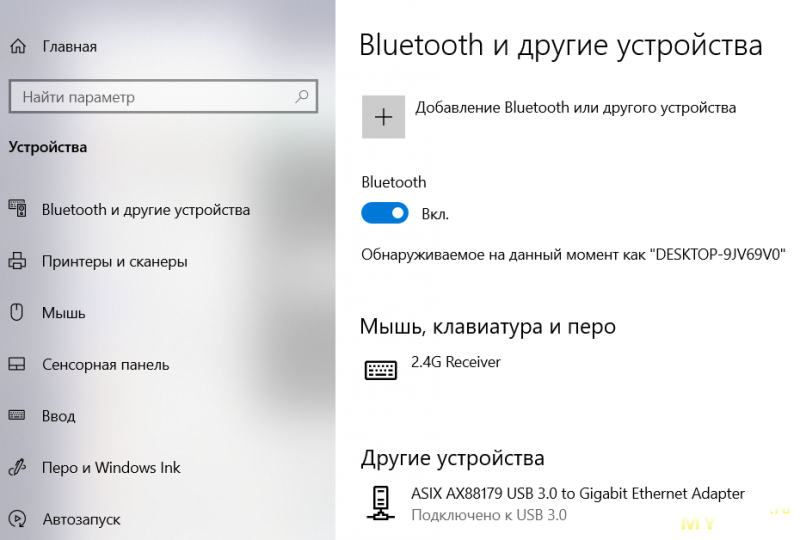
без подключения к сети 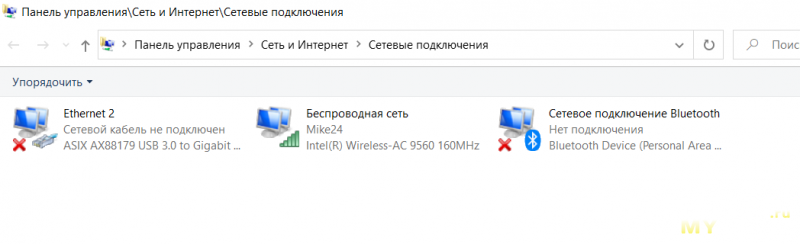
Втыкаю кабель, светодиоды светятся, доступ к Интернет идет переключается на этот адаптер. В общем — plug-n-play на месте. 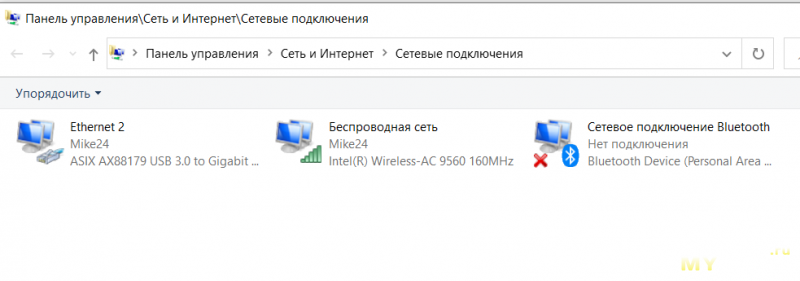
Отмечу, что перетыкал много раз — один раз устройство не определилось почему-то. Вытащил-вставил — все в порядке. Считаю — обычная для виндов история.
Давайте объективно посмотрим скорости. На втором конце запущен iperf3 как сервер. Там NAS
# uname -a
FreeBSD nas4free.local 11.2-RELEASE-p4 FreeBSD 11.2-RELEASE-p4 #0 r340062M: Fri Nov 2 16:54:03 CET 2018 root@dev.xigmanas.com:/usr/obj/xigmanas/usr/src/sys/XIGMANAS-amd64 amd64
# ifconfig
re0: flags=8843 metric 0 mtu 1500
options=8009b
ether c8:60:00:be:42:bf
hwaddr c8:60:00:be:42:bf
inet 192.168.1.34 netmask 0xffffff00 broadcast 192.168.1.255
inet 192.168.1.64 netmask 0xffffff00 broadcast 192.168.1.255
inet 192.168.1.63 netmask 0xffffff00 broadcast 192.168.1.255
inet 192.168.1.67 netmask 0xffffff00 broadcast 192.168.1.255
inet 192.168.1.50 netmask 0xffffff00 broadcast 192.168.1.255
nd6 options=29
media: Ethernet autoselect (1000baseT )
status: active
# dmesg | grep 1000
(. )
rgephy0: PHY 1 on miibus0
rgephy0: none, 10baseT, 10baseT-FDX, 10baseT-FDX-flow, 100baseTX, 100baseTX-FDX, 100baseTX-FDX-flow, 1000baseT-FDX, 1000baseT-FDX-master, 1000baseT-FDX-flow, 1000baseT-FDX-flow-master, auto, auto-flow
Сначала на WiFi для сравнения 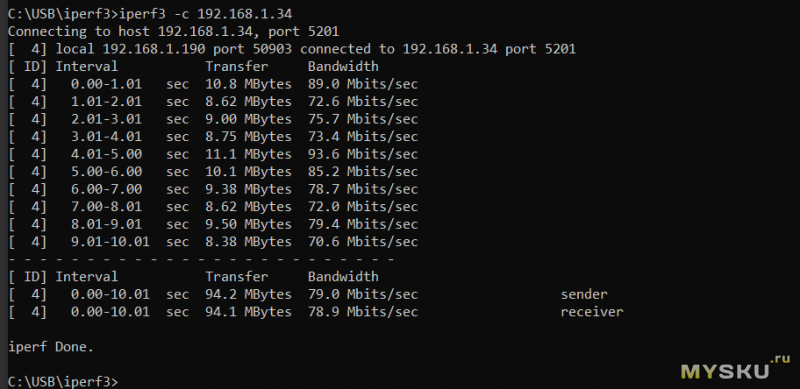
и через наше устройство (обращаем внимание — IP изменился, у WiFi и USB-Ethernet он разный, конечно) 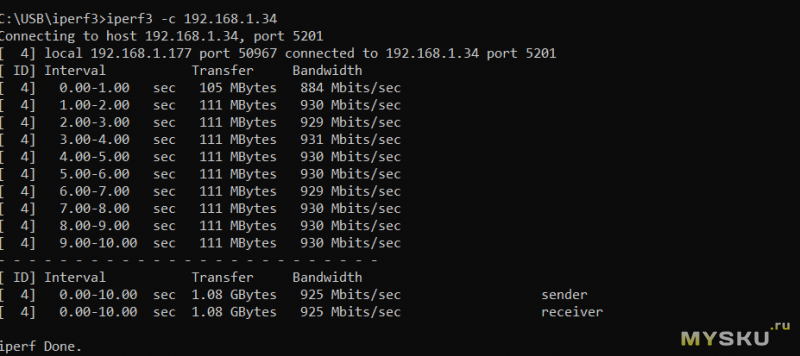
WiFi оно, конечно, удобно. Но на порядок — это на порядок.
За узкими рамками форточек
Вообще-то ASIX AX88179 — довольно старый и потому весьма широко поддерживаемый чип. Адаптер на его основе уже был у меня в обзоре, тогда это был бренд Ugreen. Тогда я его гонял под Linux и подключал к медиаплееру. Повторяться не будем, вместо этого подключу к своему телефону (redmi note 7, прошивка одна из последних ми рум — R.I.P.)
Отключаю WiFi и передачу данных, лезу в сеть, ожидаемо динозаврик — нет подключения
Втыкаю наш адаптер (в моём случае через переходник на TypeC от того же cabletime) — интернет появился 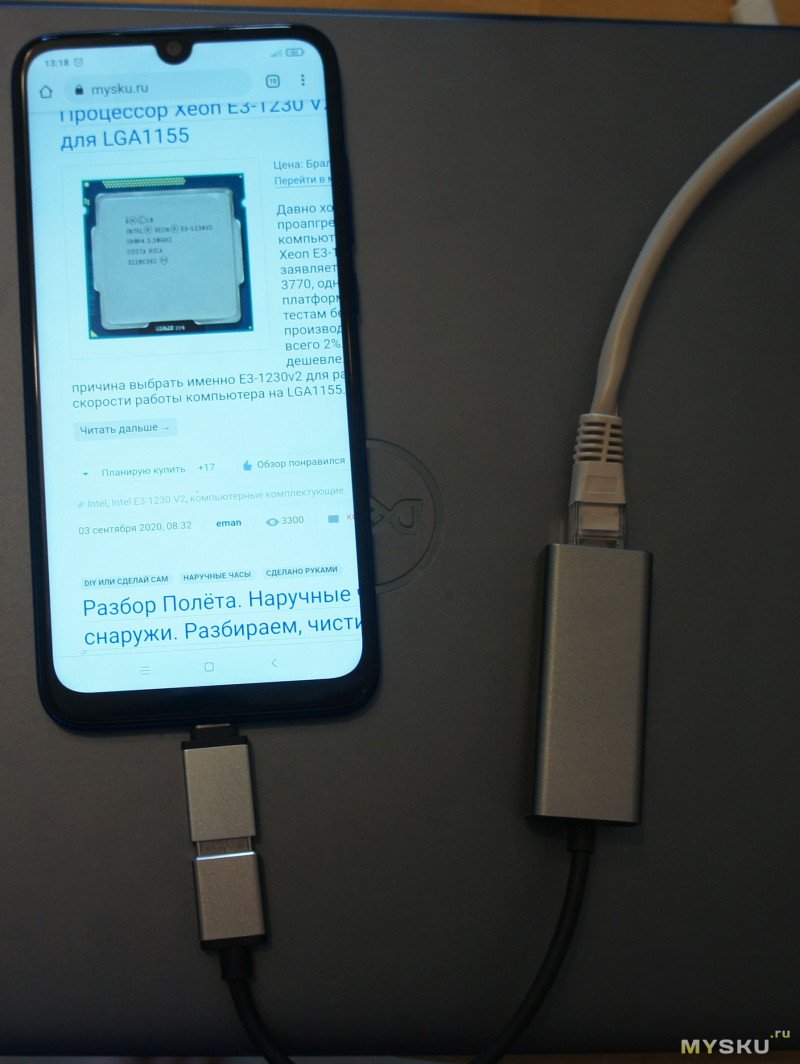
Конечно, в 99.9% случаев это лишь забавный фокус. Но возможны и полезные применения. Например подключиться к проводу телефоном может быть полезно где-то за границей в гостинице. Иногда RJ-45 в номере есть, а WiFi не добивает. Или нужно срочно раздать WiFi с проводного интернет. В офисах часто гостевой WiFi надо просить — а RJ-45 розетки повсюду. В локальные ресурсы, конечно, не пустят, если сисадмин не полный пень. Но в интернет чаще выход есть.
Добавить проводной Ethernet для медиаплеера — тоже вариант.
Надо оговориться, что на вашем телефоне заведется не обязательно — во-первых, нужен OTG, важнее — разнообразие софта огромное. Но шансы есть хорошие. Гугл по ASIX AX88179 в помощь.
В отзывах на товар можно видеть сообщения, что работает на one plus 7 pro, Xiaomi Mi Box S
Этот же адаптер запускают и на более специфическом железе. Мне нагуглилось что-то про nintendo switch
Q Какие USB Ethernet адаптеры (LAN) поддерживает консоль?
A Любые адаптеры, базирующиеся на чипсетах ASIX AX88179 (USB 3.0 1000 Mbs) или AX88772 (USB 2.0 100 Mbs), без буквенных обозначений в конце названия.
Гуглится и подключение адаптера к макинтошам — хотя мне потестить не на чем.
Достоинства и недостатки
+ Подтверждаю plug-n-play — воткнул — все работает
+ Честный гигабит
+ Компактный, ничего лишнего
+ Годный дизайн
+ Широкая совместимость — с моим телефоном зажил из коробки
Минус, наверное, можно назвать цену, других я не нашел. Всегда можно найти на том же чипе и дешевле. Но точно страшнее. И не факт что будет нормально работать — у меня был прецедент.
Итого
Этот адаптер получил у меня высший балл — право ездить вместе с ноутбуком, вытеснив универсальный комбайн, который много тяжелее. Еще там же поселился длинный толстый TypeC-TypeC кабель и зарядка от Базеус (а родная зарядка — нет, тяжела. Но той зарядке уже едет потенциальный конкурент).
Товар предоставлен для написания обзора магазином. Обзор опубликован в соответствии с п.18 Правил сайта.
Источник


