- ASIX AX88179 Driver Download (Official)
- Supported Models
- Manufacturers
- Supported Operating Systems
- File Name
- Versions
- Find Related Drivers
- Uploader Notes
- Uploaded By
- Recent Help Articles
- More Popular Downloads
- Related Driver Updates
- Driver Contents File List
- How to Update AX88179 Device Drivers Quickly & Easily
- Step 1 — Download Your Driver
- Step 2 — Install Your Driver
- How to Open Device Manager
- How to Install a driver from Device Manager
- [Drivers macOS Sierra] AmazonBasics USB 3.0 Gigabit Ethernet
- 21 thoughts on “[Drivers macOS Sierra] AmazonBasics USB 3.0 Gigabit Ethernet”
- AX88179 Drivers for Big Sur 11.0
- Answers
- AX88179 Drivers for Big Sur 11.0
- Answers
ASIX AX88179 Driver Download (Official)
Supported Models
Manufacturers
Supported Operating Systems
File Name
Versions
Find Related Drivers
Uploader Notes
Gigabit Ethernet Controller Driver File
Uploaded By
siddhik (DG Staff Member) on 28-Oct-2016
- Updates PC Drivers Automatically
- Identifies & Fixes Unknown Devices
- Supports Windows 10, 8, 7, Vista, XP
Recent Help Articles
More Popular Downloads
Related Driver Updates
Driver Contents File List
The following files are found inside the driver download file.
| Name | Size | Date |
|---|---|---|
| AX88179_178A_Macintosh_10.6_to_10.12_Driver_Installer_v2.8.0_20160912/AX88179_178A.dmg | 237.1 KB | 19 Apr 2016 |
| AX88179_178A_Macintosh_10.6_to_10.12_Driver_Installer_v2.8.0_20160912/AX88179_178A_MacOSX_Driver_Installation_Guide_v201.pdf | 1.1 MB | 10 Jun 2014 |
| AX88179_178A_Macintosh_10.6_to_10.12_Driver_Installer_v2.8.0_20160912/history.txt | 1.6 KB | 19 Apr 2016 |
How to Update AX88179 Device Drivers Quickly & Easily
Step 1 — Download Your Driver
To get the AX88179 driver, click the green download button above. After you complete your download, move on to Step 2.
If the driver listed is not the right version or operating system, search our driver archive for the correct version. Enter AX88179 into the search box above and then submit. In the results, choose the best match for your PC and operating system.
Tech Tip: If you are having trouble deciding which is the right driver, try the Driver Update Utility for AX88179. It is a software utility which automatically finds and downloads the right driver.
Step 2 — Install Your Driver
Once you have downloaded your new driver, you’ll need to install it. In Windows, use a built-in utility called Device Manager, which allows you to see all of the devices recognized by your system, and the drivers associated with them.
How to Open Device Manager
In Windows 10 & Windows 8.1, right-click the Start menu and select Device Manager
In Windows 8, swipe up from the bottom, or right-click anywhere on the desktop and choose «All Apps» -> swipe or scroll right and choose «Control Panel» (under Windows System section) -> Hardware and Sound -> Device Manager
In Windows 7, click Start -> Control Panel -> Hardware and Sound -> Device Manager
In Windows Vista, click Start -> Control Panel -> System and Maintenance -> Device Manager
In Windows XP, click Start -> Control Panel -> Performance and Maintenance -> System -> Hardware tab -> Device Manager button
How to Install a driver from Device Manager
Locate the device and model that is having the issue and double-click on it to open the Properties dialog box.
Select the Driver tab.
Click the Update Driver button and follow the instructions.
In most cases, you will need to reboot your computer in order for the driver update to take effect.
Tech Tip: Driver downloads and updates come in a variety of file formats with different file extensions. For example, you may have downloaded an EXE, INF, ZIP, or SYS file. Each file type has a slighty different installation procedure to follow.
For more help, visit our Driver Support Page for step-by-step videos on how to install drivers for every file type.
Источник
[Drivers macOS Sierra] AmazonBasics USB 3.0 Gigabit Ethernet
This is where to find the latest drivers for the AmazonBasics USB 3.0 Gigabit Ethernet Adapter which support Mac’s Sierra (10.12.x) OS (and beyond).
A good alternative for Apple’s own Gigabit Ethernet Adapter which consumes a Thunderbolt port — or the USB 2.0 device which only goes up to 100 Mbit/s.
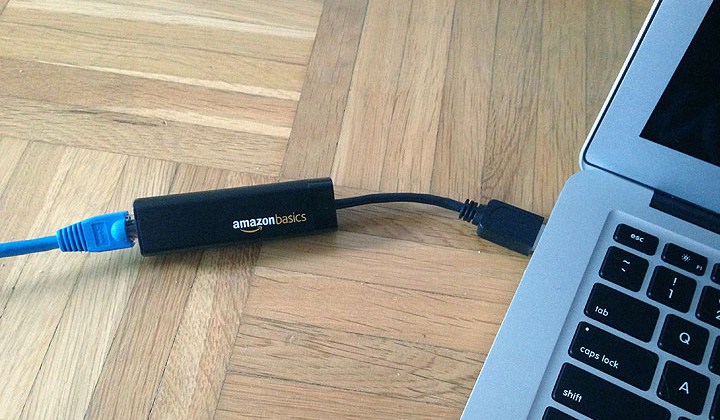
The box comes equipped with a driver installation CD — however, you may proceed to responsibly dispose of it as the latest drivers can easily be obtained online from the original manufacturer website. And who owns a CD drive anyway.
AmazonBasics uses the chipset “AX88179” made by ASIX Electronics Corporation. Here are the simple steps to install drivers.
- Proceed to official website of AX88179 Ethernet Controller
- Scroll down for “Apple Mac OS X 10.6 to 10.12 Drivers Installer”
- Download ZIP file and open the DMG container within, ex: “AX88179_178A.dmg”
- Install drivers package, ex: “AX88179_178A_v2.8.0.pkg”
- Reboot your Mac or Macbook
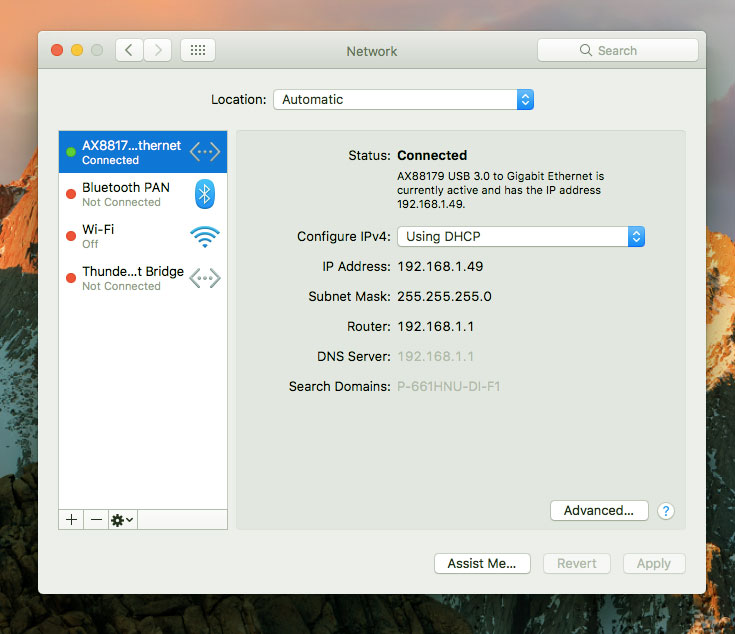
- The new ethernet controller will be visible in the System Preference’s Network settings. It works like any Mac native ethernet port would.
- Enjoy Gigabit speeds without sacrificing your Thunderbolt connection!
 ASIX AX88179 in working order..
For comments, questions, you’ll find the comments box below!
21 thoughts on “[Drivers macOS Sierra] AmazonBasics USB 3.0 Gigabit Ethernet”
Hello
After installing the most current driver;
(AX88179_178A_Macintosh_10.6_to_10.12_Driver_Installer_v2.9-2.0_20170426)
for the Amazon Basics Gigabit USB 3.0 Ethernet Adapter on my MacBook Air running OS Sierra 10.12.6, the lights both “Green and “Yellow” are on and I see the driver interface in the network preferences but I cannot connect to the network. Can you please help me?
Hi; what does your network settings say? See the screenshot.
Also you can change the priority order of network devices (drag & drop) to make sure that it is using the ethernet controller connection.
Same here, i can see the lights blinking but doesn’t work if i plug the connector in another mac (10.13) works properlly even without installing the driver.
I’m trying to use one of these on the most recent MacBook Air. The driver software installed fine and I see the “adapter” in the list of network interfaces. But no matter what I do, none of the lights turn on when I plug the dongle into the USB port. I’ve tested both ports on the laptop and they work fine with other devices. Is it possible that I have a defective adapter?
I downloaded the software from the website, but when I plug in the ethernet nothing happens. Neither of the lights on the converter will turn on, and under my network preferences I do not see anything. Not sure what the problem is.
Hello,
I cannot reach the site. Can someone post an alt link here if they have a copy of the driver?
Where can you find USB drivers for Windows 10? My XPS13 doesn’t have a CD port, so I need to get a driver instead.
It would be very helpful if someone directed me to a driver for Windows 10. Thanks!
Hello Arvind. Please, see the link provided in this post. It contains download links to the latest drivers for Windows 10, both 64bit and 32bit.
Currently, the latest versions are;
Windows 10/8.1/8.0 32-bit — Driver V1.18.4.0
Windows 10/8.1/8.0 64-bit — Driver V1.18.4.0
I am having trouble with installing this on my windows 10 laptop.
Feel free to share us your problem. Or if you already solved this, your solutions that may help others are most welcome as well. Thanks!
I downloaded the file, went through the installation, went to restart my computer, and now my computer won’t turn on. It got stuck on the restart screen for an hour and then when I tried to reboot it again the same thing happened. My computer now will not go past the loading screen no matter how long I leave it. Thanks a ton.
Источник
AX88179 Drivers for Big Sur 11.0
Answers
As a foul workaround, I can only suggest to disable system integrity protection in parts for allowing third party kernel extensions;
It worked for my AX88179 based adapter using drivers from ASIX.
Boot MacBook in recovery mode
In Terminal: /usr/sbin/spctl kext-consent add 5RHFAZ9D4P
Start MacOs X and accept pop up in system preferences/security and privacy. All works.
You need check developer ID
(An example based on ASIX ELECTRONICS CORPORATION)
Install driver and check if it exists kext in: /Library/Extensions/AX88179178A.kext
In terminal: sudo su — (type your password)
In terminal install kext:
/usr/sbin/spctl -a -vv -t install /Library/Extensions/AX88179178A.kext
/Library/Extensions/AX88179_178A.kext: accepted
source=Notarized Developer ID
origin=Developer ID Application: ASIX ELECTRONICS CORPORATION (5RHFAZ9D4P)
3. Next boot MacBook in recovery mode
4. In Terminal add developer ID: /usr/sbin/spctl kext-consent add 5RHFAZ9D4P
5. Start MacOs X and accept pop up in system preferences/security and privacy.
6. In terminal check added developer ID: /usr/sbin/spctl kext-consent list
Allowed Team Identifiers:
5RHFAZ9D4P
7. In terminal, check driver loaded: kextfind -report -b -loaded |grep com.asix.driver.ax88179-178a
I’ve downloaded the last version of drivers on Asix website (v2.18) but not sucess.
Try to follow all the steps bellow but on the step 5 doesn’t show any pop up and step 7 is showing:
You need check developer ID
(An example based on ASIX ELECTRONICS CORPORATION)
Install driver and check if it exists kext in: /Library/Extensions/AX88179178A.kext
In terminal: sudo su — (type your password)
In terminal install kext:
/usr/sbin/spctl -a -vv -t install /Library/Extensions/AX88179178A.kext
/Library/Extensions/AX88179_178A.kext: accepted
source=Notarized Developer ID
origin=Developer ID Application: ASIX ELECTRONICS CORPORATION (5RHFAZ9D4P)
3. Next boot MacBook in recovery mode
4. In Terminal add developer ID: /usr/sbin/spctl kext-consent add 5RHFAZ9D4P
5. Start MacOs X and accept pop up in system preferences/security and privacy.
6. In terminal check added developer ID: /usr/sbin/spctl kext-consent list
Allowed Team Identifiers:
5RHFAZ9D4P
7. In terminal, check driver loaded: kextfind -report -b -loaded |grep com.asix.driver.ax88179-178a
I did everything mentioned in the previous replies but, it didn’t work.
Then I found this article, I installed the drivers provided in it and it worked after the restart. The drivers are primarily for Catalina but they worked with my BigSur beta install on the MacBook Pro 13 (2018)
I followed the instructions, but the extension is still not loaded 🙁
In the systemreport / software / Extensions/ the status of AX88179178A is not loaded.
After reboot kextfind -report -b -loaded showed «com.asix.driver.ax88179-178a no»
/usr/sbin/spctl -a -vv -t install /Library/Extensions/AX88179178A.kext/
source=Notarized Developer ID
origin=Developer ID Application: ASIX ELECTRONICS CORPORATION (5RHFAZ9D4P)
I have successfully got the adapter working in Big Sur 11.0.1 Beta (20B5022a). This is the first version of Big Sur I have attempted to install. I’m not sure if a clean install makes a difference.
The workaround involves a few extra steps. But here is exactly what I did.
Go to the Asix support page asix.com.tw/en/product/USBEthernet/Super-SpeedUSBEthernet/AX88179?utmsource=ASIX.Youtube&utmmedium=video&utm_campaign=ASIX .
Click the Downloads tab.
Click the Software & Tools link.
Download the Apple macOS 10.9 to 10.15 Drivers Installer v2.18.0 2020-08-04 3.0 MB.
Proceed to install the driver.
At this point, you will be prompted to reboot. Upon reboot the driver won’t work. This is fine. Proceed to follow the previous instructions by kraczynski:
/usr/sbin/spctl -a -vv -t install /Library/Extensions/AX88179178A.kext
/Library/Extensions/AX88179_178A.kext: accepted
source=Notarized Developer ID
origin=Developer ID Application: ASIX ELECTRONICS CORPORATION (5RHFAZ9D4P)
. Next boot MacBook in recovery mode
4. In Terminal add developer ID: /usr/sbin/spctl kext-consent add 5RHFAZ9D4P
5. Start MacOs X and accept pop up in system preferences/security and privacy.
6. In terminal check added developer ID: /usr/sbin/spctl kext-consent list
Allowed Team Identifiers:
5RHFAZ9D4P
When you get to step 7, you will notice that macOS reports no instead of yes. That is ok. That happened to me too.
7. In terminal, check driver loaded: kextfind -report -b -loaded |grep com.asix.driver.ax88179-178a
Now, go to the Plugable website. Download and install v2.16.0 of the drivers from here: plugable.com/2019/10/04/usb-ethernet-adapter-not-working-after-macos-catalina-10-15-update-we-can-help/
This time, during installation you’ll be prompted to allow the extension and the install should fully succeed. After rebooting, your network adapter should be enabled and working again.
I am not sure if driver versions make a difference. I suspect that I will be able to upgrade to v2.18.0 of the drivers and they will begin to work. I’ll report back if that is the case. But for the time being I wanted to report the precise steps I took to get everything to work.
Источник
AX88179 Drivers for Big Sur 11.0
Answers
The beta drivers for Big Sur from ASIX require users to disable System Integrity Protection (SIP). That is not a very good workaround. It’s actually a very bad idea as SIP provides a much needed layer of security.
I can confirm that the steps I took below can get the previous drivers working without having to disable SIP. Also, it works with the newer driver v2.18.0. I’m going to stick with this approach for now.
Got it working on Big Sur Public release.
You need the older version, I got v2.16.0 installed and working with this steps.
The newer beta release from ASIX (v2.19.0) did not have the pop up from the system privacy and would need you to disable kext.
Resolved:
Download new driver from asix revision v2.18.0 and install
Boot MacBook in recovery mode
In Terminal: /usr/sbin/spctl kext-consent add 5RHFAZ9D4P
Start MacOs X and accept pop up in system preferences/security and privacy. All works.
I tried V2.19.0 Beta2 in Big Sur Public Release(11.0.1) Still is not working 🙁
What exactly is the root cause of this problem? Why is it so hard to release a driver?
I have a Ugreen adapter and these steps worked for me (copied from ASIX guide):
Note: If your OS is macOS11 above, please follow below step1 to disable System Integrity Protection firstly, before install the driver.
Step 1: Disable System Integrity Protection.
From the Apple menu select Restart.
As your Mac restarts, press and hold down the Command + R keys immediately upon hearing the startup chime. Hold the keys until the Apple logo appears to get the computer in Recovery mode. The computer is now in Recovery mode.
From the Apple menu select Utilities -> Terminal
Run the command: csrutil disable
From the Apple menu, select Restart.
I have a solution for those who tried to re-enabled System Integration Security (SIP) after successful driver installation.
(my OS version is: macOS Big Sur version 11.0.1)
1- Unplug your USB-Ethernet device.
2- Get the latest version and discard all advices about using older versions. Get version 2.19 (beta2) which is currently available. Do NOT install driver now !
3- Uninstall old driver first using the uninstaller that comes with the latest driver. You will have to restart.
4- Wait your screen to be off due to Restart, then directly. (next point)
5- Keep holding Command+R wile your PC is booting. Keep holding until the Apple logo appears. (If you fail to enter recovery mode, shut down and repeat this point).
6- Select your account and enter password.
7- Choose Utilities > Terminal.
8- csrutil disable
9- /usr/sbin/spctl kext-consent list
10- If 5RHFAZ9D4P is not in the list, enter: /usr/sbin/spctl kext-consent add 5RHFAZ9D4P . Otherwise, skip this point.
11- Restart you mac.
12- This is the critical point which you might miss from all other instructions available: Remove Allow permission you provided earlier to asix team (5RHFAZ9D4P). This is important to let your OS accept the device again. Follow these steps carefully:
sudo su
(enter your password if prompted), then.
sqlite3 /var/db/SystemPolicyConfiguration/KextPolicy
delete from kextloadhistoryv3 where teamid=’5RHFAZ9D4P’;
delete from kextpolicy where teamid=’5RHFAZ9D4P’;
.quit
13- Install driver.
14- Now you will be prompt to Allow this driver in System Preferences -> Security & Privacy.
15- Connect your USB-Ethernet device.
16- Your USB-Ethernet device should work by now. Ensure you have ethernet connected to router/Switch to verify.
17- If it does not yet work, try running this in terminal: sudo kextload -b com.asix.driver.ax88179-178a
Thanks IbrahimMD1!
It started to show popup and work.
On 12th step were provided wrong table name and field due to message formatting.
Should be like this:
Thanks to IbrahimMD1 and volodymyrk 🙂
it works, what a relief !
@IbrahimMD1 putting on 12th point:
delete from kextloadhistoryv3 where teamid=’5RHFAZ9D4P’;
delete from kextpolicy where teamid=’5RHFAZ9D4P’;
it says: sh: delete: command not found
Revised instructions to install AX88179-179A USB-Ethernet driver on Mac OS 11 (Big Sur)
Thanks for all who confirmed these instructions actually works even with scenarios that one find himself stuck like after re-enabling SIP using csrutil enable in recovery mode. Point 12 solves this particular issue. However, everybody should follow all these instructions including point 12. Thanks volodymyrk for correction.
Follow these instructions carefully:
1- Unplug your USB-Ethernet device.
2- Get the latest version and discard all advices about using older versions. Get version 2.19 (beta2) which is currently available. Do NOT install driver now !
3- Uninstall old driver first using the uninstaller that comes with the latest driver. You will have to restart.
4- Wait your screen to be off due to Restart, then directly. (next point)
5- Keep holding Command+R wile your PC is booting. Keep holding until the Apple logo appears. (If you fail to enter recovery mode, shut down and repeat this point).
6- Select your account and enter password.
7- Choose Utilities > Terminal.
8- csrutil disable
9- /usr/sbin/spctl kext-consent list
10- If 5RHFAZ9D4P is not in the list, enter: /usr/sbin/spctl kext-consent add 5RHFAZ9D4P . Otherwise, skip this point.
11- Restart you mac.
12- This is the critical point which you might miss from all other instructions available: Remove Allow permission you provided earlier to asix team (5RHFAZ9D4P). This is important to let your OS accept the device again. Follow these steps carefully:
sudo su
(enter your password if prompted), then enter these four lines by sequence:
Источник


