- How to Perform Windows Server Backup Restore? (Step-by-Step Guide)
- System Restore in Windows Server
- How to Perform Windows Server Restore from Backup?
- Backup and Restore Windows Servers with Powerful Software
- Conclusion
- How to use the backup feature to back up and restore data
- Summary
- Backing up the server
- To back up selected files or folders
- To back up the system state (including registry settings)
- To schedule a backup for a later time or date
- To back up data by using the Backup Wizard
- Restoring data to the server
- To restore selected files from a file or tape
- To restore the system state data (including registry information)
- To restore backed up data by using the Restore Wizard
- Troubleshooting
- You can’t back up or restore data
- You can’t schedule a backup operation
How to Perform Windows Server Backup Restore? (Step-by-Step Guide)
How to restore Windows Server backup? This article will detail every step of Windows Server Backup restore. It applies to Server 2019, 2016, 2012, 2008, etc.

By AOMEI  / Last Updated December 3, 2020
System Restore in Windows Server
How to restore Windows Server 2008/2012/2016/2019 to an earlier date if anything unexpected happens? For system state which contains some settings and boot files, usually you can restore it within Windows. But for a complete restore from Windows Server Backup, you need to do it in Windows Recovery Environment (WinRE).
In severe situations where you cannot enter WinRE from Windows, you can use Windows Server installation disc or recovery disk to boot the machine into recovery environment. And before you manage to start full server restoration, please make sure that the hard drive that you are restoring to has the same or larger space than the disk backed up. Otherwise, the backup will fail due to insufficient disk space.
This guide focus on the common steps to restore Windows Server backup, if you want to restore the backup to different or new computer you can refer to these articles:
How to Perform Windows Server Restore from Backup?
The specific steps of Windows Server backup and restore may vary among different Windows Server versions, but you can basically follow this procedure:
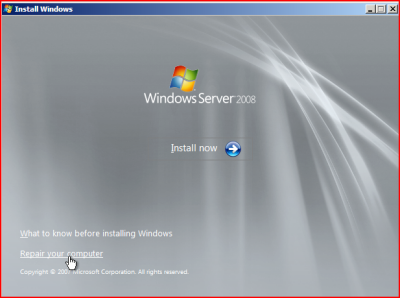
Step 1. Boot Windows Server into WinRE with the installation disc if needed. Choose the proper settings and click “Next”.

Step 2. In the next window, click “Repair your computer”, “Troubleshooting”, and then “System Recovery Options”.
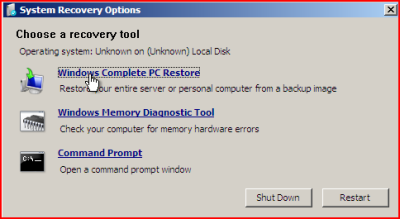
Step 3. Select «Windows Complete PC Restore» to enter the Windows Recovery Environment. Note in Server 2012 or later versions, the recovery tool will be shown as «System Image Recovery«.
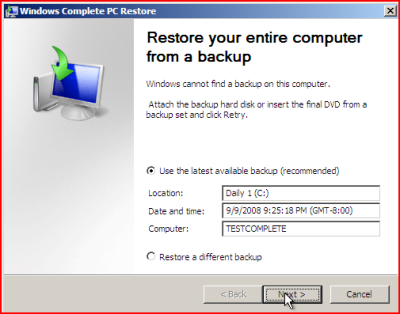
Step 4. Now the program will scan your server for image backups, and then select the latest available backup by default. If you want to choose a different backup version, just check the “Restore a different backup” option.
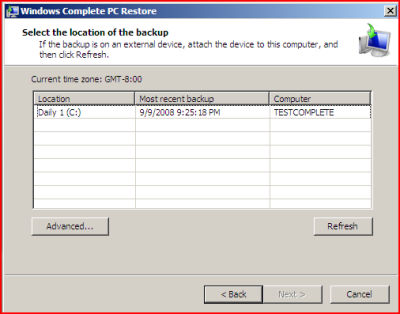
Step 5. Make sure the storage device where the image backup located is well connected to the server to be restored. If your backup was saved to network shared folder, you may need to manually specify the location path of the backup. Find the backup version that you want to restore and click ”Next” to continue.
Step 6. After choosing the backup version, it will bring you the confirmation screen. As there, click “Finish” to start the restoration process.

Then your server is starting to recover. It may take a long while if the image backup is too large. When the procedure is complete, your server will reboot and load your server system.
However, if the server hard disk to be recovered is less than 160GB, the server recovery will fail with an error message saying could not complete the server restore. What’s worse, there are other unknown problems will cause system recovery failed.
If you are not satisfied with Windows Server Backup or have problems with restoring from it, you can use server backup software as an easy alternative to protect your server.
Backup and Restore Windows Servers with Powerful Software
AOMEI Backupper Server is a backup and restore tool for Windows Server 2008/2012/2016/2019. You can use it to do Windows Sever backup and restore with better performance than using Windows Server Backup.
It supports various backup types, including system state backup, disk/partition backup, and file/folder backup.
You are allowed to save image backups on a wide range of storage devices, such as NTFS/FAT32 drive, NAS, and CD/DVD.
You are able to perform scheduled backup followed by incremental and differential backup. There are five schedule modes available: Daily, Weekly, Monthly, Event triggers, and USB plug in.
It can automatically delete old backups to help free up storage space.
It brings you offline system restore and dissimilar hardware restore.
In order to restore your server when it becomes unable to boot, you can create a full backup of your server and a bootable rescue media beforehand.
To restore Windows Server:
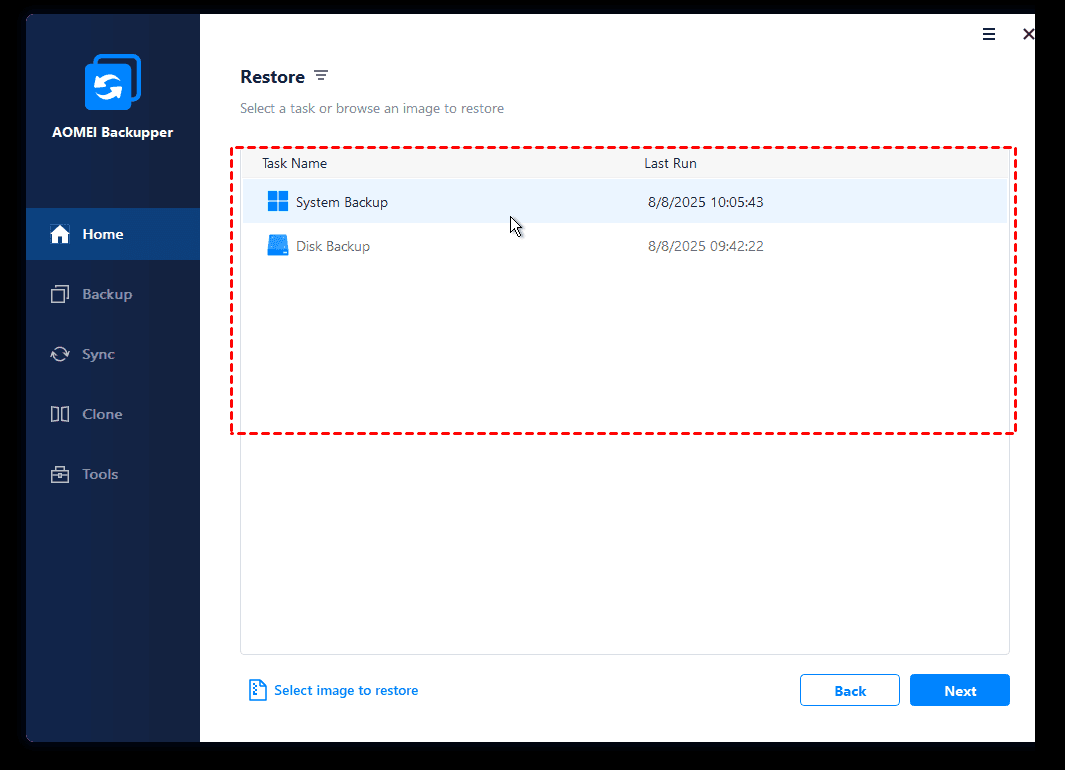
Step 1. O pen AOMEI Backupper, or boot from the bootable media created by AOMEI Backupper if your Windows Server fails to load. In the main interface, click the «Restore» option and click «Select Task«.
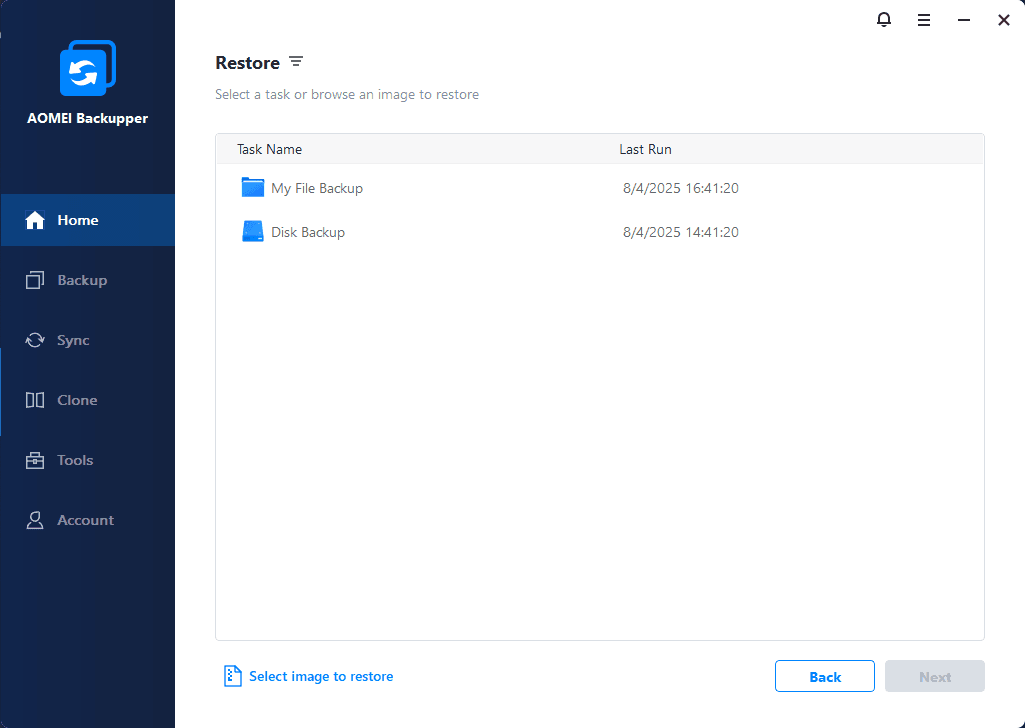
Step 2. In the next screen, all the available backup versions will be listed. If the backup you need to restore is not listed, you can return to click “Select Image File” to locate the image backup.
Step 3. After specifying the backup file, choose a backup version if needed, and then click «Next” to continue. To restore a computer with dissimilar hardware, you could tick «Universal Restore» to ensure secure boot after restoring.
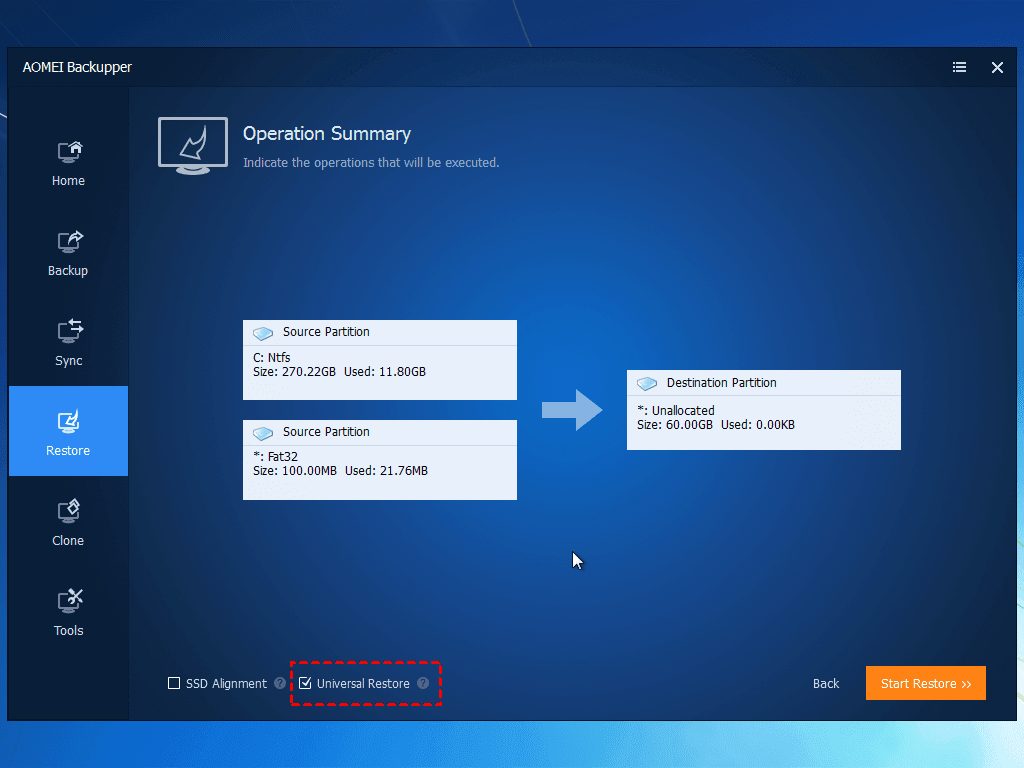
Step 4. Then confirm the operation and click “Start Restore” to start the restoration.
Conclusion
That’s how to restore Windows Server backup. If you prefer an easy and flexible way to backup your Server rather than built-in utility, then you can try AOMEI Backupper Server. It provides more powerful functions compared with Windows Server Backup, for example, it enables you to create multiple scheduled backup tasks and restore the backup to different hardware.
If you are interested in cloning your server for hard drive replacement. AOMEI Backupper allows you to do that with the Disk Clone feature. Go for it now and discover more!
If you want to protect unlimited PCs and servers within your company, you may choose AOMEI Backupper Technician Plus. It offers unlimited billable technical services to clients. It also enables you to copy installation directory for portable version creation.
How to use the backup feature to back up and restore data
This step-by-step article describes how to use the Backup feature to back up and restore data on your Windows Server 2003-based computer.
Original product version: В Windows Server 2003
Original KB number: В 326216
Summary
This article is intended for users who back up and restore data, and it includes information about how to back up and restore the system configuration and local registry.
To perform the procedures in this article, you must be logged on as a member of the Administrators group or the Backup Operators group.
Backing up the server
You can manually back up data or use the Backup Wizard, which is included in the Backup feature. You can back up the whole contents of the server, selected portions of the server, or the system state data (the system configuration information).
To back up selected files or folders
Click Start, point to All Programs, point to Accessories, point to System Tools, and then click Backup. The Backup or Restore Wizard starts.
Click Advanced Mode.
Click the Backup tab.
On the Job menu, click New.
Expand the drive or folder that contains the items that you want to back up. Click to select the check boxes next to the files, folders, or drives that you want to back up.
In the Backup destination box, specify the destination for the new job. To do so, do one of the following:
- If you want to back up files and folders to a file, click File.
- If you want to back up to tape, click a tape device.
If a tape device is not connected to your computer, File is the only backup media type that is available in the Backup destination box.
In the Backup media or file name box, do one of the following:
- If you’re backing up to a file, specify a path and file name for the backup (.bkf) file. Or, click Browse, specify a file name and location where you want to save the file, and then click Save.
- If you’re backing up to tape, click the tape that you want to use.
On the Tools menu, click Options. Specify any additional backup options that you want on the appropriate tabs of the Options page. Click OK.
Click Start Backup.
If you want to set advanced backup options, such as data verification or hardware compressions, click Advanced. Specify the options that you want, and then click OK.
Review the settings on the Backup Job Information page. Specify whether you want this backup to replace the information that is already present on the destination media, or add this backup to the existing information.
Click Start Backup.
To back up the system state (including registry settings)
To back up the system state (including the registry hives system, software, security, the Security Accounts Manager (SAM), and the default user (but not HKEY_CURRENT_USER)), follow these steps:
Click Start, point to All Programs, point to Accessories, point to System Tools, and then click Backup. The Backup or Restore Wizard starts.
Click Advanced Mode.
Click the Backup tab.
On the Job menu, click New.
Click to select the System State check box.
Click to select the check boxes next to any other files, folders, or drives that you want to back up.
In the Backup destination box, specify the destination for the new job. To do so, do one of the following:
- If you want to back up files and folders to a file, click File.
- If you want to back up to tape, click a tape device.
If a tape device is not connected to your computer, File is the only backup media type that is available in the Backup destination box.
In the Backup media or file name box, do one of the following:
- If you are backing up to a file, specify a path and file name for the backup (.bkf) file. Or, click Browse, specify a file name and location where you want to save the file, and then click Save.
- If you are backing up to tape, click the tape that you want to use.
On the Tools menu, click Options. Specify any additional backup options that you want on the appropriate tabs of the Options page. Click OK.
Click Start Backup.
If you want to set advanced backup options, such as data verification or hardware compressions, click Advanced. Specify the options that you want, and then click OK.
Review the settings on the Backup Job Information page. Specify whether you want this backup to replace the information that is already present on the destination media, or add this backup to the existing information.
Click Start Backup.
To schedule a backup for a later time or date
You may want to run a backup operation when there’s low system usage. However, such times may be late at night or on weekends. You can schedule backup jobs to run on a particular day and time.
To schedule a backup operation, the Task Scheduler service must be running.
Click Start, point to All Programs, point to Accessories, point to System Tools, and then click Backup. The Backup or Restore Wizard starts.
Click Advanced Mode.
Click the Backup tab.
On the Job menu, click New.
Expand the drive or folder that contains the items that you want to back up. Click to select the check boxes next to the files, folders, or drives that you want to back up.
In the Backup destination box, specify the destination for the new job. To do so, do one of the following:
- If you want to back up files and folders to a file, click File.
- If you want to back up to tape, click a tape device.
If a tape device is not connected to your computer, File is the only backup media type that is available in the Backup destination box.
In the Backup media or file name box, do one of the following:
- If you’re backing up to a file, specify a path and file name for the backup (.bkf) file. Or, click Browse, specify a file name and location where you want to save the file, and then click Save.
- If you’re backing up to tape, click the tape that you want to use.
On the Tools menu, click Options. Specify any additional backup options that you want on the appropriate tabs of the Options page. Click OK.
Click Start Backup.
If a message prompts you to save your current backup selections, click OK. On the Save As page that appears, specify a name and location where you want to save the backup, and then click Save.
In the Job name box, type a name for the scheduled backup job, and then click Properties.
Click the Schedule tab. In the Schedule Task box, click how frequently you want the backup job to run, and then in the Start time box, specify a time when you want the backup to run, and then click OK.
On the Set Account Information page that appears, type a user name and password of the user whom you want to run the scheduled backup for, and then click OK.
The backup job that you scheduled appears on the calendar on the Schedule Jobs tab. The scheduled backup job automatically starts at the time and data that you specified.
Close the Backup Utility page.
To back up data by using the Backup Wizard
Click Start, point to All Programs, point to Accessories, point to System Tools, and then click Backup. The Backup or Restore Wizard starts.
Click Advanced Mode.
On the Welcome tab, click Backup Wizard (Advanced). The Backup Wizard starts. Click Next.
Specify what you want to back up, and then click Next.
If you selected Back up selected files, drives, or network data in step 4, expand the drive or folder that contains the items that you want to back up, click to select the check boxes next to the drive, folder, or file that you want to back up, and then click Next.
Specify the backup type, destination, and name in the appropriate boxes, and then click Next.
If a tape drive isn’t connected to your computer, File is the only backup media type that is available in the Select the backup type box.
Review the settings that appear on the Completing the Backup Wizard page. If you want to specify advanced backup options, click Advanced, specify the options that you want, and then click OK.
Restoring data to the server
If a data loss occurs, you can restore your backup data manually or by using the Restore Wizard, which is included in the Backup feature.
To restore selected files from a file or tape
Click Start, point to All Programs, point to Accessories, point to System Tools, and then click Backup. The Backup or Restore Wizard starts.
Click Advanced Mode.
Click the Restore and Manage Media tab.
Click the media that you want to restore, and then click to select the check boxes next to the drives, folders, or files that you want to restore.
In the Restore file to box, specify the location where you want to restore the files by doing one of the following:
If you want to restore the files or folders to the same location in which they were when you backed up the data, click Original location, and then go to step 7.
If you want to restore the files or folders to a new location, click Alternate location.
This option preserves the folder structure of the backed-up data.
If you want to restore the files and folders to a single location, click Single folder.
If you selected Alternate location or Single folder, type the location in which you want the data to be restored, or click Browse and select the location, and then click OK.
On the Tools menu, click Options. Click the Restore tab, specify the restore option that you want, and then click OK.
Click Start Restore.
On the Confirm Restore page that appears, click Advanced if you want to set advanced restore options, and then click OK.
Click OK to start the restore operation.
To restore the system state data (including registry information)
Click Start, point to All Programs, point to Accessories, point to System Tools, and then click Backup. The Backup or Restore Wizard starts.
Click Advanced Mode.
Click the Restore and Manage Media tab.
In the Items to restore box, expand the media that you want to restore, and then click to select the System State check box.
Click to select the check boxes next to any other drives, folders, or files that you want to restore.
In the Restore file to box, specify the location where you want to restore the files by doing one of the following:
- If you want to restore the files or folders to the same location in which they were when you backed up the data, click Original location, and then go to step 8.
- If you want to restore the files or folders to a new location, click Alternate location. This option preserves the folder structure of the backed-up data.
- If you want to restore the files and folders to a single location, click Single folder.
If you do not designate an alternate location for the restored data, the restore operation erases the current system state data and replaces it with the information that you are restoring.
If you selected Alternate location or Single folder, type the location in which you want the data to be restored, or click Browse and select the location.
Click Start Restore.
On the Confirm Restore page that appears, click Advanced if you want to set advanced restore options, and then click OK.
Click OK to start the restore operation.
To restore backed up data by using the Restore Wizard
- Click Start, point to All Programs, point to Accessories, point to System Tools, and then click Backup. The Backup or Restore Wizard starts.
- Click Advanced Mode.
- On the Welcome tab, click Restore Wizard (Advanced). The Restore Wizard starts. Click Next.
- In the Items to restore box, expand the media that you want to restore, click to select the check boxes next to the drives, folders, or files that you want to restore, and then click Next.
- Review the settings that appear on the Completing the Restore Wizard page. If you want to specify advanced backup options, click Advanced, specify the options that you want, and then click OK.
- Click Finish.
Troubleshooting
You can’t back up or restore data
You must be a member of the Administrators group or the Backup Operators group on the local computer to back up or restore data.
You can’t schedule a backup operation
The Task Scheduler service must be running before you can schedule a backup. If the Task Scheduler service isn’t already running, follow these steps to start it:
- Click Start, and then click Run.
- In the Open box, type cmd, and then click OK.
- At the command prompt, type net start schedule, and then press ENTER.
—>


