Kali Linux для начинающих

14 декабря будет запущена новая «Test lab» — лаборатория тестирования на проникновение, имитирующая работу реальной корпоративной сети, в которой каждый желающий сможет проверить свои навыки тестирования на проникновение. Поскольку порог вхождения для выполнения всех заданий лаборатории достаточно высокий, мы решили выпустить небольшой гайд для начинающих по работе с Kali Linux 2018.4 — одним из самых популярных пентест-дистрибутивов, разработанного как преемник BackTrack и основного на Debian.
Причина популярности простая – довольно дружелюбный интерфейс и наличие необходимых инструментов для пентеста “из коробки”. Инструменты распределены по категориям, что очень удобно. Имеются варианты установки на АРМ, например, Raspberry Pi 3, а также на мобильные платформы под управлением Android. Я сейчас говорю про Kali NetHunter – тот же Kali, который практически без изменений устанавливается поверх Android и работающий внутри chroot-окружения.
Получаем токен, используя SQLi
По легенде у нас есть некий хост test.lab. Наша задача — определить уязвимости и выполнить их эксплуатацию.
Начнем с разведки — выполним сканирование портов: nmap -v test.lab

Сканирование в режиме по умолчанию результатов не дало, произведем сканирование всех портов: nmap -v -p 1-65535 192.168.60.13
На порту 9447 доступно веб-приложение:
Используя инструмент nikto, определим, что вероятнее всего используется CMS WordPress:
nikto -host test.lab:9447
Проверим приложение, используя WPScan: wpscan —url http://test.lab:9447
Нам удалось обнаружить плагин WP Symposium 15.5.1.Для данной версии имеется уязвимость SQL Injection, и также в выводе представлены ссылки на базы с описанием уязвимости, где мы и будем искать информацию.
Мы нашли способ эксплуатировать уязвимость на www.exploit-db.com/exploits/37824
Теперь нужно проверить ее, подставив этот параметр к нашему url.
Используя Burp Suite, посмотрим, какие запросы приходят при обращении к этому адресу:
Скопируем этот GET запрос в файл и передадим его в sqlmap с параметром -r, добавив ключ уязвимого параметра -p “size” и —dbs для нахождения баз данных.
sqlmap -r qwe -p “size” —dbs
В итоге мы получили несколько баз. Проверим содержимое базы wordpress_test и найденных таблиц:
sqlmap -r qwe -D wordpress_test —table
sqlmap -r qwe -D wordpress_test -T wp_posts —dump
В таблице wp_post в одной из скрытых записей нам удалось найти токен Y@u-wIn. .
Использование Nemeisida WAF не позволит выполнить эксплуатацию подобной уязвимости.
600 доступных инструментов, которые найдут свое применение у любого — от начинающего до профессионала.
Соблюдайте законодательство и до встречи в Test lab v.12.
Источник
Статья Руководство по хакингу с помощью Kali Linux
Хакинг с Kali Linux
Почему Kali Linux?
С Kali Linux хакинг становится гораздо проще, поскольку у вас есть все инструмент (более 300 предустановленных утилит) которые только могут для этого понадобиться. Кроме этого, вы с лёгкостью можете скачать дополнительные программы. Это руководство поможет вам освоиться, и вы сами не заметите, как начнёте заниматься взломом.

Проблема с новичками
Я уже долгое время общаюсь с новичками. Обычно им нужна магия. Простой инструмент, работающий под Windows, который можно скачать, поискав в Google и нажав на первую ссылку, и который всё будет делать автоматически, а пользователю надо только нажать на кнопку. К сожалению, подобных инструментов не существует. Хакинг — это искусство, и на его освоение необходимы многие годы практики. С чего же начать? Не иметь никакого представления о хакинге — это нормально, но вы не можете быть совершенным профаном, у которого просто есть компьютер. Под новичком я понимаю пользователя, не знакомого с программированием и методологиями хакинга, а не человека, которому нужно целое руководство только чтобы скачать инструмент. Если вы хотите быть хакером, то должны усердно трудиться. Итак, как же ступить на этот путь? Если вы уже установили Kali Linux, нажмите сюда, чтобы пропустить параграфы об установке и перейти непосредственно к разделу о хакинге.
Я не собираюсь утомлять вас теорией (как будто это всё не было теорией). Моя цель — как можно скорее довести вас до точки, откуда вы сможете приступить к хакингу с помощью Kali Linux. Так что я просто расскажу, что нужно делать. Процесс довольно прост:
- Если вам неизвестно, что такое Kali Linux, перейдите по этой ссылке и получите начальное представление об этой системе.
- Если вы ещё этого не сделали, откройте страницу загрузок и скачайте ISO файл Kali Linux..
Теперь начнутся настоящие сложности
Если у вас нет опыта работы с Linux, виртуальными машинами и другими подобными вещами, установка и запуск Kali Linux несколько усложнится. У вас есть 2 варианта:
1. Прочитайте официальную документацию Kali
Из неё вы узнаете, что такое виртуальная машина, как запустить ОС с USB-накопителя, а также как создать раздел и установить на компьютер сразу 2 ОС одновременно. Именно это я и рекомендую. Официальную документацию Kali можно найти здесь.
2. Прочитайте мою отредактированную версию документации Kali
Второй вариант — ознакомиться с этими постами, которые представляют собой несколько изменённую версию документации Kali. Это позволит вам сэкономить немного времени, поскольку в официальном тексте содержится много дополнительной информации, которую вам не нужно знать… пока. Даю ссылки на них здесь:
- Установка Kali Linux на жёсткий диск с помощью USB
- Загрузка Kali в качестве второй операционной системы (в дополнение к Windows)
- Подробное пошаговое руководство по установке Kali Linux на VmWare (прим.: пишется)
Интерфейс командной строки
Если вы действительно уверены, что хотите стать хакером, придётся привыкнуть к linux и, в частности, интерфейсу командной строки. Его часто сравнивают с командной строкой Windows, но терминал Linux гораздо лучше и эффективнее. Вам придётся выполнять все обычные задачи в командной строке Linux. Используйте cd для навигации, poweroff для выключения компьютера и так далее.
Материалы этого сайта займут вас на целый месяц, но вы можете продвигаться вперёд постепенно. Первые несколько руководств здесь написаны с учётом того, что читатель не очень хорошо знаком с командной строкой.
Несколько полезных команд:
Если вы не планируете изучать все команды linux, вот несколько полезных вещей, которые помогут вам удержаться на плаву.
- Стандартный логин и пароль — «root» и «toor».
- Введите «poweroff» в терминал, чтобы выключить компьютер.
- Команду «apt-get» можно использовать для установки инструментов и обновлений.
- «apt-get update» и «apt-get upgrade» позволят обновить все программы, установленные на вашей машине.
- «apt-get dist-upgrade» установит последний дистрибутив Kali (то есть обновит вашу ОС).
Примечание: Нажатие кнопки Tab во время печати заставит Kali завершать слова за вас. Двойное нажатие Tab приведёт к отображению всех возможных вариантов окончания незавершённого слова. Ctrl+c останавливает работу любого запущенного инструмента. Нажатие стрелки вверх показывает последнюю введённую команду.
Настоящий хакинг с Kali Linux
Если вы прошли все вышеописанные шаги и научились работать в новой среде, пришло время приступить к реальному хакингу с помощью Kali Linux. Я бы порекомендовал сначала взломать wifi, затем провести тестирование на проникновение, а в свободное время почитать об атаках отказа в обслуживании. Ссылки вы найдёте ниже.
Источник
Ethical hacking and penetration testing
InfoSec, IT, Kali Linux, BlackArch
badKarma: Advanced Network Reconnaissance Assistant
The search for vulnerabilities on a host (the host can be a website, a web server, a network device (router and others), an end-user computer) begins with the Information Gathering. This information includes finding hosts (if we are examining a subnet), scanning their ports for open ones, determining which services are running on these ports, determining the versions of services and finding vulnerabilities for these versions, checking for weak passwords (brute-force), starting additional scans by various tools, depending on the detected network services.
This is usually a fairly typical set of actions, which varies from network services running on the host. Therefore, there are already various automation tools that can scan the IP range of the network and, for example, run brute-force of the found services.
I want to talk about another tool — this is badKarma, Advanced Network Reconnaissance Toolkit.
This program has a graphical interface in which it is enough to click with the mouse — it is not necessary to enter commands (although they can be corrected for fine tuning).
How to install badKarma
Installing badKarma is easy. But the fact is that this is just a graphical shell for running tools. That is, you need to install all the tools that the program uses. Therefore, I recommend working with badKarma in Kali Linux or BlackArch, in which (almost) everything you need is already present.
To install badKarma on Kali Linux, run the following commands:
To install badKarma on BlackArch, run the following commands:
How to use badKarma
Start by entering a target. You can specify the site address, IP address or range of IP addresses:
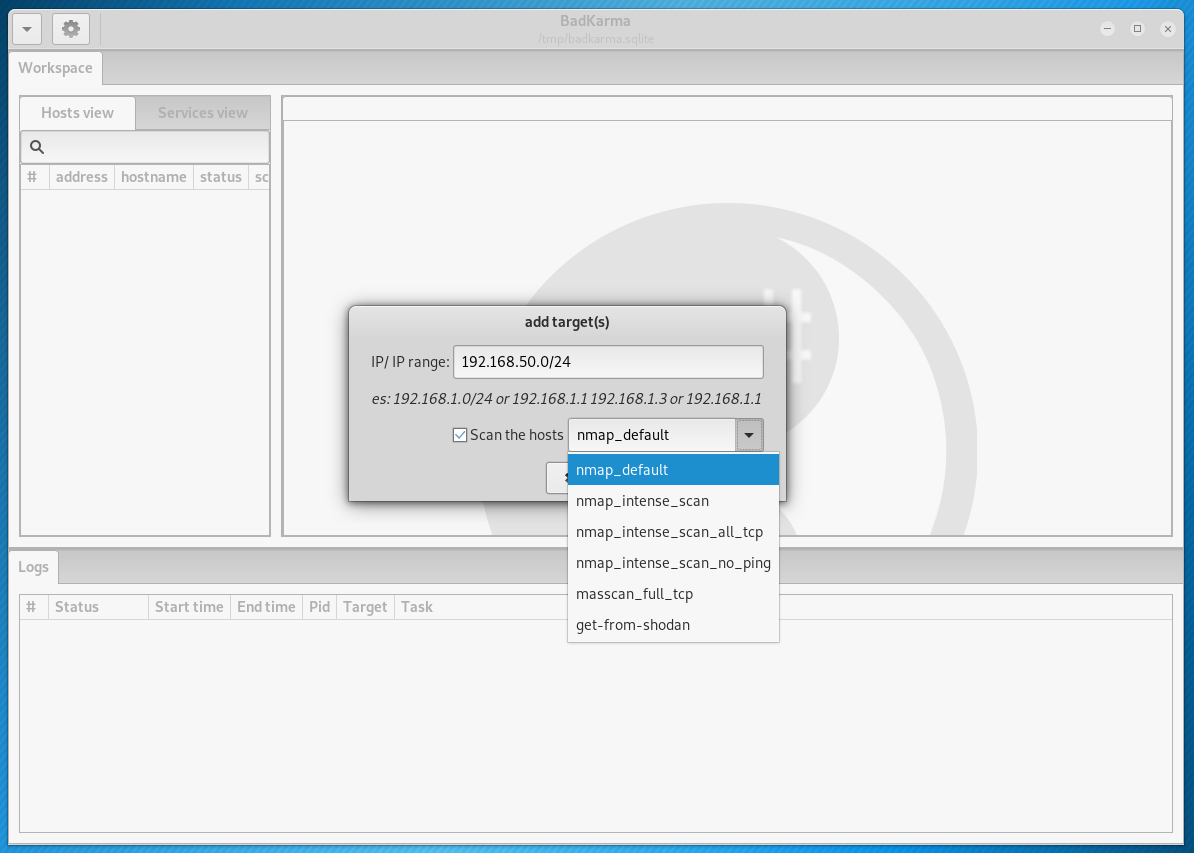
You can also select a scan profile. The following options are available:
- nmap_default — normal scan with Nmap,
- nmap_intense_scan — intensive scanning with Nmap, using -T4 -A -v -oX options
- nmap_intense_scan_all_tcp — intensive scanning of all TCP ports with Nmap, using the -p 1-65535 -T4 -A -v -oX options
- nmap_intense_scan_no_ping — intensive scanning with Nmap without checking if the host is available (without ping), using the -T4 -A -v -Pn -oX options
- masscan_full_tcp — full scan with Masscan, using -p0-65535 —rate 10000 —banner options
- get-from-shodan — do not scan, and get data from shodan. For this to work, you must pre-specify your API key from shodan. In Kali Linux API, the key from shodan needs to be written in the
/bin/badKarma/conf/shodan.conf file. And in BlackArch API, the key from shodan needs to be written in the /usr/share/badkarma/conf/shodan.conf file.
I will add a local network as a goal through which I access the Internet: 192.168.50.0/24
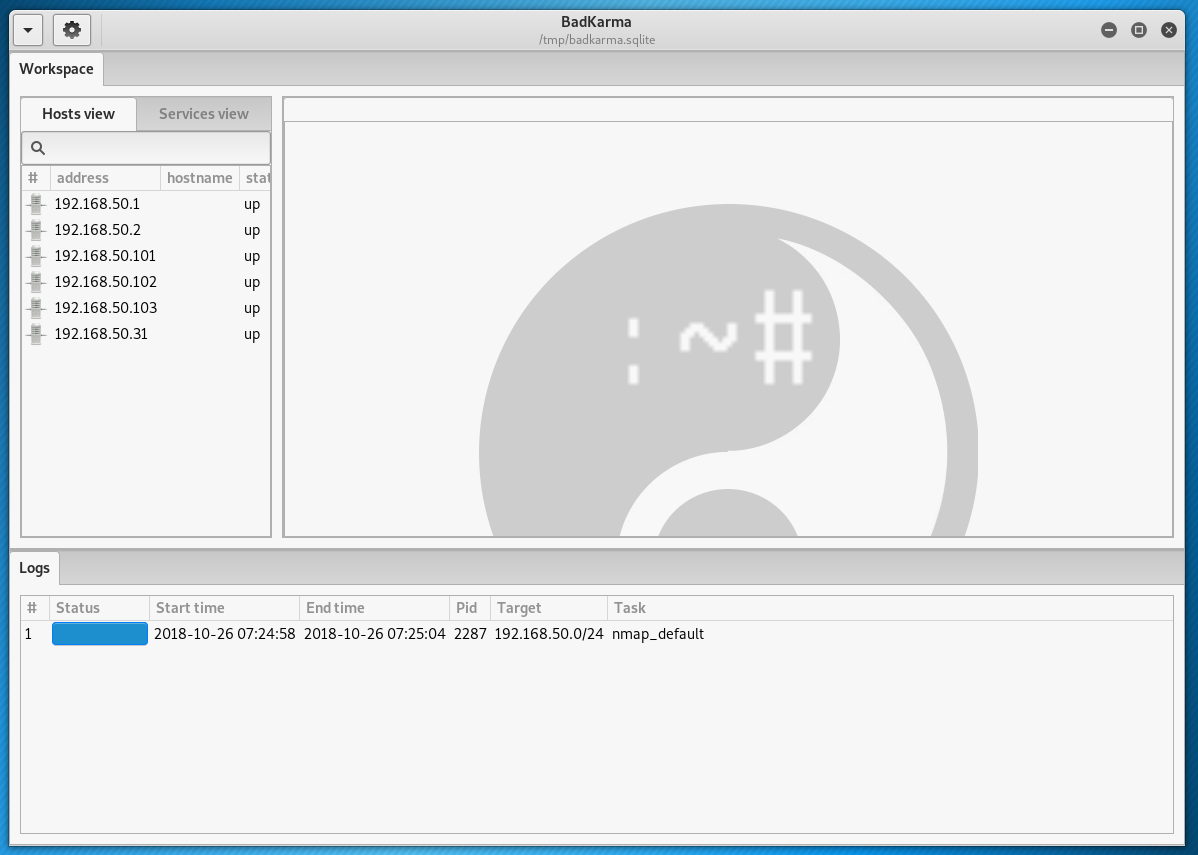
The scan results will be presented in the form of a list of available hosts:
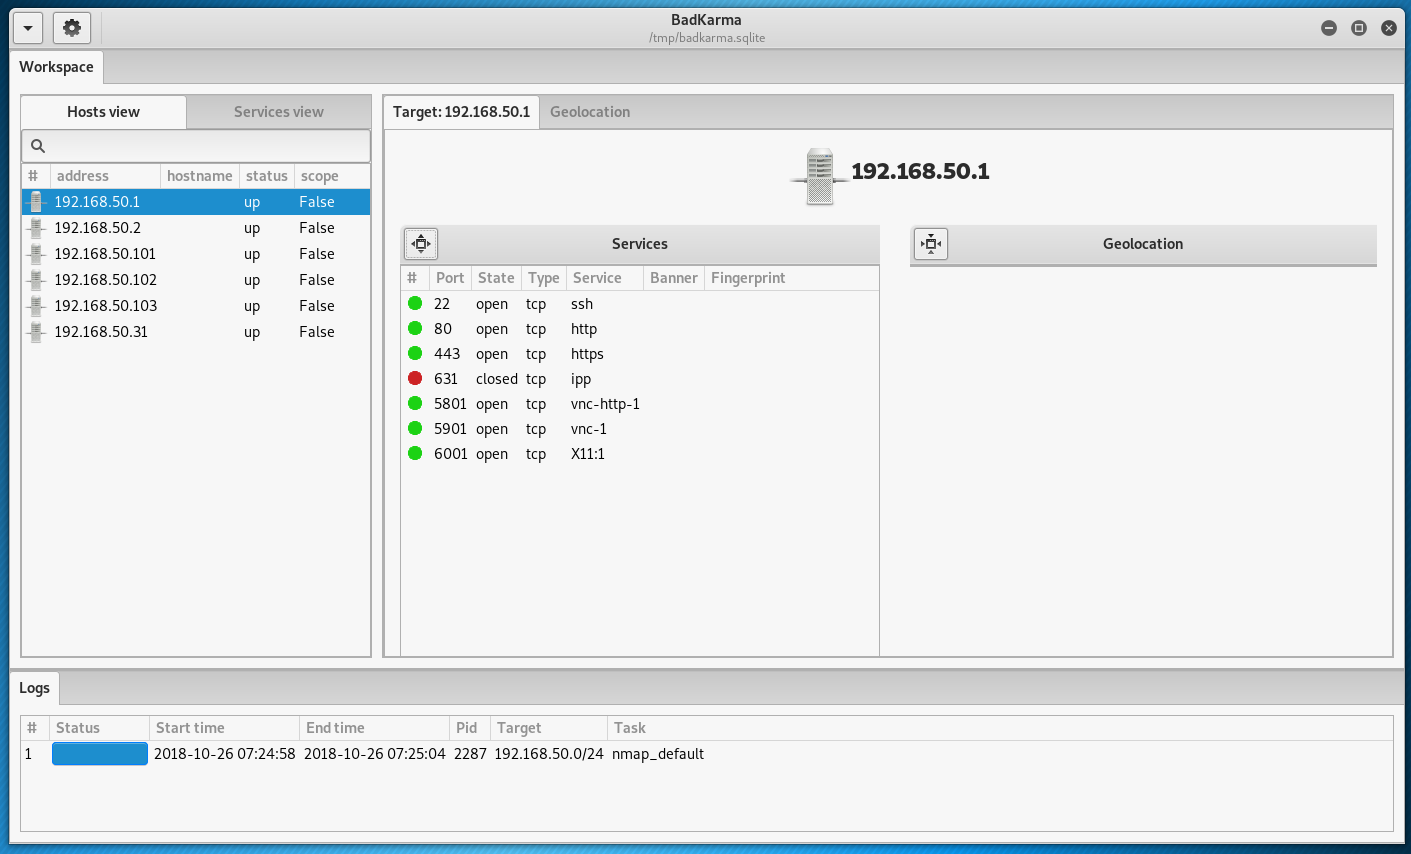
If you click on a host, it will show open ports and running network services:
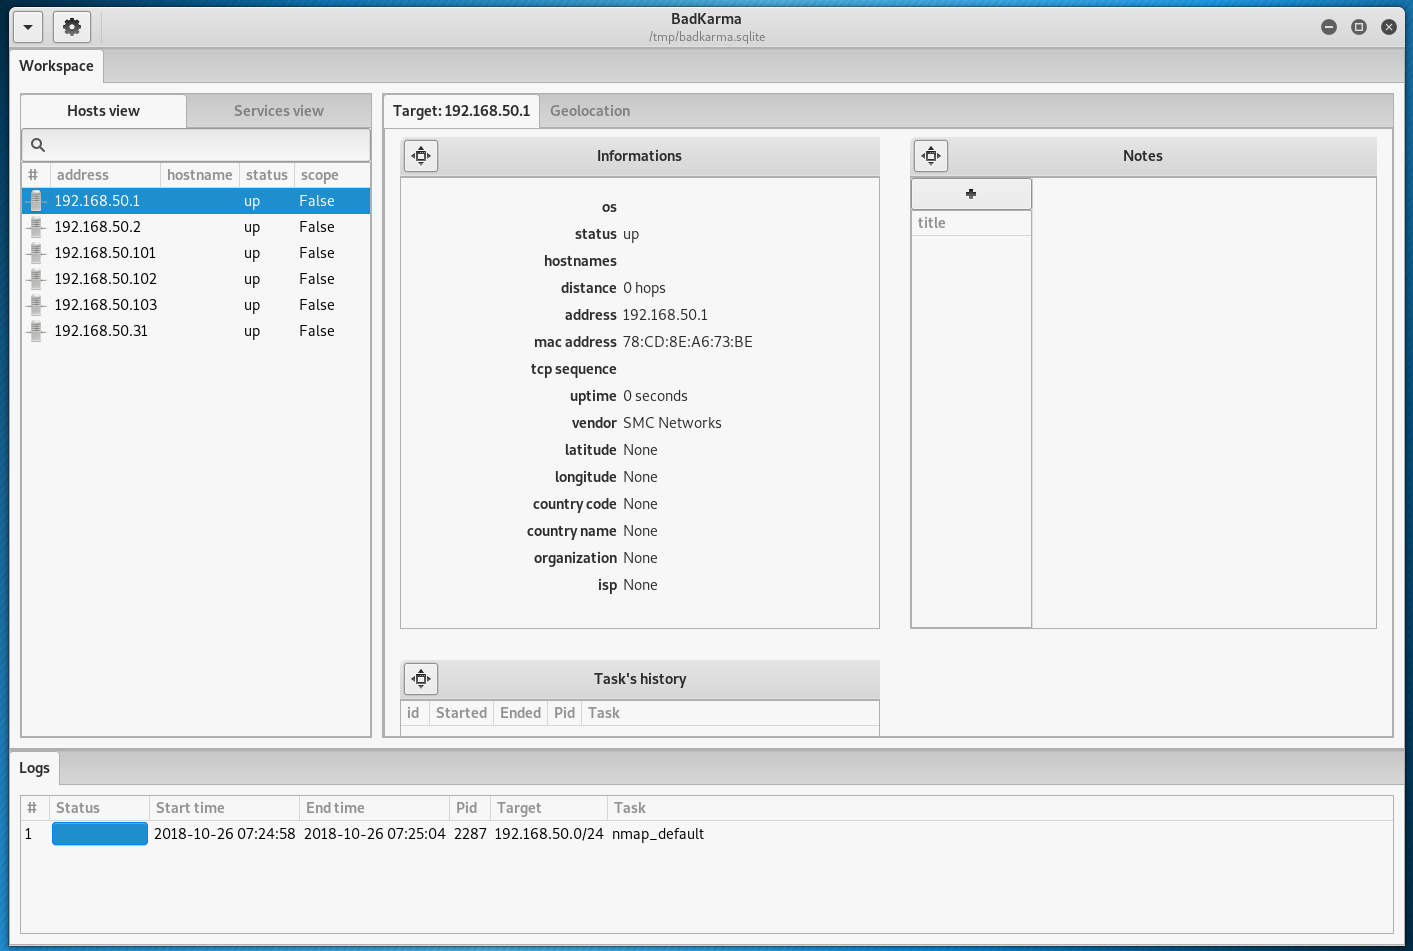
Under the list of running services, there is other additional information (if gathered) about the operating system, location, MAC address, and so on:
Now we have two options: you can continue to explore the host as a whole, or focus on its individual services. To view the available options for working with the host, click on it with the right mouse button:
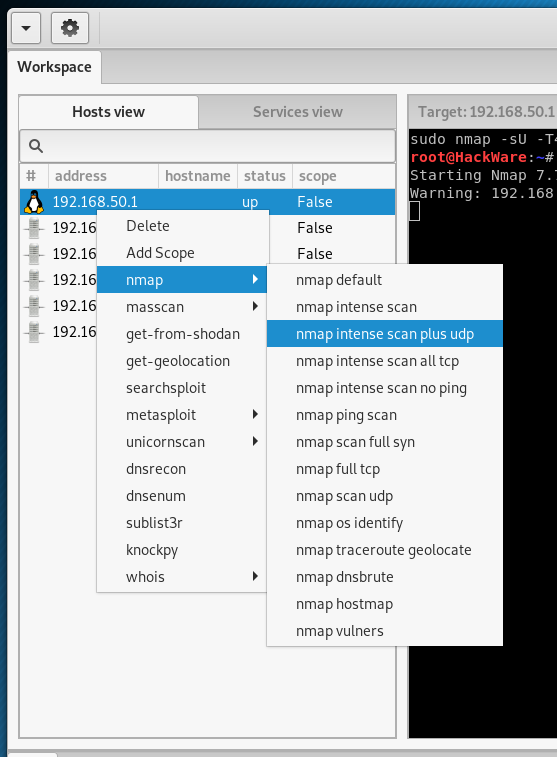
There are various types of scanning available using Nmap, various options for finding subdomains, DNS lookup records and other ways to get information on a host.
By right clicking on the services running on the host, you can see the actions available to them:
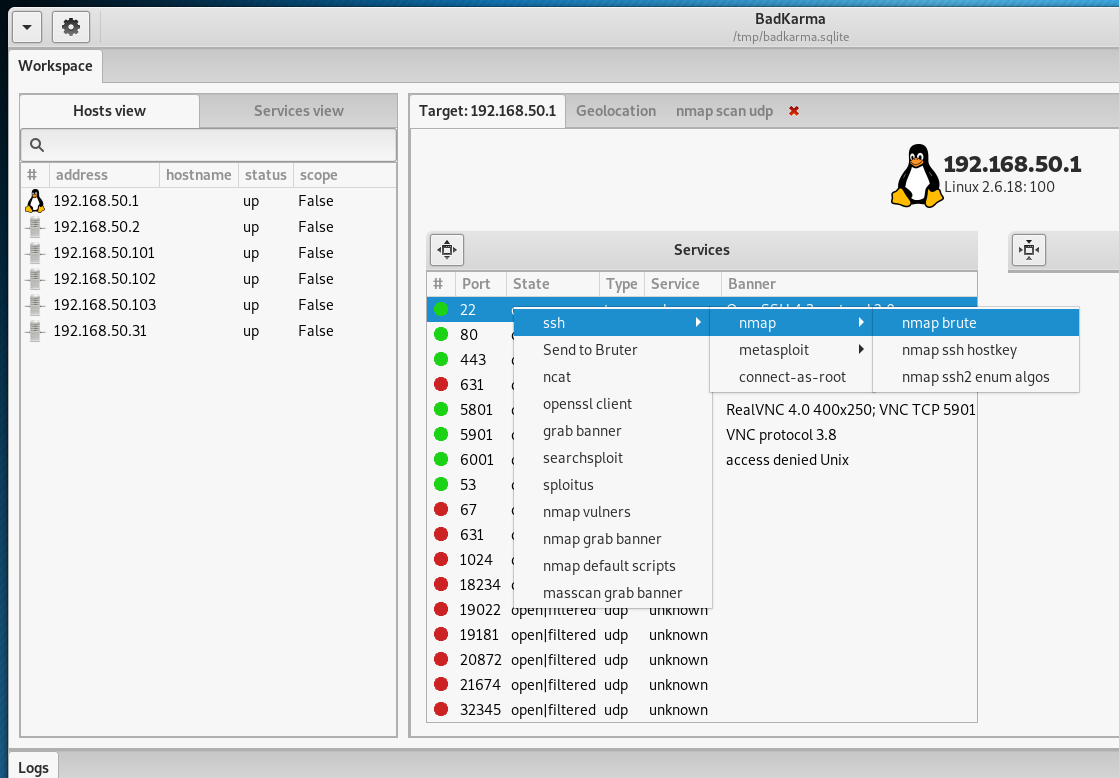
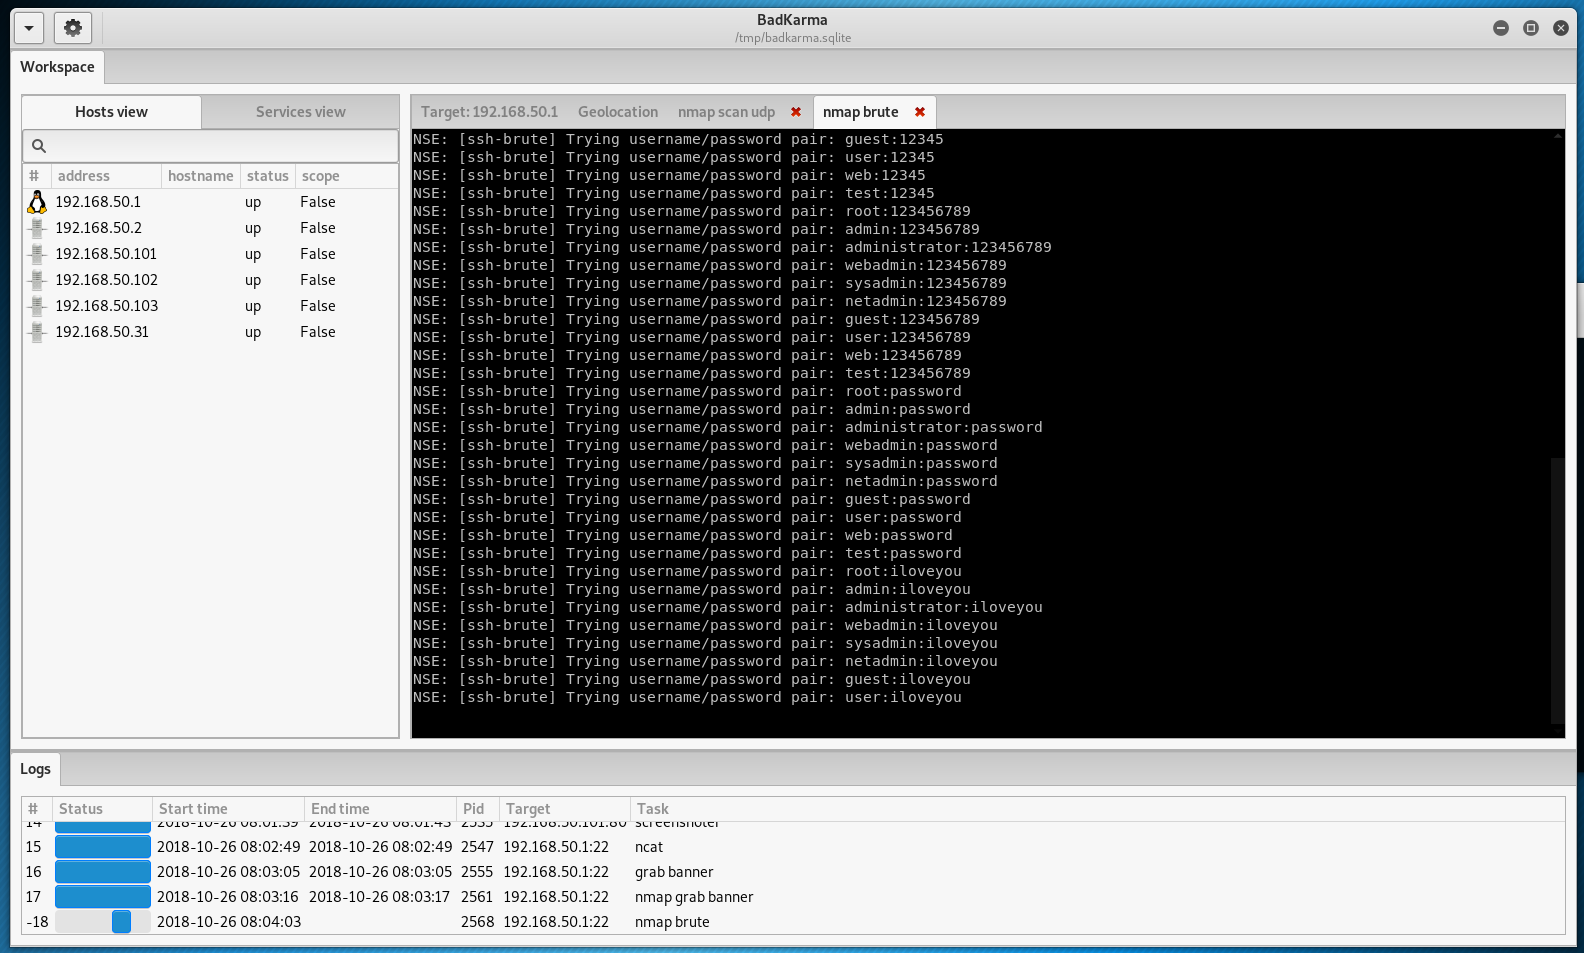
For example, for SSH, you can run brute force:
You can run an exploit search with nmap, searchsploit, or sploitus:
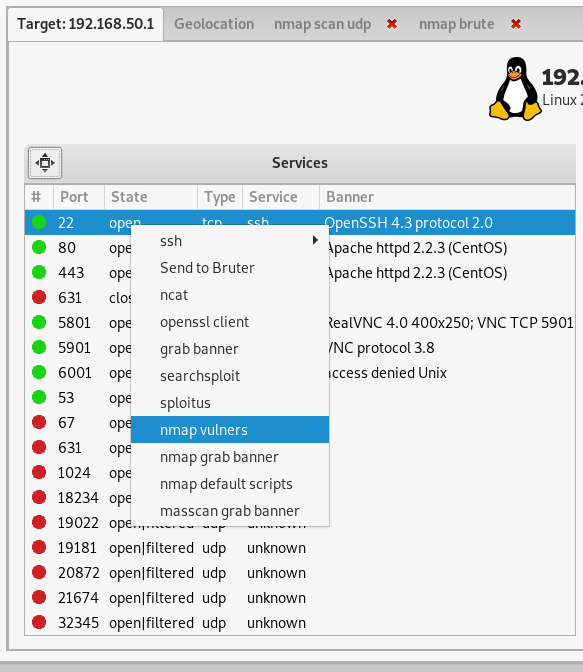
In this case, the exact version number of the service will be determined (if it hasn’t been done before), and exploits will be searched for it in popular databases.


Especially a lot of different options for web services:
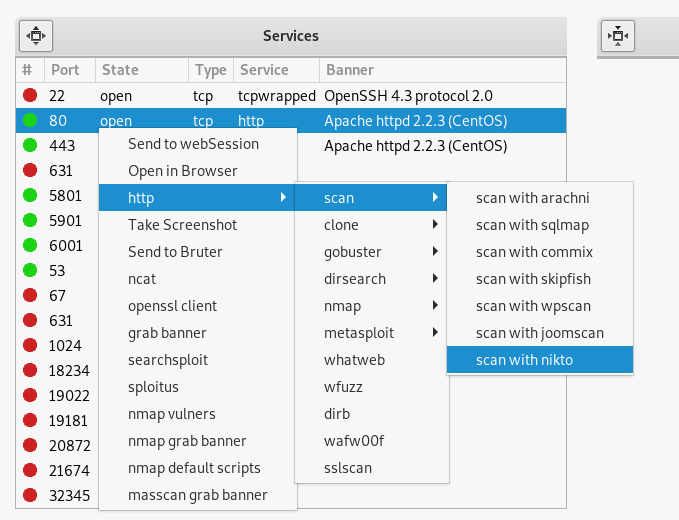
You can take a screenshot, clone a page, perform scanning with popular tools to search for vulnerabilities, run a search for users, hosts, directories, subdomains, etc.
there is a WebSession (works with mitmproxy):

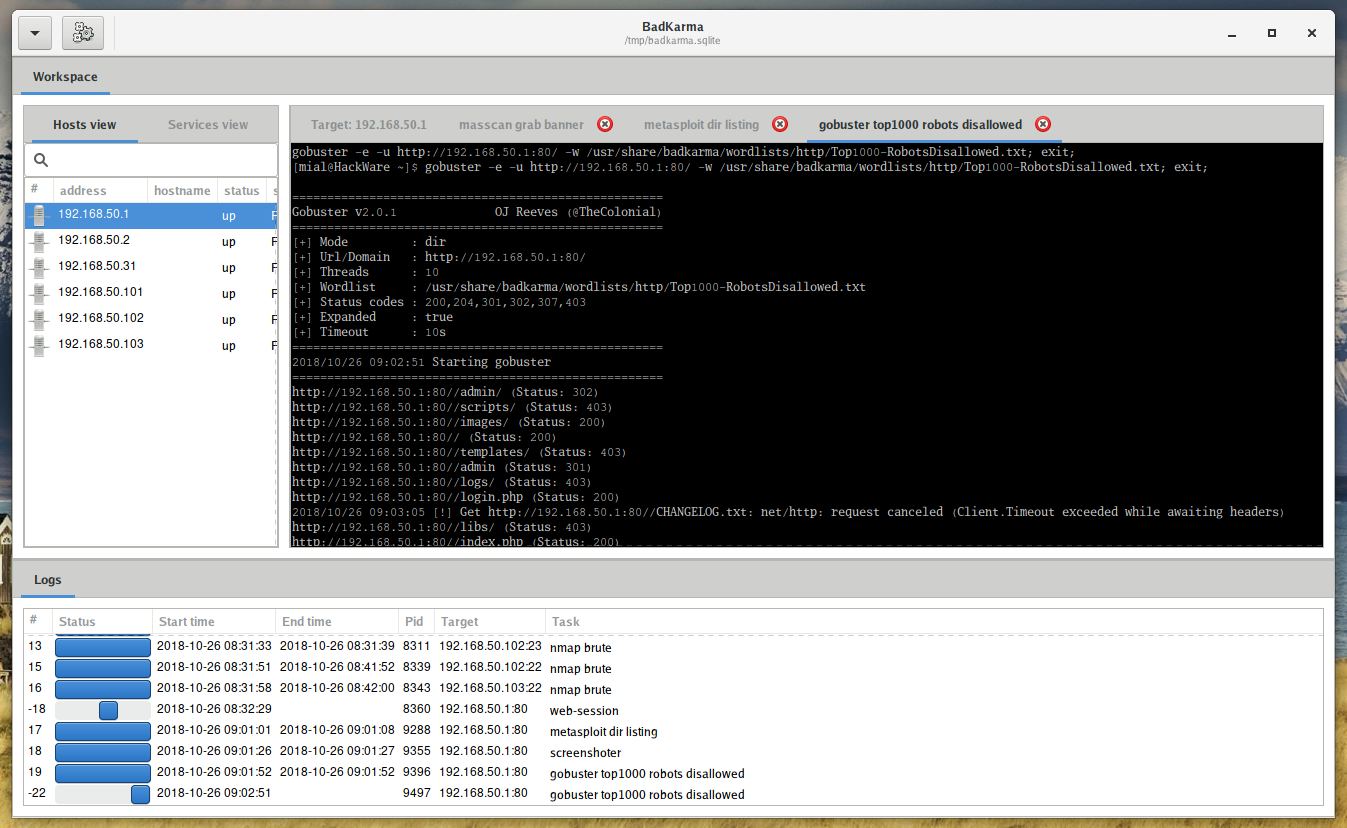
The data received during operation is not only displayed on the screen, but is also stored in the session file /tmp/badkarma.sqlite. If you want to save this file, after completing the work, be sure to copy it to a safe place, since the /tmp folder is automatically cleared every time you restart your computer.
You can also save the project and load a previously saved project.
The Session file is a sqlite database, it contains all the information gained during the activity, real-time updated it can be exported or/and imported from badKarma’s GUI. By default the database is located inside the «/tmp» directory, this means that you have to save it in a different location before rebooting your computer.
Inside the database there are four tables: hosts, ports, activity_log and notes.
You can specify session file while launching the program:
Available optional arguments:
badKarma is modular, the extensions are full-interactive and they allow the penetration tester to tune tasks options, since output is logged under the session file, their output can be exported as a raw txt from the «Logs» tab.
Extensions can be found under the «extension» directory, they are sorted in two categories: importers and workspace. Importers extensions aim to identify tools output files, parse them and import the results into the session file.
Current available workspace’s extensions are:
- Shell: this is the main module of the toolkit since it allow the tester to execute preconfigured shell tasks. Shell commands are located under the «conf» directory.
- Bruter: as the name says, bruter is the brute-force extension. It allow the tester to send a target directly to Hydra and configure the parameters through a GUI. Default hydra parameters can be modified from conf/bruter.conf.
- Screenshot: this extension allow the tester to take screenshots of possible http, rdp, rtsp, vnc and x11 servers, screenshots will be stored in the session file as base64 and can be shown from badKarma.
- WebSession: a fast and ready to use webview in tailing with mitmproxy, it allow to browse a target’s website and read, edit or resend HTTP requests. Some common payloads are available as well, just click on a payload to copy it on the clipboard. Since full dumps are too big to be imported inside the session file, only mitmdump’s default output is imported.
- Browser: just an «open in browser» for http menu item, take it as an example to build your own extensions.
Conclusion
badKarma as a whole is an interesting assistant program, with which you can quickly perform routine actions and keep the results in one place, convenient for visual perception.
The program is under heavy development. In general, most of the functionality works, although some commands were not run due to incorrectly used options, some due to their absence in the system — even in Kali Linux. Some necessary utilities can be installed from standard repositories, but some (for example, dirsearch and WAFW00F) are missing there and you need to install them correctly (so that they are available to call by the program name, and not by specifying the path to the file).
Conveniently, the program centrally stores the results.
As you can understand when working with the program, a set of operations for each service is chosen intellectually, depending on the type of service. If tyour favorite tool is absent in this list, then this is not a problem: badKarma is a modular program and you can add your own module.
Источник


