Troubleshoot problems updating Windows 10
In Windows 10, you decide when and how to get the latest updates to keep your device running smoothly and securely. This article will help you answer questions and troubleshoot common problems with your Windows 10 update.
If you’re looking for info on how to activate Windows 10 or to verify that your installation of Windows 10 is activated, see Activate Windows 10.
Have issues installing Windows updates? Start here.
Your device may not be able to update to the latest version of Windows 10 for a few reasons. The following tips can help you pinpoint the issue affecting your device.
Before you begin, make sure your device is plugged into a power source and connected to the internet. Then, try the steps listed below to get your PC to update.
Some updates require administrator access. If your account doesn’t have administrator access, see Create a local user or administrator account in Windows 10. Or if someone else at home or in your office has an administrator account on your device, try asking them to install the updates.
Before trying any of the solutions below, make sure you back up your personal files. You can use File History to back up your files to another drive, or insert a USB drive and use File Explorer to drag and copy important files to the USB drive. If you’re signing into Windows with a Microsoft account, your system settings will be automatically restored after updating, once you’re connected to the internet.
You can also back up your files with OneDrive. For more info, go to Back up your Documents, Pictures, and Desktop folders with OneDrive.
Make sure that your device has enough space. Your device requires at least 16 GB of free space to upgrade a 32-bit OS, or 20 GB for a 64-bit OS. If your device has a small hard drive, you may need to insert a USB drive to update it.
If your PC is running low on storage, try the techniques at Free up drive space in Windows 10.
Many updates require you to restart your device. Save your work and close all open applications. Then, select Start > Power , and select either Update and restart or Update and shut down.
Even if you have downloaded some updates, there may be more available. After trying the preceding steps, run Windows Update again by selecting Start > Settings > Update & Security > Windows Update > Check for updates. Download and install any new updates.
Remove any external storage devices and drives, docks, and other hardware plugged into your device that aren’t needed for basic functionality. Then try to run updates again and see if this resolved your issue. If it didn’t, continue to the next tip.
If you’ve added hardware to your device, check for third-party driver updates and installation instructions on the hardware manufacturer’s website. Update any drivers, then try to run updates again and see if this resolved your issue. If it didn’t, continue to the next tip.
In the search box on the taskbar, type device manager, then select Device Manager from the list of results.
In the window that appears, look for any device with a yellow exclamation mark next to it. (You may have to select each category to view the list of devices.) Select the device name.
Select Action, and then choose either Update driver or Uninstall to correct the errors.
Common troubleshooting questions
If you are receiving an error message with a specific error code, try running the Windows Update Troubleshooter. If that doesn’t resolve the issue, see Fix Windows Update errors and follow the instructions to help resolve common update issues.
The time required to download and install updates depends on connection speed, network settings, and the size of the update. If the installation remains stuck at the same percentage, try checking for updates again or running the Windows Update Troubleshooter.
To check for updates, select Start > Settings > Update & Security > Windows Update > Check for updates.
To get help, in the search box on the task bar, type get help, then select Get Help from the list of results. To leave feedback if you run into further problems, in the search box on the taskbar, type feedback hub, then select Feedback Hub from the list of results.
Windows 10 is the most secure Windows ever, and we recommend you stay updated to protect your PC from security risks and to keep it running smoothly. However, you can temporarily pause updates as well as schedule a restart to install updates at a time that’s convenient for you.
Learn how to temporarily pause updates
Find out how to schedule a restart to install updates at a convenient time
You will only receive a notification when it’s time to restart your computer to apply the installed updates.
If you need to know where you left off in your work after an update, use Timeline to jump back in.
To get started with Timeline, select Task View on the taskbar, or press the Windows logo key +Tab and select the activity you want to resume.
Monthly quality updates on Windows 10 are quite small and have a minimal impact on data usage. Feature updates typically happen twice per year, and you can control when to install them. They require more data but are less frequent.
If you’re on a metered connection, some updates for Windows won’t be installed automatically. Metered connections in Windows 10
Your computer might be slow for a number of reasons, but updating to the latest version of Windows 10 can improve its performance. For help with a slow computer, see Tips to improve PC performance in Windows 10.
If you’re having trouble finding your files after an upgrade, see Find lost files after the upgrade to Windows 10 for other things to try.
Warning: Microsoft only recommends trying the procedures in this section if you’re comfortable working in the command line. These procedures require administrator permissions on your device.
In the search box on the taskbar, type command prompt, then select Run as administrator from the list of options. Select Yes. Next, in the window that appears, type the following commands one at a time, including the spaces as shown. After you type each command, press Enter. Then let each command complete before you type the next command.
net stop wuauserv
ren %systemroot%\softwaredistribution softwaredistribution.bak
ren %systemroot%\system32\catroot2 catroot2.bak
net start wuauserv
After all these commands are completed, close the Command Prompt window and restart your computer.
In some instances, third-party antivirus or security software can cause errors when you try to update to the latest version of Windows 10. You can temporarily uninstall this software, update your PC, and then reinstall the software after your device is up to date. We recommend using third-party antivirus or security software that’s compatible with the latest version of Windows 10. You can check compatibility by visiting the software manufacturer’s website.
Note: Before uninstalling software, make sure you know how to reinstall your programs and that you have any necessary product keys.
In the search box on the taskbar, type command prompt, and then select Run as administrator from the list of options. Select Yes. In the window that appears, type the following command, including the space as shown:
chkdsk/f C:
and then press Enter. Repairs will automatically start on your hard drive, and you’ll be asked to restart your device.
A clean restart starts Windows with a minimal set of drivers and startup programs. This helps eliminate software conflicts that occur when you install a program or an update that may cause issues updating your PC.
Learn how to do a clean restart
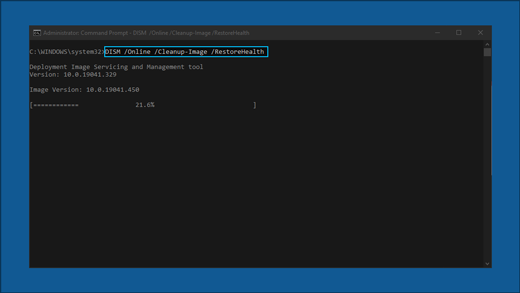
In the search box on the taskbar, type command prompt, then select Run as administrator from the list of options.
In the window that appears, type this command including spaces as shown:
DISM.exe /Online /Cleanup-image /Restorehealth
Press Enter. When the command operation has run successfully, you’ll see a confirmation message from Command Prompt that says, “The restore operation completed successfully” or “The operation completed successfully”.
Note: If you don’t see a confirmation message, retype the command and try again.
Next, type this command, including the space as shown:
sfc /scannow
Press Enter. Wait until the sfc scan verification reaches 100% completion, and then close Command Prompt.
Try running the Windows Update again.
Go to the software download page and select Download tool now to download the clean installation tool. Make sure to carefully read the notes on the software download page before using the tool.
Still stuck?
Contact Microsoft support if you continue to have problems with your Windows updates.
Making Windows 10 prompt before updating
Every now and again my PC just stops working. In the middle of a cycle, no matter what I’m asking it to do, it just stops. Dead. And it seems the only way to get it going again is to hard boot it. And EVERY time, guess what: it’s doing a Windows update. So OK, I go to change the settings to make it ask me for a «go» before it does that. But I can’t find that option. So I go to the MS support site. No mention of this issue. Can’t find it anywhere. That seems odd. So I go to Google, and there it’s all over the place. Thousands of people are apparently very ticked off that Microsoft has decided they know best when to do updates.
OK community: I have Windows 10 Pro on a Surface Book. How do I prevent Windows Update from automatically crashing my machine when I’m in the middle of a project?
Replies (6)
![]()
Though updates are being downloaded and installed automatically in Windows 10, you can still set it to notify you when to download and install Windows updates. Before you proceed, please make sure to create a back up of your files for security purposes.
You can follow the steps below to disable automatic updates in Windows 10:
- Use the Windows key + R keyboard shortcut to open the Run command.
- Type regedit, and click OK to open the Registry.
- Browse the following path: HKEY_LOCAL_MACHINE\SOFTWARE\Policies\Microsoft\Windows.
- Right-click the Windows (folder) key, select New, and then click Key.
- Name the new key WindowsUpdate and press Enter.
- Right-click the newly created key, select New, and click Key.
- Name the new key AU and press Enter.
- Inside the newly created key, right-click on the right side, select New, and click on DWORD(32-bit) Value.
- Name the new key AUOptions and press Enter.
- Double-click the newly created key and change its value to 2.
- Click OK.
- Close the Registry to complete the task.
Should you have further questions, please let us know.
Before Upgrade My Windows 7 PC to Windows 10, What Should I Prepare?
I want to upgrade my Windows 7 PC to Windows 10, but with the long time I have used my PC, there are many important data on it, and I don’t want the data lost after upgrading. What preparations should I do before I upgrade my PC to Windows 10?
Here are the several things I need to do:
1. Update the Windows on my computer to the newest
Go to the Windows Update screen: Control Panel >> System and Security >> Windows Update >> Install updates
If the updates have been downloaded, click on the «Install updates» button to start the updates.
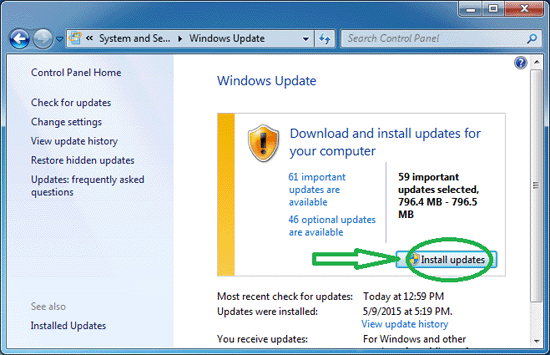
After the two important updates, «Update for Windows 7 for x64-based System (KB3035583)» and «Microsoft.NET Framework 4.5.2 for Windows 7 x64-based Systems (KB2901983)», I finally got the «Get Windows 10» icon.
Tips: You may need to update several times before the «Get Windows 10» icon appears on the bottom-right corner.
2. Check for my PC if it meets the system requirements
2.1 After the windows update, the Windows 10 icon can be seen on the bottom-right corner.
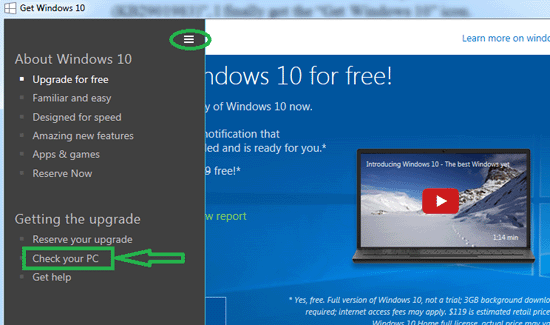
2.2 Click on the Windows icon to start the «Get Windows 10» app.
2.3 Click on the Menu icon on the top-left, click on «Check your PC».
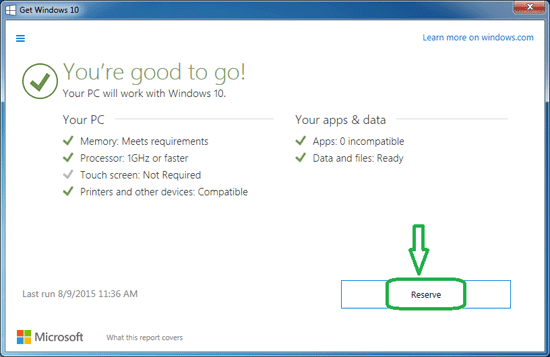
2.4 If everything is good, you will get the green message «You are good to go! Your PC will work with Windows 10».
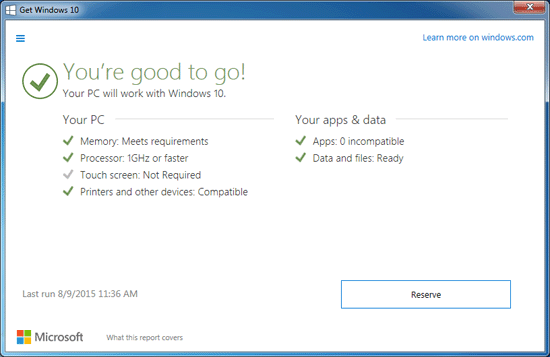
2.5 And then you can click on the «Reserve» button to freely get the Widows 10 upgrade reservation.
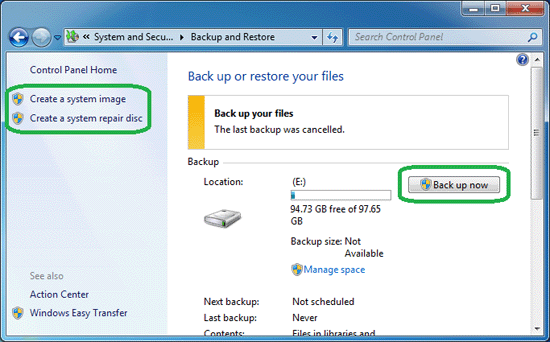
3. Back up my System
In case the upgrade process broken, or the Windows 10 is not perform as well as I expect, I would roll back to my Windows 7 system with the backup on my computer.
If you have enough space to save the backup, you can create a system image or create a system repair disc, if not create a system restore point.
Go to the backup screen: Control Panel >> System and Security >> Backup and Restore
You can choose «Create a system image» or «Create a system repair disc» on the right side.
You also can click on «Back up now» button to create a restore point.
For more information, get to this article: How to back up Windows 7 or 8 system.
4. Back up and save the important data
If you have some data that you really don’t want to lost, save them to the cloud (Google Drive, One Drive, or Drop box), besides on your computer local disk.

Documents for work, that is very important for you.
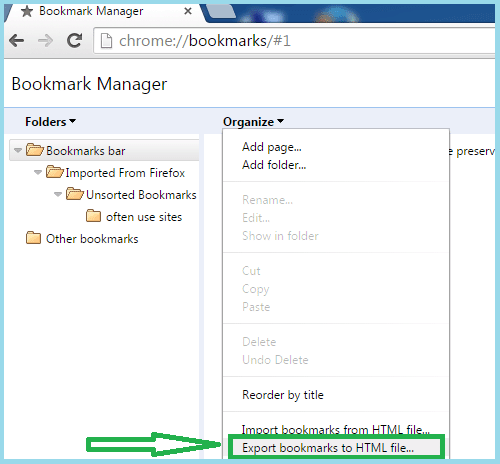
Bookmarks for your favorites websites, you can export them to a html file.
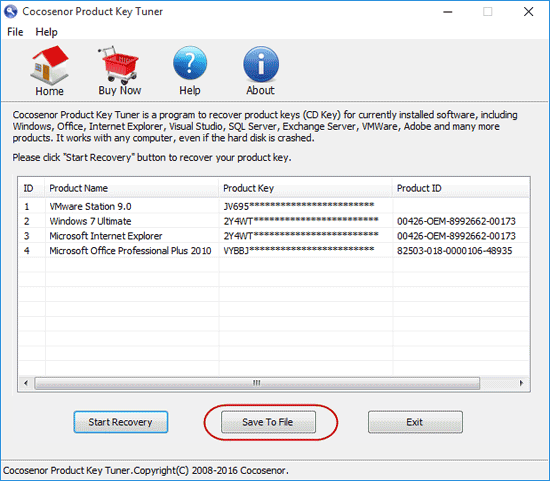
Product keys for my Windows 7, Office 2013, or other software, need to be found out and saved. Cocosenor Product Key Tuner is a powerful product key recovery tool to find back Product Keys, CD keys and serial numbers for Windows, Office, Adobe, MS SQL Server and other software. It can help you to find out the product keys and save to a file.
5. Update device drivers
If the driver is incompatible for windows 10, the upgrade process would be fail, so, it is necessary to update the device drivers before upgrade my Windows 7 PC to Windows 10.
6. Disconnect the unnecessary external device
It would be a good idea to disconnect the external device that would interrupt or effect the installation when you are upgrading to Windows 10.


