- Things You Need to Do Before and After Installing Windows
- Before Re-installing Windows
- 1. Back Up Files, Application Settings, and Configurations
- 2. Make Sure You Have All the Product Keys
- 3. Download Drivers
- 4. Make a List of All Installed Programs
- 5. Make Sure You Have Up-to-Date Installation Media
- After Re-installing Windows
- 1. Install Device Drivers
- 2. Update Windows
- 3. Download and Install All Your Software
- 4. Configure Windows and Application Settings
- 5. Create a Backup Image for Future Use
- 5 comments
- Popular Posts
- How to Reinstall Windows 10 without Losing Data (3 Ways)?
- Case: Reinstall Windows 10 without losing data
- How does reinstalling Windows 10 work, will it erase your data?
- Method 1: Repair install Windows 10 without losing any dataВ
- Method 2: Fresh install Windows 10 without losing personal files
- Method 3: Clean install Windows 10 without losing data
- Reinstall Windows 10 isn’t always a perfect solution
- Backup system in case you need to restore Windows 10 without data loss
- Wrapping things up
Things You Need to Do Before and After Installing Windows

When your computer is not behaving as it should, re-installing Windows is sometimes the only way to go. Just insert the installation media and follow the wizard. That being said, the problem starts after installing Windows. For instance, you cannot connect to the Internet due to driver issues or you forget to install some applications, lose application settings and configurations, etc. If you have a plan beforehand, the reinstallation procedure will be much smoother.
Before Re-installing Windows
Here are some simple things you need to do before reinstalling Windows.
1. Back Up Files, Application Settings, and Configurations
This is the first thing you need to do when considering a re-installation. Skim through your C: drive and back up any personal files like images, videos, and documents. Especially, look in general folders like Desktop, Documents, Pictures, Downloads, etc.
After that you need to back up the settings and other data of your favorite applications. For instance, if you are using the Thunderbird email client, you can back up the profile folder. This helps you restore the Thunderbird application without manually adding all the email accounts again. Each application has its own way to export settings and configurations, so take your time and back up those settings. Since you can easily import those settings and configurations with just a few clicks, it helps you save a ton of time after re-installing Windows.
2. Make Sure You Have All the Product Keys
To activate some premium software like Windows, Office, etc., you need to have product keys. It is a good idea to have those products keys beforehand. This lets you activate the software as soon as you install it. You can use free software tools like ProduKey or Belarc Advisor to quickly find and copy the product keys of different software. One thing to keep in mind is that you might not get the product keys of all your premium software. If you find that the you are missing a product key for premium software, you can try to recover it from your email inbox or simply contact the developer.
3. Download Drivers
Device drivers are a big issue for Windows systems. Though Windows 10 tries to install generic drivers automatically, it is good to have all the required drivers beforehand, especially video and network drivers. Head to your laptop or motherboard manufacturer website and download their latest drivers. The drivers contained in the CD/DVD you get when you buy the laptop or motherboard are usually outdated and may sometimes cause unnecessary problems.
4. Make a List of All Installed Programs
This is one of the most overlooked parts, but it always helps to make a list of all the software installed on your system. Besides the installed software, also note down any portable software you are using.

5. Make Sure You Have Up-to-Date Installation Media
Unlike Windows 7, Microsoft is updating Windows 10 twice every year. So before you proceed to reinstall, make sure you have the up-to-date installation media. If you are unsure, you can download the latest ISO from the official Microsoft website and create a bootable USB drive.
After Re-installing Windows
1. Install Device Drivers
The first thing to do after installing Windows is to install all the drivers you downloaded earlier. This will ensure that all the hardware devices work properly and that you can connect to the Internet.

2. Update Windows
After installing hardware drivers, you need to install Windows updates. More often than not these updates contain bug fixes, security patches, and feature updates. To update a Windows 10 machine, open the Settings app by pressing the keyboard shortcut “Win + I,” navigate to “Update and Security -> Windows Update” and click on the “Check for updates” button.

3. Download and Install All Your Software
Next, download and install all the required software. Use the list you created earlier to make sure that you are installing all your favorite applications. For general purpose software like browsers, media players, image viewers, etc., use Ninite. This free software automates everything and installs common software with just a single click.

4. Configure Windows and Application Settings
After installing all the required software, it is time to configure the Windows settings. When I say Windows settings, I’m talking about common settings like unhiding file extensions, disabling unwanted startup items, setting up Windows Hello, changing default apps, etc.

Restore all the backed-up application settings one by one. Every app has its own way to import the settings and configurations. For instance, to restore Thunderbird all you have to do is copy the profile folder to the “AppData” folder and you are done.
5. Create a Backup Image for Future Use
This step is optional. However, creating a backup image after installing and configuring your system is always the best thing to do. This backup image lets you quickly restore Windows if anything bad happens in the future. Of course, you still have to update Windows and other software after restoring Windows, but that is much better than actually re-installing and going through the whole process.

Do comment below sharing your thoughts and experiences about re-installing Windows.
Vamsi is a tech and WordPress geek who enjoys writing how-to guides and messing with his computer and software in general. When not writing for MTE, he writes for he shares tips, tricks, and lifehacks on his own blog Stugon.
5 comments
Fantastic guide! Thank you!
Before: Are you going to completely flush your data and format the drives (to get rid of malware)?
Scan your system and all files for viruses and malware. You don’t want to go to all this effort and time, just to move bad stuff right back onto your fresh installation.
Backup wanted downloads, music, videos (and what else. ), browser favorites, email contacts and passwords. Have the product keys, logons and (router!) passwords on paper and drivers and basic system protection (anti-malware) application on thumb drive.
Check router for security updates.
Think of privacy and security settings that you want to set during installation, like account email logon. Do you want a private new account?
Test your installation and backup media BEFORE you wipe it out!
Before installing Windows check your sanity, after installing Windows just remove it. “joke”
Before installing Windows: Think twice.
After installing Windows: Uninstall Windows, install Linux.
That’s the right way of repairing a defective or broken windows installation.
Comments are closed.
Popular Posts

6 Ways to Check Hard Disk Health on Windows 10

8 Ways to Quickly Turn Off Your Screen in Windows 10

Latest Windows 10 Update Problems and How to Fix Them

13 Cool 4K Desktop Backgrounds for Windows 10

5 of the Best Ebook Readers for Windows 10

How to Remove Old and Useless Drivers in Windows 10

5 Lightweight Browsers for Windows 10

Find and Open Files Using Command Prompt in Windows 10

How to Increase the Maximum Volume in Windows 10

How to Fix Webcam or Camera Not Working in Windows 10
Affiliate Disclosure: Make Tech Easier may earn commission on products purchased through our links, which supports the work we do for our readers.
How to Reinstall Windows 10 without Losing Data (3 Ways)?
Sometimes, you may need to reinstall Windows 10 to solve system issues. This guide will show you how to reinstall Windows 10 without losing data step by step.

By AOMEI  / Last Updated March 2, 2021
Case: Reinstall Windows 10 without losing data
Hi there. I have an issue with my laptop and I was told to resolve that issue, I’d need to reinstall Windows 10. I don’t recall where I put my CD, but I have my product key. My question is, if I reinstall Windows 10, will it delete the data on my laptop or do I have to back it all up into a hard drive?»
How does reinstalling Windows 10 work, will it erase your data?
When you’ve tried many solutions to fix system errors and none of them actually works, it may be the time to reinstall Windows 10 and get all problems sorted out. But does this process delete your important data? Can you reinstall Windows 10 without any data loss?
Well, it depends on the approach you take:
By using Repair Install, you can choose to reinstall Windows 10 while keeping all personal files, apps and settings, keeping personal files only, or keeping nothing.
By using Reset This PC, you can do a fresh install to reset Windows 10 and keep personal files, or remove everything.
By using installation disk to perform a clean install, your data won’t be delete, but will be moved to Windows.old folder in the root directory of C: drive after installing.
In short, you definitely can, and have different methods to reinstall Windows 10 without losing data.В
If you are pretty sure that all your files and applications are in good conditions and have no thing to do with the problem you are facing, then you can choose a way to reinstall Windows 10 without losing files and programs.В
To do that, Windows will scan your C: drive and place all your personal data aside. And when the installation is complete, Windows will put these files and settings back.
If you are using a genuine Windows 10, Windows 10 will automatically get activated after the reinstallation.
Quick navigation for Windows 10 reinstallation:
Method 1: Repair install Windows 10 without losing any dataВ
If your Windows 10 can boot and you believe all the installed programs are fine, then you can use this method to reinstall Windows 10 without losing files and programs. If one or more of your program are damaged, you’d better keep personal files only.
1. Download the latest Windows 10 installation ISO file. You can also use Windows Media Creation tool to create an installation ISO.
2. Double click to mount the ISO file (for Windows 7, you need to use other tools to mount it). At the root directory, double-click to run the Setup.exe file.

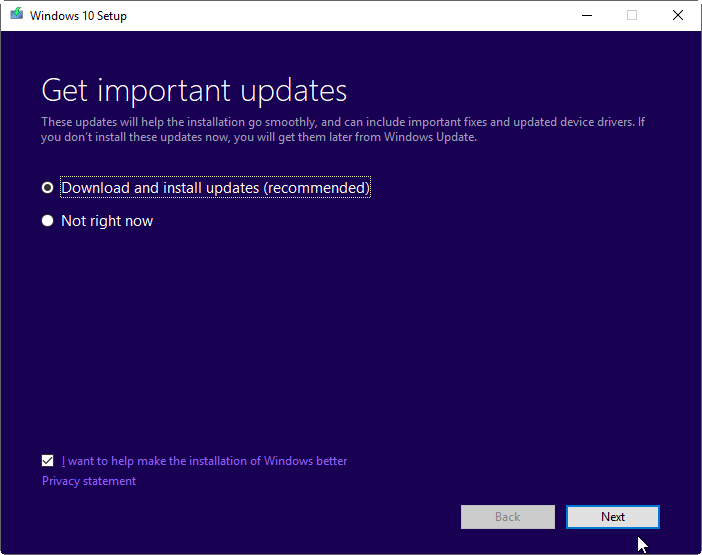
3. When the Windows 10 Setup is ready, you can whether to download updates or not based on your needs.
4. In the screen, click «Change what to keep«.
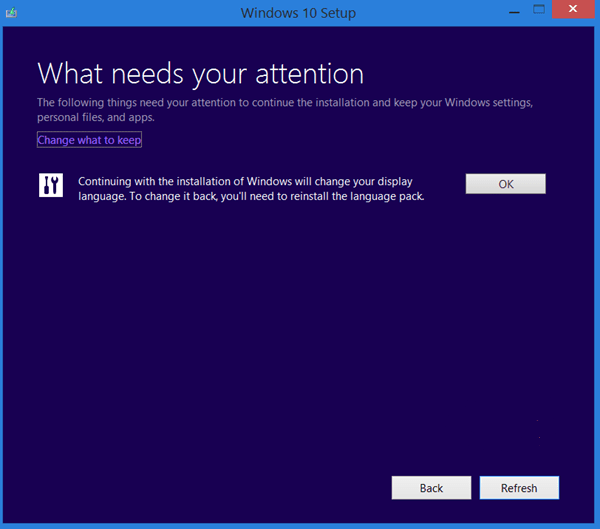
5. From there. You can select «Keep personal files, apps, and Windows settings» or «Keep personal files only«.

6. Click Next to install Windows 10.
This may take a while because it will spend extra time scanning your hard drive and moving files. If you just want to keep your files where they are, then try the next method.
Method 2: Fresh install Windows 10 without losing personal files
Windows 10 provides the feature «Reset this PC» to help you solve system problems by reinstalling Windows 10. During the process, you can choose whether to keep your personal files or not.
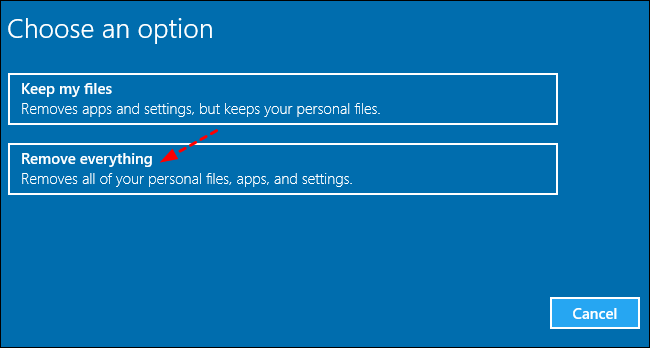
To use the feature, you can go to Settings > Update&Security > Recovery > Reset this PC, then you will have two options, «Keep my files» and «Remove everything«, select one of them and follow the on-screen instruction.
You can also reset Windows 10 from command line. The process are shown below:
1. Type “cmd” in the search box and press Enter.
2. In the listed results, right click on the Command Prompt and select «Run as Administrator«.
3. Type “systemreset” (without quotes) in the command prompt window and press Enter. If you need to reinstall Windows 10 and install new updates, you can run command “systemreset -cleanpc”.

If your system cannot boot, you can boot into recovery mode and from there, you can reset your PC. You can boot your PC from a recovery drive to reset your Windows 10.
Method 3: Clean install Windows 10 without losing data
If you prefer installing Windows 10 without losing data from USB drive or installation disc, you can choose to upgrade Windows 10 using this method. Before you do, you need to make sure your C: drive has more than 16GB of free space.
1. Insert your installation disc and boot from it. If you do not have one, you can download the Windows Media Creation tool to create one.
2. When it loads, select the language and keyboard, then click «Next«.
3. Click «Install Now«.
4. Type your product key or skip it.
5. Select the installation type «Custom«.
6. At the following screen, just select the C: drive and click Next to proceed. Then, wait patiently until the installation complete 100%.

As long as you do not format the C: drive in the Setup, you will not lose your data, but they are moved to another location. After the installation, you can find a folder Windows.old in the root directory of C: drive. All your files are saved there.
After copy all your needed files out from Windows.old folder, you can use Disk Cleanup to delete the Windows.old folder to free up disk space.
Reinstall Windows 10 isn’t always a perfect solution
Though there are several methods to choose, they all have some shortcomings in practical use. For example, the first method will keep your programs, but won’t fix problems caused by them. And the other two methods can only keep your files, so you have to spend time and effort reinstalling these apps. That’s why I say reinstallation is not a perfect way.
To avoid such trouble, you can use a free backup software to create a system image in case of possible system issues. For simplicity and effectiveness, I strongly recommend youВ AOMEI Backupper Standard to protect your Windows 10 PC.
It enables you to backup file, partition, system or even the whole disk in a simple manner.
It can save you from manual operation with the scheduled backup on daily, weekly, monthly, etc.
With theВ incremental/differential backupВ mode, you don’t need to worry about cumulative backups filling up the space.
Also, you can change the compression level, split backup images, choose backup mode, etc. as you like.
Backup system in case you need to restore Windows 10 without data loss
If you want to fix the computer without losing any important files, apps and settings, restoring system to an earlier normal state is the safer way than reinstalling from scratch.В
To simplify the process, you could set up a scheduled backup to make it run automatically. Thus when any error arises, you can easily restore Windows 10 to the latest normal state without losing data.
1. Download and install this free backup software.
2. On the main page, click the «Backup» tab and then choose «System Backup«. If you want to backup entire disk, you can choose «Disk Backup» as instead.

3. Select a destination location to receive the backup image. You can backup to any location (folder) that Windows detects, including external hard drive, NAS network location, local storage, etc.

4. In the next screen, click «Schedule» to configure scheduled backup settings if needed. After that, click «Start Backup» to start the operation.

Note: System backup in AOMEI Backupper Standard can satisfy almost users’ need. But if you have advanced needs like below, higher editions like Professional may serve you better.
• Enable encryption for backup: This feature is useful for users who store sensitive data or business data on their computer to prevent unauthorized access.
• USB Plug in:В This feature is designed for users who frequently use USB storage device, and make the backup task more convenient. Once you create a schedule backup with «USB Plug in», AOMEI Backupper will automatically start backup when USB connected to your computer.
• Scheme: This is a indispensable feature is for all users who don’t want to miss any changes, but worry about disk space issue. It can delete old backups automatically when backup versions reaches the specified number.
In a short time, the backup will be created. With a backup, whenever you have problems with your system, you can easily restore from the backup. Even when your PC fails to boot, you can restore from bootable CD. AOMEI Backupper also enables you to create a specialized recovery environment for backup/restore without booting Windows. Just go to Tools > Recovery Environment to enable it.
Wrapping things up
To reinstall Windows 10 without losing data is surely possibly using these three methods mentioned above, and it can fix system issues that your computer may have. But, honestly, it’s not perfect. And it is obvious that restoring from a backup is easier and more convenient to solve Windows issues.
The basic version AOMEI Backupper Standard is enough to prevent unexpected disaster, such as, system crash, disk failure, virus, fire etc. But if you want more advanced features, such as, USB plug in, incremental and differential backup, universal restore, you need to upgrade from the basic version.В
If you want to protect unlimited computers within your company, AOMEI Backupper TechnicianВ is worth a shot. The inbuilt AOMEI Image Deploy tool allow users to deploy/restore system image file on server-side computer to multiple client-side computers over network.


