- Как получить доступ к информации BIOS из Windows 10 (без перезагрузки)
- Доступ к информации о BIOS из Windows 10 с помощью PowerShell
- Просмотр информации о BIOS из Windows 10 с помощью командной строки
- How to Enter the BIOS on a Windows 10 PC
- How to access BIOS on a Windows 7/Windows 10 PC
- How to get into BIOS in Windows 7 and Windows 10
- 1. Access BIOS on a HP device
- 2. Access BIOS on a Dell device
- Run a System Scan to discover potential errors
- 3. Access BIOS on an Asus device
- 4. Access BIOS on an Acer device
- 5. Access BIOS on Windows 10
- 6. Access BIOS on Windows 7
- How To Access BIOS On Your PC
- Del Key
- Escape + F10
- Lenovo
- Samsung
- F2+Power Button
- Assist Key
- Toshiba
- Windows 10 Settings
- Leave a Reply Cancel reply
Как получить доступ к информации BIOS из Windows 10 (без перезагрузки)
На каждом компьютере есть BIOS, запускающий компьютер. Мы можем настроить различные параметры оборудования в BIOS. Чтобы получить доступ к BIOS, нажмите клавиши F2, F12 или DEL в зависимости от производителя компьютера.
По определению, базовая система ввода / вывода (BIOS) — это набор компьютерных инструкций в микропрограммном обеспечении, которые управляют входами и выходами компьютера. Это можно назвать серией алгоритмов для соответствующего функционирования аппаратного обеспечения компьютера, которые контролируются программным обеспечением. Микропроцессор в компьютере также выполняет свои функции с помощью BIOS.
Некоторая информация в BIOS ценна и время от времени требуется пользователю. Это включает серийный номер компьютера, бирку ресурса, версию BIOS и т.д.
Проблема в том, что пользователю необходимо перезагрузить компьютер, чтобы получить доступ к BIOS. К нему нельзя получить доступ напрямую из Windows.
Есть способ извлечь полезную информацию из BIOS компьютера. Давайте обсудим:
Доступ к информации о BIOS из Windows 10 с помощью PowerShell
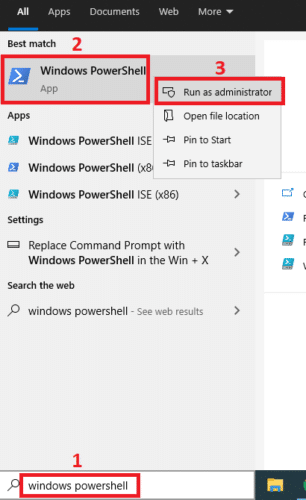
Перейдите в меню «Пуск» и найдите PowerShell. Щелкните правой кнопкой мыши Windows PowerShell и выберите Запуск от имени администратора .
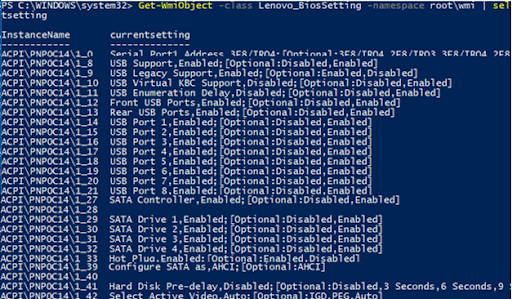
Выполните следующую команду в PowerShell, чтобы просмотреть все текущие настройки BIOS:
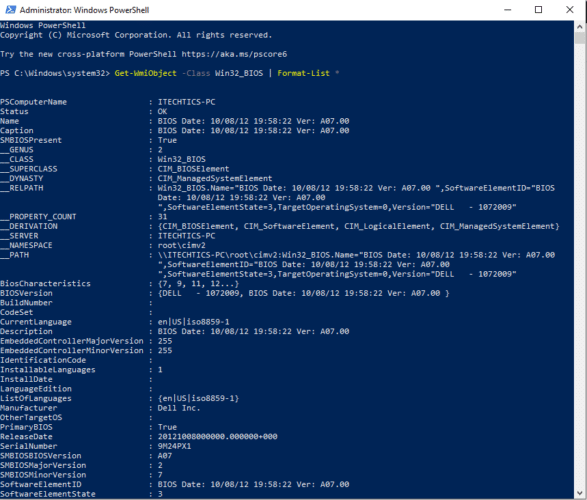
Некоторую другую полезную информацию также можно получить из PowerShell с помощью различных команд.
Если вы хотите получить серийный номер компьютера или метку актива , введите следующую команду:
Просмотр информации о BIOS из Windows 10 с помощью командной строки
Чтобы получить только серийный номер, используйте следующую команду:
Если вы хотите получить версию BIOS, введите следующую команду:
Ряд индивидуализированной информации можно получить из BIOS. Список автоматически создается следующей командой, которая предлагает, какие команды вы можете ввести, чтобы получить соответствующую информацию:
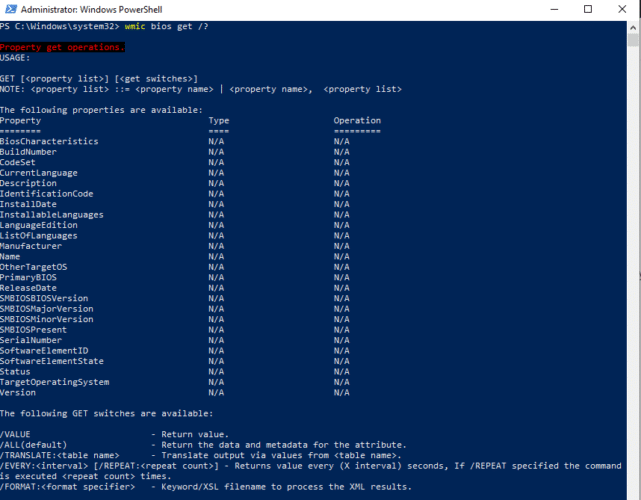
На изображении, показанном выше, можно увидеть, что команда отобразила список слов, которые могут заменить «/?» в команде wmic bios get /? . Например, если вы хотите получить статус машины, просто введите следующую команду:
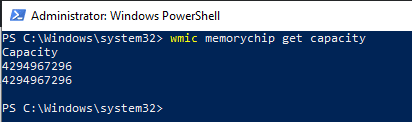
Более того, еще одна полезная информация, которую можно получить, — это память (RAM) компьютера. Его можно получить из Windows PowerShell с помощью следующей команды:
Отображаемая информация будет относиться к отдельным картам памяти, а число будет отображаться в байтах, как в примере ниже:
Надеюсь, это будет полезно, если вы хотите получать информацию из BIOS при работе с Windows 10 и не хотите перезагружать компьютер.
Эта информация полезна для вас? Какого типа информация обычно требуется от BIOS?
How to Enter the BIOS on a Windows 10 PC
Windows 10 gives you a lot of options you can configure directly within the operating system, but on every laptop or desktop, there are some settings you can only change in the BIOS (basic input/output system). The BIOS is the software that is built into your computer’s motherboard and controls everything from the boot order of your drives to preboot security options to whether the Fn key on your keyboard activates a function key or a media control.
Unfortunately, because the BIOS is a pre-boot environment, you can’t access it directly from within Windows. On some older computers or those deliberately set to boot slowly, you can hit a function key such as F1 or F2 at power-on to enter the BIOS.

However, most computers made in the past four years boot Windows 10 too quickly to listen for a key press at startup. To access your BIOS on a Windows 10 PC, you must follow these steps.
How to Enter the BIOS on a Windows 10 PC
1. Navigate to settings. You can get there by clicking the gear icon on the Start menu.
2. Select Update & security.
3. Select Recovery from the left menu.
4. Click Restart Now under Advanced startup. The computer will reboot to a special menu.
5. Click Troubleshoot.
6. Click Advanced options.
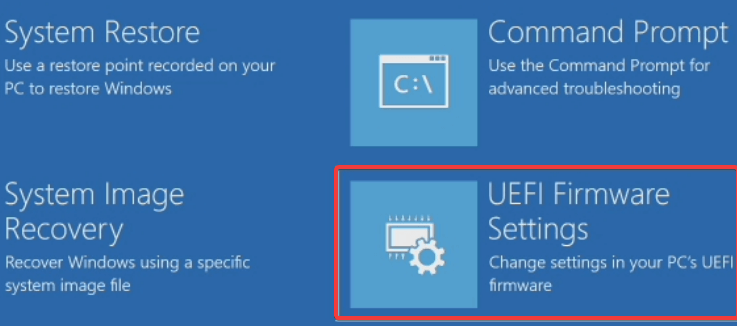
7. Select UEFI Firmware Settings. If you don’t see this icon, then press Startup Settings, instead. When your PC is restarting, tap F1 (or F2) to access the BIOS.
8. Click Restart.
Your system will restart and take you to the BIOS.
How to access BIOS on a Windows 7/Windows 10 PC

- Accessing the BIOS in Windows 10 is a must if you want to change the boot settings for instance.
- BIOS is an acronym for Basic Input/Output System and it’s a software tool installed in a ROM chip on your motherboard .
- In this article we explain how you can access BIOS on devices from several brands including HP, Dell, Asus, Acer.
- Read all our guide as you will also learn what you can do to access BIOS from Windows 10.

- Download Restoro PC Repair Tool that comes with Patented Technologies (patent available here).
- Click Start Scan to find Windows issues that could be causing PC problems.
- Click Repair All to fix issues affecting your computer’s security and performance
- Restoro has been downloaded by 0 readers this month.
BIOS which stands for Basic Input Output System is basically a ROM chip that contains instructions needed to perform hardware initialization operation during the boot-up process.
The BIOS section is also where you get a host of options to change the way the computer boots up along with a few other security and power settings as well.
All of this also makes it quite necessary to access the BIOS section just in case you need to tinker with the hardware setting or the default booting process.
Accessing BIOS also becomes imperative when you need to extract the most out of your existing hardware setup.
However, notwithstanding how critical it can be to have access to BIOS, that often isn’t the case. And the reasons might be varied, of both software and hardware origin.
Mentioned here are steps to reach BIOS on some of the most well known Windows PC brands like HP, Dell, Asus, and Acer.
How to get into BIOS in Windows 7 and Windows 10
- Access BIOS on a HP device
- Access BIOS on a Dell computer
- Access BIOS on a Asus PC
- Access BIOS on a Acer device
- Access BIOS on Windows 10
- Access BIOS on Windows 7
1. Access BIOS on a HP device

Turn off the PC, wait for a few seconds and re-start it. When the first screen come on, start pressing F10 repeatedly until the BIOS screen is displayed.
This applies to PCs that came pre-installed with Windows, which is devices manufactured in 2006 or later.
For PCs built before 2006, press F1 repeatedly during the booting process to get into BIOS.
2. Access BIOS on a Dell device

Turn off the PC and restart it again after waiting for a few seconds. When the first screen id displayed, press F2 continuously until the BIOS screen is displayed.
Run a System Scan to discover potential errors


Another method will be to start pressing F2 the moment the keyboard has been activated.
Note: Dell cautioned against pressing and holding down the F2 button as this might lead the system to interpret it as a stuck key. Instead, press F2 repeatedly.
3. Access BIOS on an Asus device
Turn off the PC, wait for a few seconds. Press and hold on to the F2 button and then click on the power button once. Continue holding on to the power button until the BIOS screen is displayed.
4. Access BIOS on an Acer device
The process is similar as on an Asus PC. Press and hold on to the F2 button and click on the power button. Continue holding on to the F2 button until the BIOS section is reached.
5. Access BIOS on Windows 10
- Go to Settings and select Update & Security.
- In the Update & Security page, select Recovery from the list of options on the left panel.
- Under Advanced start-up, select Restart now (This will re-boot the PC to launch a special set of menu options).

- Select Troubleshoot and select Advanced options.
- From the list of Advanced options provided, select UEFI Firmware Settings.
- You will next be led to the UEFI Firmware settings page.
- Click on the Restart button there.
- The PC re-starts and will launch BIOS.

Since Windows 10 is inherently designed to boot faster, that leaves virtually no scope for keypresses such as the F1 or F2 to register any response.
Fortunately, Microsoft has ensured there is a more foolproof means of accessing BIOS from right within Windows 10 though you surely have to restart the PC before getting to it.
6. Access BIOS on Windows 7

Getting into BIOS in Windows 7 can be a bit tricky in that you got to have your timing right. You have time before Windows loads completely to access BIOS.
If you miss the slot, you will have to begin all over again by rebooting your PC. Also, different manufacturers assign different keyboard buttons as the hotkey for accessing BIOS.
If you’re still running Windows 7, you need to know that Microsoft pulled its support for this OS and they no longer issue any updates for it. Therefore, using it can be risky for your system security.
You should update your PC to the last version of Windows 10 and perform any necessary updates for your safety.
We hope this guide helped to access your BIOS settings on your computer and if you have any suggestions, write a line in the comments section below.
How To Access BIOS On Your PC
Jun 12, 2017
Comment
BIOS is the basic input/output system that every laptop and desktop on the market comes packaged with. You normally don’t have to use it if you’ve got Windows installed. In fact, there’s little reason to need to access it in the first place. That said, it’s not something that you never need to change. The BIOS contains system settings that you might need to change on occasion. For example, the BIOS is where you change your first boot device. It’s really easy to access BIOS on your PC. When you boot into your system, you need to tap a specific key. You must tap it before you see the Windows boot logo. The only tricky part is knowing which key to tap. The key differs from system to system so we’re going to attempt to compile a list of these keys for every available PC there is.
Make sure you don’t have Fast Startup enabled on Windows. You might have to use the Fn key in addition to the other function keys when you’re trying to access BIOS.
Tap the F2 key repeatedly or hold it down when you power on your ASUS laptop to access BIOS.
Hold down the F2 key and then press the Power button. Keep holding down the F2 key until you see your BIOS screen (Image courtesy ASUS Support page).

Del Key
If the F2 key doesn’t take you to your BIOS, you might need to try the Del i.e., the Delete key. Tap is when you boot into your system, or hold it down when you boot to get to your BIOS.
The BIOS key on a Dell laptop is the F2 key. Turn on your laptop and tap the F2 key repeatedly. Be warned that you might need to hold down the Fn key when you tap the F2 key.
The key to access BIOS differs from one HP product to another. They have not standardized this and there are quite a few keys you will have to try.
Escape + F10
The most common key is the Escape key. Turn on your laptop and tap the Escape key. You will see a list of other menus you can access and your BIOS will be one of them. The BIOS setting will be associated with the F10 key. Tap it to access BIOS on your HP laptop. This basically means you need to tap two keys to get to the BIOS.
On some HP laptops, tapping the F10 key will take you to your BIOS settings.
Tap F2 when you boot your laptop. You will see a second menu telling you which F key to press to get to your BIOS.
If the above three combinations don’t work, try the F6 key. The process is the same. Reboot your laptop and tap the F6 key.
Lenovo
Lenovo laptops have a few different key sets depending on the laptop model you have.
If you own a Lenovo Thinkpad or ThinkCenter, tap the F1 key when you boot your laptop. Wait for the Lenovo splash screen/logo and then tap the key to get to your BIOS menu. Your system will beep when you’re in.
If you own a Lenovo Idea or something that isn’t a Thinkpad or ThinkCenter, try using the F2 key on system startup.
Samsung
Boot your system and wait for the Samsung logo to appear. Tap the F2 key to access BIOS. The BIOS screen may differ from one laptop model to another but the key to access it will always be the same.
Sony had some great looking laptops back in the day. They had quite the rich line so naturally you can expect some variation on how to get to your BIOS.
F2+Power Button
If you own a series S or Z Sony Vaio laptop, hold down the F2 key and then press the power button to turn on your system. Do not release the F2 key until you get to your BIOS.
Assist Key
Turn on your system and tap the Assist key to get to your BIOS. The Assist key is a special key that you won’t find on other laptops. You might not even have it on all Sony laptop but if your model does have the Assist key, it can take you straight to your BIOS. It seems to be present on the Vaio Z Flip series.

Toshiba
Tap the F2 key to access BIOS on your Toshiba laptop.
If the F2 key doesn’t work, you need to reboot your system and tap the F12 key to get to your BIOS settings.
Windows 10 Settings
Hold down the Shift key and click Restart start on the power menu. This will restart your system but you will see the advanced startup options instead of booting to your desktop. Click Troubleshoot>Advanced Options>UEFI Firmware settings, and click Restart. You will boot to your BIOS. No data will be lost and nothing is going to happen to your Windows installation.

Leave a Reply Cancel reply
This site uses Akismet to reduce spam. Learn how your comment data is processed.


