- Can you block neighbor noise in a townhome or condo?
- Blocking Sound from Windows and Ductwork
- How to Change Windows 10 System Sounds
- Tired of hearing the default Windows 10 sounds? You can change them
- What to Know
- Which Windows Sounds Can Be Customized In Windows 10?
- How to Access Windows 10 Sound Settings
- How to Customize Windows 10 Audio Settings
- How to Change Sound Effects for an Event in Windows 10
- How to Turn Off the System Sounds
- Fix sound problems in Windows 10
Can you block neighbor noise in a townhome or condo?
Blocking Sound from Windows and Ductwork

Windows are another major source of neighbor noise, especially in a townhome. The average double pane window has an STC of only around 26 [source: Cmar]. There are several ways to improve this rating. First, in situations where windows are a significant source of noise, the resident can replace standard windows with STC-rated varieties, available up to STC 56.
While STC windows are very effective, they can also be expensive and impractical for many people. If this is the case, consider using sound seals instead. Window seal kits are available at most home improvement stores, and are very affordable. They can be installed quickly without the use of special tools, and they can make a big difference in sound transmission. While you’re applying your seals, be sure to caulk any cracks or joints you see. Use a clear or matching shade of caulk to trace around the window frame both inside and outside of the home.
For a low-tech solution to neighbor noise passing through the windows, try hanging heavy curtains that run from the floor to the ceiling. Heavy fabric can do quite a bit to dissipate sound. Add a few large, leafy plants near your windows as well. Remember, every bit of sound control you include adds up to reduce the total noise level.
What if noise from your neighbors is traveling into your home through the ductwork? This scenario can be particularly annoying because the sound tends to be amplified in the tight metal space. To combat this problem, wrap your ducts with acoustical insulation, or replace the sections nearest the air grilles and vents with lined duct sections. Another solution is to replace your regular metal grilles with lined versions, or to ask your landlord about adding sound attenuators to the ducts.
And now you’re ready to cozy up in your nice, quiet apartment. Sleep well!
How to Change Windows 10 System Sounds
Tired of hearing the default Windows 10 sounds? You can change them
:max_bytes(150000):strip_icc()/AnitaGeorge-d50ba5f507844f5ea2f54a1b1d9e7fd1.jpg)
What to Know
- Enter Change system sounds in the Windows search bar. The Sound tab opens.
- Under Program Events, choose an event; then select a Sound, or Browse to upload a .WAV file. Test >Apply >OK.
- To turn off sound effects, select No Sounds in the Sound Scheme drop-down menu >Apply >OK.
Microsoft offers numerous ways to customize its Windows operating systems. This article explains how to adjust the sound settings on PCs running Windows 10.
Which Windows Sounds Can Be Customized In Windows 10?
Windows 10 allows you to set custom sounds for system notifications (like low battery alerts) and sound effects for actions such as closing a program or emptying the recycle bin. To help you navigate the many different kinds of system sounds, the sound settings menu divides them up into the following categories:
- Windows (system): Includes sounds for things like battery notifications and instant messages.
- File Explorer: Handles sounds for things like moving menu items and blocked pop-up windows.
- Windows Speech Recognition: This category deals with sounds for things like turning the speech recognition feature on and off.
How to Access Windows 10 Sound Settings
The easiest way to access your Windows 10 system sound settings is to type Change System Sounds in the Windows search box, and then select Change System Sounds.
:max_bytes(150000):strip_icc()/001_change-windows-10-system-sounds-4587694-81454b332b23445e9fee3fffebd24017.jpg)
To access the sound settings from the Windows control panel:
Select the Windows icon in the taskbar, then select the gear to open Windows Settings.
:max_bytes(150000):strip_icc()/005-change-default-download-location-windows-10-4587317-ed009e660cfd4b54bc5c46e959e80d33.jpg)
Select System.
:max_bytes(150000):strip_icc()/004-test-and-calibrate-your-pc-monitor-2640280-8abbdc393a9445bba3ac2b035025dc69.jpg)
Select Sound in the left pane, then select Sound Control Panel under Related Settings in the top-right corner.
:max_bytes(150000):strip_icc()/001-change-windows-10-system-sounds-4587694-ebff7b4c794e45239c316e9f658a411e.jpg)
Select the Sounds tab in the window that pops up.
:max_bytes(150000):strip_icc()/002-change-windows-10-system-sounds-4587694-2e57eaeae9014bb3a63d7ed7ee2f19e4.jpg)
How to Customize Windows 10 Audio Settings
There are two main ways you can change your Windows 10 system sounds once you’ve accessed the sound settings: You can either totally turn off the system sounds, or you can adjust and change the sound effects assigned to each program event. An example of a program event would be a low battery notification.
How to Change Sound Effects for an Event in Windows 10
Once you have accessed your sound settings:
Select an event under Program Events.
:max_bytes(150000):strip_icc()/003-change-windows-10-system-sounds-4587694-3d94bc23a8f84d768b5f7815c37136be.jpg)
Select the box under Sounds to choose from a list, or select Browse to search your computer for your own sound effects files.
Your chosen sound effect must be in the WAV format.
:max_bytes(150000):strip_icc()/004-change-windows-10-system-sounds-4587694-b415a501743748c2bf34bfe7da535681.jpg)
Once you’ve selected a sound effect, select Test for a preview, then select Apply. and OK.
:max_bytes(150000):strip_icc()/005-change-windows-10-system-sounds-4587694-8ba037ea352e4f5b8ae4bfbb88db3068.jpg)
How to Turn Off the System Sounds
To turn off all of the system sounds in Windows 10:
In the Windows 10 sound settings, select the box under Sound Scheme, then select No Sounds.
:max_bytes(150000):strip_icc()/006-change-windows-10-system-sounds-4587694-64f56c0dc6e54bac9d41737e7ab63592.jpg)
Select Apply, then select OK.
:max_bytes(150000):strip_icc()/007_change-windows-10-system-sounds-4587694-878a8064b0414686a025bc3d2d7f6113.jpg)
To turn off the sound for individual events, select one of the options under Program Events.
Select the box under Sounds. Choose None from the list that appears.
:max_bytes(150000):strip_icc()/007-change-windows-10-system-sounds-4587694-86189b59ff0a4f168382acd7c7584735.jpg)
Select Apply and OK.
Fix sound problems in Windows 10
If you’re having audio problems, the following suggestions might help. The tips are listed in order, so start with the first one, see if that helps, and then continue to the next one if it doesn’t.
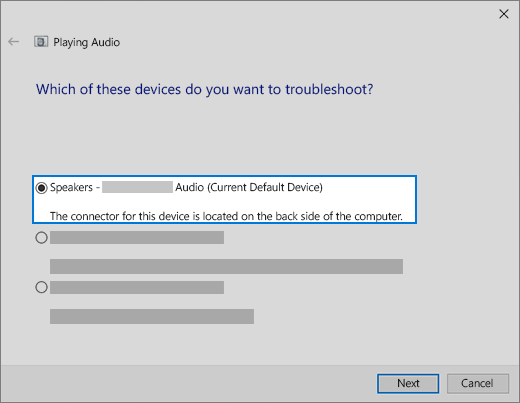
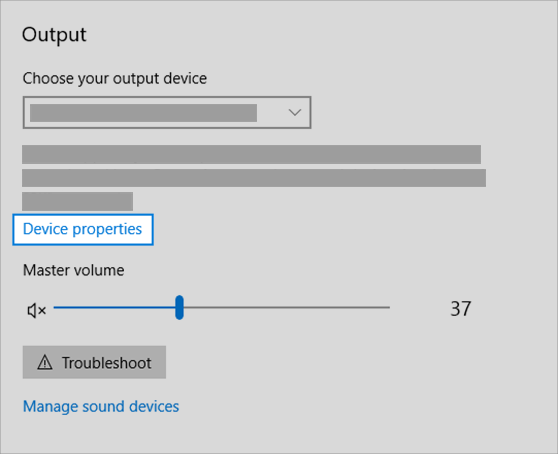
If multiple audio output devices are available, check that you have the appropriate one selected. Here’s how:
Select the Speakers icon on the taskbar.
Next, select the arrow to open a list of audio devices connected to your computer.
Check that your audio is playing to the audio device you prefer, such as a speaker or headphones.
If this doesn’t help, continue to the next tip.
The audio troubleshooter might be able to fix audio problems automatically.
To run the troubleshooter
In the search box on the taskbar, type audio troubleshooter, select Fix and find problems with playing sound from the results, then select Next.
Select the device you want to troubleshoot and then continue through the troubleshooter.
You can also launch the troubleshooter from audio Settings. Select Start > Settings > System > Sound > Troubleshoot.
If running the troubleshooter doesn’t help, continue to the next tip.
To check for updates
Select Start > Settings > Update & Security > Windows Update > Check for updates.
Do one of the following:
If the status says «You’re up to date, go to the next tip.
If the status says «Updates are available,» select Install now.
Select the updates you want to install, then select Install.
Restart your PC and see if your sound is working properly.
If that didn’t solve your problem, continue to the next tip.
Try these steps
Check your speaker and headphone connections for loose cords or cables. Make sure all cords and cables are plugged in.
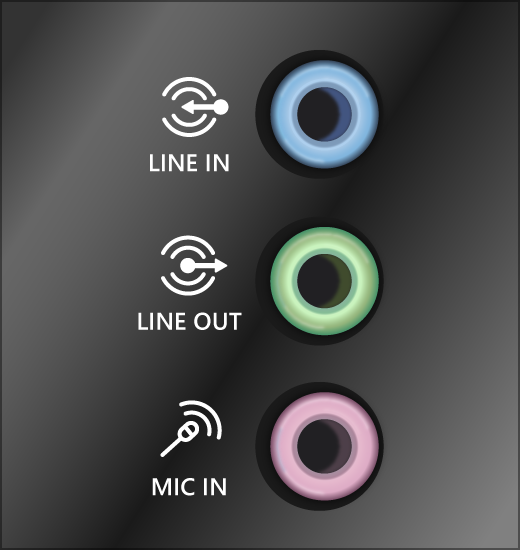
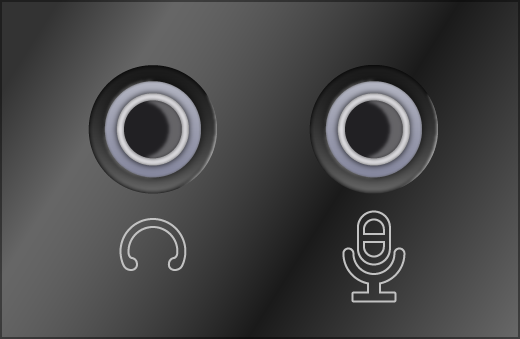
If you have multiple 5mm jacks to plug into, especially on a surround sound system, make sure all cords and cables are plugged into the correct jack.
If it’s not clear which jack goes with which cord, consult your hardware manufacturer, or try the most obvious outputs one at a time and see if they work.
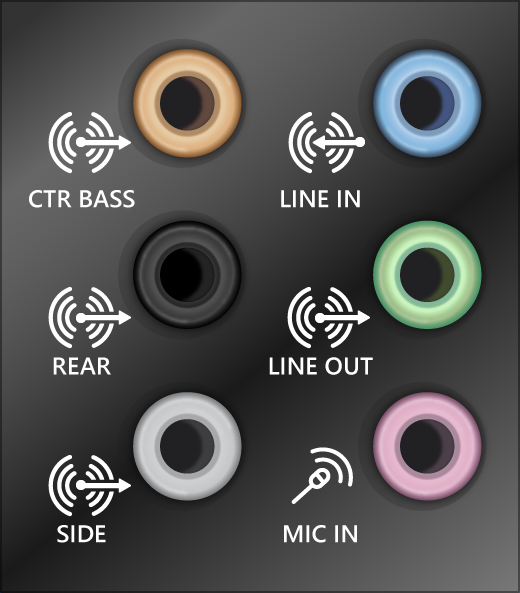
Note: Some systems use a green jack for output and pink for mic input and others will be labeled «headphone» or «microphone.»
Make sure the power is turned on and check the volume level.
Make sure the mute setting is not turned on, and try turning up all the volume controls.
Remember some speakers and apps have their own volume controls. Be sure to check them all.
Try connecting your speaker and headphones to a different USB port.
It’s possible that your speakers won’t work when your headphones are plugged in. Unplug your headphones and see if that helps.
If your cables and volume are OK, see the next sections for additional troubleshooting.
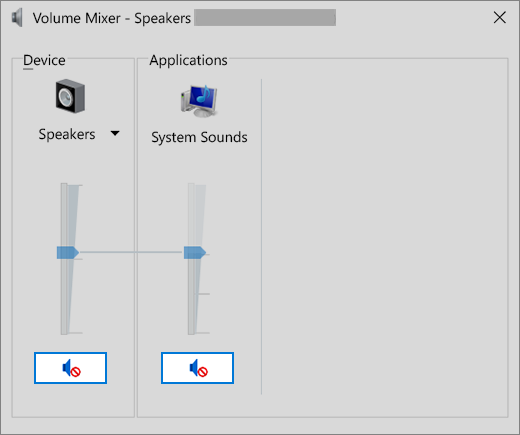
Check to make sure your audio devices aren’t muted and haven’t been disabled.
Right-click the Speakers icon on the taskbar, and then select Open Volume mixer.
You’ll see a set of volume controls for your devices. Make sure none of them are muted. If any of them are muted, you’ll see a red circle with a line through it next to the volume control. In that case, select the volume control to unmute.
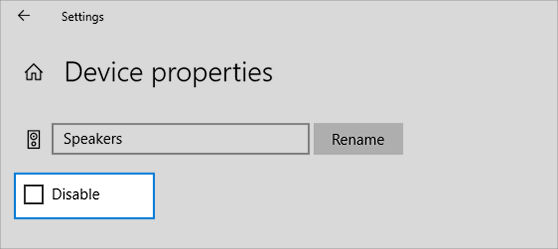
Check your device properties to make sure that your devices have not been disabled by mistake. Select Start > Settings > System > Sound .
Select your audio device, and then select Device properties. Be sure to select Device properties for both the output and input devices.
Make sure the Disable check box is cleared for the output and input devices.
If that didn’t solve your problem, continue to the next tip.
Hardware problems can be caused by outdated or malfunctioning drivers. Make sure your audio driver is up to date and update it if needed. If that doesn’t work, try uninstalling the audio driver (it will reinstall automatically). If that doesn’t work, try using the generic audio driver that comes with Windows. If you’re having audio issues after installing updates, try rolling back your audio driver.
To update your audio driver automatically
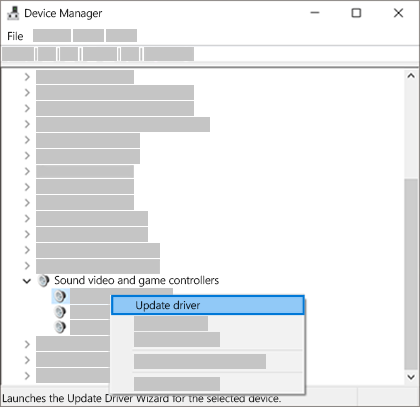
In the search box on the taskbar, type device manager, then select it from the results.
Select the arrow next to Sound, video and game controllers to expand it.
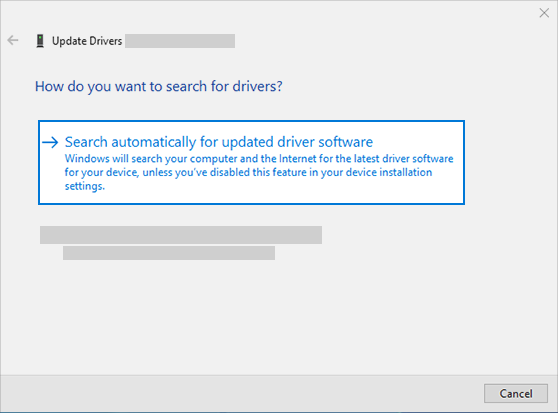
Right-click the listing for your sound card or audio device, such as headphones or speakers, select Update driver, then select Search automatically for updated driver software. Follow the instructions to complete the update.
If Windows doesn’t find a new driver, look for one on the device manufacturer’s website and follow those instructions. If that doesn’t work, try uninstalling your audio driver.
To uninstall your audio driver
In the search box on the taskbar, type device manager, then select it from the results.
Select the arrow next to Sound, video and game controllers to expand it.
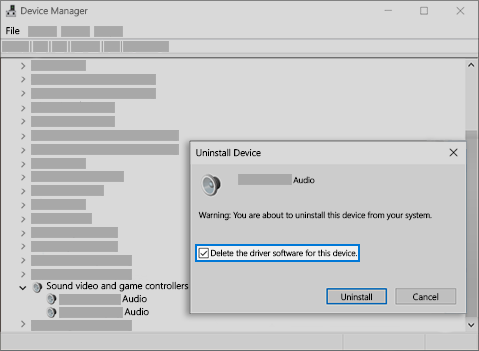
Right-click the listing for your sound card or audio device, select Uninstall device, select the Delete the driver software for this device check box, and then select Uninstall.
Restart your PC.
Note: Be sure to save documents and any other current work before you restart.
This restart will automatically prompt your PC to reinstall your audio driver.
To restart, select Start > Power > Restart .
If those options didn’t work, try using the generic audio driver that comes with Windows.
To use the generic audio driver that comes with Windows
In the search box on the taskbar, type device manager, then select it from the results.
Select the arrow next to Sound, video and game controllers to expand it.
Right-click the listing for your sound card or audio device, then select Update driver > Browse my computer for driver software > Let me pick from a list of device drivers on my computer.
Select the audio device whose driver you want to update, select Next, and then follow the instructions to install it.
If these steps didn’t solve your audio issue, visit your device manufacturer’s website and install the most recent audio/sound drivers for your device. Following is an example of a driver download page for a sound device manufacturer.
If you have audio issues after installing updates
If your audio was working before you ran Windows Update and now isn’t working, try rolling back your audio driver.
To roll back your audio driver
In the search box on the taskbar, type device manager, then select it from the results.
Select the arrow next to Sound, video and game controllers to expand it.
Right-click the listing for your sound card or audio device, then select Properties.
Select the Driver tab, then select Roll Back Driver.
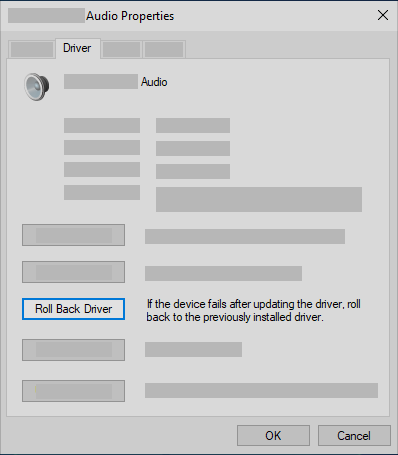
Read and follow the instructions and then select Yes if you want to roll back your audio driver.
If rolling back your audio driver didn’t work or wasn’t an option, you can try to restore your PC from a system restore point.
Restore your PC from a system restore point
When Microsoft installs updates on your system, we create a system restore point in case problems arise. Try restoring from that point and see if that fixes your sound problems. For more info, see «Restore from a system restore point» in Recovery options in Windows 10.
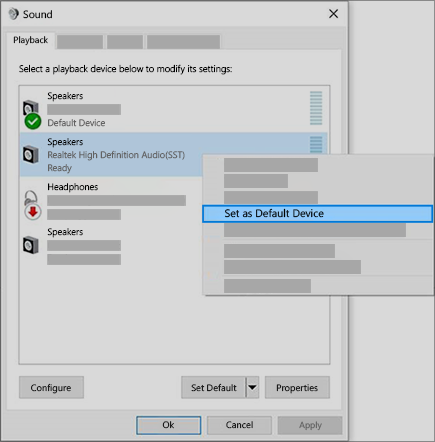
If you’re connecting to an audio device—such as headphones or speakers—using USB or HDMI, you might need to set that device as the default audio device. If you’re using an external monitor that doesn’t have built-in speakers, make sure that the monitor isn’t already selected as your default output device. if it is, you won’t have any audio. You can check that when you set your default output audio device. Here’s how:
In the search box on the taskbar, type control panel, then select it from the results.
Select Hardware and Sound from the Control Panel, and then select Sound.
On the Playback tab, right-click the listing for your audio device, select Set as Default Device, and then select OK.
If setting your audio device as the default device doesn’t help, continue to the next tip for additional troubleshooting.
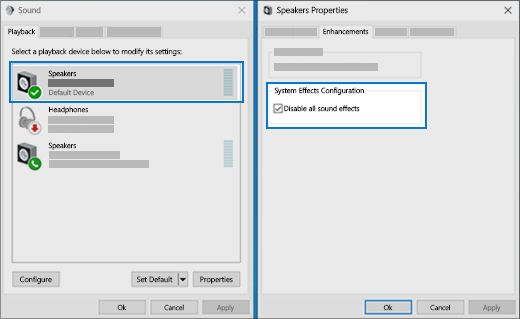
Sometimes having audio enhancements on can result in audio issues. Disabling them may resolve your issue.
In the search box on the taskbar, type control panel, then select it from the results.
Select Hardware and Sound from the Control Panel, and then select Sound.
On the Playback tab, right-click the Default Device, and then select Properties.
On the Enhancements tab, select either the Disable all enhancements or the Disable all sound effects check box (depending on which option you see), select OK, and try to play your audio device.
If that doesn’t work, on the Playback tab, select another default device (if you have one), select either the Disable all enhancements or the Disable all sound effects check box (depending on which option you see), select OK, and try to play audio again. Do this for each default device.
If turning off audio enhancements doesn’t help, see the next sections for additional troubleshooting.
In the search box on the taskbar, type services, then select it from the results.
Select each of the following services, right-click, and then select Restart:
Windows Audio Endpoint Builder
Remote Procedure Call (RPC)
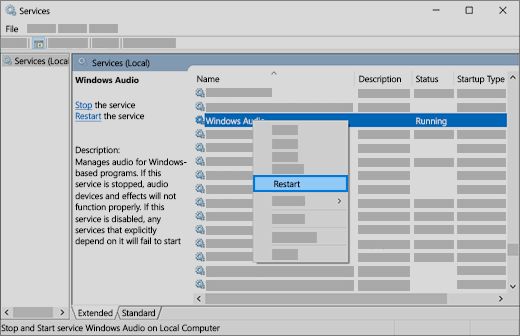
If restarting these services doesn’t resolve your issue, see the next sections for more troubleshooting.
In the search box on the taskbar, type control panel, and then select it from the results.
Select Hardware and Sound from the Control Panel, and then select Sound.
On the Playback tab, right-click (or press and hold) Default Device, and then select Properties.
On the Advanced tab, under Default Format, change the setting, select OK,and then test your audio device. If that doesn’t work, try changing the setting again.
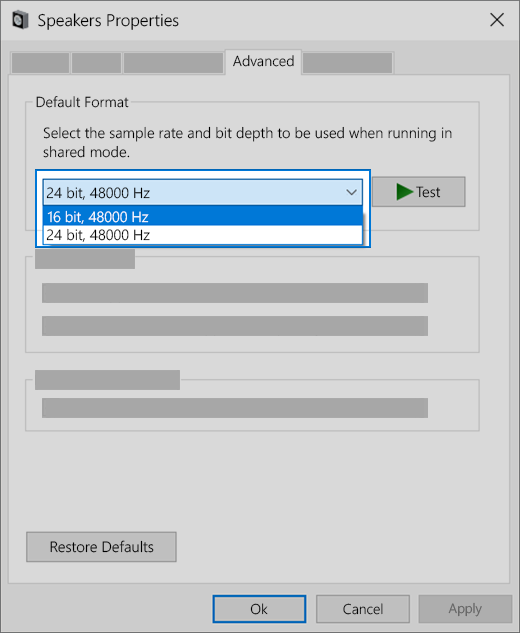
If trying different audio formats doesn’t help, see the next sections for additional troubleshooting.
Many updates require you to restart your device.
To check and see if you have installed updates pending and need to restart
Save your work and close all open applications.
Select Start > Power . If you have installed updates pending, you’ll see options to Update and restart and Update and shut down.
Select one of those restart options to apply the updates
If restarting doesn’t help, see the next section for additional troubleshooting.
Some audio problems might be caused by an issue with the audio system’s IDT High Definition Audio CODEC. This can be fixed with a manual driver update which allows you to choose the sound driver you want to use.
Note: Not all systems will have an IDT High Definition Audio CODEC.
To check and see if you have one, and to manually update the driver
In the search box on the taskbar, type device manager, then select it from the results.
Select the arrow next to Sound, video and game controllers to expand it.
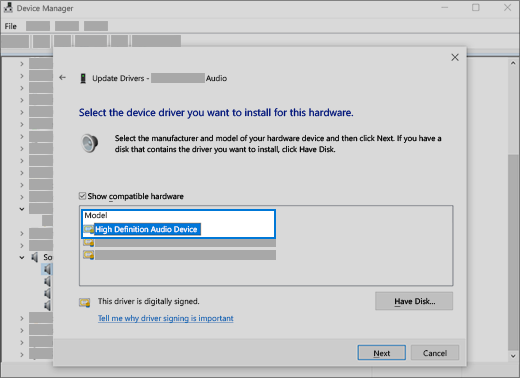
Look for IDT High Definition Audio CODEC. If it’s listed, right-click it and select Update driver, then select Browse my computer for driver software > Let me pick from a list of device drivers on my computer.
You’ll see a list of pre-installed drivers. Select High Definition Audio Device, and then select Next.
1. Select Start > Settings > Privacy , and then select Microphone from the left menu.
Under Allow access to the microphone on this device, select Change. Make sure the toggle is turned On.
If you’re having this issue with a specific app, scroll down to Choose which Microsoft Store apps can access your microphone and make sure that the toggle next to that app is turned On as well.


