- Где находится файл hosts и как его изменить
- Зачем нужен файл hosts
- Где находится файл hosts
- Как внести изменения в файл hosts
- Блокировка доступа к сайту через файл hosts
- Оригинальный файл hosts и как его восстановить
- How to Lock, Manage, Edit Hosts File in Windows 10
- Hosts File in Windows 10
- Host file location
- Lock Hosts file to prevent hijacking
- Block website using the Hosts file
- Edit Hosts file
- HostsMan
- How To Block Websites On Windows Using The Hosts File
- What Is The Hosts File?
- How Does The Hosts File Work?
- Blocking Websites With The Hosts File
- Is The Website Blocked?
- I Don’t Want to See an Error Page
- What Else Can I Do With The Hosts File?
Где находится файл hosts и как его изменить
Файл hosts — текстовый документ, который содержит в себе информацию о домене и адресе, на который ссылается домен.досту Файл hosts появился во времена зарождения Интернета (ARPANET) и служил где лежит неким маршрутизатором, пока на замену ему не пришла служба DNS. Но до сих пор он не утратил важности и по-прежнему используется как инструмент, который обладает приоритетом перед обращением к DNS-серверам.
Зачем нужен файл hosts
Предположим: вы зарегистрировали домен и привязали его к Hosting Linux. Но чтобы увидеть сайт, вам нужно дождаться делегирования домена на DNS-серверы. В файле hosts вы можете указать ваш домен и IP-адрес хостинга, а затем открыть браузер и зайти на ваш сайт, не дожидаясь делегирования домена. Также с его помощью вы можете заблокировать на локальном компьютере доступ к определённому сайту, указав соответствующую запись.
Где находится файл hosts
Путь к папке, где лежит файл hosts, зависит от операционной системы, которая установлена на вашем компьютере:
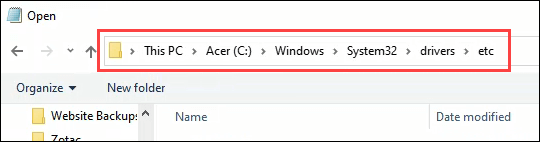
Windows XP, 2003, Vista, 7, 8, 10 — c:\windows\system32\drivers\etc\hosts
Linux, Ubuntu, Unix, BSD — /etc/hosts
Редактировать файл etc hosts нужно от имени администратора, иначе вы не сможете сохранить внесённые изменения.
Как внести изменения в файл hosts
Ниже мы рассмотрим, как редактировать и как сохранить файл hosts. Важно открыть файл с правами администратора, иначе система не даст вам его сохранить. Выберите вашу операционную систему и следуйте инструкции:
Запустите Блокнот или любой другой редактор от имени администратора. Откройте Пуск, найдите нужный редактор, нажмите по нему правой кнопкой мыши и выберите Запуск от имени администратора:
Как отредактировать файл hosts
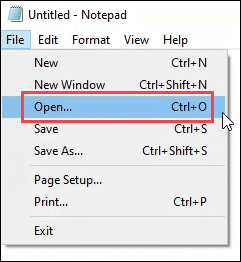
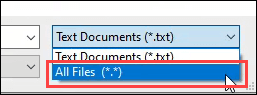
В меню «Файл» нажмите Открыть и перейдите в каталог, в котором расположен файл hosts. Измените тип файла на «Все файлы»:
Добавьте в конце файла необходимую запись в формате:
| 123.123.123.123 | faq-reg.ru | www.faq-reg.ru |
123.123.123.123 — IP-адрес вашего сервера или хостинга,
faq-reg.ru — имя вашего домена.
Теперь вы можете открыть ваш сайт в браузере, не дожидаясь обновления DNS-серверов.
Чтобы изменить файл hosts в виндовс 10 (8), выполните следующие действия:
Запустите Блокнот или любой другой редактор от имени администратора. Для этого найдите его в Пуске, нажмите по нему правой кнопкой мыши и выберите Запуск от имени администратора:
В меню «Файл» нажмите Открыть и перейдите в каталог, где находится файл hosts . Измените тип файла на «Все файлы»:
Добавьте в конце файла необходимую запись в формате:
| 123.123.123.123 | faq-reg.ru | www.faq-reg.ru |
123.123.123.123 — IP-адрес вашего сервера или хостинга,
faq-reg.ru — имя вашего домена.
Теперь вы можете открыть ваш сайт в браузере, не дожидаясь обновления DNS-серверов.
В Linux файл hosts находится в папке etc. Чтобы отредактировать его:
Введите в терминал linux команду hosts: sudo nano /etc/hosts
Добавьте в конце файла необходимую запись в формате:
| 123.123.123.123 | faq-reg.ru | www.faq-reg.ru |
123.123.123.123 — IP-адрес вашего сервера или хостинга,
faq-reg.ru — имя вашего домена.
Теперь вы можете открыть ваш сайт в браузере, не дожидаясь обновления DNS-серверов.
Файл hosts в Ubuntu редактируется так же, как и во всех Unix-системах.
Файл hosts в Mac OS расположен в каталоге: /private/etc/hosts. Чтобы изменить его:
Введите команду: sudo nano /etc/hosts и нажмите Enter:
Добавьте в конце файла необходимую запись в формате:
| 123.123.123.123 | faq-reg.ru | www.faq-reg.ru |
123.123.123.123 — IP-адрес вашего сервера или хостинга,
faq-reg.ru — имя вашего домена.
Теперь вы можете открыть ваш сайт в браузере, не дожидаясь обновления DNS-серверов.
Также вы можете заблокировать определенный сайт через файл hosts, воспользовавшись инструкцией ниже:
Блокировка доступа к сайту через файл hosts
Доступ к сайту также можно ограничить для локального компьютера. Для этого укажите адрес страницы (домен) в файле hosts. Заблокировать IP нежелательного сайта не требуется. Блокировка осуществляется по локальному хосту с фиксированным IP (127.0.0.1):
В указанной на скриншоте строке укажите IP-адрес 127.0.0.1 и через пробел адрес нежелательного сайта. Чтобы заблокировать несколько сайтов, повторите действие в следующей строке. В примере ниже в файле hosts отказано в доступе (заблокирован доступ) к сайтам «vk.com» и «youtube.com»:
Готово! Доступ к сайтам будет ограничен на определенном ПК.
Оригинальный файл hosts и как его восстановить
Скачать оригинал файла hosts можно на разных ресурсах. Но мы не рекомендуем делать это, так как файл может быть заражен.
Файл hosts по умолчанию есть в каждой операционной системе, но он может быть скрыт для просмотра. Следуя инструкциям выше, вы сможете его открыть и отредактировать. Если вы удалили его, то просто создайте текстовый файл без расширения в нужной папке.
По умолчанию файл hosts выглядит следующим образом:
How to Lock, Manage, Edit Hosts File in Windows 10
The Hosts file in Windows 10/8/7, is used to map hostnames to IP addresses. This Hosts file is located deep down in the Windows folder. It is a plain text file, and the size of the original default Hosts file is around 824 bytes.
Hosts File in Windows 10
In this post, we will see its location and also how to manage, lock, or edit the Hosts file.
Host file location
The Hosts file in Windows is located at the following location:
Lock Hosts file to prevent hijacking
Imagine clicking on www.thewindowsclub.com and seeing a completely different website load in your browser. Malware can redirect Web addresses on your computer by altering your Hosts file. This is referred to as the Host File Hijack.
To prevent Host file hijacks, you may navigate to it, right-click on it, select Properties and make it a Read-only file. This will lock down your Hosts file and prevent anyone or any malware from writing to it.
Block website using the Hosts file
To block a website using the Hosts File, simply add the following entry:
Although I do not do it, many users like to manually add entries to it in order to block the opening of one or more particular websites. Others, like to download and use List from well-known sources like mvps.org, to add entries which block malware sites from opening.
Edit Hosts file
If you need to edit the Hosts file, navigate to the following folder location:
Here you will see the Hosts file. Right-click on it and select Notepad. Make the changes and Save.
But sometimes, even when you are logged on with administrative credentials, you may receive the following error message:
Access to C:\Windows\System32\drivers\etc\ hosts was denied
Cannot create the C:\Windows\System32\drivers\etc\hosts file. Make sure that the path and file name are correct.
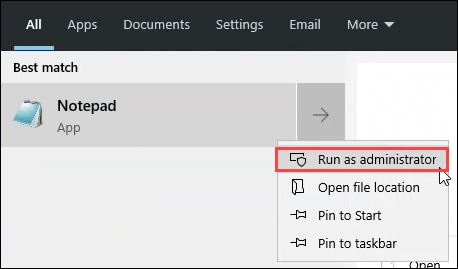
In this case, type Notepad in Start search and right-click on the Notepad result. Select Run as administrator. Open the Hosts file, make the necessary changes, and then click Save.
HostsMan
While you can always manually manage or edit Hosts file manually, I would like to suggest that you use a third-party freeware tool like HostsMan to do it.
HostsMan is a feature-rich tool that lets you add, remove, edit entries in the Hosts file. It also lets you easily add third-party Hosts lists that help in blocking malware sites and lets you easily enable or disable the hosts file. It includes a built-in hosts file updater & a hosts editor. It lets you scan the hosts file for errors, duplicates, and possible hijacks – and also lets you create an Exclusion list. One more useful feature it offers is the Hosts file backup manager. Backup your Hosts file to a safe place and use it to restore it, should the need arise.
Hostman also lets you Flush DNS cache, open Hosts with a text editor, count the number of hosts, find duplicates, replace IP, scan hosts for malicious entries, rearrange hosts, manage DNS Client Service and more. In short, its the only Hosts Manager that you will even need. You can download it from its home page. SysMate Hosts File Manager is another tool that lets you do so.
How to manually reset Hosts file back to default in Windows may also interest you.
If your browser has been hijacked, you might find this post on Browser Hijacking and Free Browser Hijacker Removal Tools helpful.
Date: December 23, 2018 Tags: Hosts, Security
How To Block Websites On Windows Using The Hosts File
Protect your kids, stop trackers, eliminate distractions
Why would you want to know how to block websites? Maybe you want to keep your kids safe on the Internet? Maybe you want to block distracting websites so you don’t procrastinate? It can also be used to block tracking sites that are embedded in ads.
Whatever your reason, you can simply block websites on Windows 10 using something called the hosts file.

The text below can get a bit technical, especially if you have never gotten into the nuts and bolts of Windows system files. If you want a quick overview, be sure to check out our short and easy to follow YouTube video first.
What Is The Hosts File?
Have you heard the term DNS (Domain Name System)? It refers to a system of files distributed around the Internet that help resolve domain names like helpdeskgeek.com into its actual Internet Protocol (IP) address which happens to be 13.225.198.106. That helps your computer know what server to talk to when you want to view this site.

Before DNS came into being in 1984, this was done through a local file on your computer called the hosts file. Back then computers weren’t connected to many other computers. At most, we may have connected to a few dozen. It was easy to keep all that information in a plain old text file. The host file lives on today.
How Does The Hosts File Work?
The hosts file allows the computer to look up other computer names, like localhost, or domain names, like helpdeskgeek.com and the IP number for them is right beside the name in the file. It’s a bit like how your friends’ names are associated with their phone numbers in your phone. You don’t need to remember or punch in the number, just find the person’s name.
Before we go further it’s important to understand that some IP addresses are reserved for local use. That means that they can only be used to point to your computer and devices within your immediate network. That means anything before your communication connects to the Internet.

For example, the IP address 127.0.0.1 always means the computer you’re working on, also known as localhost. Try typing that in your web browser. It will likely bring up a blank page.
Also understand that www.website.com and website.com are not the exact same thing. For both of them to take us to the same website both must resolve to the same IP address.
Blocking Websites With The Hosts File
- Open Notepad as Administrator.
- Click on File >Open.
- Navigate to C:\Windows\System32\Drivers\etc
- Once there, change file type from Text Documents (*.txt) to All Files (*.*).
- Now you can see the hosts file. Open it.
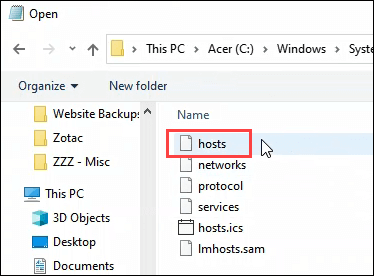
- Go to the last line of the page and add your own line. Let’s say we’re blocking Facebook.

Enter the localhost IP of 127.0.0.1. Press the tab key and enter facebook.com. Press Enter to go to the next line. Create a second line like the one above, but use www.facebook.com instead of just facebook.com.

Is The Website Blocked?
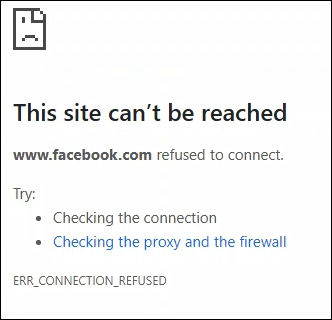
Open the command prompt and run ping facebook.com then run ping www.facebook.com. You should see that the IP address it’s trying to ping is 127.0.0.1.

Now open your web browser and go to facebook.com. It might still load! Why? Facebook’s real IP may still be sitting in the browser cache and the browser will use that IP first. Delete your browser’s cache and try Facebook again. You should now see an error page.
I Don’t Want to See an Error Page
You could try redirecting the site to another IP address, but these days that won’t work well. Maliciously editing the hosts file used to be a common attack by hackers. Now, web browsers check carefully for certificates to prevent this. But, you can still try.

Another way to not see an error page is to install and set up a web server on your computer and have the hosts file point to that. Maybe have it display a page that says, “Get back to work!” or lists some of your goals as motivation to stay off social media.
What Else Can I Do With The Hosts File?
You can use the same technique but paste in the URLs of various malware and tracking ad sites. There is a pre–made hosts file of malware and ad sites that you can copy and paste into your hosts file. As of writing this, it was last updated in March, 2020.
Guy has been published online and in print newspapers, nominated for writing awards, and cited in scholarly papers due to his ability to speak tech to anyone, but still prefers analog watches. Read Guy’s Full Bio


