- Как заблокировать сайт в Linux?
- Как заблокировать сайт в Linux?
- 5 способов заблокировать сайты и ограничить время экрана в Linux
- 1. Ограничить время экрана с элементарной ОС
- 2. Установите расширения в Firefox или Chrome
- 3. Отредактируйте файл Hosts для блокировки сайтов.
- 4. Фильтрация веб-контента с помощью OpenDNS
- 5. Мониторинг использования с StaffCounter и KidLogger
- Стоит ли вообще использовать программное обеспечение для родительского контроля?
- How to block websites temporarily?
- 5 Answers 5
- Example
- Block IP addresses in Linux with iptables
- Blocking IP addresses and subnets with ipset
- Check existing iptables configuration
- Manually blocking a single IP address
- Using blacklists with iptables and ipset
- Install ipset utility
- Creating a blacklist
- Adding IP addresses to block
- Show details
- Test rules and activate rules on reboot
- Combining ipset and IPv6
- Continue reading
- Beginners Guide to nftables Traffic Filtering
- Differences between iptables and nftables explained
- Exporting nftables rules and configuration
- 30 comments
Как заблокировать сайт в Linux?

В Ubuntu на Linux очень легко заблокировать сайты, например от ленивых детей и жен, которые могут слишком много времени проводить в социальных сетях. Для этого необходимо отредактировать файл hosts командой в Терминале:
sudo gedit /etc/hosts
Кстати, если вы хотите оградить своих детей от посещение сомнительных сайтов, могу посоветовать использовать сервис Yandex DNS, который позволяет фильтровать некачественный контент сети.
После чего в текстовом редакторе gedit откроется файл hosts со следующим содержимым:
127.0.0.1 localhost
127.0.1.1 slava
# The following lines are desirable for IPv6 capable hosts
::1 ip6-localhost ip6-loopback
fe00::0 ip6-localnet
ff00::0 ip6-mcastprefix
ff02::1 ip6-allnodes
ff02::2 ip6-allrouters
Как заблокировать сайт в Linux?
Для блокировки сайта необходимо в конце файла hosts вписать строку 127.0.0.1 и через пробел название сайта. Например как указано на картинке ниже:
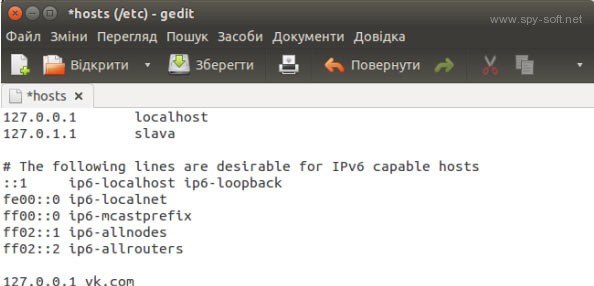 Файл hosts linux
Теперь вы знаете как легко, быстро и без использования дополнительных программ заблокировать сайт в Ubuntu.
Вам также может быть интересно узнать, как с помощью утилиты Dm-Crypt надежно зашифровать файлы в Linux?
Источник
5 способов заблокировать сайты и ограничить время экрана в Linux

У пользователей Linux есть дети, как и у всех остальных. Когда приходит время передавать компьютер, некоторые родители хотели бы немного помочь, чтобы их дети не выходили за борт и не заходили в определенные уголки сети.
К сожалению, бесплатное программное обеспечение для родительского контроля с открытым исходным кодом не является чем-то особенным, и большинство настольных систем на базе Linux не имеют встроенных функций. Но это не значит, что вам не повезло. Вот несколько вариантов, доступных для вас.
1. Ограничить время экрана с элементарной ОС

Большинство десктопов Linux не поставляются с программным обеспечением для родительского контроля, но это не значит, что ни один из них не делает. Одна из наиболее популярных версий — исключение из правила: elementaryOS
Вы можете найти родительский контроль в приложении «Системные настройки». Там вы можете ограничить использование компьютера определенным временем суток. Вы также можете назначить больше использования компьютера в выходные дни, чем в будние дни.
elementaryOS требует, чтобы вы создали отдельную учетную запись для ваших детей. Если на вашем компьютере есть приложения, которые вы не хотите, чтобы они использовали, вы можете заблокировать их. Вы также можете заблокировать доступ к определенным веб-сайтам. Это не отфильтровывает типы контента, но может помешать им посещать какой-то конкретный тратящий время или хлопотный сайт, с которым они столкнулись.
Чтобы изменить настройки родительского контроля или установить дополнительные приложения, ваши дети должны будут знать пароль, связанный с учетной записью администратора (которая, вероятно, ваша). Пока они не знают и не угадывают ваш пароль, вы можете идти.
Скачать: elementaryOS (бесплатно)
2. Установите расширения в Firefox или Chrome

Те же расширения веб-браузера для родительского контроля, которые работают в Windows и macOS, также работают в Linux. Mozilla Firefox предустанавливается на многие рабочие столы Linux, а Google Chrome легко загружается.
Хотя расширения предлагают, пожалуй, самый простой способ начать фильтрацию веб-контента, они также очень ограничены. Ребенок может обойти любые ограничения, установленные в Firefox, установив другой браузер. Плюс надстройки легко отключить.
Даже если ваш ребенок еще не имеет большого опыта работы с компьютером, компьютерные фильтры могут ускорить процесс. В конце концов, многие из нас многому научились, пытаясь обойти ограничения на школьные компьютеры, когда были моложе. Ребенок может быстро узнать, как отключить расширение и снова включить его, когда вы закончите, а вы не будете мудрее.
3. Отредактируйте файл Hosts для блокировки сайтов.
Файл hosts — это простой текстовый файл, который служит небольшим шлюзом между вами и сетью. Прежде чем ваш браузер загрузит IP-адрес сайта, он сначала проверяет файл hosts. Если ваш файл hosts отображает другой адрес, который указывает на ваш локальный компьютер, например 127.0.0.1, то браузер скажет, что сайт не найден.
Сайт эффективно заблокирован, если у вашего ребенка нет доступа к вашему паролю администратора.
Хотя для редактирования файла hosts требуется больше технических знаний, чем для настройки расширений веб-браузера, это все равно влияет только на ваш компьютер. В то время, когда смартфоны, планшеты и несколько компьютеров часто проходят по дому, это может быть скорее скоростным ударом, чем препятствием. Плюс, опять же, черные списки не могут надеяться заблокировать весь нежелательный контент в Интернете.
Но следующий вариант устраняет оба этих недостатка.
4. Фильтрация веб-контента с помощью OpenDNS
OpenDNS — это бесплатный сервис, который может блокировать доступ веб-сайтов через ваш маршрутизатор. Таким образом, вы можете запретить загрузку сайтов на компьютерах, планшетах и интеллектуальных устройствах.
Сервис предлагает несколько вариантов фильтрации. А «низкий» установка попытки отфильтровывать порнографии, в то время как «высокий» установка также блокируют социальную сеть, сайты обмена видео, а также незаконная деятельность. Вы также можете блокировать сайты, которые тратят время.
Вы можете просмотреть различные варианты и найти руководства по настройке на веб-сайте OpenDNS . Этот процесс немного технический, что может снизить вероятность того, что ваши дети найдут способ отменить их, особенно если они младше.
Тем не менее, остается один простой и очевидный обходной путь. OpenDNS не делает ничего, чтобы блокировать контент, поступающий через сотовую сеть. Если у вашего ребенка есть смартфон с тарифным планом передачи данных, он все равно может получить доступ ко всей сети, если вы не установите родительский контроль на своем мобильном устройстве. Хотя, если у них ограниченный объем данных, это может ограничить некоторую активность — по крайней мере, пока их друг не придет со своим собственным смартфоном.
5. Мониторинг использования с StaffCounter и KidLogger
 Изображение предоставлено: KidLogger
Может быть, вы пришли к выводу, что попытка заблокировать нежелательные сайты просто не стоит усилий, но вы не готовы доверять своему ребенку в навигации по Интернету без присмотра. Рекомендуется не пускать компьютеры в спальню и ограничивать детей рабочим столом в общественных местах дома.
Но даже если вы выросли без компьютера дома, вы, вероятно, узнали на работе, как легко минимизировать то, что вы делаете, когда приходит начальник.
Поэтому, если вы не хотите, чтобы ваши окна были свернуты, вы можете получать журнал каждого сайта, который посещает ваш ребенок. KidLogger может сделать это, а также сообщать имена каждого активного окна, отслеживать, какие приложения работают, и делать скриншоты каждые несколько минут.
KidLogger не предоставляет приложения для Linux, но служба работает с помощью программы StaffCounter, инструмента, который используется для мониторинга того, что сотрудники делают на работе. Вы можете найти описание того, как это сделать, в блоге KidLogger .
Загрузить: StaffCounter (бесплатно)
Стоит ли вообще использовать программное обеспечение для родительского контроля?
Программное обеспечение для родительского контроля может не стоить усилий. Для начала, сеть обширна, и новые сайты появляются постоянно. Мало того, что технически невозможно разработать систему, которая может блокировать весь неприемлемый контент, но многие родители не согласны с тем, что считается неприемлемым!
Даже если вам удастся найти или обучить фильтр, который делает то, что вам нужно, и настроить родительский контроль, который ваш ребенок не может обойти которыми ваши которыми ваши , вы, возможно, проделали всю эту работу, чтобы обнаружить, что вы получили обиду вашего ребенка. В конце концов, никакое техническое решение не может служить заменой для обучения вашего ребенка тому, как ответственно пользоваться Интернетом.
Источник
How to block websites temporarily?
Is there a way to temporarily block websites in Ubuntu?
For example let’s say . Facebook (or any other website) is just available from 8pm or just for five minutes within e.g. two hours?
5 Answers 5
The tool I’d recommend is Get-Shit-Done. It edits your host file so that you cannot access blocked domains using any browser. However, it does not have a scheduler (although you could use cron for that).
Stay Focusd is Chrome Extension that does something similar.
I personally use a secondary profile in Chrome, with the Whitelist extension, so that it blocks all websites, other than absolutely necessary ones
Open Terminal ( CTRL + ALT + T ).
Type sudo -i in the input field. Check the Run in terminal option. Finally click Run button.
Type your password if necessary and press enter. Then do the following command.
You will get gedit Text Editor window.
For example, if we need to block Facebook just add the following lines just after 127.0.0.1 localhost .
By doing this, it will block the site in all browsers including Google Chrome, Chromium, Mozilla etc. In fact, you can’t access the website at all by any means.
That’s it. When you now open www.facebook.com or facebook.com, you cannot access it. To enable back Facebook, remove the lines we added from the file /etc/hosts or as Eliah Kagan said you can add a # character before the 0.0.0.1 text we added in /etc/hosts to make it a comment and to block it again just remove # character from the beginning of the line.
Example
Enabling It Back by making the line a comment :
Источник
Block IP addresses in Linux with iptables

Blocking IP addresses and subnets with ipset
Most system administrators will already be familiar with iptables. It is around for quite a while and is enabled by default within the Linux kernel. We can use iptables to block one, multiple IP addresses, or even full networks. This may come in handy when you get repeating port scans or see failed login attempts in your log files. Time to get started and block some IP addresses!
Check existing iptables configuration
The first step is to validate existing iptables rules. We will use an empty ruleset for test purposes.
Manually blocking a single IP address
The first option to permanently block an IP address is by creating a rule in the INPUT chain. This way traffic is no longer allowed from that particular IP address.
iptables -I INPUT -s 192.168.1.100 -j DROP
Although this option works great, it might not scale very well. You might even get a very long list of IP addresses to block after a while. Let’s have a look at ipset.
Using blacklists with iptables and ipset
Another option is creating a blacklist. This way we can add multiple systems we no longer want to connect to our systems.
Install ipset utility
Most Linux systems do not have the ipset utility installed by default. So first install that toolkit.
CentOS
You may need to install the epel-release package first.
Debian and Ubuntu
Creating a blacklist
With the newly installed ipset utility we create a new list to block IP addresses. We name it blacklist to show clearly its purpose.
Note: if you want to block based on networks, use hash:net.
After the blacklist is created, we can use the set in iptables. It is related to the –match-set option.

These commands will add the blacklist (or set) to the INPUT and FORWARD chains. As this is a blacklist, the related policy is to drop traffic. No output will be displayed when entering the commands.

Adding IP addresses to block
Next step is adding actual IP address to the list:
Show details
To confirm the blacklist contains the IP address, use the ipset list command.

In this screenshot, we can see the IP address is listed as a member of the set. Now traffic should be blocked.
Test rules and activate rules on reboot
When setting up a blacklist like this, always test it. You want to be sure that the blacklist is enforced in your specific configuration. Also, make sure it still works after a reboot of the system.
To save and restore iptables rules, use the package iptables-persistent. As the name implies, this makes the iptables rules persistent across reboots.
To also store ipset rules, create a small systemd service file: /etc/systemd/system/save-ipset-rules.service
# ipset save/restore script (see https://linux-audit.com/blocking-ip-addresses-in-linux-with-iptables/)
[Unit]
Description=ipset persistent rule service
Before=netfilter-persistent.service
ConditionFileNotEmpty=/etc/iptables/ipset
[Service]
Type=oneshot
RemainAfterExit=yes
ExecStart=/sbin/ipset -exist -file /etc/iptables/ipset restore
ExecStop=/sbin/ipset -file /etc/iptables/ipset save
This script helps to save and restore the ipset rules. You may need to create the /etc/iptables/ipset file.
/sbin/ipset -file /etc/iptables/ipset save
Combining ipset and IPv6
If you want to use IPv6 addresses, create the related database with the ‘inet6’ family.
ipset create blacklist6 hash:net hashsize 4096 family inet6
Then create the ip6tables rule:
ip6tables -I INPUT -m set —match-set blacklist6 src -j DROP
Keep learning
So you are interested in Linux security? Join the Linux Security Expert training program, a practical and lab-based training ground. For those who want to become (or stay) a Linux security expert.
Run automated security scans and increase your defenses. Lynis is an open source security tool to perform in-depth audits. It helps with system hardening, vulnerability discovery, and compliance.
Continue reading
Beginners Guide to nftables Traffic Filtering
Differences between iptables and nftables explained
Exporting nftables rules and configuration
30 comments
Thank you that worked out fantastic.
We should always block external traffic. Allow only required IP with port. IPTABLES is good firewall to block external traffic.
I’m using this heavy duty bash script as root for some like 15 minutes:
sort blacklist-ip | uniq -u > blacklist-ip-sorted
sort blacklist-ip-range | uniq -u > blacklist-ip-range-sorted
while read IPADDR
do
route add $IPADDR gw 127.0.0.1 lo &
done Michael Boelen
Thanks for sharing. While this is another option, it might be less efficient than dropping traffic directly.
thanks for this guide however in centos 6 these steps do not survive an iptables restart and there is no package iptables-persistent.
AND how do i unblock/deleted IP.
Remove it from the list. Example: ipset del blacklist 192.168.1.1
i want to create a blacklist but kernal is not allowing! how can i go about this?
Why is it not allowing it? Any message/error you get?
Thanks for sharing this information to help us all block amazon (‘;-)
But can you tell me if there’s an easier way of converting a long list of (amazon) ip’s to the set without individually doing the chore?
Use the jq tool on the JSON file Amazon provides and block all subnets?
Been using ipset for years. Love it. Thought I pass along additional commands.
To save ips before a reboot, do the following:
Example below uses blacklist as the name, the file blacklist.txt to hold the blocked ips and is located at ‘/var/block/blacklist.txt’.
Fist, make sure iptables is not set to start automatically upon reboot. As ipset needs to be setup again with its ip lists and iptables will fail if it can’t find the ipset resources.
cd /var/block/
ipset -L blacklist > blacklist.txt
Then after a reboot, do the following:
ipset -N blacklist nethash
for i in $( cat /var/block/blacklist.txt ) ; do ipset -A blacklist $i ; done
service iptables start (Or, whatever you use to start iptables)
ipset can also be used to allow entry into a certain area. That is, if you have a private area under a designated IP. You can code to add a ip to ipset, as in this example:
Note: you will need to adjust sudoers on your system to allow for this to work.
ipset -N private nethash
Your code would send the command:
ipset -A private 111.111.111.111;
And, iptables will have a rule which is:
-A INPUT -i eth0 -d (Your Server IP that holds the private resource) -m set ! –match-set private src -j DROP
Once your user logs out or isn’t using the resource anymore, simply send the following command:
ipset -D private 111.111.111.111;
Of course, if the user is on a dynamic IP, this won’t work. Though, you could code to change the ip itself to 111.111.111.0/24 before adding to ipset and would require you to hold this info somewhere.
To add a bunch of IP’s to ipset:
This example uses the name blocklist and is located at /var/blocklist.txt
Add your ips one line at a time to the blocklist.txt file.
Then run the following:
for i in $( cat /var/blocklist.txt ) ; do ipset -A blocklist $i ; done
Then add the rule to iptables, such as:
-A INPUT –match-set blocklist src -j DROP
ipset can be used by the new firewalld system that overlays iptables in CentOS 7. It will store ipsets persistently in XML files under /etc/firewalld/ipsets. You can reference them using “direct rules” in firewalld, a way to inject raw iptables commands into firewalld. The firewalld service will create the ipsets before it installs the rules that use them.
(The firewalld documentation cautions you not to use the iptables service at the same time, but you can safely use the iptables commands to inspect the underlying rules that firewalld creates.)
i don know whats wrong, after a reboot there is no blacklist aviable.
I must do again all commands for ipset
– ipset create blacklist hash:ip hashsize 4096
– iptable -I INPUT -m set –match-set blacklist src -j DROP
– iptable -I FORWARD -m set –match-set blacklist src -j DROP
– ipset add blacklist xxx.xxx.xxx.xxx
ipset list shows me the correct output.
apt install iptables-persistent
Источник


