- Bodhi Linux
- О системе
- Что нового
- Системные требования
- Полезные ссылки
- Подробное описание
- Обзор Bodhi Linux
- Варианты установка
- Download
- Bodhi Linux Download
- System Requirements
- Installation Instructions
- Preview
- Previous Versions
- Installation Instructions
- A: Materials Needed
- B: Download Bodhi Linux
- C: Verify File Integrity (highly recommended)
- II: Create a Bootable USB
- A: Unetbootin Method (Linux Only):
- B: Command-Line ‘dd’ Method (Linux Only)
- C: Rufus (Windows 7/8/10 only)
- D: Alternative Optical Media Method
- III: Boot into the Live Environment
- A: Prepare Your Computer
- B: Reboot to USB
- C: Live USB Boot Options
- IV: Installation to Hard Drive
- A: Installation Steps
Bodhi Linux


| Разработчик: | Bodhi Linux Team (США) |
| Лицензия: | GNU GPL (бесплатно) |
| Версия: | 6.0.0 |
| Обновлено: | 2021-05-10 |
| Архитектура: | armhf, i386, x86_64 |
| Интерфейс: | английский |
| Рейтинг: |  |
| Ваша оценка: | |
| Категория: | Операционные системы |
| Размер: | зависит от дистрибутива |
О системе
Что нового
Новое в версии 6.0.0 (10.05.2021):
Системные требования
Минимальные:
- Процессор: 500 MHz
- Оперативная память: 256 MB
- Место на диске: 4 GB
Рекомендуемые:
- Процессор: 1.0 GHz
- Оперативная память: 512 MB
- Место на диске: 10 GB
Полезные ссылки
Подробное описание
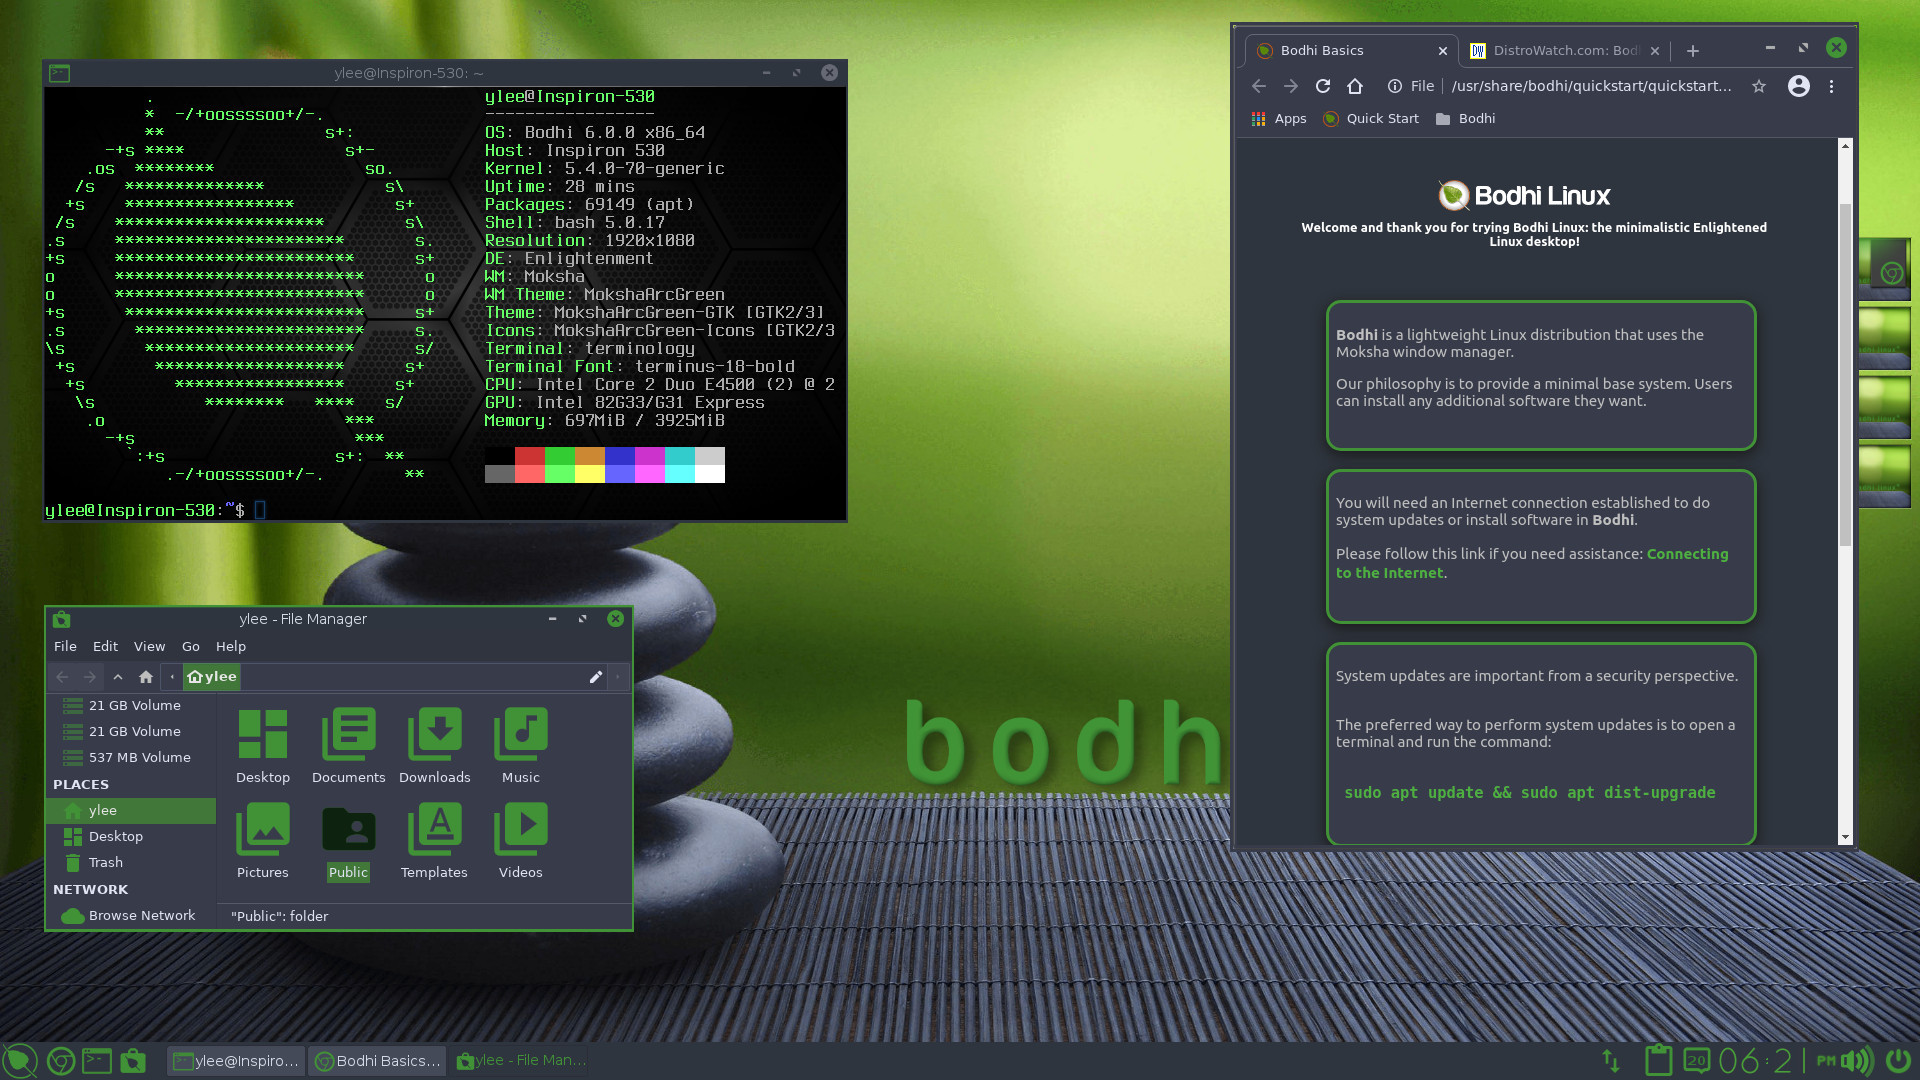
Bodhi Linux — привлекательный и легковесный дистрибутив на базе Ubuntu, который включает среду рабочего стола Moksha, построенную на базе проекта Enlightenment-17.
Проект использует крайне минималистичный подход и предлагает модульность, высокий уровень персонализации и широкий выбор тем оформления. Кроме 32-битных и 64-битных архитектур, проект Bodhi имеет отдельные ISO-образы для хромбуков (Chromebook) и старых машин.
По умолчанию в Bodhi установлено всего пять приложений: Midori, Terminology, PCManFM, ePhoto, и ePad. Другие программы можно устанавливать с помощью веб-инструмента AppCenter.
Обзор Bodhi Linux
ОС Bodhi характеризуется двумя основными элементами:
- Минимализм
- Среда рабочего стола Moksha
Таким образом, пользователь получает полностью функциональную систему, не переполненную сторонними программами. Стандартный набор приложений Bodhi занимает около 10 мегабайт пространства и включает:
- ePad (текстовый редактор)
- PCManFM (файловый менеджер)
- ePhoto (просмотрщик изображений)
- Midori (веб-браузер)
- Terminology (эмулятор терминала)
Концепция системы подразумевает, что пользователи самостоятельно установят необходимые им приложения с помощью AppCenter.
Среда рабочего стола Moksha
Moksha — быстрая, гибкая и привлекательная среда рабочего стола. В отличие от других окружений Linux, которые скрывают настройки конфигурации от конечного пользователя, Moksha выставляет их напоказ, позволяя максимально кастомизировать среду под конкретные нужды.
Кроме настроек параметров, пользователь может изменить внешний вид рабочего стола с помощью многочисленных тем оформления из AppCenter.
Moksha является продолжением проекта Enlightenment 17. Moksha включает исправления ошибок и улучшения, а также удаляет недоработанные или нерабочие функции Enlightenment 17.
Варианты установка
Bodhi Linux предлагает три различных ISO-образа для каждого релиза:
- 32-битный
- 64-битный
- для устаревших машин (Legacy)
32-битные и 64-битный образы поставляются в двух изданиях:
32-битная версия — безопасный выбор
32-битная загрузка с большой вероятности заработает на большинстве машин различных аппаратных конфигураций. 32-битная операционная система также обеспечивает наилучшую поддержку для сторонних приложений с закрытым исходным кодом, например, Steam или WPS Office. Если Вы не уверены, какой образ выбрать, данный вариант идеально подойдет.
64-битная версия — идеальный выбор для рабочих станций и систем UEFI
Среди преимуществ 64-битной версии ОС:
- Поддержка UEFI
- Кодирование видео и аудио
- Запуск виртуальных машин
- Поддержка использования более 64 Гб ОЗУ
- Запуск сервера
Релиз Standard включает минималистичный набор приложений и подразумевает, что пользователь добавить только требуемые приложения. Стандартный набор:
- Веб-браузер Midori
- Файловый менеджер PCManFM
- Текстовый редактор ePad
- Просмотрщик изображений ePhoto
- Мeнеджер обновлений eepDater
- Апплет звуковых настроек ePulse
- Терминальный эмулятор Terminology
Релиз AppPack может использоваться как полноценный Live CD или для установки. Он поставляется с богатым набором приложений и тем, установленными по умолчанию. Встроенные приложения:
- Терминальный эмулятор Terminology
- Веб-браузер Midori
- Файловый менеджер PCManFM
- Текстовый редактор ePad
- Просмотрщик изображений ePhoto
- Менеджер обновлений eepDater
- Апплет звуковых настроек ePulse
- Веб-браузер Chromium
- Офисный пакет Libre Office 5
- Проигрыватель VLC Media Player
- Видео редактор OpenShot
- Графический редактор Pinta
- Просмотрщик документов Evince
- Калькулятор Qalculate
- Текстовый редактор Geany
- Менеджер задач Exterminator
- FTP клиент Filezilla
- Чат-клиент HexChat
- Менеджер пакетов Synaptic
- Поддержка принтеров
Источник

Bodhi Linux, a lightweight distribution featuring the fast & fully customizable Moksha Desktop. The 64-bit is built on top of Ubuntu (20.04). The 32-bit Non-PAE architecture has a Ubuntu 18.04 base – Bodhi Linux 6.0.0 is the Enlightened Linux Distribution.
Here you’ll find all you need to discover more about Bodhi Linux, including helpful resources such as:
- The Wiki: For Tutorials; Installation & Configuration guides, FAQs and much much more.
- The Bodhi Linux AppCenter: Curated Software, Themes and Icon sets for desktop styling/customisation.
Bodhi Linux has a very friendly and active community, check it out for yourself on our Forum or in the live chat.
Bodhi is a small open-source distro with a rather small team of active Team Members, we are always looking for help. In particular, we are looking for c, bash, and python programmers, translators, graphic artists, theme developers, and more. If you have skills to put to use, or a willingness to learn, contact us via Discord or our Forums. Not all users can contribute to the code or documentation, so even a small financial donation helps tremendously.
We hope you’ll enjoy Bodhi Linux as much as we do!
Источник
Download
Bodhi Linux Download
Bodhi Linux 6.0.0 is available for download in one of three flavors:
- Standard Release: Download | Torrent | Md5 | sha256
Minimalist base install, 64-bit, 5.4.0-72 non-updating kernel. (more info). - Hwe Release: Download | Torrent | Md5 | sha256
“Hardware Enablement”. Based on Standard, with 5.8.x updating kernel (more info). - AppPack Release: Download | Torrent | Md5 | sha256
Based on Standard, with a variety of additional Apps & Themes. (more info).
The 32-bit Release is currently a Bodhi Linux 5.1.0 Release. The 6.0 Release coming soon.
- Legacy Release (32-bit only): Download | Torrent | Md5 | sha256
Minimalist base install, 32-bit Non PAE, 4.9.0-6-686 non-updating kernel. (more info).
To learn which flavor is best suited to your needs take a look at the following wiki page: Selecting a Bodhi ISO image.
System Requirements
In order to install Bodhi Linux certain system requirements need to be met. Details on minimum/recommended specifications can be found in the wiki page: System Requirements.
Installation Instructions
For in-depth installation instructions, please see the Installation Guide. If you have any questions about the installation process, don’t hesitate to ask questions on our forum or in our live chat (Discord).
Preview
Previous Versions
Earlier versions of Bodhi Linux (prior to version 6.0.0), are available for download from our SourceForge page.
Источник
Installation Instructions
January 29, 2015
The following are instructions for installing Bodhi Linux on to your computer from a working Linux/Windows system via a USB drive (eg: thumb-drive). This is the recommended method. Installation using CD/DVD is also possible.
A: Materials Needed
Before beginning, you will need the following things:
- If you want to dual boot (from another Linux distribution or Windows) and all your hard drive storage is fully allocated then it’s recommended that you shrink these partitions until you have sufficient free space to create a new Bodhi installation partition.
- If you are willing to overwrite any/all current data, including your current OS:select the Erase disk and install Bodhi – see section IV.
- NOTE: ALL DATA WILL BE ERASED DURING THIS PROCESS!
- – A USB drive that contains no important data
- NOTE: ALL DATA WILL BE ERASED DURING THIS PROCESS!
Bodhi Linux 6.0.0, System Requirements:
Minimum:
- 32bit, 500MHz (Non-PAE) processor
- 512MB** of RAM
- 5GB of drive space
Recommended:
- 64bit, 1.0GHz processor
- 768MB of RAM
- 10GB of drive space
** NOTE: The Bodhi installer runs best with more than 512MB of RAM (ideally 1GB or more). With 512MB RAM, the Bodhi Linux installer will work, but it will work slowly. After installation, you will find Bodhi runs reasonably well with 512MB RAM.
Does your system meet these requirements? Check out which ISO image will best suit you/your hardware!
NOTE: Is your PC only just meting the Minimal Hardware Specification? Take a look at the Minimal Spec FAQ, you will find answers to questions, comments on software alternatives (when system memory is limited) and successful installs against minimal hardware specs.
B: Download Bodhi Linux
NOTE: See Selecting the Correct ISO wiki page for more information on which version of Bodhi best suits your hardware
Examples below are based on bodhi-6.0.0.0-64.iso ).
C: Verify File Integrity (highly recommended)
3) Open a terminal emulator (Terminology for example)
II: Create a Bootable USB
The following sub-sections are OS-specific, use the quick links below to jump to your preferred method:
A: Unetbootin Method (Linux Only):
NOTE – 1: may not work with UEFI motherboards
NOTE – 2: There are known issues using Unetbootin when using Windows. See the dedicated section titled “Rufus (Windows 7/8/10 only)” (below) for the recommended approach for creating Live USB from within Windows.
- b) Insert your USB drive.
More information about unetbootin is available on their site at https://sourceforge.net/projects/unetbootin/
B: Command-Line ‘dd’ Method (Linux Only)
If the unetbootin method does not work for you, use this ‘dd’ method from the command line:
- a) Open a terminal.
- b) Navigate to the location where you downloaded the Bodhi Linux .iso
- c) To inspect your drives; insert your USB drive and in the terminaltype:
**Tip – run the above command before and then after inserting your USB Drive – the drive that shows up will be your USB Drive (this can be helpful for new users to interpret the output from the ‘sudo parted -l’ command).
You will see output representative of all of your HHDs/SSDs/USB drives (types, partitions, etc) similar to the following:
This output is telling you that a 2 GB Toshiba USB drive plugged in has been allocated as /dev/sdb . From this information, you will now be able to use ‘dd’ to create a live, bootable Bodhi USB drive.
*** Do NOT overwrite your PC’s hard drive during this next step or you will very likely lose all data on your hard drive. Be VERY SURE that the device you type is NOT your PC’s hard drive. ***
The previous step determined that /dev/sda is our 1000 GB hard drive, we do NOT want to enter that into the next step, or it will be over-written. If you have more than one physical hard drive in your PC, be sure you don’t overwrite that (or those) either. OK?…
- d) From the data collected during the previous step, you can now execute the ‘dd’ command in the terminal:
It will take a while to complete this command [without progress output (until it is finished)], so it may just be best to walk away and get a snack or some exercise while this step completes. Trust thy PC!
C: Rufus (Windows 7/8/10 only)
NOTE: With Rufus, the “DD method” must be used when creating the Live USB, otherwise the live USB may fail/error during the USB boot process.
Pay special attention to this in step (f) below. 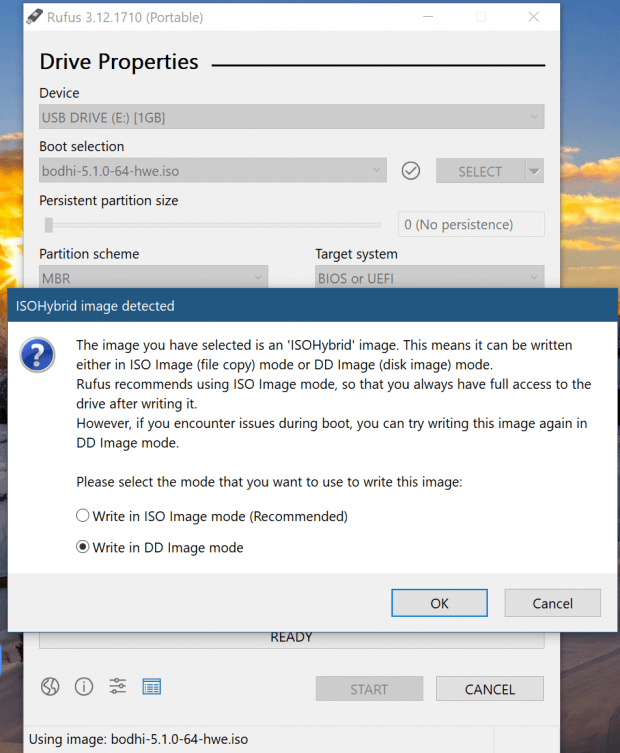
D: Alternative Optical Media Method
If you want to burn a CD/DVD that will be bootable under both Legacy & UEFI, try this command (it is basically the equivalent of ‘dd‘ for a CD/DVD):
III: Boot into the Live Environment
A: Prepare Your Computer
Most systems are not set up to boot from a USB stick automatically. Since the method for doing so varies from machine to machine, you may have to experiment and/or consult the documentation for your system’s BIOS. Here are some pointers:
A lot of newer systems are no longer coming with a BIOS. Intel’s UEFI standard changed a lot of mechanics in a computer boot sequence. Unfortunately, the details of the changes and exactly how to configure it is beyond the scope of this guide. Please feel free to stop by the forums or join our live chat (discord) for help configuring your UEFI machine.
B: Reboot to USB
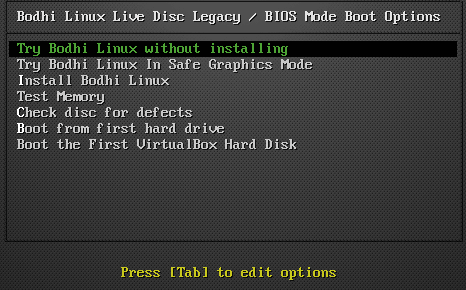
C: Live USB Boot Options
When the Live USB boots you will be presented with a number of options. If you are uncertain which option to select, In most scenarios option (1) is recommended. For older / minimum spec hardware use option (2) or option (3).
NOTE depending on your system’s specs, your selected Boot Option this step may take a while to load – be patient!
- Try Bodhi Linux without Installing
….will boot to the Bodhi’s (Moksha) Desktop. From there you may use the system, install applications and drivers, connect to the Internet and use many of Bodhi’s features. An “Install” icon is available from the Main Menu should you wish to begin the standard installation without rebooting. At the end of a Live USB session, unless an installation is completed, none of the changes you have made will be retained (on the USB Drive). - Try Bodhi Linux In Safe Graphics Mode
….as in option (1), but it instructs Bodhi to not load graphics drivers ( nomodset ). Use this option if you have issues using option (1) …such as hanging on startup / desktop display issue. - Install Bodhi Linux
Boots straight into the standard installer. This option is also very useful for PCs/Laptops with Minimum Spec hardware, that have experienced installation issues in options (1) or (2) due to memory constraints / unexpected installer crashes. - Test Memory
- Check disk for defects
This option can help detect defects on your storage device prior to installation (or use if installation issues arise relating to storage device defects) - Boot from first hard drive
IV: Installation to Hard Drive
A: Installation Steps
With the exception of step #1, the following steps outline the installer screen you will be presented with during installation.
- Download updates while installing Bodhi (default: selected)
- Install third party software updates for graphics cards and WiFi hardware (default: not selected)NOTE: For minimum specification PCs, un-select the option “Download updates while Installing Bodhi”, as this increases the memory demands of the installer. The method to run updates post-installation is outlined further through this tutorial.
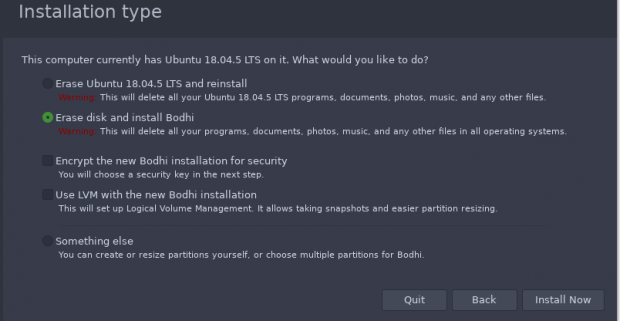
- If you are installing Bodhi onto a system where it will be the only OS , selectErase disk and install Bodhi
- If the installer detects other operating systems you will see options to “install alongside…”. For example, Install Bodhi alongside Windows Boot Manager
- If you need complete control over the installation target (or need to modify your disk Partitions) select the option “Something else“. This is an advanced option, care must be taken. When you have made your selected click Install Now.
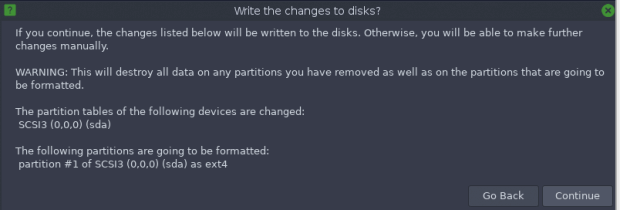
Note! The next screen is the last screen before the installation completes. If you are unsure of any settings you selected you may use the Back button to double-check/change them. When satisfied, click Forward.
8 Who are you?: As the singer Roger Daltrey once asked, enter your given name, for now skip the computer name we will return to this at the end. Now enter a username you would like for the primary user (non-root) account. Enter the password you would like associated with this account twice (for confirmation). Validate (or rename) the name to identify your computer. There is also a radio button choice between Log in automatically and Require my password to log in – the choice is yours but we always recommend requiring a password.
When you’re satisfied with your selection click to Continue, this last step requires no further intervention. A slide show of general Bodhi Linux info is presented. Sit back and relax – in just a few minutes you’ll have a shiny new Bodhi Linux system!
Источник


