- Загрузочная флешка Linux Live USB Creator
- Использование Linux Live USB Creator
- Запуск Linux с флешки
- Boot and Run Linux from a USB Flash Drive
- Helping You Make Linux Boot from USB since 2006
- UNetbootin
- Features
- Using UNetbootin
- Supported Distributions
- Installing Other Distributions Using UNetbootin
- Distribution X isn’t on the list of supported distributions, will it work?
- UNetbootin isn’t able to download the distribution, what should I do?
- My USB stick isn’t booting, what should I do?
- My USB stick/hard drive isn’t detected, what should I do?
- How do I use UNetbootin from the command line?
- How does UNetbootin work, and what does it do?
- Where can I report bugs, submit patches, etc?
- Does UNetbootin have any spyware, viruses, trojans, or other malware?
- What translations are available, and how can I use them?
- Can I help translate?
- Removal Instructions (Applicable only to Hard Disk installs)
- Where’s the source code, and how can I compile or modify it?
- License
- Other open-source projects from the creators of UNetbootin
- HabitLab
Загрузочная флешка Linux Live USB Creator
 Я не раз писал про самые разные программы, позволяющие сделать загрузочную флешку, многие из них умеют записывать и USB накопители с Linux, а некоторые специально предназначены только для этой ОС. Linux Live USB Creator (LiLi USB Creator) — одна из таких программ, имеющая особенности, которые могут оказаться очень полезными, особенно для тех, кто никогда не пробовал Linux, но хотел бы быстро, просто и ничего не меняя на компьютере посмотреть, что к чему в этой системе.
Пожалуй, сразу начну с этих особенностей: при создании загрузочной флешки в Linux Live USB Creator, программа, при вашем желании, сама скачает образ Linux (Ubuntu, Mint и другие), а после записи его на USB, позволит, даже не загружаясь с этой флешки, опробовать записанную систему в Windows или работать в режиме Live USB с сохранением настроек.
Установить Linux с такого накопителя на компьютер вы, естественно, тоже можете. Программа бесплатная и на русском. Все нижеописанное проверялось мной в Windows 10, должно работать в Windows 7 и 8.
Использование Linux Live USB Creator

Интерфейс программы представляет собой пять блоков, соответствующий пяти шагам, которые нужно сделать, чтобы получить загрузочную флешку с необходимой версией Linux.
Первый шаг — выбор USB накопителя из числа подключенных к компьютеру. Тут все просто — выбираем флешку достаточного объема.
Второй — выбор источника файлов ОС для записи. Это может быть образ ISO, IMG или ZIP-архив, компакт-диск или, самый интересный пункт, можно предоставить программе возможность скачать нужный образ автоматически. Для этого нажимаем «Скачать» и выбираем образ из списка (здесь присутствуют сразу несколько вариантов Ubuntu и Linux Mint, а также совсем неизвестные мне дистрибутивы).

LiLi USB Creator выполнит поиск самого быстрого зеркала, спросит, куда сохранить ISO и начнет загрузку (в моем тесте, загрузка некоторых образов из списка не удавалась).

После загрузки, образ будет проверен и, если он совместим с возможностью создания файла настроек, в разделе «Пункт 3» появляется возможность настроить размер этого файла.
Под файлом настроек подразумевается тот размер данных, которые может записать Linux на флешку в Live-режиме (без установки на компьютер). Сделано это для возможности не терять сделанные при работе изменения (стандартно они теряются при каждой перезагрузке). Файл настроек не работает при использовании Linux «под Windows», только при загрузке с флешки в БИОС/UEFI.
В 4-м пункте по умолчанию отмечены пункты «Скрыть созданные файлы» (в этом случае все файлы Linux на накопителе помечаются как системные защищенные и не видны в Windows по умолчанию) и пункт «Разрешить запуск LinuxLive-USB в Windows».
Для того, чтобы задействовать эту возможность, во время записи флешки программе потребуется доступ в Интернет, для загрузки необходимых файлов виртуальной машины VirtualBox (она не устанавливается на компьютер, а в дальнейшем используется как portable-приложение с USB). Еще один пункт — форматировать USB. Здесь на ваше усмотрение, я проверял с включенной опцией.
Последним, 5-м шагом будет нажать по «Молнии» и дождаться завершения создания загрузочной флешки с выбранным дистрибутивом Linux. По завершении процесса, просто закройте программу.
Запуск Linux с флешки
В стандартном сценарии — при выставлении в БИОС или UEFI загрузки с USB, созданный накопитель работает так же, как и другие загрузочные диски с Linux, предлагая установку или Live-режим без установки на компьютер.

Однако, если зайти из Windows в содержимое флешки, там вы увидите папку VirtualBox, а в ней — файл Virtualize_this_key.exe. При условии, что на вашем компьютере поддерживается и включена виртуализация (обычно это так), запустив этот файл, вы получите окно виртуальной машины VirtualBox, загруженной с вашего USB-накопителя, а значит возможность использовать Linux в Live-режиме «внутри» Windows в виде виртуальной машины VirtualBox.

Скачать Linux Live USB Creator можно с официального сайта http://www.linuxliveusb.com/
Примечание: пока проверял работу Linux Live USB Creator, не все дистрибутивы Linux успешно запустились в Live режиме из-под Windows: в некоторых случаях загрузка «зацикливалась» на ошибках. Однако, и для тех, что успешно запустились вначале были схожие ошибки: т.е. при их появлении сначала лучше некоторое время подождать. При непосредственно загрузке компьютера с накопителем такого не происходило.
А вдруг и это будет интересно:
08.02.2016 в 10:36
Здравствуйте, на днях хотела установить linux ubuntu второй системой. У меня стоит windows 10 (обновилась с windows 7), но ничего не получилось, так как «застряла» на разметке диска, куда должна встать linux, у меня нет знаний как это сделать правильно, в интернете читала, пробовала, но не получается. Может вы объясните поэтапно, как правильно выделить место на диске при установке уже самой ubuntu (в открывшемся окне программы, куда и как выделить, мне не понятно)
09.02.2016 в 08:11
Татьяна, здравствуйте. Тут мне самому нужно бы проверить, так как на 10-ку не ставил еще, а сходу если посоветую, то может быть, что наврежу (было уже так, человека оставил без Windows, а только с Ubuntu). А вот когда я до этого доберусь сказать не могу.
Но уверен, должны быть адекватные инструкции. Возможно, вам поможет видео, которое на ютьюб первым выходит по запросу Dual boot Windows 10 With Ubuntu
10.02.2016 в 02:56
Спасибо, Dmitry, за ваш ответ.
08.02.2016 в 11:40
Спасибо за статью давно хотел попробовать или люникс или юбунту.
08.02.2016 в 12:19
Добрый день помогите пож, не могу удалить с реестра виртуал бокс, показывает не удаётся удалить все выделенные параметры
09.02.2016 в 08:06
А у вас установлен VirtualBox? Тогда просто удалить. Если же просто ключи в реестре остались, поищите в интернете по запросу как стать владельцем раздела реестра, а потом удалите.
08.02.2016 в 13:56
Дмитрий, спасибо за интересную статью. Вопрос: загрузочная флэшка, как USB-накопитель, в данном случае должна быть какого объема (минимально и максимально).
09.02.2016 в 08:03
По моим прикидкам, для большинства дистрибутивов должна подойти от 2 Гб. Для Lubuntu точно пойдет.
20.02.2016 в 10:46
спасибо за интересный вариант, только вот проблема, на флешку в NTFS линукс не ставится, нет зелёного сигнала светофора, на FAT32 без проблем, но только вот при запуске, виртуальная машина ругается и в логе можно найти почему-требует NTFS. как тут быть?
21.02.2016 в 06:18
Vladi, я в такой же ситуации с какими-то из образов тоже не разобрался (в статье отмечено, что не все заработали). Так что не подскажу…
09.07.2016 в 19:57
Здравствуйте Дмитрий!
Спасибо за статью, все понятно и просто.
Давно хотел попробовать Linux, тем более получилось запуститься без установки, в режиме Live USB!
16.02.2017 в 12:18
Спасибо за исчерпывающую информацию
18.02.2020 в 20:32
Какие Линукс в этой программе показали себя лучше всего для запуска в гостевом окне Windows?
22.03.2020 в 23:35
Спасибо за статью. Это единственная стоящая инфа в инете на эту тему. Много подобных, но они или не понятны, или скомканы, а здесь всё по полочкам. Спасибо.
17.04.2021 в 11:00
Linux Mint и Kali и Ubuntu не плохие
рекомендую ставить на USB stick класс работает
новичкам не рекомендую ставить рядом с Windows испортите его рано или поздно
USB самое то
Linux проверял 16.04 2021
Источник
Boot and Run Linux from a USB Flash Drive
Boot from USB and take your favorite Portable Linux Desktop with you!
Make a Linux Bootable USB to Boot and Run Linux from a USB Flash Drive.
Recommended YUMI – Multiboot USB Creator Updated: September 29, 2021
Legacy Classic Universal USB Installer – UUI Updated: August 29, 2021
 Easily install your favorite Linux operating system to a bootable USB flash drive. Take your portable Linux with you to run from any computer that can boot from a USB device. You can also Boot Multiple ISO files from a flash drive by using tools like YUMI to create a MultibootUSB. Multibooting allows you to store, boot and then run several Live Linux Operating Systems, Windows installers, diagnostic utilities, antivirus scanners, penetration testing, backup tools, and more, all from the same device. Resulting in your very own custom USB bootable diagnostic tool kit that will fit in your pocket.
Helping You Make Linux Boot from USB since 2006
Pendrivelinux provides simplified information to make it easy for anyone to install, USB boot, and then run their favorite Distros and tools from a flash drive.
- USB Boot Creators
- USB Emulation
- USB Boot From Windows
- USB Boot From Linux
Источник
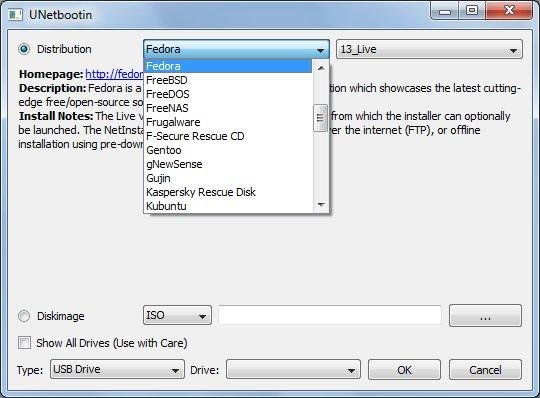
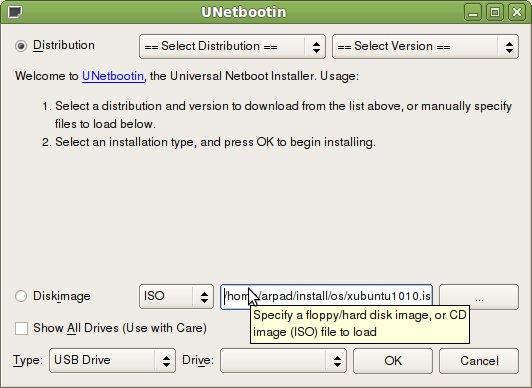
UNetbootin
UNetbootin allows you to create bootable Live USB drives for Ubuntu and other Linux distributions without burning a CD.
You can either let UNetbootin download one of the many distributions supported out-of-the-box for you, or supply your own Linux .iso file.
Features
UNetbootin can create a bootable Live USB drive
It loads distributions either by downloading a ISO (CD image) files for you, or by using an ISO file you’ve already downloaded.
Using UNetbootin
Select an ISO file or a distribution to download, select a target drive (USB Drive or Hard Disk), then reboot once done. If your USB drive doesn’t show up, reformat it as FAT32.
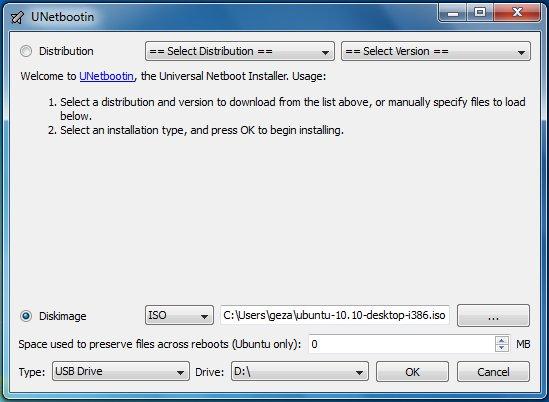
If you used the «USB Drive» install mode: After rebooting, boot from the USB drive. On PCs, this usually involves pressing a button such as Esc or F12 immediately after you turn on your computer, while on Macs, you should hold the Option key before OSX boots.
If you used the «Hard Disk» install mode: After rebooting, select the UNetbootin entry from the Windows Boot Menu.
Supported Distributions
UNetbootin has built-in support for automatically downloading and loading the following distributions, though installing other distributions is also supported:
UNetbootin can also be used to load various system utilities, including:
Installing Other Distributions Using UNetbootin
Download and run UNetbootin, then select the «disk image» option and supply it with an ISO (CD image).
UNetbootin doesn’t use distribution-specific rules for making your live USB drive, so most Linux ISO files should load correctly using this option. However, not all distributions support booting from USB, and some others require extra boot options or other modifications before they can boot from USB drives, so these ISO files will not work as-is. Also, ISO files for non-Linux operating systems have a different boot mechanism, so don’t expect them to work either.
Distribution X isn’t on the list of supported distributions, will it work?
UNetbootin isn’t able to download the distribution, what should I do?
Download the ISO straight from the website, then provide it to UNetbootin via the diskimage option.
My USB stick isn’t booting, what should I do?
Reformat the USB drive as FAT32, then use UNetbootin again to put your distribution on the USB stick.
My USB stick/hard drive isn’t detected, what should I do?
Reformat the USB drive as FAT32, then use UNetbootin again. If it still isn’t showing up, use the targetdrive command line option.
How do I use UNetbootin from the command line?
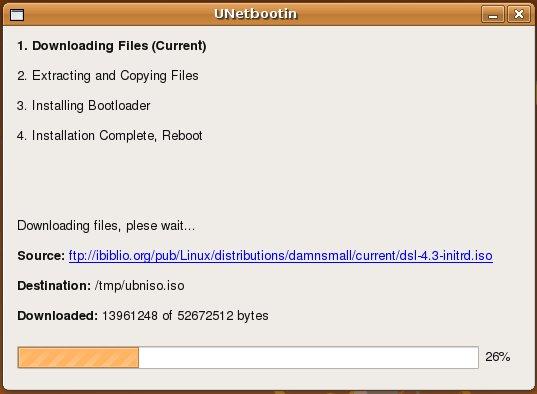
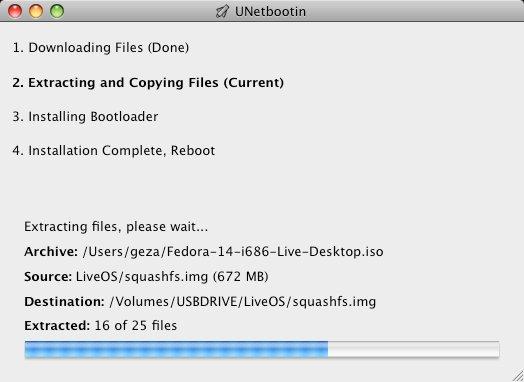
How does UNetbootin work, and what does it do?
Where can I report bugs, submit patches, etc?
First, make sure you are using the latest version available on this website.
» See Github Issues to file a bug report.
» See Github Pull Requests to submit a patch.
Does UNetbootin have any spyware, viruses, trojans, or other malware?
No; though some anti-virus products may raise «Trojan.generic» warnings due to the auto-uninstall feature, these are false positives. Just make sure you obtain UNetbootin from this site, not some shady third-party source. If you’re absolutely paranoid, you can check the source code and compile it yourself.

What translations are available, and how can I use them?
A number of translations are included in the latest UNetbootin release. See the Translations Page for the status of each.
If a translation corresponding to your system’s native language has already been included into UNetbootin, it should automatically load the corresponding translation. Alternatively, you can force the language to use via the lang=es command-line option, where you substitute es with the the 2-letter ISO 639-1 code for your language.
Can I help translate?
If you’d like to help translate this website, join the project on Transifex, then edit translations either on this website or on Transifex.
If you’d like to help translate the UNetbootin program itself, please use Launchpad Translations. If you are new to Launchpad, you will first have to join the corresponding Ubuntu Translators group for the language you intend to translate. For information on using the Launchpad Translations system, see the translations help page.
Removal Instructions (Applicable only to Hard Disk installs)
If using Windows, UNetbootin should prompt you to remove it the next time you boot into Windows. Alternatively, you can remove it via Add/Remove Programs in the Control Panel.
If using Linux, re-run the UNetbootin executable (with root priveledges), and press OK when prompted to uninstall.
Removal is only required if you used the «Hard Drive» installation mode; to remove the bootloader from a USB drive, back up its contents and reformat it.
Uninstalling UNetbootin simply removes the UNetbootin entry from your boot menu; if you installed an operating system to a partition using UNetbootin, removing UNetbootin will not remove the OS.
To manually remove a Linux installation, you will have to restore the Windows bootloader using «fixmbr» from a recovery CD, and use Parted Magic to delete the Linux partition and expand the Windows partition.
Where’s the source code, and how can I compile or modify it?
Source code is on Github, though you may prefer a tarball of the latest release.
License
UNetbootin was created and written by Geza Kovacs (Github: gkovacs, Launchpad: gezakovacs, contact info).
Translators are listed on the translations page.
UNetbootin is licensed under the GNU General Public License (GPL) Version 2 or above. Site materials, documentation, screenshots, and logos are licensed as Creative Commons Attribution-Share-Alike 3.0.
Other open-source projects from the creators of UNetbootin
HabitLab
A Chrome extension to help you waste less time online (on sites like Facebook, Youtube, etc) by experimenting with different interventions (news feed blockers, comment hiders, and more) to find the ones that work best for you.
Источник


