- [FAQ] Создание загрузочной флешки Windows через Ассистент Boot Camp на Маке с дисководом
- Как создать загрузочную флешку macOS из Windows
- Как создать загрузочную флешку в Windows
- Как запустить Mac с флешки
- Артём Суровцев
- Коротко о гибком смартфоне Huawei Mate X
- Лучшие гаджеты и аксессуары за прошедшие 10 лет
- 👀 Читайте также . Всё по теме
- Apple выпустила расширение Пароли iCloud для Google Chrome. Теперь Связка ключей работает на Windows
- В Windows появится поддержка Связки ключей iCloud, в том числе прямо в Chrome
- iMessage внезапно появился в Windows, но неофициально. Как работает новое приложение Beeper
- Появились первые изображения совершенно новой версии Windows
- Как установить Windows на iPhone или iPad и играть в старые игры
- Как сохранять страницы в Safari для просмотра без интернета
- Как использовать пароли из Связки ключей iCloud в Windows или Linux
- Как скачать аудиокнигу на iPhone для прослушивания без интернета
- 🙈 Комментарии 13
- How to start up your Mac from a bootable CD/DVD, USB thumb drive or external storage device
- Requirements
- How to start up your Mac from a bootable CD/DVD
- How to start up your Mac from an external USB storage device
- How to start up your Mac from an external volume using System Preferences
- Troubleshooting startup issues
- Is the storage device to an external power supply?
- Is the storage device connected and turned on?
- Does your disk need repair?
- Did you try using a different USB port?
- Has the disk been formatted with a GUID partition type?
- Does your Mac shut down automatically upon connecting the disk?
- Are you using Boot Camp?
- Are you using an external USB hub?
- Is the disk connected to the keyboard’s USB port?
- Is the disk bootable?
- Are you using wireless keyboard?
- Other ways to start up your Mac
- Safe Mode
- Verbose Mode
- Target Disk Mode
- Startup Manager
- System Preferences
- See also:
[FAQ] Создание загрузочной флешки Windows через Ассистент Boot Camp на Маке с дисководом

Если вы хотите увидеть на нашем сайте ответы на интересующие вас вопросы обо всём, что связано с техникой, программами и сервисами Apple, iOS или Mac OS X, iTunes Store или App Store, пишите нам через форму обратной связи.
К нам поступил следующий вопрос:
Здравствуйте если Вас не затруднит помочь с решение, пытаюсь создать образ Винды 7 из под мак, Имею Мак мини середины 2010 собственно с сдромом но интересует именно флеш образ пробовал редактирование кода файла info.plist не помогло почемуто проверял много раз все было верно а надпись так и не появилась, есть решение для Mountain Lion без стороннего софта только средствами apple, буду признателен.
Не уверены, каким именно мануалом вы пользовались, поэтому расскажем о том способе, работоспособность которого мы только что проверили сами на OS X 10.8.4.
Но сначала поясним остальным читателям, о чём речь. Ассистент Boot Camp в Mac OS X умеет создавать загрузочные флешки с Windows. Но Apple в своём стиле – то ли из-за опасений распространения пиратства, то ли ещё почему-то эта возможность доступна не на каждом Маке. Вот так выглядит основной экран Ассистента Boot Camp на компьютере без оптического дисковода:

А вот так тот же экран выглядит на компьютере, где есть DVD-дисковод:
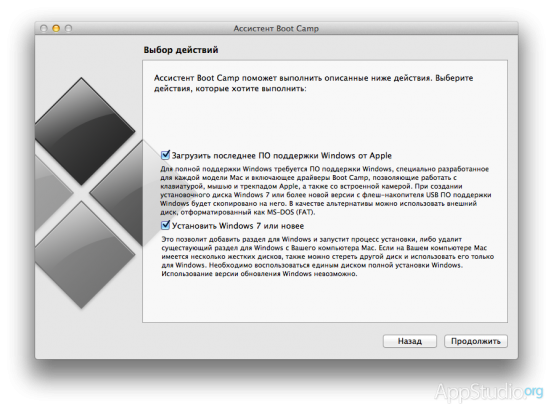
Логика странная: раз есть дисковод, то Windows надо непременно ставить с диска, а уж если нет, то доступно создание загрузочной флешки Windows.
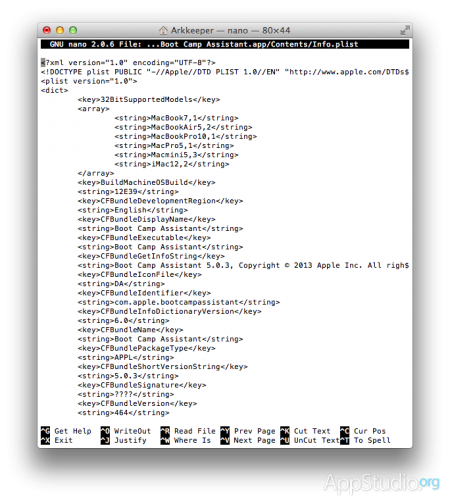
Отношение Ассистента Boot Camp к разным моделям Маков определяется параметрами, прописанными в файле Info.plist внутри него. Чтобы открыть этот файл, введите в Терминале следующую команду:
[php]sudo nano /Applications/Utilities/Boot\ Camp\ Assistant.app/Contents/Info.plist[/php]
Потом вслепую введите пароль от аккаунта и нажмите Enter. Вы увидите содержимое файла, перемещаться по нему можно будет с помощью стрелок на клавиатуре.
Пролистайте содержимое вниз, до секции «PreUSBBootSupportedModels». В ней перечислены минимально требуемые аппаратные идентификаторы моделей Маков, начиная с которых разрешается развёртывание системы на флешку:
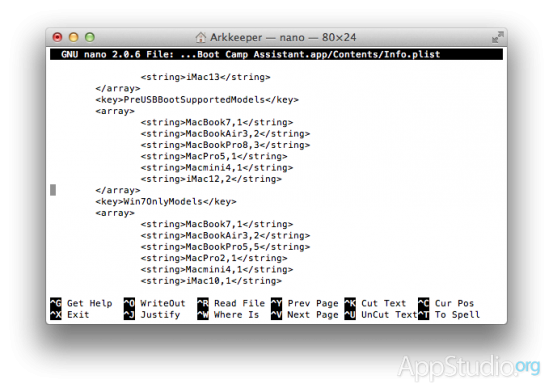
Исправите Macmini4,1 на Macmini1,1 — и создание флешек заработает на любых Mac mini. Аналогично можно поступить и с остальными типами Маков — замените первую цифру в индексе на 1.
После этого останется сохранить файл. Нажмите Ctrl+X, затем введите Y и нажмите Enter. Всё, Ассистент Boot Camp можно запускать заново и проверять эффект.
Как создать загрузочную флешку macOS из Windows
Когда компьютер Mac внезапно перестал запускаться, а резервной копии macOS под рукой нет, поможет чистая переустановка системы.
Если рядом есть другой Mac, то проблем с созданием загрузочной флешки не возникнет. Сейчас расскажем, как выкрутиться из ситуации с Windows-ПК.
? Спасибо re:Store за полезную информацию. ?
Как создать загрузочную флешку в Windows
1. Для создания флешки скачиваем приложение TransMac.
Утилита распространяете на сайте разработчика по цене $59. К счастью, есть бесплатный 15-дневный триал.
2. Теперь потребуется найти образ для установки macOS.
Официального способа скачать операционную систему из Windows нет. Придется либо искать друга с компьютером Mac, либо пользоваться известными всем сайтами.
Обратите внимание, что для работы утилиты TransMac нужен образ macOS в формате *.dmg
Если удастся найти друга с яблочным компьютером и скачать macOS из Mac App Store, будет проще у него же и сделать нагрузочную флешку по инструкции.
![]()
3. Когда образ скачан, а утилита установлена, запускаем TransMac от имени Администратора и соглашаемся на триальный период использования программы.
4. Подключаем к компьютеру флешку (понадобится накопитель емкостью 8ГБ и более)
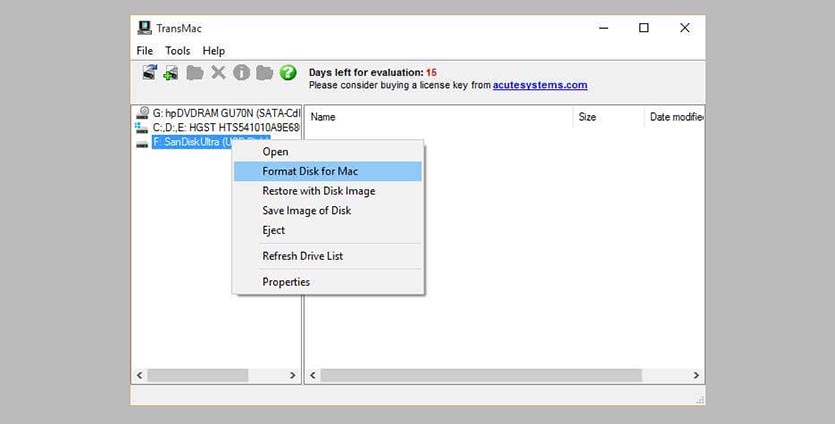
5. В боковом меню находим подключенный накопитель и через контекстное меню форматируем командой Format Disk for Mac.
Внимание! Данный процесс является необратимым, все данные с флешки будут удалены.
6. После окончания форматирования снова вызываем контекстное меню диска и выбираем пункт Restore with Disk Image.
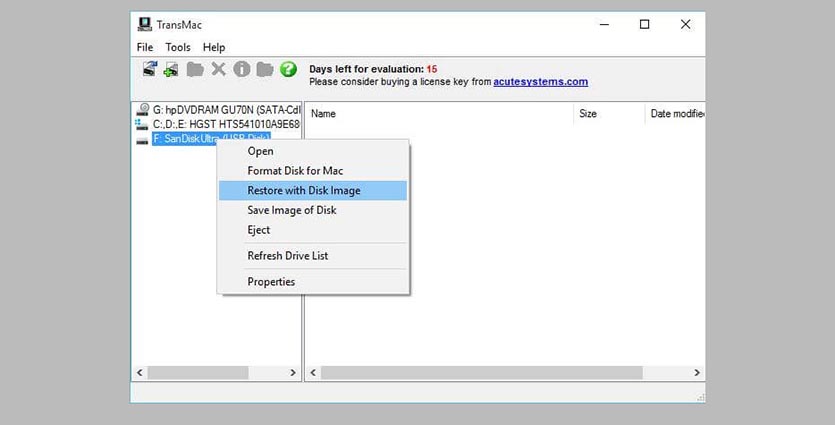
7. В открывшемся окне проводника указываем скачанный образ для установки macOS.
8. Подтверждаем запись образа на флешку и ждем 20-30 минут, пока процесс не завершится.
Все! Флешка для установки macOS готова.
Как запустить Mac с флешки
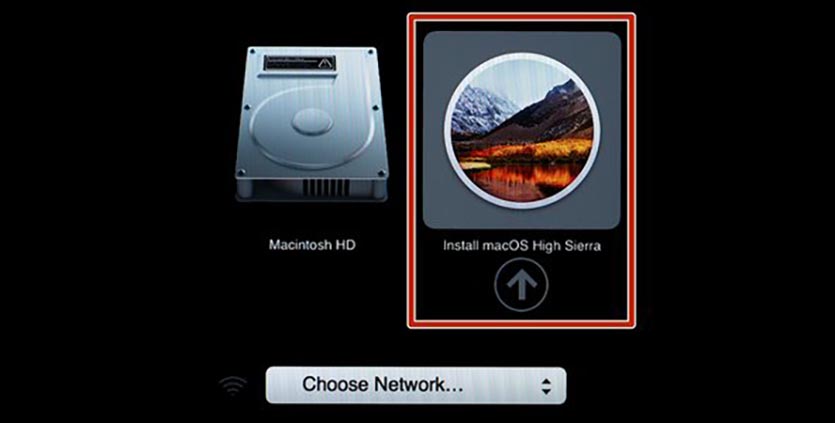
Подключаем наш накопитель к компьютеру Mac и включаем его с зажатой клавишей Alt (Option).
Обратите внимание, что для загрузки со внешних накопителей на Mac с чипом T2 нужно произвести некоторые манипуляции.
В меню выбора диска указываем флешку и производим установку macOS.
Следуйте подсказкам мастера установки и через несколько минут получите работоспособный Mac.
![]()
Артём Суровцев
Люблю технологии и все, что с ними связано. Верю, что величайшие открытия человечества еще впереди!
Коротко о гибком смартфоне Huawei Mate X
Лучшие гаджеты и аксессуары за прошедшие 10 лет
👀 Читайте также . Всё по теме

Apple выпустила расширение Пароли iCloud для Google Chrome. Теперь Связка ключей работает на Windows
В Windows появится поддержка Связки ключей iCloud, в том числе прямо в Chrome

iMessage внезапно появился в Windows, но неофициально. Как работает новое приложение Beeper
Появились первые изображения совершенно новой версии Windows
Как установить Windows на iPhone или iPad и играть в старые игры
Как сохранять страницы в Safari для просмотра без интернета

Как использовать пароли из Связки ключей iCloud в Windows или Linux

Как скачать аудиокнигу на iPhone для прослушивания без интернета
🙈 Комментарии 13
Как наоборот сделать загрузочную флешку Windows 7 из-под Mac OS?
@sergeyc , чз Boot Camp Assistant
Shift-Option-⌘-R
Переустановка версии macOS, входившей в комплект поставки компьютера Mac, или ближайшей к ней версии из доступных.
Option+Command+R
Установит самую свежую доступную версию ОС.
Все работает от Интернет и флэшку делать не нужно!
@Phonerz , Артём хакинтош ставит. На Mac пока денег нет.
@near , аа! Спасибо за подсказку! Но, он забыл про этап на котором еще надо пропатчить установщик!
![]()
@Phonerz , до виндузятников никак не дойдет, что на маке не нужно трахаться с образами, флэшками, драйверами и прочим говнецом
![]()
Накой? Ненужны уже сто лет флешки, есть интернет – комп через него сам и восстановится.
Можете себе представить, есть места в мире где есть мак и нет интернета.
@Sviatoslav_Dmitrievsky , в мире нет мест без интернета. Либо там нет людей.
Это настолько устаревший способ, что в интернете в каждом форуме про использование TransMac масса комментариев, что он уже НЕ РАБОТАЕТ. Из личного опыта могу сказать, что работающую загрузочную флешку с TransMac вы можете создать только с Lion. С более новыми OS этого не получится. С сайта Apple вы сможете скачать системы только начиная с EL Capitan. Системы выше High Sierra уже не скачивается в виде dmg образа. Если не прав, то поправьте.
Я делаю не так. Загрузочная флешка не нужна. В роли загрузочной флешки я использую 16Гб ssd диска (на время установки).
Для этого нужно сделать так:
1. Скачать из App Store последнюю прошивку и поместить прошивку (расширение файла – .app) в раздел “Программы” (если начнется установка системы – остановить установку).
2. Запускаем “дисковую утилиту” и временно выделяем 16gb пространства для загрузочного образа, для этого жмем “вид”-“показывать все устройства” и выбираем контейнер disk1. Потом жмем “разбить на разделы”, затем снова жмем вкладку “разбить на разделы”, потом жмем “плюс”, ставим 16gb размер диска, вводим имя раздела “16Gb” (без кавычек), формат выбираем Mac OS Extended (журналируемый), а потом жмем “применить”.
3. Запускаем Терминал и копируем такую строку:
sudo /Applications/Install\ macOS\ Catalina.app/Contents/Resources/createinstallmedia –volume /Volumes/16Gb и нажать “Enter” (ввести пароль администратора). После этого создастся загрузочный образ на выделенном разделе ssd.
4. Потом перезагружаем и с нажатым alt выбираем запуск системы с созданного образа. Когда запустится консоль установки системы, выбрать “дисковую утилиту” и стираем диск, на котором стояла система в формат APFS, потом продолжить установку системы на уже отформатированный диск.
5. Если место на ssd жалко, то после установки системы стираем диск “16Gb” и в разделе “разбить диски” объединяем эти разделы и останется один общий раздел на диске ssd.
боже, чтобы сделать загрузочную флешку в macOS, нужно купить хероту за 59$ . Оо
How to start up your Mac from a bootable CD/DVD, USB thumb drive or external storage device
Christian Zibreg on September 14, 2015
macOS can start up your Mac in a myriad of ways. We’ve already covered some of them in detail, such as using built-in Startup Manager to pick a disk to startup your Mac from and booting into Safe, Verbose and Target Disk modes.
In this article, we get to talk about starting your Mac up from external storage like optical media or an external USB-based hard drive or flash storage. Booting from an external storage allows you to start up your Mac in another version or copy of macOS, Additionally, it can help you troubleshoot certain issues, and more.
Requirements
Starting up your Mac from an external disk requires the following:
- Intel-based Mac
- Bootable optical media (CD or DVD) on Macs equipped with Apple’s Super Drive or a USB thumb drive formatted with a GUID partition type and containing a macOS installer or a usable operating system.
Apple advises against booting from external storage containing a version of macOS earlier than the one your Mac shipped with.
How to start up your Mac from a bootable CD/DVD
1) Firstly, turn on your Mac, or restart it if it’s already on by choosing Restart in the Apple menu.
2) Secondly, press and hold the C key on your keyboard immediately upon hearing the startup chime. Your Mac should start up from the macOS installer CD/DVD media. You can also press the left mouse button on a wired mouse during startup to open the disc tray.
Tip: You can easily burn a bootable image of macOS to a DVD using Disk Utility.
How to start up your Mac from an external USB storage device
If your USB thumb drive, USB external disk or flash storage contains a usable operating system or a macOS installer, you can select it at boot time using macOS’ built-in feature called Startup Manager, which can be invoked via a simple keystroke.
1) Turn on or restart your Mac.
2) Press and hold the Option key immediately upon hearing the startup chime. Release the key after Startup Manager appears. Startup Manager will scan and list connected drives and volumes that can be booted from, as shown below.

3) Highlight the volume you want to use by using your mouse or trackpad, or left and right arrow keys on the keyboard.
4) Double-click or press the Return key to boot your Mac from the selected volume.
Tip: If there are several USB storage devices connected to your Mac, Startup Manager will only list the ones containing bootable volumes.
How to start up your Mac from an external volume using System Preferences
You can use System Preferences to tell your Mac to automatically use optical media or an USB-based external disk or flash storage every time it’s restarted.
1) Open the System Preferences application in the Dock.
2) Now click the Startup Disk pane. You will be presented with various disk icons.

3) Select the system you would like to use to start your computer up.
4) Now click the Restart button to start up your Mac using the chosen volume.
Tip: Your Mac will now always boot into the selected startup disk. However, you can change that in System Preferences, or temporarily override it through Startup Manager.
Troubleshooting startup issues
Should you run into problems whilst attempting to boot your Mac from an external storage device, consult our FAQ below. It will help troubleshoot any start up issues you may be plagued with.
Is the storage device to an external power supply?
Depending on its model and power requirements, it may be necessary to connect your USB storage device to an external power supply.
Is the storage device connected and turned on?
Make sure your external storage is turned on and connected to your Mac. USB-based external hard disks usually have the power on/off button at the back of the enclosure.
Does your disk need repair?
If your Mac doesn’t boot from an external volume or the drive doesn’t show up in Startup Manager even though it contains a bootable copy of macOS, it might need repair.
The first order of business should be attempting to repair disk permissions in Disk Utility. In the worst case scenario, you might need to reinstall macOS on the external volume.
Did you try using a different USB port?
If you own a MacBook or MacBook Pro, try using a different USB port if you cannot startup from the external USB storage device.
Has the disk been formatted with a GUID partition type?
Intel-based Macs support starting from an external USB storage device’s volume that has been formatted with a GUID partition type.
Does your Mac shut down automatically upon connecting the disk?
Apple states that a MacBook Air contains a preventive measure which prompts the computer to shut down automatically if the connected USB storage device has issue or if the USB port on the MacBook Air itself is damaged.
Are you using Boot Camp?
If you’re using Boot Camp in a dual-boot Windows/macOS environment, you may be unable to boot natively into supported versions of Microsoft Windows XP, Windows Vista or Windows 10 operating systems installed on external USB hard drive.
Are you using an external USB hub?
Using an external hub to connect several USB devices may cause your Mac to fail recognizing them at boot time. Try connecting the USB drive to another port on the hub. Should that fail, connect the disk directly into your Mac’s USB port. Keep in mind that some USB hubs and external USB storage devices need an external power supply, depending on their power requirements.
Is the disk connected to the keyboard’s USB port?
Both wired and wireless Apple Keyboard, and some other keyboards with built-in USB ports, may not supply enough power to some external USB hard drives.
Is the disk bootable?
Make sure the external drive you’re trying to start from contains a usable operating system. Volumes that aren’t bootable and don’t contain a copy of a valid operating system aren’t listed in Startup Disk or Startup Manager.
Are you using wireless keyboard?
If you use an Apple Wireless Keyboard or another Bluetooth keyboard with your Mac, keystrokes won’t be recognized during the startup process because Bluetooth isn’t initialized at boot time. Connect a wired keyboard or use the built-in keyboard if you own a Mac notebook. The same disclaimer applies to holding the left button on a wireless mouse during bootup to open the disc tray.
Other ways to start up your Mac
In addition to what we already discussed above, your Mac can start up in a number of different ways, including the following methods that our tutorials provide step-by-step instructions for:
Safe Mode
You can invoke it by pressing and holding the Shift key after hearing the startup chime. Safe Mode disables certain features of macOS and loads only essential components to make troubleshooting software issues simpler. It also includes an automatic disk check and repair which might resolve boot problems and allow you to start up your computer successfully.
Verbose Mode
Verbose Mode is a text-only environment which displays status messages as the startup process progresses. Press and hold the Command – V key combination after hearing the startup chime to enter Verbose Mode. You can use this mode to troubleshoot startup issues and resolve problems with kernel extensions and custom hardware while allowing you to see exactly what’s going on behind the scenes as macOS loads its components.
Target Disk Mode
Target Disk Mode allows a Mac to be used as an external hard disk connected to another Mac. To enter Target Disk Mode, turn on your Mac and hold down the T key immediately upon hearing the startup chime. Once the computer is in Target Disk Mode and available as an external volume to the host Mac, you can copy files to or from that volume. You can start up any Mac with a FireWire or Thunderbolt port in Target Disk Mode.
Startup Manager
macOS’ built-in Startup Manager allows you pick a volume to start your Mac up from at boot time, which temporarily overrides your startup disk defaults set in System Preferences. Just turn on your Mac, hold the Option key after the startup chime and release it after Startup Manager appears.
System Preferences
To change your default startup disk, use the Startup Disk pane in the System Preferences application. Your Mac will boot into the selected disk until you choose another one or temporarily override your selection using Startup Manager at boot time.
See also:
Please bookmark the article for later as you never know when it might come in handy.


