- How to Create a Windows 10 System Image Backup
- Create a System Image in Windows 10
- More on Windows 10 Backup and Recovery Tools
- WindowsImageBackup: что это за папка и можно ли ее удалить?
- WindowsImageBackup — что это за папка?
- Можно удалить папку WindowsImageBackup?
- Важно знать: принципы архивации
- Restore Windows 10 System Image to New Hard Drive | 2 Ways
- The need to backup and restore Windows 10 to new hard drive
- Method 1. Restore Windows 10 system image to new hard drive with Backup and Restore(Windows 7)
- Part 1: Create Windows 10 full system backup with Backup and Restore (Windows 7)
- Part 2: Restore system image Windows 10 to new hard drive
- Part 3: What to do after backup and restore Windows 10 image to new hard drive?
- Situation 1: Restore Windows 10 backup to larger hard drive
- Situation 2: Restore Windows 10 image to smaller drive
- Method 2. Restore Windows 10 image to new hard drive with AOMEI Backupper Standard
- Step by step guide: Windows 10 system image restore to new hard drive
- Conclusion
How to Create a Windows 10 System Image Backup


Windows 10 offers several ways to back up and recover your data. One toolset that you might be used to from Windows 7 is the ability to create a full system image backup. A system image can be used to recover files or restore your entire PC if you’re unable to boot into Windows.
It can also be used to access files in backups you might have made in Windows 7 or Windows 8.1.
Create a System Image in Windows 10
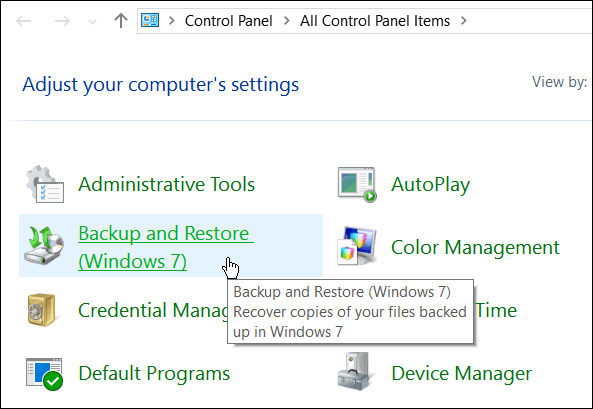
To get started hit the Windows key on your keyboard and type: control panel and choose the Control Panel app from the results. That will open the classic Control Panel that you’re used to from earlier versions of Windows.

Once you have Control Panel open, click Backup and Restore (Windows 7).
Then click the Create a system image link on the left side of the menu.

Windows will scan your computer for backup devices, and you have a few different ways to create your system image. You can use an extra internal or external drive, a network location, and you can still go “old school” and use DVDs.

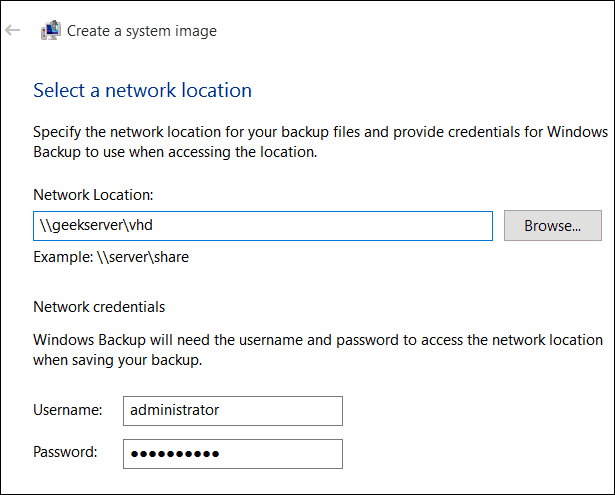
Note: Backing up to a network location like a NAS or Windows Home Server is for experienced users and takes a bit of work. Make sure that Windows is set to discover network locations, browse to the network share, and the first time you’ll need to enter your admin credentials. Unless you have a network share set up, you don’t need to worry about this option.
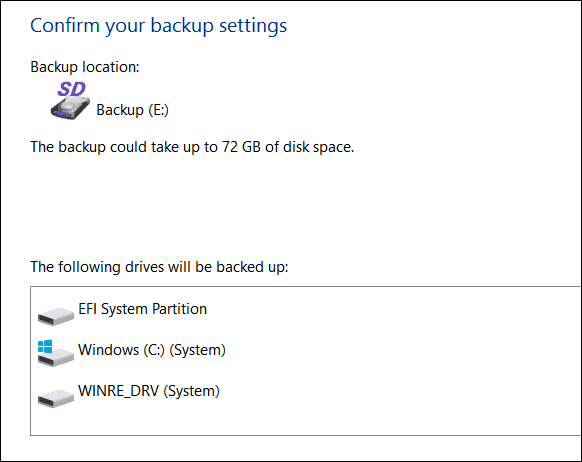
For this example I am going to use what most people would — an external drive plugged into my PC. After selecting your drive and everything looks right, select Start Backup and wait while the image is created.
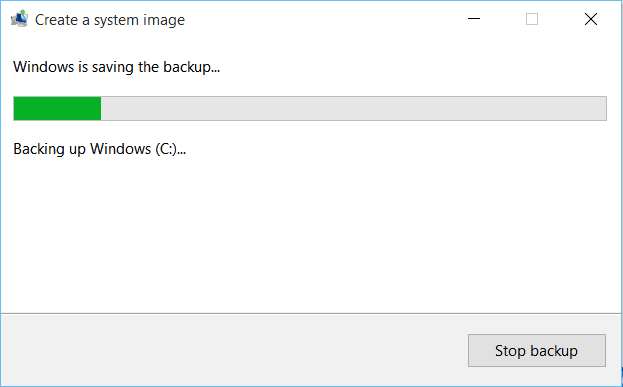
You’ll get a progress screen while the backup is being saved. The amount of time it takes will vary depending on the amount of data you have as well as your hardware.
When it completes, you will get the option to create a USB recovery drive. If you haven’t created one yet, definitely do it now so you’re prepared to recover your computer if needed.

If you’re wondering where the image is at, go into the drive or network location you used, and look for the folder called WindowsImageBackup.

More on Windows 10 Backup and Recovery Tools
Windows 10 has several new backup and recovery features that can come in quite handy if something goes awry.
There’s a PC Reset feature that allows you to restore Windows 10 while keeping your files, or even downgrade to your previous version of Windows (within the first 30 days of upgrading).
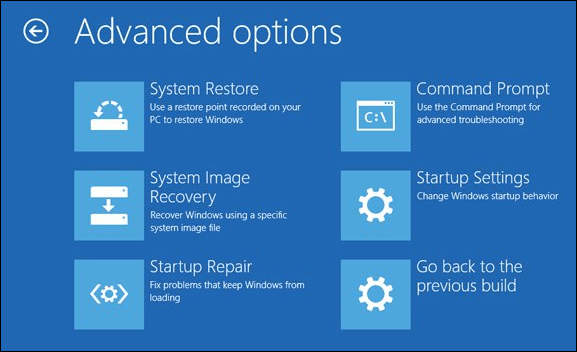
And the Advanced Recovery environment provides tools like System Restore, System Image Recovery, Startup Repair, Selective Startup, and a command prompt for advanced troubleshooting. You can access Advanced Options by holding down the Shift Key and clicking Restart.
In fact, we showed you that trick when we covered how to start Windows 10 in Safe Mode. You can also access the Advanced Options environment by creating a Windows 10 USB Recovery Drive.
When it comes to file recovery and backup, in addition to making a System Image, there is File History that can be configured to automatically back up your most important files to a separate drive or network location. It’s a lot like Time Machine in Apple’s OS X, but for Windows.
Even with all of these options to backup and recover your data or PC, there might come a time when things are so bad (deeply embedded malware for example), or you just want a fresh start…and that’s where grabbing the Windows 10 ISO and doing a clean install comes into play.
If you haven’t upgraded your Windows PC to Windows 10 yet, make sure you back up your data first, and with that, you might want to create a system image. Check out the link that pertains to your system below for a step-by-step guide:
WindowsImageBackup: что это за папка и можно ли ее удалить?
Порой мы сталкиваемся с такой проблемой, как нехватка свободной памяти на жестком диске компьютера. Само собой, первым делом хочется удалить что-то не особо нужное и при этом «тяжелое». Если таким кандидатом для вас оказалась папка WindowsImageBackup, изрядно весящая, то эта статья поможет вам взвесить все за и против ее удаления.
WindowsImageBackup — что это за папка?
Здесь хранятся все данные для восстановления ОС в случае ее краха, резервный образ вашей системы. Этим и объясняется ее приличный «вес» — пара, а то и десяток гигабайт.

Узнав, что это за папка WindowsImageBackup, мы понимаем, что восстановление операционной системы проходит благодаря резервным образам, в ней хранящимся. Запустить этот процесс восстановления можно следующим путем:
- Меню «Пуск», далее — «Параметры», раздел «Безопасность и обновление», затем «Восстановление системы» — пункт «Особые виды перезагрузки». Клик на кнопке «Перезагрузить сейчас».
- На следующем экране вам будет нужен раздел «Диагностика».
- Далее «Дополнительные параметры» и, наконец, «Восстановление ОС».
Можно удалить папку WindowsImageBackup?
Удаление папки пройдет безболезненно для ПК. Дисковое пространство освободится, но вы лишитесь резервных образов системы, отчего в случае проблемы восстановление системы без потери данных будет невозможно. Если вы уверены в своей ОС, то вы можете смело освобождаться от WindowsImageBackup.

Однако мы вам советуем убрать не всю папку, а наиболее старые данные из нее, оставив на всякий случай свежие. Сделать это можно так:
- «Пуск» — раздел «Панель управления». Найдите «Восстановление и резервные копии».
- Зайдите в «Управление. «, затем в «Архив файлов с данными» и далее — «Просмотреть архивы».
- Уберите из архива наиболее старые компоненты.
Важно знать: принципы архивации
Что это за папка WindowsImageBackup, мы разобрались. Вы догадались, что если вы ее единожды удалите, при следующем периоде архивации данных ОС Windows вновь ее создаст и наполнит необходимой информацией. Чтобы остановить этот процесс, вам нужно зайти в «Резервное копирование и восстановление» и отключить его.
Система также не позволяет архивам занять весь жесткий диск целиком — как только WindowsImageBackup заполняет 30% памяти, наиболее старая информация начинает из нее автоматически удаляться. Большей доли дискового пространства эта папка не может занять.
Чтобы вручную отрегулировать максимальный объем для WindowsImageBackup, зайдите в «Резервное копирование» на «Панели управления», в «Управлении пространством» направьтесь в «Образ системы» и измените параметры на свое усмотрение. При желании вы можете задать сохранение только самой свежей резервной копии ОС.
Выяснив, что это за папка — WindowsImageBackup, вы наверняка не поспешите ее удалять. Тем более несложно задать вручную параметры ее наполнения и максимального объема.
Restore Windows 10 System Image to New Hard Drive | 2 Ways
Here you will learn how to restore Windows 10 system image to new hard drive with «Backup and Restore(Windows 7)» and AOMEI Backupper Standard. Select one per your needs.

By Ivy  / Last Updated February 1, 2021
The need to backup and restore Windows 10 to new hard drive
Given that you have a laptop that can only hold one hard drive which is failing, how do you transfer Windows 10 to new hard drive without wasting time reinstalling the operating system and programs? In this case, you can backup Windows 10 to external hard drive or USB and then restore system image to new hard drive or SSD.
Although the final version of Windows 10 has been released for a long time, it still has many bugs reported by users. Therefore, it is essential to backup system image in Windows 10, so you can restore system from backup in the event of hard drive failure or any other unexpected error.
When it comes to migrating Windows 10 to new hard drive free, you could consider using Windows 10 backup utility, Backup and Restore (Windows 7) or AOMEI Backupper Standard. Both of them can help you create Windows 10 backup image as well as bootable USB to boot your computer, but the latter is simpler. Keep reading to get the two methods or the easier way directly.
Method 1. Restore Windows 10 system image to new hard drive with Backup and Restore(Windows 7)
Now, let’s start to restore system image from external hard drive in Windows 10 to new hard drive. You should prepare one external hard drive or USB flash drive to save the backup image. And one CD/DVD is required to create the system repair disc.
Part 1: Create Windows 10 full system backup with Backup and Restore (Windows 7)
Step 1. Go to Control Panel, click System and Security and Backup and Restore (Windows 7) in order.
Step 2. Click Create a system image in the left pane.
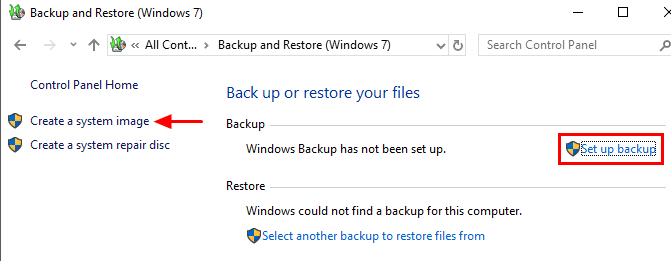
Note: There’s one option named “Set up backup” at the right side. You can also click it to create a system image. On this occasion, you can add other files or partitions that you want to backup besides the system.
Step 3. Choose the destination drive (external hard drive or USB flash drive) to save your backup.
Step 4. The drives that are required for Windows to run will be included by default and click Next to continue.
Step 5. Confirm the settings and click Start backup.
When the backup is done, you’ll be asked if you want to create a system repair disc (CD/DVD) to access the recovery options when your computer is unable to boot. If you do not have the CD-ROM device, you can choose to create Windows 10 recovery disk with your USB flash drive instead.
Part 2: Restore system image Windows 10 to new hard drive
In the following, we will use Windows 10 system image recovery to put Windows on a new hard drive, which is a recovery tool in Windows recovery environment to help users restore Windows 10 backup image and get computer back to a normal state.
Step 1. Shutdown the computer and switch hard drives in Windows 10.
Step 2. Connect the external hard drive containing Windows 10 backup image to your computer. Also, the system repair disc is required.
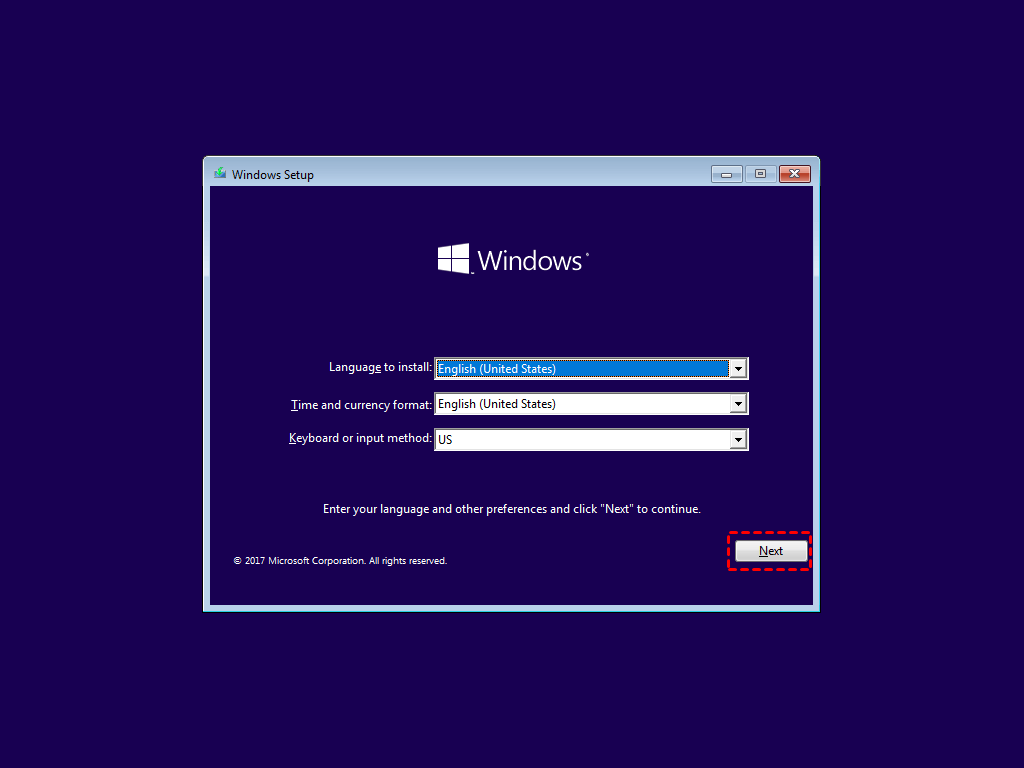
Step 3. Boot computer from the system repair disc. Change your system’s BIOS settings to make sure it can boot from the CD/DVD by hitting the specified key on the first screen.
Step 4. Click Next when you see the Windows Setup interface for the first time, then choose Repair your computer > Troubleshoot > System Image Recovery > Windows 10 subsequently.
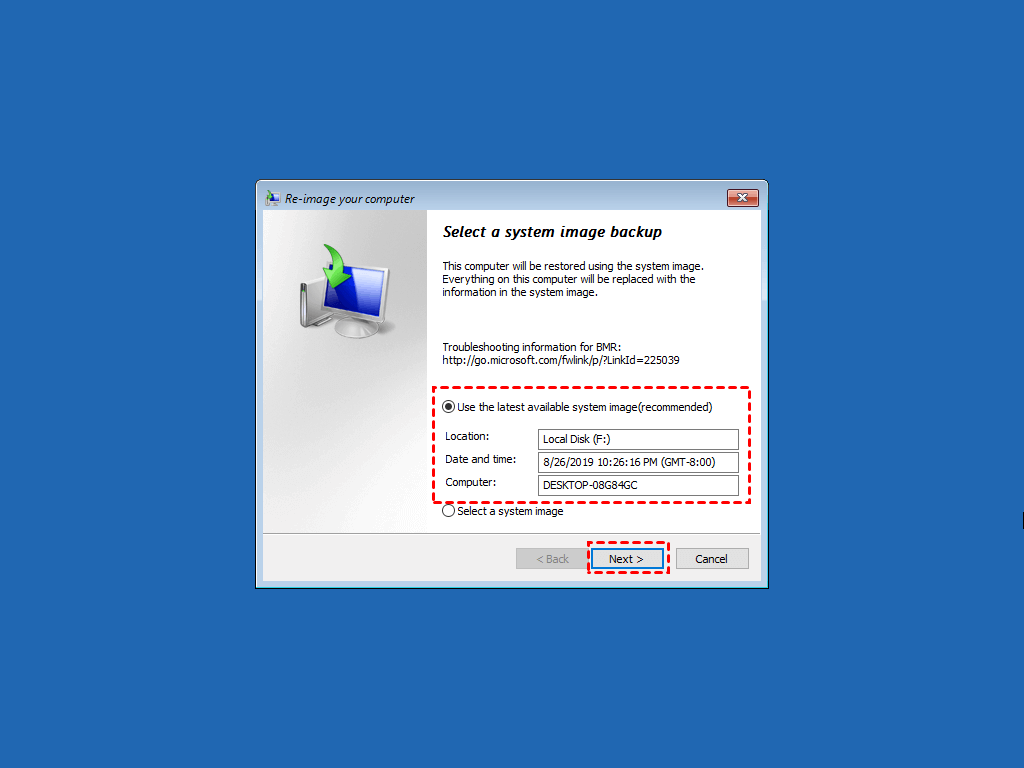
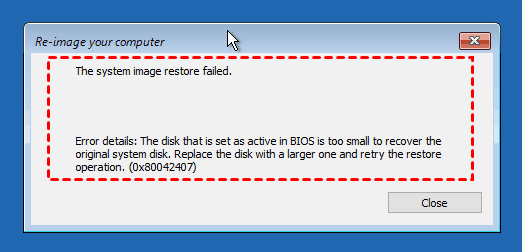
Step 5. In the re-image your computer window, tick Use the latest available system image and then click Next.
Step 6. Choose Format and repartition disks option, then click Next > Finish > Yes to start the restoration.
Part 3: What to do after backup and restore Windows 10 image to new hard drive?
Is it over here? No, you still need to do something per your situation. Here are two main situation, please stay for a while and check it carefully, which can help you make full use of disk space on the new hard drive and avoid system restore failed error.
Situation 1: Restore Windows 10 backup to larger hard drive
If the new hard drive is larger than the old one, there will be an unallocated space at the end of new disk. Thus, you need to extend the partition size, otherwise you cannot use it to store data or do any operation. Here I’ll show you the simple steps to extend partition.
1. Press Win + R to open the run window and type diskmgmt.msc to open Disk Management in Windows 10.
2. Right-click the partition at the left side of unallocated space and select Extend Volume. Then, you will enter the Extend Volume Wizard, click Next to move on.

3. Select the disk you want to extend the partition and click Next. Usually, you can only use unallocated space on the same disk to extend volume.
4. Click Finish to start this operation.
This method works in most cases, but there is an except. If there is the 450MB recovery partition or other partition between the system partition and unallocated space, this method will become invalid. At this time, you need a professional partition resize feature, such as, «Edit Partitions» in AOMEI Backupper.
Situation 2: Restore Windows 10 image to smaller drive
Also, there are some users restore Windows 10 image to smaller drive, and most of them are out of luck. They will encounters the major problem of Windows backup and restore software: it does not support restoring to partition layouts that smaller than the original disk.
For example, if you restore a system image in Windows 10 created on 500GB hard drive to 250GB SSD, you will receive the system image restore failed error and indicated the disk is too small.
If you receive this error, the backup image is useless unless you replace the smaller hard drive with a larger one. Instead, you can use a third party tool like AOMEI Backupper to restore only used sectors on the old hard drive or consider only cloning Windows 10 to new hard drive.
Besides the system image restore error, Windows built-in backup tool still has backup errors, such as, system image backup failed because of shadow copy storage, not enough space, EFI or BIOS, no disk can be used, backup error 0x80070002, etc.
Method 2. Restore Windows 10 image to new hard drive with AOMEI Backupper Standard
AOMEI Backupper Standard is trust and reliable Windows backup and restore software to help you backup and restore Windows 10 from system image to new hard drive smoothly, even a smaller one, while your computer is running well. Also, it’s appliable to restore system image to new SSD. In addition, it allows you to create bootable media and boot the unbootable computerper.
More so, you can perform Windows 10 system image restore to different computer , even with different hardware. However, you need the help of Universal Restore feature and this feature is only available on the paid version, such as, AOMEI Backupper Professional. And this software can help you reuse unallocated space after restoration with its «Edit Partitions» feature. The premise is the restored hard drive does not have multiple partitions.
Step by step guide: Windows 10 system image restore to new hard drive
To restore Windows 10 to new hard drive using AOMEI Backupper, you need to do some preparations first.
Download and install AOMEI Backupper Standard on your computer.
Create system image backup in Windows 10 with AOMEI Backupper and save the image files to external hard drive, USB flash drive or other storage devices. Because it only restores the image created by itself.
Create bootable USB to boot your computer when it’s unbootable. If you don’t have USB drive or CD/DVD, you could consider adding an entry to this software by creating Windows recovery environment.
Then, let’s see how to restore from system image in Windows 10.
Step 1. Install new hard drive in Windows 10, and connect bootable media created by AOMEI Backupper as well as the external drive containing system image to your computer. Then, boot your computer from the bootable media.
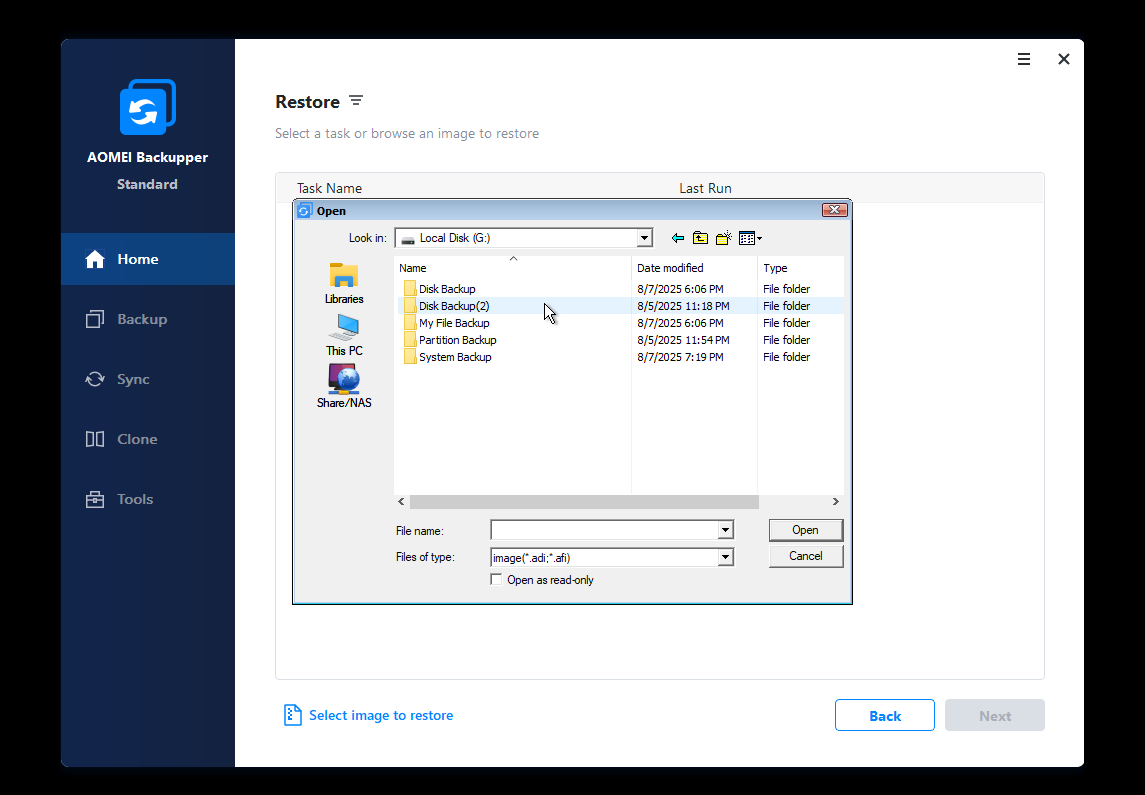
Step 2. Under Restore tab, click Select Image File to find the image on your external drive and hit Next.
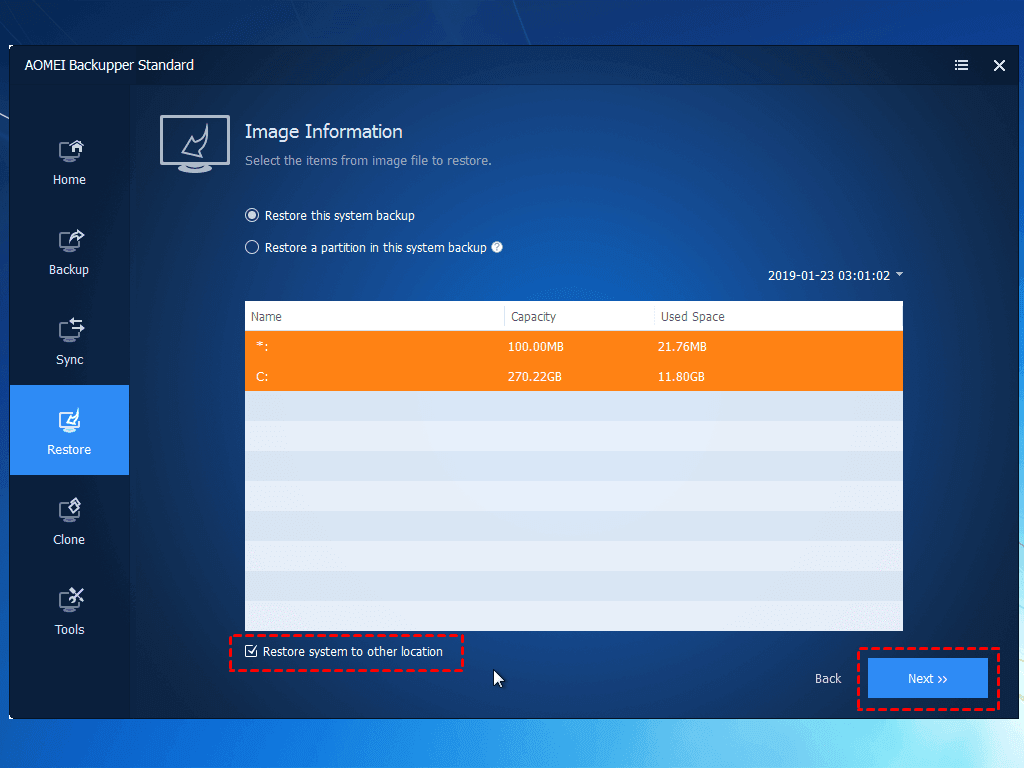
Step 3. Tick restore this system backup and Restore system to other location, then click Next to continue. If you set a scheduled full/incremental/differential backup task, there will be a few backup image that you can choose.
Step 4. Select a destination partition to restore t the image and click Next.
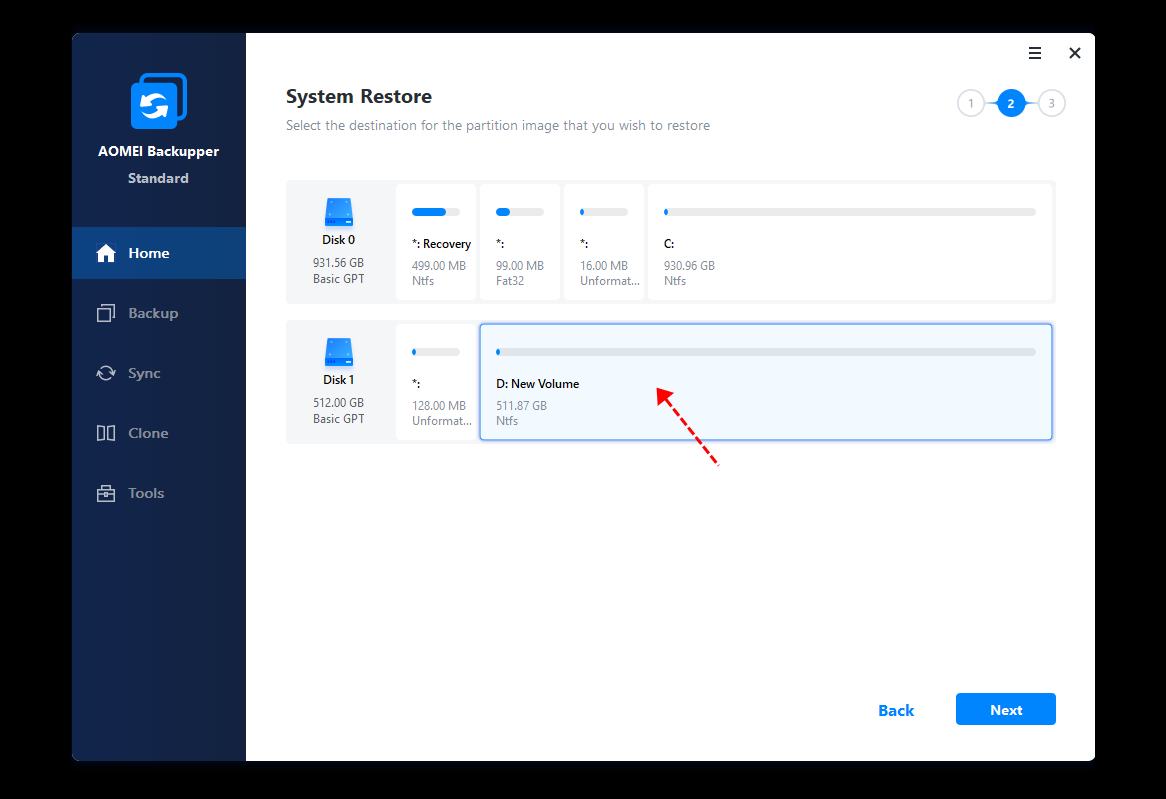
Tip: Please select the first partition on the target disk as destination, otherwise the system could not boot from the target disk.
Step 5. Click Start Restore to install OS on new hard drive.
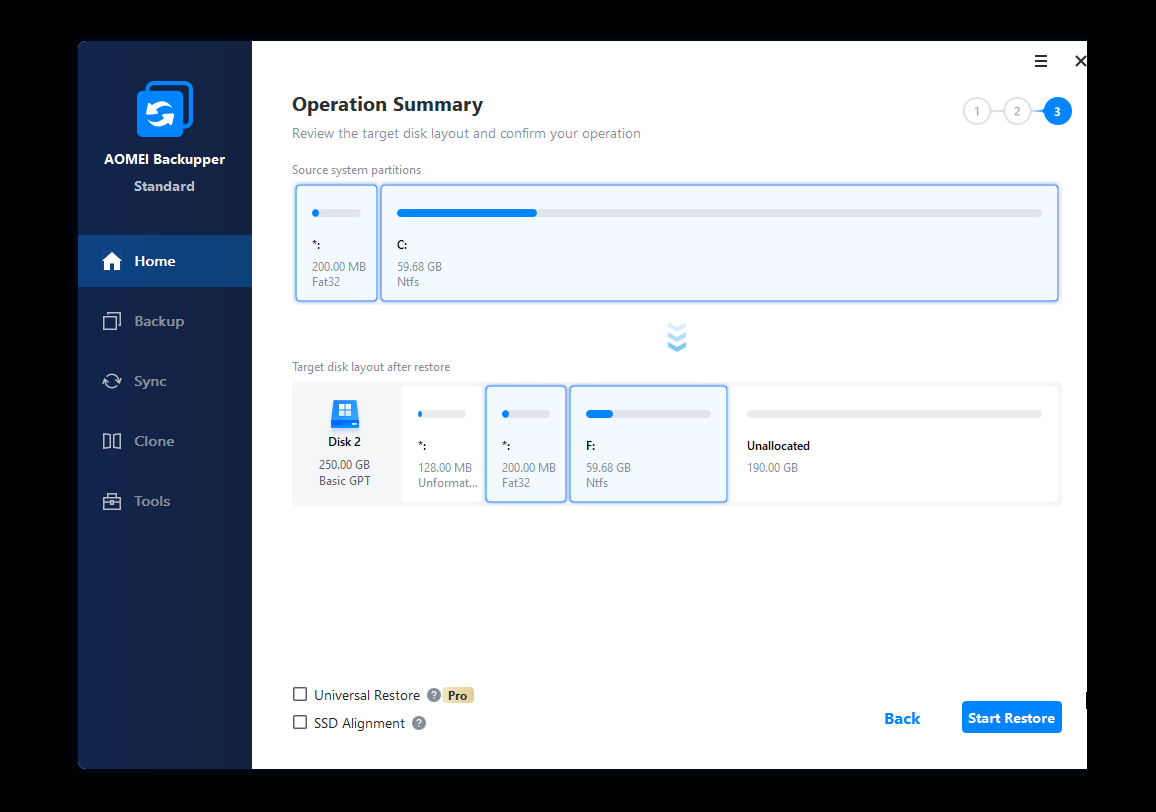
Tips:
в—’ If you want to put Windows on a new hard drive in different computer, it’s suggested to tick «Universal Restore (supported by AOMEI Backupper Professional)». Because this feature can install all drivers required to boot Windows.
в—’ If you are restoring Windows 10 system image to new SSD, please tick «SSD Alignment«. Because this feature can accelerate writting and reading speed of SSDs with 4k alignment technology.
в—’ If your new hard drive is big enough to hold everything on the old disk, you could create a disk image in Windows 10. Then, restore Windows 10 disk image to new hard drive.
Conclusion
That’s all for how to restore Windows 10 image to new hard drive. You can make it with Windows built-in tool or AOMEI Backupper Standard. No matter what method you use, a bootable media is needed if your system crashes, Either optical drive or USB flash drive will be fine.
Besides system backup, you still can backup hard drive, partitions and files. Also, you can set custom schedule backup task to backup automatically, such as, daily/weekly/monthly backup, event trigger backup, USB plug in, differential backup etc. Trust me, it’s one of the most powerful software for you to secure your data and system. Just explore it by yourself now!


