- Create a USB recovery drive
- To create a USB recovery drive
- UEFI boot from recovery USB or from older Windows 10 USB media fails after unsuccesful rollback from 16193!
- How to enter recovery mode in Windows 10
- How do I boot into recovery mode on Windows 10?
- 1. Press F11 during the system startup
- 2. Enter Recover Mode with the Start Menu’s Restart option
- 3. Enter Recovery Mode with a bootable USB drive
- 4. Select the Restart now option
- 5. Enter Recovery Mode using Command Prompt
- 4 Effective Ways to Restore Windows 10 from Recovery USB
- What is a recovery USB?
- Method 1: Recover Windows 10 from a recovery drive
- Method 2: Reinstall Windows 10 without losing data
- Method 3: Reinstall Windows 10 but keep files
- Method 4: Restore Windows 10 image from USB driveВ
- The way forward
Create a USB recovery drive
If you run into problems with your PC running Windows, a USB recovery drive can help you troubleshoot and fix those problems, even if your PC won’t start.
Your PC might have come with a recovery image that’s used to refresh or reset your PC. The recovery image is stored on a dedicated recovery partition on your PC, and is typically 3 to 6 GB in size. To save space on your PC, you can delete the recovery image from your PC and use a recovery drive instead. Windows 8.1 includes a built-in tool to create a USB recovery drive. Windows will let you know how big the recovery partition is, and you’ll need a USB flash drive at least that big.
Warning: Creating a recovery drive will erase anything already stored on your USB flash drive. Use an empty USB flash drive or make sure to transfer any important data from your USB flash drive to another storage device before using it to create a USB recovery drive.
To create a USB recovery drive
Swipe in from the right edge of the screen, and then tap Search. (If you’re using a mouse, point to the lower-right corner of the screen, move the mouse pointer up, and then click Search.)
Enter recovery drive in the search box, and then select Create a recovery drive.
After the recovery drive tool opens, make sure the Copy the recovery partition from the PC to the recovery drive check box is selected, and then select Next.
Note: The check box is greyed out when your PC doesn’t have a recovery partition. The recovery drive will include only the recovery tools and a bootable image, but not a recovery image to use for refreshing or resetting your PC.
Insert a USB flash drive into your PC that’s at least as large as the size indicated on the screen.
Select the USB drive you’d like to use for your recovery drive, then select Next.
Select Create. The recovery image and necessary recovery tools will be copied to your USB flash drive, which will take a while, depending on your PC and the size of the recovery image.
When the process is done, do one of the following:
If you want to keep the recovery partition on your PC, select Finish.
If you want to remove the recovery partition from your PC and free up disk space, select Delete the recovery partition. Then select Delete. This will free up the disk space used to store your recovery image. When the removal is done, select Finish.
Note: Some PCs don’t offer the option to remove a recovery partition. If you experience this, there isn’t a recovery partition on your PC that’s using additional disc space.
Remove the USB flash drive. This is now your Windows 8.1 recovery drive, and you’ll need it if you ever need to refresh or reset your PC. Keep it in a safe place and don’t use it to store other files or data.
Note: If your PC came with Windows 8 and you upgraded it to Windows 8.1, your recovery drive will include Windows 8, and you’ll need to upgrade to Windows 8.1after you refresh or reset your PC.
UEFI boot from recovery USB or from older Windows 10 USB media fails after unsuccesful rollback from 16193!
After trying insider build 16193 on my HP Envy 13 laptop, I tried to rollback to previous version of Windows, unsuccessfully.
So I thought that I make a clean installation media for Windows 10 15063 from media creation tool, but my laptop was not able to boot from that USB stick. It said Your PC/Device needs to be repaired / Error 0xc0E90002. So it seems that somehow UEFI stopped working.
I tried recover bios, changed setting and nothing helps, except setting legacy on. And that is not what I want.
So I tried some other USB media that had earlier Windows 10 images that I have successfully used before but none of my USB sticks work. I tried to use HP recovery media USB, and it does not work. Seems that UEFI is completely broken on my machine. I’m not sure if 16193 build screw up something on this machine or on UEFI bios or SSD.
However, I found another discussion about UEFI not working after 16193: https://www.tenforums.com/windows-10-news/84109-announcing-windows-10-insider-preview-build-16193-pc-15213-mobile-6.html#post1020354 so it is possible that it really has something to do with this build.
Any ideas how to troubleshoot or recover from this? Thanks.
I had the same problem on my SP2. After reading all the threads and many trial and error, I finally got Windows 10 1703 back on my SP2. The final solution was quite simple:
- Secure Boot enabled (so no red boot screen).
- Clean install of Windows 8.1 from USB stick made with Rufus .
- the SP2 recovery image did not work with Secure Boot enabled.
- Finish the installation of Windows 8.1 (Updates not required)
- The Windows 10 1703 USB Stick was still unable to boot on my SP2, so I startet the Upgrade from within Windows 8.1.
- When it came to the first reboot, I was back in UEFI. Disabled Secure Boot now and detached Windows 10 USB stick.
- With the next restart, the Windows 10 Upgrade completed successfully.
- Installed all updates
- Enabled Secure Boot again.
- Surface Pro 2 is back on Windows 10 1703 and Secure Boot working as expected 🙂
Hope that helps anyone.
Was this reply helpful?
Sorry this didn’t help.
Great! Thanks for your feedback.
How satisfied are you with this reply?
Thanks for your feedback, it helps us improve the site.
How to enter recovery mode in Windows 10

- It’s not hard to learn how to enter recovery mode in Windows 10 and there are a few ways to do it.
- The Windows 10 recovery mode can be reached by pressing an F key during the system startup.
- Another simple solution is to use the Start Menu’s Restart option.
- You can even use a line-command tool to enter recovery mode.

- Download Restoro PC Repair Tool that comes with Patented Technologies (patent available here).
- Click Start Scan to find Windows issues that could be causing PC problems.
- Click Repair All to fix issues affecting your computer’s security and performance
- Restoro has been downloaded by 0 readers this month.
Windows 10 includes a recovery mode that enables users to access a range of diagnostic and repair utilities outside the OS. That recovery mode is more widely known as the Advanced Startup Options menu.
The Advanced Startup Options menu is there to assist users troubleshoot Windows when the platform doesn’t start up as users expect. Thus, it appears automatically after startup errors. Users can also manually enter recovery mode.
How do I boot into recovery mode on Windows 10?
1. Press F11 during the system startup

This is among the more straightforward methods for entering recovery mode. Users can press the F11 key shortly after turning their PCs on to enter recovery mode.
Note, however, that this method might not work on all PCs. Some may use the F9 or F12 keys so check that detail with the PC manufacturer.
2. Enter Recover Mode with the Start Menu’s Restart option
- The Start menu’s Restart option provides one of the most reliable methods for entering recovery mode. Click the Start button in Windows 10.
- Then click the Power button.
- Press and hold the Shift key.
- Then click Restart while holding the Shift key.
- After that, select Troubleshoot and Advanced options on the blue menu.
3. Enter Recovery Mode with a bootable USB drive
- Users can enter recovery mode with a bootable USB drive that they can install (or reinstall) Windows 10 with.
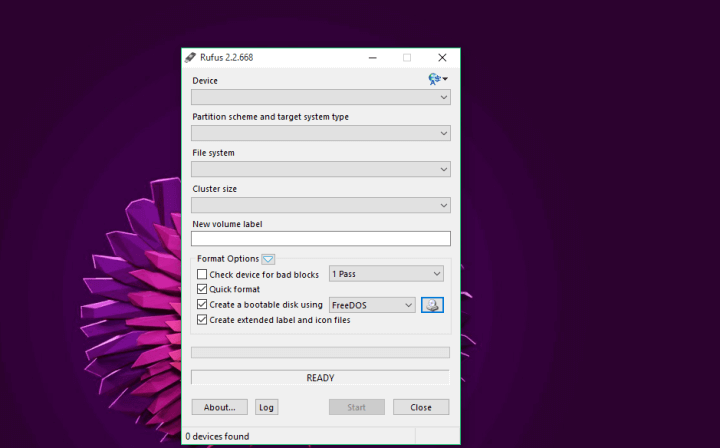
- First, users will need to set up the bootable USB drive with the Rufus software and a Windows 10 image file.

- Users will also need to configure their PCs to boot from USB drives first by adjusting the BIOS or UEFI settings.
- Thereafter, insert a bootable USB drive into a PC’s USB slot.
- Turn the laptop or desktop on. Then a Windows Setup window will appear if the PC is configured to boot from USB drives.
- Click Next on the Windows setup window.
- Select the Repair your computer option.
- Then select Troubleshoot and click on Advanced Options to enter the Advanced Startup Options menu.

4. Select the Restart now option
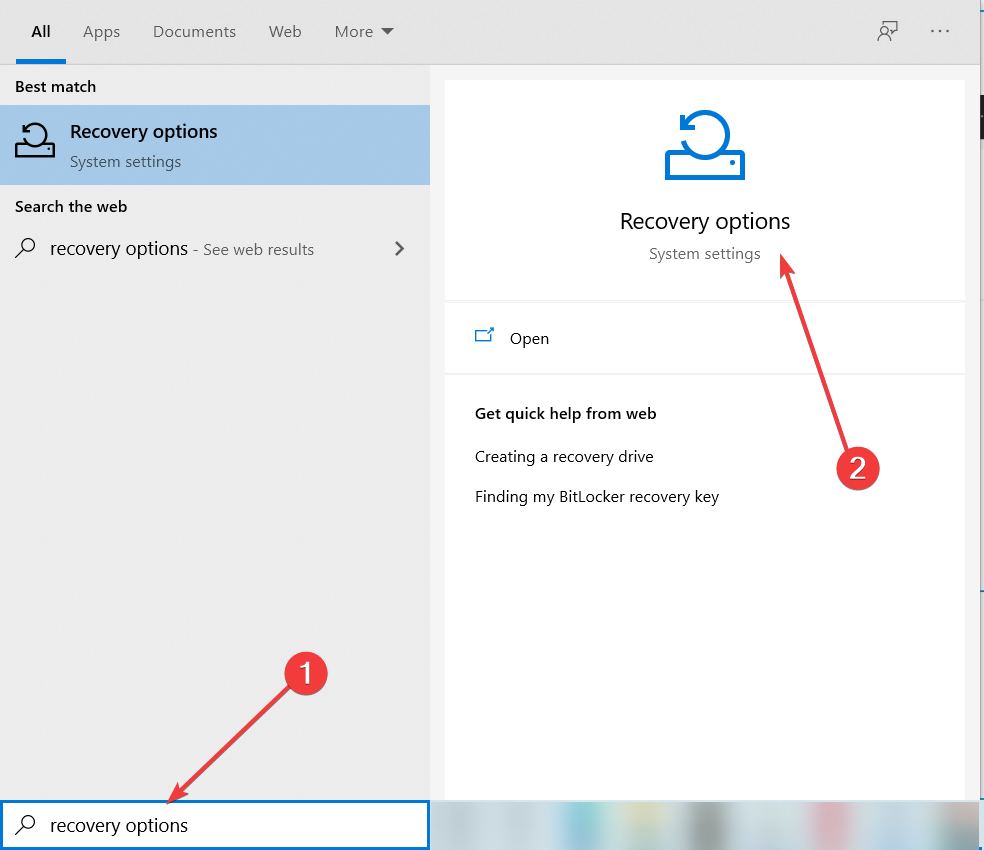
- Users can also get to Advanced Startup Options by clicking the Restart now option in Settings.
- Click the Type here to search button on Windows 10’s taskbar.
- Enter the keyword recover in the search box to find the Recovery option.
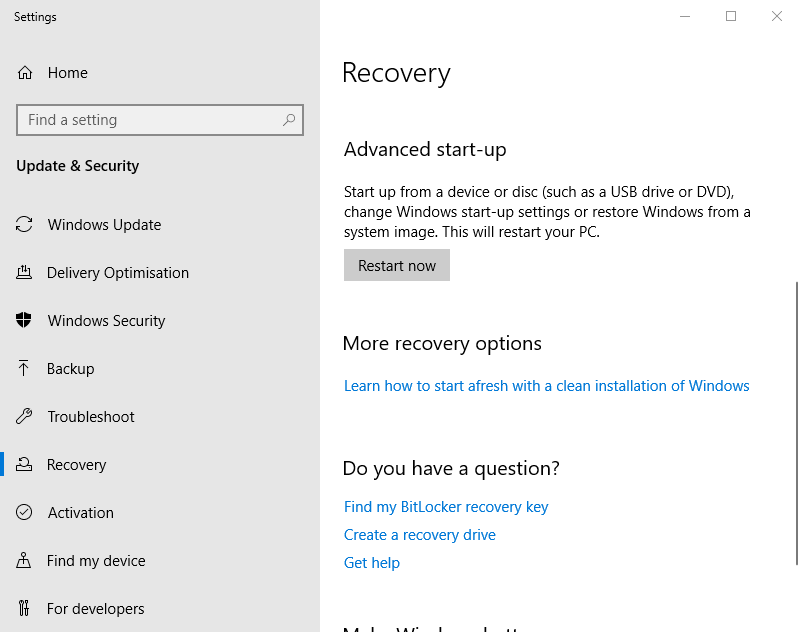
- Click Recovery to open the window shown directly below.
- Click the Restart now button under Advanced start-up.
- The PC will restart to the Choose an option menu from which users can select Troubleshoot and then Advanced options.
5. Enter Recovery Mode using Command Prompt
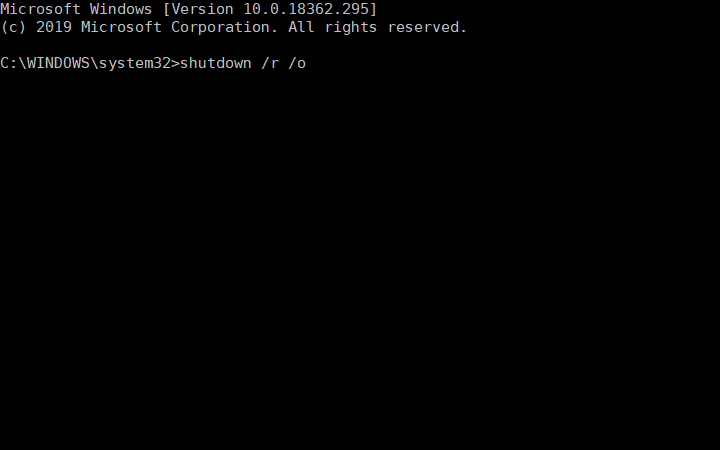
- The Command Prompt provides another way to access recovery mode. Type cmd in Windows Search and click on Run as administrator to start Command Prompt.
- Input the following command and press Enter: shutdown /r /o
- Click Close on the You’re about to be signed out prompt that appears.
- Thereafter, select Troubleshoot and Advanced options after the restart.
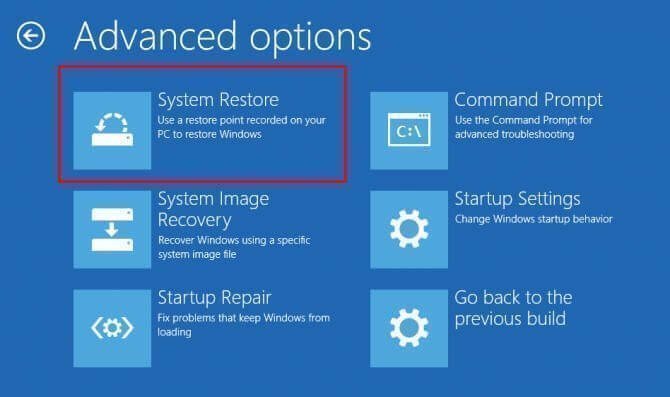
So, there are few ways users can enter Windows 10’s recovery mode. When users enter the recovery mode, they can then utilize the System Restore, Command Prompt, System Image Recovery, and Startup Repair utilities from there.
4 Effective Ways to Restore Windows 10 from Recovery USB
Now is the best time to create a recovery disk and then you can restore Windows 10 from usb when your computer runs into issue. 4 useful methods and complete guides are included.

By Ivy  / Last Updated April 8, 2021
What is a recovery USB?
Recovery USB (a USB version of system repair disc in Windows) contains several tools that can be used to troubleshoot the unbootable computer or restore your computer to factory settings.
In Windows, the recovery USB created by buillt-in tool cannot be used on different version of computer. That’s to say, you cannot use a Windows 8 32-bit recovery drive to repair Windows 10 32-bit. Also, you cannot use a Windows 8 32-bit recovery drive to troubleshoot Windows 8 64-bit.
In addition, you still can use an installation disk as a repair disk. But the one comes along with your computer is a CD/DVD disc. Thus, if you want toВ reinstall windows 10 without CD/DVD, you need toВ download installation media tool from MicrosoftВ and create Windows 10 recovery USB yourself.В
Well then, how to use recovery drive in Windows 10 to get computer back? You could use recovery drive or installation disc to boot computer and then restore it using Windows 10 recovery tools. Also, if your computer has a serious error or you want to keep all your personal files and programs, you could tryВ free backup softwareВ AOMEI Backupper Standard to make up for these shortcomings. Four methods are below, please check them and start your restoration.
Method 1: Recover Windows 10 from a recovery drive
Here you will create a recovery drive in Windows 10 with built-in tool — Recovery Drive, and then learn how to use recovery drive in Windows 10 to completely reinstall Winodws 10. Please prepare a USB drive with 16GB at least, otherwise this operation may fail because of insufficient disk space and throw you an error message, saying, «we can’t create the recovery drive». Learn more below.
Tips:
• Restoring from Recovery from a drive option is a process to clean install Windows 10, so it will remove all your files, even the entire disk. Please backup your important files in advance, whether it is pictures, documents, audios, or videos, otherwise your data will go forever.
• If you want to reinstall Windows without losing data, please try the following methods.
Step 1.В Connect the USB drive to your computer, and make sure it can be detected. Then, typeВ Create a recovery driveВ in the search box and select it from the top result.В
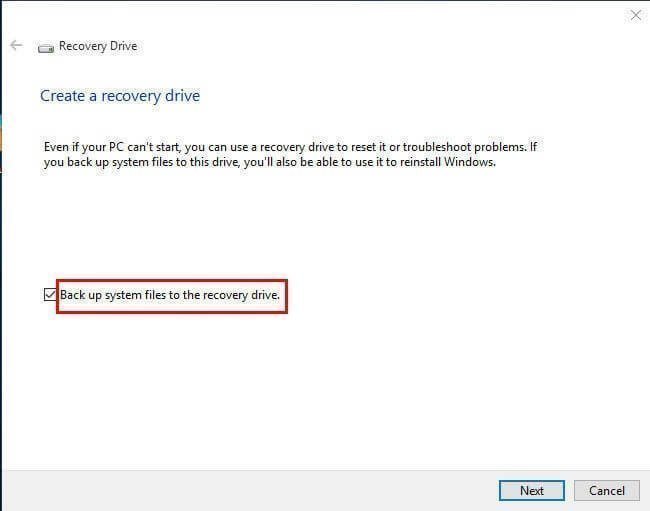
Step 2.В Check theВ back up system files to the recovery driveВ option and hitВ Next. If not, you will not see Reset this PC and Recover from a drive in the system recovery environment.
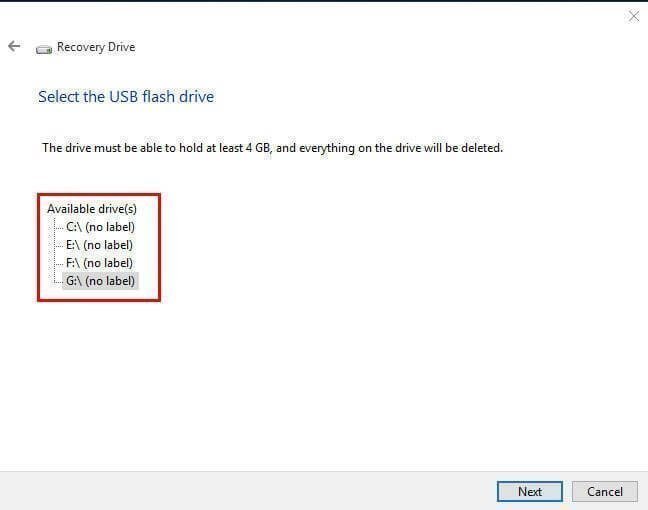
Step 3. Select USB flash drive and hitВ Next.
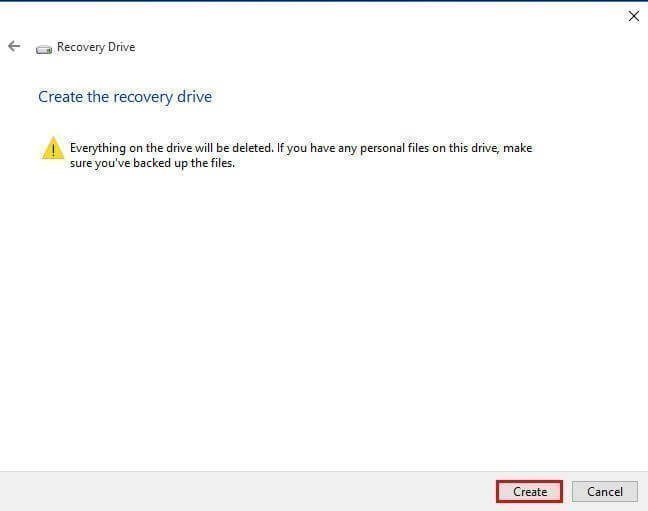
Step 4.В ClickВ CreateВ to start Windows 10 recovery usb creation.
Step 5. Boot from Windows 10 repair disk. In the initial page, select keyboard layout and other prepference.В
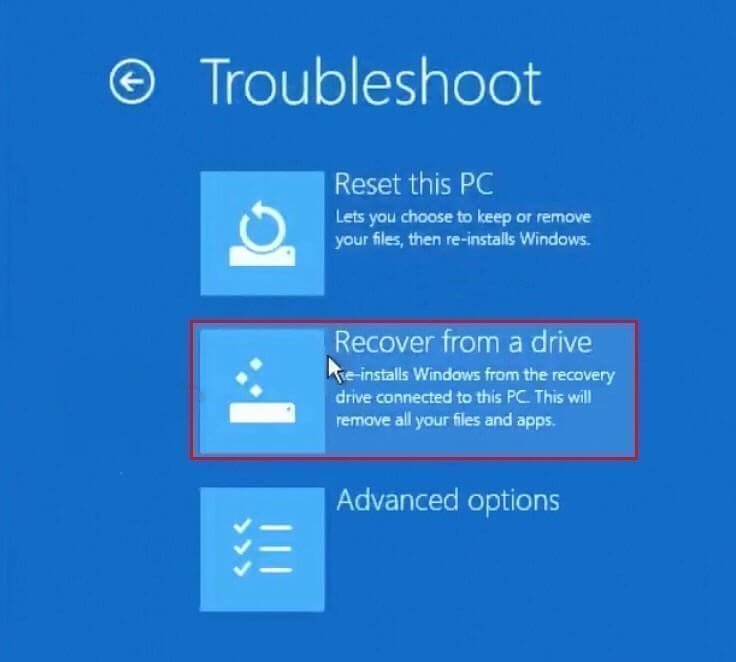
Step 6.В Select Troubleshoot andВ Recover from a drive.В
Step 7. SelectВ Just remove my files or Clean the drive fully.
Step 8. Click Recover to recover from a drive.В It will take a while to finish and your PC will restart. After that, you just need to set up your Windows 10 with the on-screen instructions.
Note: Also, you can use recovery partition Windows 10 to reinstall system. It comes along with your computer, usually, a hidden partition, and allows you to access the system partition by a specifc key and restore system, F9 for ASUS system recovery partition, for example.
Method 2: Reinstall Windows 10 without losing data
Here you will use the built-in recovery drive to recover Windows 10 with «System Restore» in the Advanced options, andВ It will keep all your files at the point youВ make a system restore point.В
Step 1. Create Windows 10 recovery USB with steps mentioned in Method 1, and then boot from it.В
Step 2. Then, access the TroubleshootВ page and select Advanced optionsВ >В System Restore in order.
Step 3. In the Restore system files and settings, click Next.
Step 4. Select a restore point and click Next.
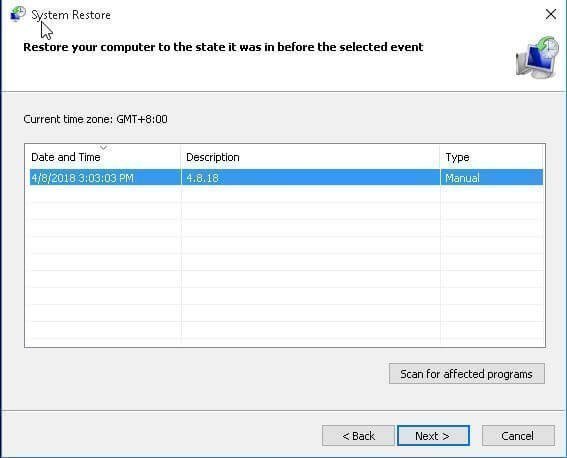
Step 5. Confirm the info and click Finish to recover Windows 10.
Method 3: Reinstall Windows 10 but keep files
Here you will use «System Restore» option as well, but the recovery drive is an installation disc or USB. This can be a great choice if you don’t createВ Windows 10 recovery USB drive with the built-in recovery drive, it will keep your files as well.
Note: If you don’t have CD/DVD disc, please download Windows 10 Media creation tool and then use it to create Windows 10 system repair USB. Also, it is applicable to create Windows 10 recovery USB for another PC.
Step 1.В DownloadВ Windows 10 Media Creation toolВ from Microsoft and run it with administrator priority. Click AcceptВ to agree the license terms.
Step 2. In the «What do you want to do?» page, select Create installation media for another PCВ and click Next.
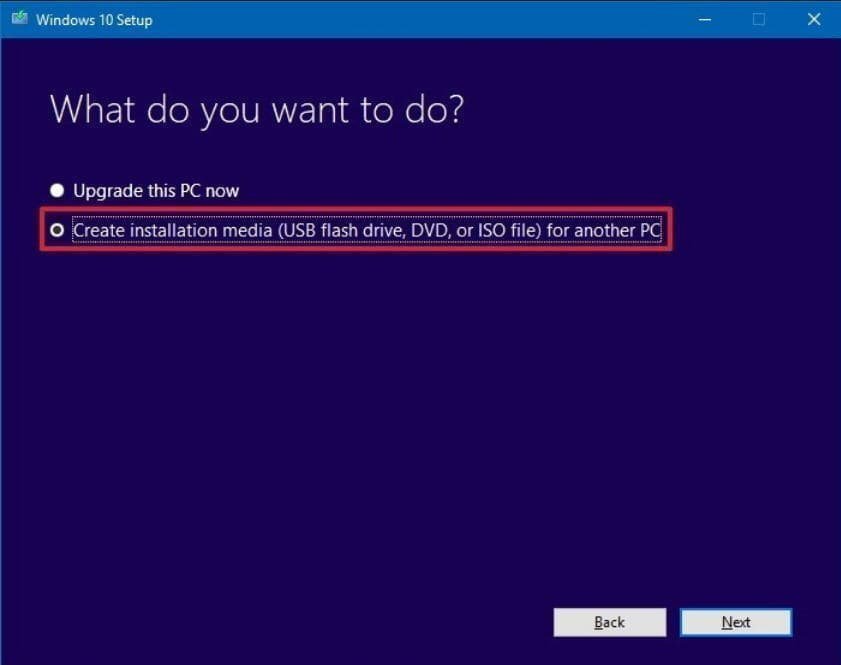
Step 3. SelectВ language,В editionВ andВ architectureВ (32-bit or 64-bit) for Windows 10. Then, selectВ USB flash driveВ (at least 8GB required) as the bootable media and click Next to create Windows 10 reinstall USB.
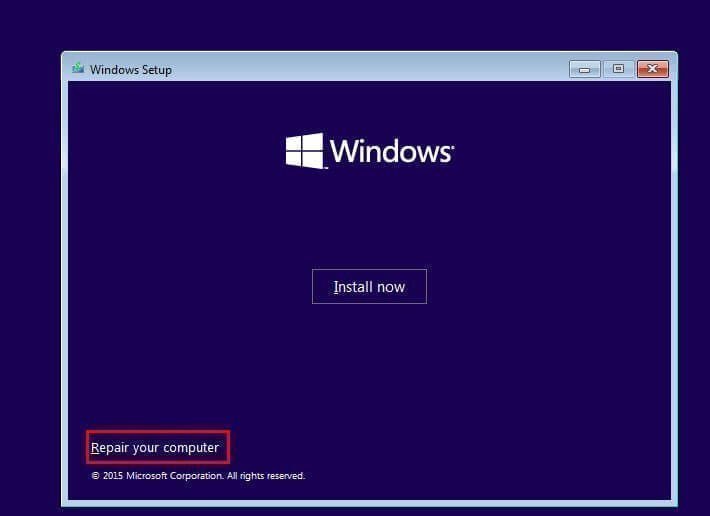
Step 4. Connect the installation disk to your computer and boot from it. Then, selectВ language and other preference.
Step 5. Click Repair your computerВ at the lower left corner.В Immediately afterwards, Select TroubleshootВ and Advanced options.
Note: If your computer is brand-new, you can still clean install Windows 10 from USB via installation disk. To make it, click Install Now, pitch on Next until you see the installation type: Custom and select this option, then delete hard drive on your new computer and select the unallocated space to install Windows 10. Finally, click Next.В
Step 6. Select System Restore and follow on-screen instructions to start Windows 10 reinstall.
Method 4: Restore Windows 10 image from USB driveВ
The built-inВ Windows 10 recovery tools do help to some extent, but they may remove all your files or the previously installed programs. Is there any safe way to restore Windows 10 from USB drive without deleting files and programs? Fortunately, you could useВ free backup softwareВ AOMEI Backupper Standard to make up for this. With it, you can make a Windows 10 boot disk to start unbootable computer andВ create Windows 10 system imageВ for disaster recovery.В В
To create a backup image, you need to click the download button to install AOMEI Backupper Standard, then select Backup >System Backup >В destination path to save system, and finally click Start Backup to move on. If your computer currently is running smoothly without any obstacle, it’s suggested to schedule backup system, so the newly changed files and installed apps will be included in this image.

To create boot disk Windows 10, click Tools > Create Bootable Media, then select bootable disc type > PE boot mode > bootable media (here is USB Boot Device) and click Next to start the process. When the proces is complete, click Finish to exit. Then, you can see theВ Windows 10 system repair USB on your drive.В

Notes:В
в—‘ The Windows 10 repair disk created by AOMEI Backupper Standard can be used on all branded computers, such as, HPВ Windows 10 recovery USB, Samsung Windows 10 repair disk etc.
в—‘ Also, it can be used on different operating system, such as, Windows 7, Windows 8, Windows 10, Windows XP etc.
Tip: If you don’t have USB or CD/DVD, you can directly create a recovery environment entry of AOMEI Backupper. It allows you to boot your unbootable computer and then backup & restore or clone.
Step 1. Connect bootable media and USB drive with system image backup to your computer. And then restart your computer, press F2 or other specific key you see on the initial screen, change boot order to the Windows 10 repair disk, at last save changes and boot your computer.В
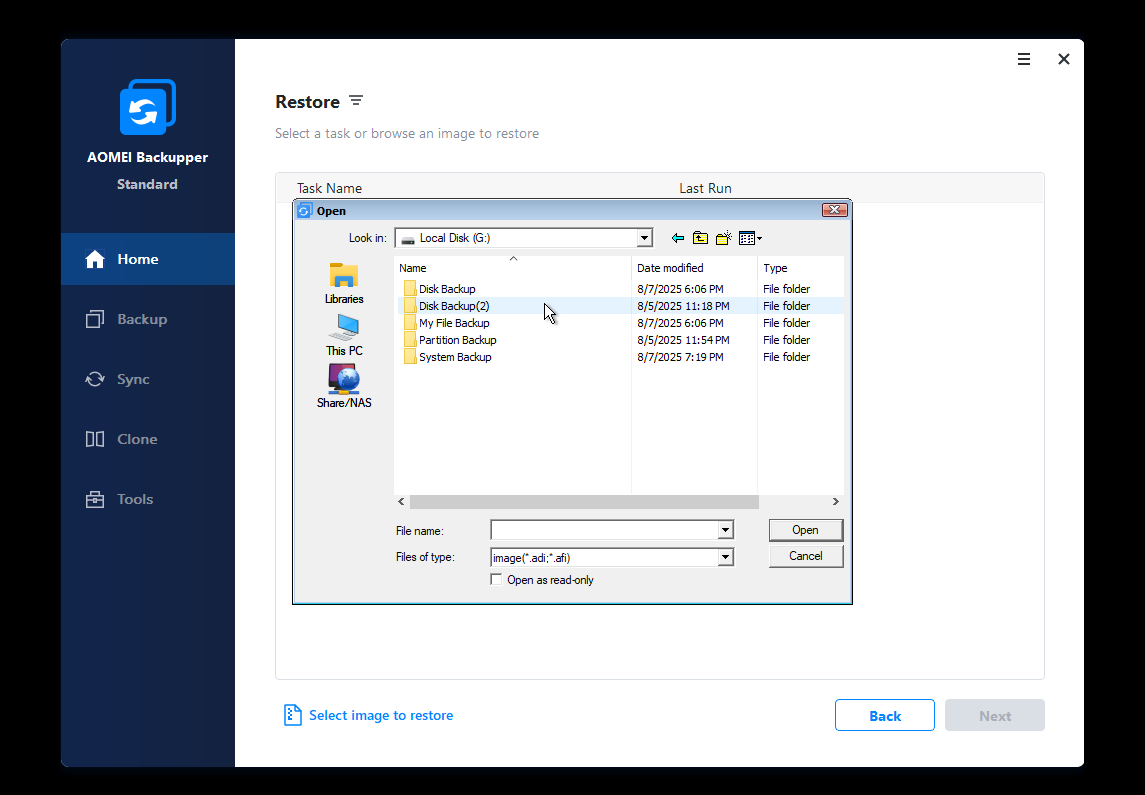
Step 2. Wait for the loading to complete, and then you will see the interface of AOMEI Backupper Standard. At this time, click Restore >В Select Image File to find and select your system image to be restored.В
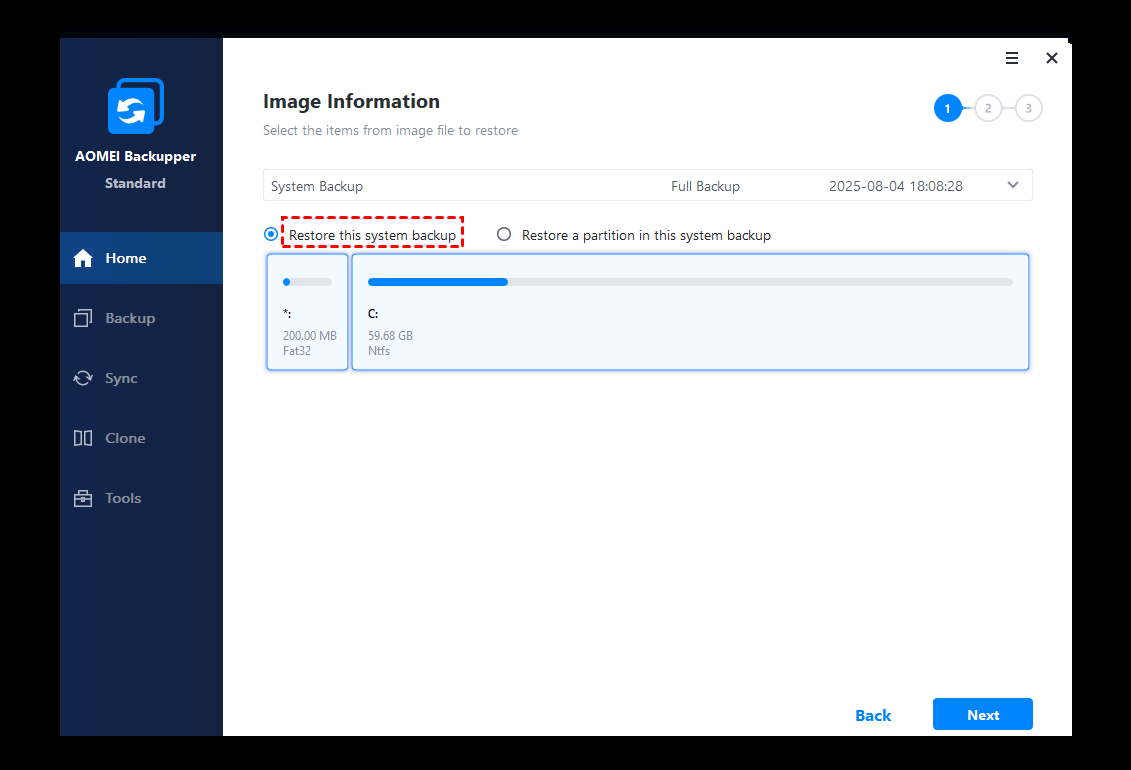
Step 3. Tick Restore this system backup and clickВ Next.
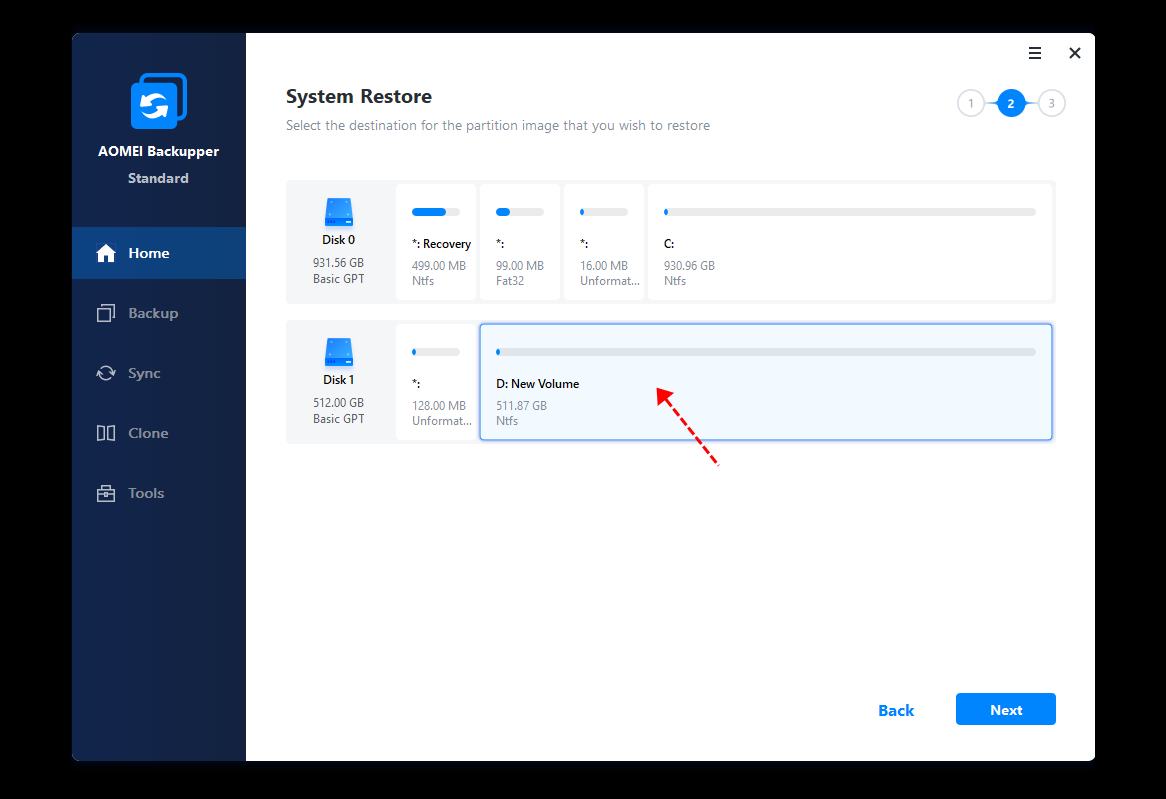
Step 4.В Select the destination path to save Windows 10 image and clickВ Next.В
Step 5.В Then,В clickВ Start RestoreВ to reinstall Windows 10 from a system image. When the progress reaches 100%, clickВ FinishВ to exit.
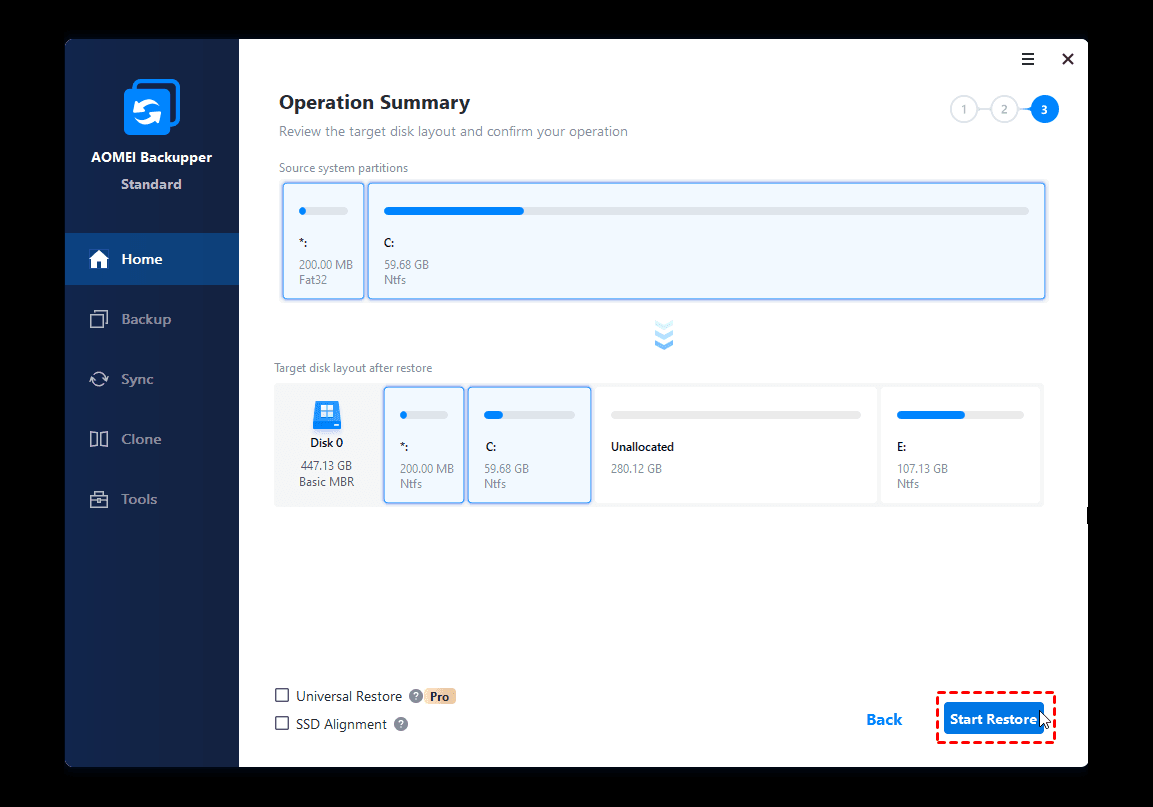
Note: If you are currentlyВ transferring OS from one computer to anotherВ with different hardware, such as, CPU or motherboard, it’s suggested to use «Universal Restore» feature. But it is available at least on the Professional version. You should upgrade to AOMEI Backupper Professional to enjoy this feature.В
The way forward
With the help of Windows 10 recovery drive or installation disc, you can effortlessly restore Windows 10 from USB. But theВ Recover from a drive option either wipe data or everything and then reinstall Windows 10. Also, you can reinstall Windows 10 free with System Restore option. Both recovery drive and reinstall USB have this option.
However, none of solution can keep everything on your system. If you don’t want to waste time to reinstalling apps and recover files, you’d better use freeware AOMEI Backupper Standard to reinstall Windows 10 from boot and keep everything.
In addition, this software has far more useful features to secure your system and data, including disk backup, file backup, schedule backup, event trigger backup, USB plug in, daily incremental backup, universal restore, PXE boot tool, replace laptop HDD with SSD, etc. Any interest? Please download this freeware or advanced version, such as, AOMEI Backupper Professional.


