- Booting from USB Media: A Comprehensive Overview
- How to boot a Mac from USB media
- Boot from USB: Windows
- Linux USB Boot Process
- Creating USB boot media
- MultiBoot/DualBoot OpenCore with Windows, macOS & Linux
- So let’s get started,
- MAKE SURE:
- HARDWARE WE’LL BE USING IN THIS GUIDE:
- Tools Needed Throughout the Guide:
- macOS Catalina 10.15.4 :
- What the Heck is OpenCore Bootloader and What it means to Hackintosh Community? | Kextcache
- Opencore Bootloader is the new bootloader popping out of nowhere and is getting lots of love from the Hackintosh…
- [GUIDE] Make Intel 700$ Hackintosh Build Using OpenCore Bootloader | Kextcache
- Before you start, first to know about What is Hackintosh and OpenCore, If you are new to this don’t be scared as 90% of…
- Windows:
- [GUIDE] How To Optimise Windows 10 for Gaming in 2020 | Kextcache
- Wish to Optimize Windows 10 for gaming however, don’t know the place to start out? Here are 20 knowledgeable tips about…
- LINUX:
- Ubuntu Documentation
- Introduction
- Note on encrypted disks/partitions
- BACKUP YOUR DATA
- Single-Boot: Ubuntu Only
- Avoid long EFI wait before GRUB
- Dual-Boot: Mac OSX and Ubuntu
- Quick Steps
- Detailed How-To
- Installing rEFIt
- Partitioning
- The Ubuntu LiveCD
- Boot your Mac from the CD
- Start Installing
- Fix the Partition Tables
- Other Partitioning Options Multi-booting
- Triple Boot: Mac OSX, Windows, and Ubuntu
- Multi linux
- Mac OSX and multi Linux
- Manual partitioning using Disk Utility GUI
- Mac OSX, Vista, and Ubuntu
- This method won’t work for XP because XP wants to be on the last MBR partition.
- Partitioning Diagram
- Mac OSX, XP, and Ubuntu
- Partitioning Diagram
- Mac OSX, Vista, XP, and Ubuntu
- Shared storage partitons
- problems
- share that partition
- helpfull links
- Installing ubuntu using wubi in vista and other complex systems
- Other Info
- Multiple Hard Drives (Mac Pro)
- GRUB2 / GRUB_EFI
- Example Ubuntu Installation after Mac OSX and Vista
- You have already installed Mac OSX and Windows Vista, now to install Ubuntu.
- Troubleshooting
- Obtaining Help
- External Links
Booting from USB Media: A Comprehensive Overview
While fans of different operating systems might debate which one is the most stable, reliable, flexible or user-friendly, there’s one inarguable point: Every machine – regardless of the OS – can run into issues.
And while users historically would pop a boot media disk into their DVD or CD drive, many computers no longer come with optical disk drives. As a result, booting from USB media is becoming the standard.
How you start that rescue media can vary depending on the operating system you are using, but there are a few general guidelines that can help get your machine started, regardless of the OS you prefer.
So if your system is unstable, you need to run a diagnostic tool on the hard drive, or you just want to load a Linux desktop just to see what it’s all about, let’s look at how you start your machine using rescue USB boot media.
How to boot a Mac from USB media
Getting your Mac to load from a USB drive is fairly straightforward.
- Insert the USB boot media into an open USB slot.
- Press the Power button to turn on your Mac (or Restart your Mac if it’s already on).
- When you hear the startup chime, press and hold the Option key. Holding that key gives you access to OS X’s Startup Manager. Once the Startup Manager screen appears, release the Option key. The utility will look for any available drives that include bootable content.
- Using either the pointer or arrow keys on the keyboard, select the USB drive you wish to boot from.
- Once selected, either hit the Return key or double-click your selection. The machine will start to boot from the USB drive.
NOTE: Have multiple USB devices connected to your Mac? Don’t worry. The Startup Manager only lists drives that include bootable content.
Boot from USB: Windows
Starting your PC using USB rescue media is not difficult, although it first requires an adjustment in the BIOS (Basic Input Output System). That’s because the BIOS settings include the boot sequence the machine follows when starting up. The boot order tells the machine which devices to search for the software needed to launch the computer and the priority each device in that search.
If you’re booting from USB media, you must change the BIOS boot order so the USB device is listed first. Otherwise the computer will load from the hard drive as normal.
Start by plugging the thumb drive into a USB port. Then to change the BIOS boot sequence:
- Press the Power button for your computer.
- During the initial startup screen, press ESC, F1, F2, F8 or F10. (Depending on the company that created your version of BIOS, a menu may appear.)
- When you choose to enter BIOS Setup, the setup utility page will appear.
- Using the arrow keys on your keyboard, select the BOOT tab. All of the available system devices will be displayed in order of their boot priority. You can reorder the devices here.
- Move USB to be first in the boot sequence.
NOTE: If you cannot find USB or Removable Devices among the device options, your BIOS may list it under Hard Drive Devices. In that case, you’ll need to:
- Move Hard Drive Devices to the top
- Expand to show all hard drive device options
- Move USB device to the top of that hard drive list
In the future, your computer will first check the USB port for boot media when starting up. That won’t be a problem, since the BIOS will move to the next device in the boot sequence . unless you keep the boot media in the USB port. Then the system will launch from that device every time.
Linux USB Boot Process
To boot Ubuntu from USB media, the process is very similar to the Windows instructions above.
- Confirm the BIOS boot sequence lists the USB drive first, or make that change as needed.
- After the USB flash drive is inserted into the USB port, press the Power button for your machine (or Restart if the computer is running).
- The installer boot menu will load, where you will select Run Ubuntu from this USB.
- Ubuntu will launch and you can begin to working in the system – setting preferences, reconfiguring the system as needed, or running any diagnostic tools.
Creating USB boot media
Regardless of the operating system you are using, booting your machine from USB media does not need to be difficult. A general understanding how your system loads can provide the basics needed to understand what is going on when you use boot media.
Creating USB boot media doesn’t need to be difficult either, although there are several options to consider.
For Mac users, we recommend visiting Apple’s support page on USB boot media. It provides guidance that is specific to the iteration of OS X you are running (i.e. Sierra, High Sierra, Yosemite, etc.) to help you get the boot version you need.
Windows and Linux users might consider Acronis Disk Director 12, which includes an intuitive Boot Media Builder that streamlines the process and offers tremendous flexibility for the type and kind of boot media you can create, including WinPE media.
Источник
MultiBoot/DualBoot OpenCore with Windows, macOS & Linux

The hottest bootloader is now dropped OpenCore 0.5.8 and you wanted to multiboot your system with macOS Catalina, Windows 10 & Linux but don’t know how to do it, Well this typical bootloader is not as typical how it seems. Turns out you can actually dual-boot or multiboot your OpenCore System either AMD or Intel.
So let’s get started,
MAKE SURE:
- YOU’LL NEED 3 Separate SSD’s FOR INSTALLING EACH OPERATING SYSTEM.
- CONNECT ONLY 1 DRIVE, IN EVERY OS INSTALLATION. DISCONNECT ALL OTHER SSD/HDD’s
HARDWARE WE’LL BE USING IN THIS GUIDE:
- Intel i5 9400F
- 16GB Corsair RAM (2 x 8GB)
- Crucial MX500 500GB SSD
- Cooler Master 450W Power Supply
- MSI B360M-PRO-VDH.
- Sapphire RX580 8GB
- Corsair K95 Platinum RGB Keyboard
- Logitech G402 Mouse.
- Logitech G433 Headset.
Tools Needed Throughout the Guide:
- Working macOS System.
- 3 USB PenDrives.
- Internet
- OC-Configurator — For Fine Tuning our Config.plist
macOS Catalina 10.15.4 :
CONNECT THE DRIVE, IN WHICH YOU WANT TO INSTALL macOS CATALINA.
Install the macOS as usual with OpenCore USB Drive, If you don’t know how to install it check these resources out,
What the Heck is OpenCore Bootloader and What it means to Hackintosh Community? | Kextcache
Opencore Bootloader is the new bootloader popping out of nowhere and is getting lots of love from the Hackintosh…
[GUIDE] Make Intel 700$ Hackintosh Build Using OpenCore Bootloader | Kextcache
Before you start, first to know about What is Hackintosh and OpenCore, If you are new to this don’t be scared as 90% of…
Windows:
Install Windows as usual in GPT-UEFI mode, if you don’t know how to to that follow the steps below.
1. On any Existing Windows machine go to Rufus.ie and Download Rufus 64Bit.
2. make a Bootable Installation USB with GPT Format.
3. Plug the USB in and Start the Installation Process.
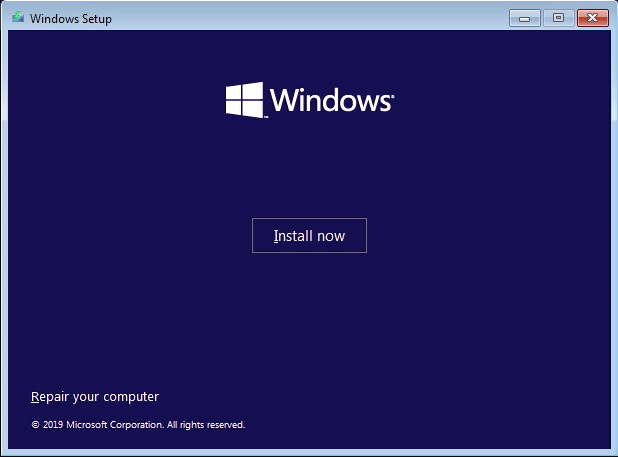
4. Choose the Partition which we made and format it.
5. Complete the Installation.
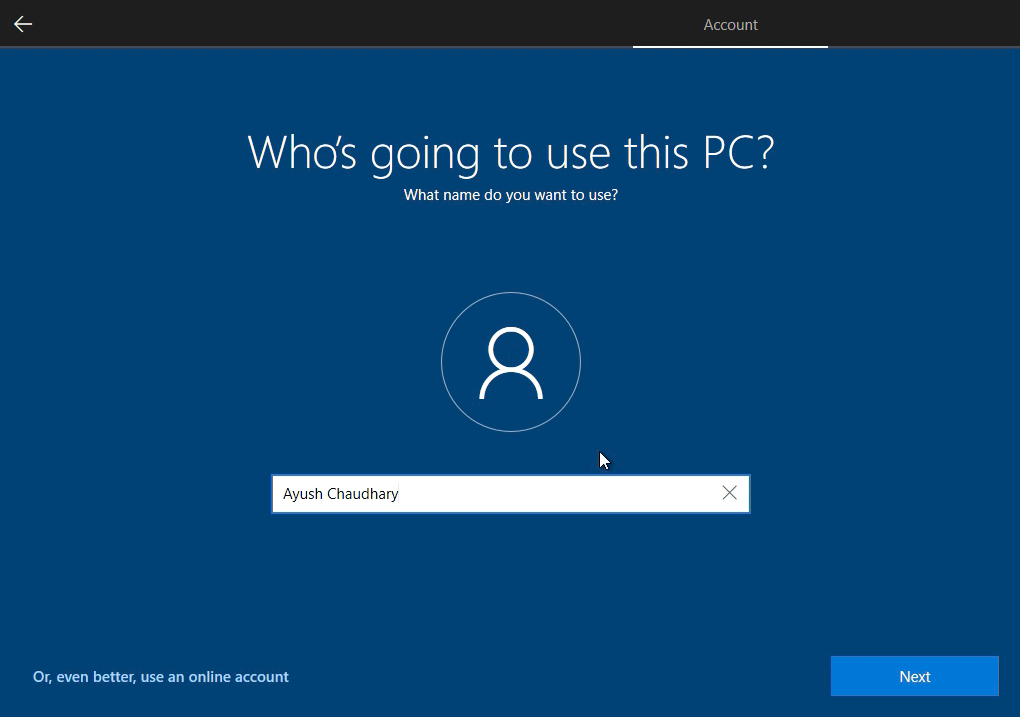
6. Make sure you Successfully Get into the Windows Desktop.
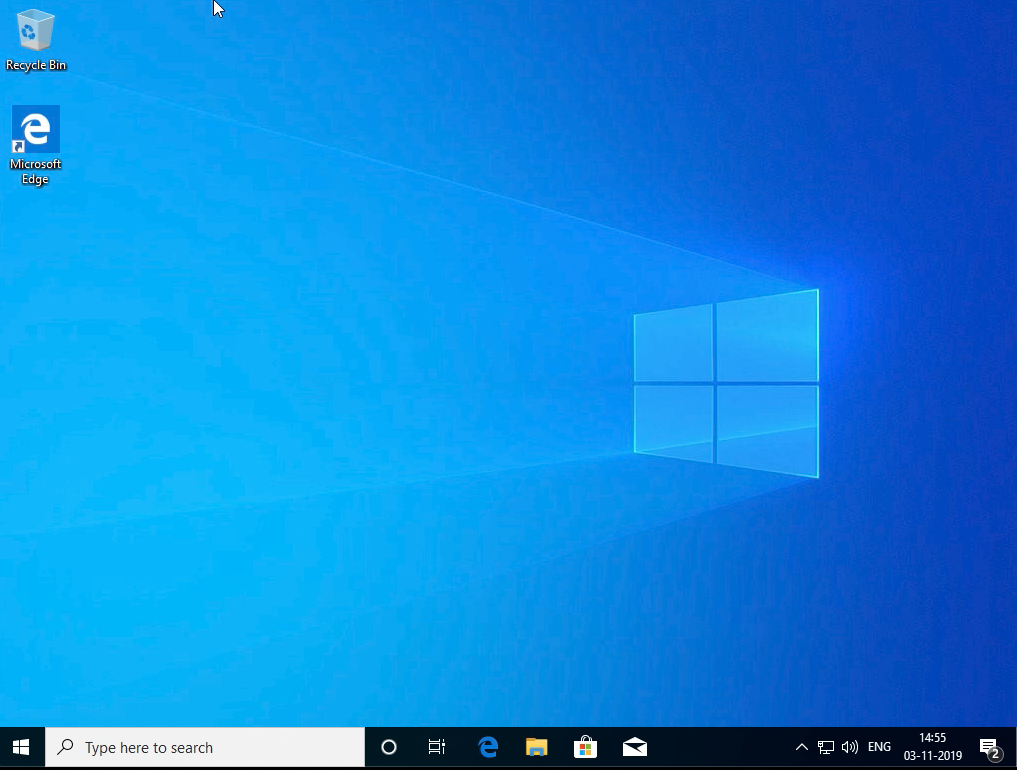
Before Restarting make sure to check for Windows Update, if you want everything up-to-date.
[GUIDE] How To Optimise Windows 10 for Gaming in 2020 | Kextcache
Wish to Optimize Windows 10 for gaming however, don’t know the place to start out? Here are 20 knowledgeable tips about…
LINUX:
DISCONNECT macOS CATALINA SSD AND CONNECT THE 2ND DRIVE, IN WHICH YOU WANT TO INSTALL macOS CATALINA.
For this Specific hack, I’ll use Manjaro KDE 20.0 as it has beautiful UI and Power of Arch Linux, you can use any other Linux build duh.
Keep in Mind GRUB Bootloader is no GAME, Remove All the Other SSD/HDD’s Before Proceeding.
So Just Follow Along with the Step-by-step Screenshots Posted Below and Understand the Process. DON’T RUSH. ask for help if you stuck somewhere.
Download the Latest ISO From Manjaro Website and Rufus, make bootable USB.
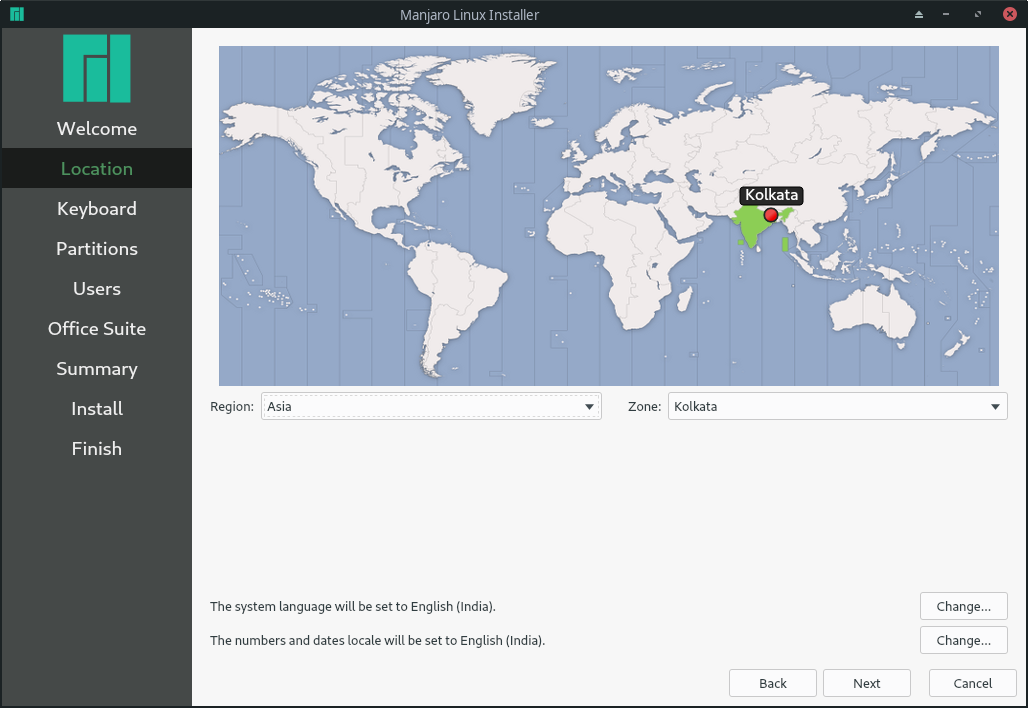
Insert The USB and Select Install ManjaroLinux x64
2. Select Your Region
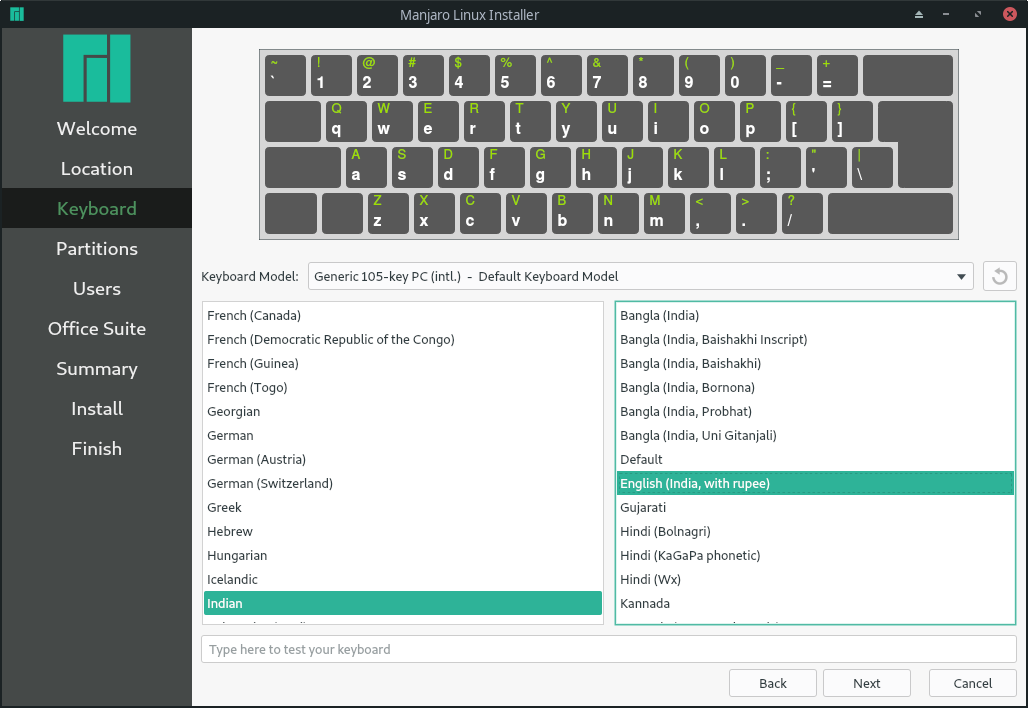
3. Select your Keyboard Layout.
4. Select SSD and Erase and Format with Swap/Hibernate
Источник
Ubuntu Documentation
As with all wiki documentation, this page continues to be updated.
The partitioning options require additional testing.
This information will not work for iMac (11,1 or newer) users installing recent versions of Ubuntu (e.g., Maverick, Precise, Quantal. ), for this you may try this guide Ubuntu 12.10 on 2011 imac. The presence of the bios-grub partition that the Ubuntu installer creates by default (e.g., sda3) causes a conflict that prevents syncing the GPT and MBR partition tables. Deleting sda3 does not help since grub2 requires that bios-grub partition, nor will it use either sda or sda4 aborting with the error: «This GPT partition table has no BIOS boot partition; embedding won’t be possible!». So installing Ubuntu with the bios-grub partition fails and installing without it fails. See «Single-Boot».
Introduction
Slightly adventurous Intel-based Mac («Mactel») owners seem to often be afraid or confused about installing Ubuntu alongside OS X, but it is not very difficult. There are some oddities (see NOTE) that make installation on Mactel different from installation on a PC (but if it were the same, it wouldn’t be a Mac, now would it?). Guidelines for different configurations are detailed here.
If your computer does not have a CD-ROM drive, such as the Mac Book Air, this document may not have enough information. See the «Install Ubuntu on MacBook from USB» guide.
In Ubuntu do not try COMPIZ, this will completely mess around Unity and make it necessary to reinstall Ubuntu. Be aware that it keeps being tricky running Linux on a Macintosh
Note on encrypted disks/partitions
This guide does not mention how to use e.g. diskutility to resize an encrypted mac partition.
BACKUP YOUR DATA
You may laugh now, but when you make a mistake and wipe out your disk, you will be sorry! Time Machine comes with Leopard, and it is so easy to use that it isn’t funny, so most people have no excuse for not backing up their data. Better even, a backup to another system, external disk or cloud (e.g., Mozy) are not subject to partition configuration errors. When Bootcamp fails or you have strange faults maybe you want to clean up your harddrive. When erasing the hard drive choose «Security Options . » — «Zero Out Data».
Single-Boot: Ubuntu Only

It is recommended that you keep an install of OS X, even if you do not plan to use it, so that you can install firmware updates in the future. (Such updates may be required for your Mac to continue to operate properly.) One way to avoid using space for OS X on your internal hard drive, is to install it to an external USB or Firewire hard drive; if a firmware update is released, you can boot from the external drive to upgrade.
Many users would like to make Ubuntu their only operating system. If this is what you plan to do, there are some changes that you can make to your system that will make its operation closer to that of a PC, avoiding some of the special partition considerations detailed in the other installation situations below.
Intel Macs have an EFI instead of a BIOS as in an ‘IBM compatible’ system. A different partition table scheme, GPT, is used on the hard drive.
The EFI is capable of using MBR partition table format. Since the recommended Ubuntu installation methods use the «legacy mode» of the EFI, it make sense for a single-booter to convert their hard drive to the MBR format.
As an Ubuntu installer developer, I recommend against making this change. —> GPT is a fundamentally better partition table format, and is expected to be used more generally in the future MBR partition tables can’t cope with disks over 2TB).
I recommend staying with GPT. Perhaps the author of this recommendation could contact me (cjwatson AT ubuntu.com) to discuss it. —ColinWatson qqq I didn’t want to loose this in case Colin wants it back in DGerman qqq
You can convert your hard drive partition format with gparted on the Ubuntu LiveCD.
- Insert the Ubuntu LiveCD into your Mac and Shutdown. Restart the Mac and hold the Option Key. When the boot selector screen comes up, choose to boot from the CD.
- Choose you language and and select «Try Ubuntu». This won’t make any changes to your Mac.
Once you get to the Ubuntu desktop, go to System > Administration > Partition Editor
gParted will start. From gParted’s menu, choose Device > Create Partition Table.
Avoid long EFI wait before GRUB
If your Macbook spends 30 seconds with «white screen» before GRUB shows, try booting from your Mac OS X install disc, select language, then click Utilities->Terminal, and enter:
bless --device /dev/disk0s1 --setBoot --legacy
Assuming that the bootloader is on sda1, otherwise /dev/disk0s2 if it’s on sda2, etc.
Dual-Boot: Mac OSX and Ubuntu

Quick Steps
- Install rEFIt and make sure it is working (you should get a boot chooser on startup)
- Use Bootcamp or Disk Utility to create a partition at the end of the disc. Don’t worry about what format, just make it the size you want for Ubuntu and your swap partition. If you you are using OS X Lion which comes with Bootcamp 4.0 you will need to use the Disk Utility. Boot Camp 4.0 will only allow you to resize if you provide a Windows 7 installation disk.
Boot the Ubuntu desktop CD, and select «Try Ubuntu. Start the partition editor (gparted) under System > Adminstration. Use gparted to delete the partition you just made in OS X. It should be the last partition on the disc and follows after the HFS+ partition (OS X). Deleting it will leave an area called unallocated. This is free space, and exactly what you want. Use gparted to manually partition the space on your drive for Ubuntu. First create a SWAP area of about 1GB. Then the rest of the unallocated area format as EXT4. Apply changes and take note the label of the EXT4 partition such as /dev/sda3.
Detailed How-To
Installing rEFIt
INSTALL rEFIt! You don’t HAVE to use it once you get Ubuntu up and running, but until then, INSTALL rEFIt! You will need it after installing to sync partitions, once you have done that and Ubuntu works, then you can uninstall it. You can even burn a rEFIt CD if you prefer. If you do not see the rEFIt boot menu when starting your Mac on the second reboot (It takes two reboots to apear after using the package installer), it is not installed properly!
Partitioning
The first thing we need to do is repartition your Mac’s hard drive. Of course, we would like to do this non-destructively (without wiping out the partition you have already). With Leopard, this is quite easy as Apple has provided a nifty little tool that will shrink your OSX partition and create a Windows partition in the freed space (which we can convert to Linux partitions later). BootCamp is probably the easiest way to accomplish what you need.

Leopard’s DiskUtility can also shrink the OS X partition and add partitions in a single step. It cannot create Linux format partitions though, so if you choose this route, you should create “free space” or an “msdos” format partition, which can be modified later.

At this point, we are really just allocating the space you want for Ubuntu. The actual Linux partitions will be created later during the installation.
For pre-Leopard OS X, there are no such tools. BootCamp does not run, and Disk Utility will only allow you to create more partitions if you wipe out all the current partitions. However, the underlying commandline utility still exists.
Here’s a usage example. Let’s say you want to resize your OS X partition to 200GB and leave the rest of the disk free (for Ubuntu of course). You would open a terminal and type the following, followed by the «Return» key.
You can read more on diskutil by typing ‘diskutil help’ in your OS X terminal.
The Ubuntu LiveCD
You can download the Ubuntu Desktop Edition ISO from ubuntu.com. (You can choose 32-bit or 64-bit, the choice is yours. If you want to see the pros and cons, you can check out the sticky.)
NOTE: Core Duo machines (early Mactels) are 32-bit only! Core 2 Duo machines can use 32-bit or 64-bit ISOs.
An ISO is an “image” of a CD-ROM. You do not burn an ISO onto a CD like you do with pictures or music. Instead, you burn the image onto a disc. It’s kind of like mixing Cool-Aid. You don’t just drop the packet (ISO) into the water (disc), you must open the packet and dump the contents into the water.
ISO images can be burned with Apple’s Disk Utility or other burning apps. You should burn the CD as slow as you can to increase its “bootableness”.
Boot your Mac from the CD
Put the Ubuntu LiveCD in your Mac and reboot.
When the rEFIt menu comes up You should get the option to boot from the Ubuntu CD. If you do not see this option, try pressing the Option key when your computer starts. On a Mac, the «c» key will instruct the Mac to attempt booting off of a CD/DVD.
On the Ubuntu CD’s boot menu, select your keyboard language, then choose to «Try Ubuntu». This will start a LiveCD Ubuntu session, which makes no changes to your Mac.
Booting into Ubuntu this way takes many minutes, including a minutes-long period where Ubuntu appears to have locked up on the boot menu. Most likely it has not. Just wait! note I had to set the boot option to nomodeset. If you press function f6 at the boot options screen you can choose that option. Note 2: I had to press function f6 when I saw a man and keyboard.
Once booted, you have a Ubuntu desktop. Start gparted (partitioning tool) by navigating to System > Adminstration > Partition Editor.
If you previously created an “msdos” style partition used Boot Camp, you should use gparted to delete this partition. It will be located after an EFI partition (hidden in OSX) and an HFS+ partition (HFS+ is OS X’s filesystem). Deleting the new partition leaves “free space” on the disk for the Ubuntu install. Use gparted to manually partition the space on your drive for Ubuntu. First create a SWAP area of about 1GB. Then the rest of the unallocated area format as EXT4. Apply changes and take note the label of the EXT4 partition such as /dev/sda3.
Start Installing
Back on the Ubuntu LiveCD desktop, start the Ubuntu Installer from the desktop icon. When prompted, choose to manually partition. Select the EXT4 partition and click change. Select to use the space as the EXT4 filesystem and root (/) as the mount point. You will also want to check the box to format the partition. On the last dialog of the installer, be sure to click the “Advanced” button and choose to install the boot loader (grub) to your root Ubuntu partition, for example /dev/sda3. This will be the only partition with the EXT4 file system.
When the installer is finished, reboot.

Fix the Partition Tables
There is a bug in the installer that causes a problem on Macs. FIXME: Describe problem? It can be fixed with rEFIt.
Reboot to the rEFIt menu and select the “partition tool”. rEFIt will ask if you would like to sync your partition tables. Say Yes and let it do it’s magic. (If you don’t have an English keyboard, note that the keys «Z» and «Y» are swapped in the partition tool.) If you see the error «GPT partition of type ‘Unknown’ found, will not touch this disk» instead of the ‘yes’ prompt, follow the instructions in comment #6 of this thread and make sure to install gptsync_0.13-10 or higher.
rEFIt may not offer to sync your partition tables, but just show the error and leave no option but a return to the main menu. For suggestions on other ways to fix the table, see the discussion at Ubuntu on MacBookPro — difficulties w partition tables.
if you have errors such as «GPT partition of type ‘Unknown’ found, will not touch this disk.» or «analysis inconclusive» as explained in this thread, then you have to use gdisk to rebuild the partition table. This is best explained in this post — boot a live Ubuntu CD (the instructions say this is also possible from an OS X terminal), install and run the gdisk tool as the instructions say.
After it is done, SHUTDOWN your Mac (not reboot) and startup again. You should now be able to boot into Ubuntu. If you select the Linux Icon in rEFIt, and it freezes on the grey Tux logo, shutdown again and try one more time.

Other Partitioning Options Multi-booting
Most Intel macs will use the Mac OS X default GPT partitioning scheme. The MBR/PC-BIOS compatibility of Intel Macs is limited and cannot provide all the disk/BIOS management features found in a PC. This is the reason why some extra attention is needed for partitioning layouts in Intel Macs to get what you want. (The alternative msdos/MBR partitioning avoids many of these limitations, but Mac OSX support and utilities are lost, which is why it was recommended only for the single-boot section.)
Additional partitions can be created for installation of an additional OS (Linux, Windows, BSD) or shared storage. Mac OSX can be installed on an external drive, and Linux on an external is possible with the installation of a small boot partition on the HD.
If Windows is installed, rules apply to choice of partition, and this depends on Windows version (Vista or XP). Some methods used for Vista will not work for XP.
It is not intended to detail all the possible combinations here, but some general rules and examples of multi-booting partition arrangements and tools required are shown to help you choose. Some of these require extra enthusiasm, and the more complex, the more need for backup.
Triple Boot: Mac OSX, Windows, and Ubuntu
 *Note, because this is likely the most popular scenario after dual-booting, it should be the first in the «multi-booting» section and deserves a full write up.
Multi linux
Mac OSX and multi Linux
Manual partitioning using Disk Utility GUI
For a complete new installation with partitioning requirements known, it can be easier to set out the partitions initiallly using the Mac OSX installer DVD Disk Utility GUI, then using ubuntu gparted to finish off. This screen shot shows an example (OSX 10.4), the OSX partition is p2, initially unjournalled to allow write access for ubuntu. The external drive was partitioned the same way. (This method requires careful choice of partition formats if MS Windows is involved).

The following screen shot shows the same partitoning and resizing options as seen in ubuntu desktop gparted.

Mac OSX, Vista, and Ubuntu
This method won’t work for XP because XP wants to be on the last MBR partition.
- Assuming that OS X is installed, use bootcamp to install Windows Vista. NOTE: MAKE ENOUGH SPACE FOR BOTH WINDOWS AND UBUNTU WITH BOOT CAMP!
- Install windows normally.
- Start your computer with the Ubuntu disk in the drive. Install Ubuntu by partitioning the boot camp drive that Windows is located on, and install both Ubuntu and GRUB bootloader onto the new partition. (There are programs that allow Mac OS X to write to ext2, you’ll just have to mount your ext3 partition as ext2 in Mac OS X)
- Start the computer and boot back into Mac and install rEFIt. This will allow you to boot into every operating system on boot.
Partitioning Diagram
(Do not use the above method to install with XP, it will fail)
Mac OSX, XP, and Ubuntu
Partitioning Diagram
If XP is installed before its partition number changes, then its boot.ini will need editing to change the partition number. The alternative is to install XP after the OSX partition is split and the XP partition number has changed. This has not been tested. Changing «boot.ini» afterwards has been tested though.
Back-up all data using «Time machine» and repair disk permissions.
Make sure you have the currently running OSX installation disk ready and your system is up to date.
Start Boot Camp and create a partition for Windows XP (15Gb is enough but 30Gb is recommended by MS apparently).
install Windows using Boot Camp.
Delete the Linux partition you just created and follow the steps as described in the section above «Start Installing» in Detailed How-To: create a SWAP area of about 1GB. The rest of the unallocated area format as EXT4. Apply changes and take note the label of the EXT4 partition such as /dev/sda3.
If XP was installed before the partition change, it will need boot.ini to be edited to change its partition from 3 to 4.
Mac OSX, Vista, XP, and Ubuntu
- Quad booting method and discussion.
FIXME: add summary.
Shared storage partitons
To share your home directory between OSX and ubuntu you need to use hfsplus with journaling turned off. R/W of hfsplus is experimental on ubuntu as far as I know and ymmv I have been succesfully doing this on my G4 and now on an intel macbook pro, with some problems but no data loss so far.
problems
- you cannot hibernate the system in e.g. ubuntu and then boot OSX, you will corrupt data this way.
- If you have an unclean unmount, because suspend to ram fails on an empty battery or any other reason, ubuntu won’t mount the disk in RW before a lengthy fsck.hfsplus (30minutes)
- recently I noticed that bot OSX and ubuntu have to go through this filecheck everytime I boot the other system.
share that partition
- disable journaling in OSX
- boot ubuntu, don’t log in, open a terminal (CTRL-ALT-F3)
- add an entry in /etc/fstab
/dev/sda2 /media/Mac hfsplus user,force,rw,nodev 0 0
- change uid to match that of OSX (google it I forgot how to do it)
- rename your old homedir
- make a symlink in your /home to your Mac /Users:
sudo ln -s /media/Mac/Users/yourusername /home/yourusername
helpfull links
Installing ubuntu using wubi in vista and other complex systems
Other Info
Multiple Hard Drives (Mac Pro)
The basic single and dual system partitioning, tools, and installation method have been described above for a single, internal hard disk. Macs with multiple disks have the additional simple option of separate disk for each OS (with some traps such as refit being limited to gptsync the first disk). Some information on this can be found on the Mac Pro page
GRUB2 / GRUB_EFI
Some Intel macs can use the EFI version of the grub bootloader (AKA GRUB2 or grub-efi) which enables external booting similar to the Mac OSX EFI bootloader.
Example Ubuntu Installation after Mac OSX and Vista
You have already installed Mac OSX and Windows Vista, now to install Ubuntu.
- Startup your laptop with Ubuntu Desktop CD inserted into the drive.
- In rEFIt menu, choose to boot the Ubuntu CD.
- Select English as the language to be used.
- Select the 2nd option, the one that says : «Install Ubuntu»
- After the loading, on the install screen, select the O.S. Language (English) and hit «Forward» button, then select your country location.
- On the Keyboard layout, choose your keyboard language, and on the other window select the variant Macintosh (mine is Portugal — Macintosh), and test the typing if you want.
On the «Prepare Disk Space» menu, select the 1st option: «Guided — Resize SCSI3 (0,1,0), Partition #3 (sda) and use Free Space», and with your mouse select the desired partition size (I set mine to 80% Windows Vista & 20% Ubuntu), and hit «Forward» button.
Use the refit Partitioning Tool to re sync the MBR, then restart again, select the Linux icon on rEFIt to boot into Ubuntu.
Troubleshooting
In case you are stuck with a «No bootable device» message or a blank screen, a bug prevents booting after a successful install (a blank screen or blinking cursor) See information on the forum here to fix it.
If you are attempting to triple boot (OSX, WIN7 using bootcamp and now adding Ubuntu) you probebly installed rEFIT. rEFIt version 0.14 has a built in limitation that messes up the Hybrid MBR that bootcamp set up, so now either booting into windows doesn’t work or choosing Ubuntu in GRUB always boots into windows (depends on how you partitiond your HD). So go here or here for detailed explenation, the solution on both is the same.
Obtaining Help
For further assistance please refer to the Ubuntu Apple Users forum.
External Links
The MactelSupportTeam is restructuring and reorganizing the documentation for Intel-based Macs. If you are interested in helping, please visit our team page for information. For all Mactel wikis, there is a starting place here. There is also a thread about planning the Mactel docummentation going on.
MactelSupportTeam/AppleIntelInstallation (последним исправлял пользователь knome 2013-12-14 00:51:29)
The material on this wiki is available under a free license, see Copyright / License for details
You can contribute to this wiki, see Wiki Guide for details
Источник


