- Linux Boot Process Explained Step by Step in Detail
- Stages of Linux Boot Process (flowchart)
- 1. BIOS Stage
- 2. Boot Loader Stage
- 3. Kernel Stage
- Related Posts
- 6 thoughts on “Linux Boot Process Explained Step by Step in Detail”
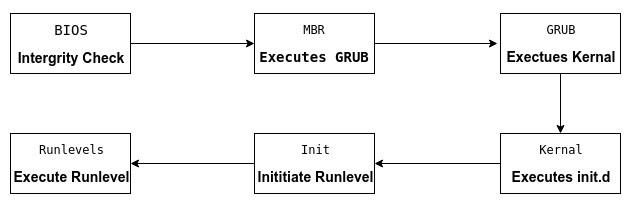
- The Linux Booting Process — 6 Steps Described in Detail
- 1. BIOS
- 2. MBR
- 3. GRUB
- 4. Kernel
- 5. Init
- 6. Runlevel programs
- A Basic Guide to Linux Boot Process
- 1. The BIOS Integrity Check (POST)
- 2. The Bootloader (GRUB2)
- 3. Kernel Initialization
- 4.Starting Systemd
- If You Appreciate What We Do Here On TecMint, You Should Consider:
Linux Boot Process Explained Step by Step in Detail
Table of Contents
In this article I will give you an step by step overview of Linux boot process with some flowchart diagrams which can help you understand better.

Stages of Linux Boot Process (flowchart)
- BIOS Stage
- Boot Loader Stage
- Kernel Stage

1. BIOS Stage
- When the machine is powered on BIOS is the first one to be called to verify if the hardware is present in the machine and if it is functioning.
- This is done by performing a Power On Self Test (POST)
- After a successful test, BIOS checks the MBR (Master Boot Record) in the hard disk to check if it refers to the location of the boot loader.

2. Boot Loader Stage
The boot loader will be installed if an operating system is installed on the system.
Two of the most common boot loaders are
- The boot loader will present the user with a list of menu entries, each of which corresponds to different operating system
- The boot loader will then start to boot the operating system
- When you select the the option to start Linux, it decompresses the Linux kernel in memory
- After that Linux kernel (which you selected to boot from) loads initrd (Initial ramdisk)
- The initrd is used by the Linux kernel as a temporary filesystem in the memory
- It contains tools and kernel modules which will continue the boot process including mounting a virtual root file system temporarily.
- Instead of using initrd, some Linux filesystem will also use initramfs.
- It serves the same purpose of initrd, it is just that it is a successor of initrd
- linuxrc is an executable file that is next spawn, it probes the mass storage hardware and finds a suitable kernel module to drive the mass storage hardware
- This is required to prepare the real root filesystem to be mounted by the Linux kernel

3. Kernel Stage
- In the kernel stage of the Linux boot sequence, the Linux kernel based on the result of linuxrc can then mount the real root file system
- The real root file system in Linux is referenced as «/» and it is where all other sub directory and files visible when Linux is running exist
- The kernel will then spawn the init process, this process always has the process identifier (PID) as «1» because it is the first background process or daemon started by the kernel upon boot
- All other background daemons are spawned from the init process
- So the init process will load other system daemons depending upon the configuration of different runlevel
For example:
- If the system boots into runlevel 3 then the init process will start all the daemons from this runlevel.

Lastly I hope the Linux Boot process explained using flowchart in this article was helpful. So, let me know your suggestions and feedback using the comment section.
Related Posts
Didn’t find what you were looking for? Perform a quick search across GoLinuxCloud
If my articles on GoLinuxCloud has helped you, kindly consider buying me a coffee as a token of appreciation.

For any other feedbacks or questions you can either use the comments section or contact me form.
Thank You for your support!!

6 thoughts on “Linux Boot Process Explained Step by Step in Detail”
This is the best explanation I’ve ever seen in the Internet for the Linux boot process.
Hi there, I read your new stuff like every week.
Your story-telling style is awesome, keep doing what you’re doing!
Is the arrow from bootloader to initrd correct? You say “After that Linux kernel creates initrd”
So the arrow should go from kernel to initrd, shouldn’t it?
Thank you for highlighting, the text can be little confusing here so I reworded it. The flow chart is correct. The Linux kernel doesnot creates initrd, instead initrd is part of kernel whichcontains important binaries to load virtual file system and detect the hardware to proceed with the boot up.
Источник
The Linux Booting Process — 6 Steps Described in Detail

An operating system (OS) is the low-level software that manages resources, controls peripherals, and provides basic services to other software. In Linux, there are 6 distinct stages in the typical booting process.
1. BIOS
BIOS stands for Basic Input/Output System. In simple terms, the BIOS loads and executes the Master Boot Record (MBR) boot loader.
When you first turn on your computer, the BIOS first performs some integrity checks of the HDD or SSD.
Then, the BIOS searches for, loads, and executes the boot loader program, which can be found in the Master Boot Record (MBR). The MBR is sometimes on a USB stick or CD-ROM such as with a live installation of Linux.
Once the boot loader program is detected, it’s then loaded into memory and the BIOS gives control of the system to it.
2. MBR
MBR stands for Master Boot Record, and is responsible for loading and executing the GRUB boot loader.
The MBR is located in the 1st sector of the bootable disk, which is typically /dev/hda , or /dev/sda , depending on your hardware. The MBR also contains information about GRUB, or LILO in very old systems.
3. GRUB
Sometimes called GNU GRUB, which is short for GNU GRand Unified Bootloader, is the typical boot loader for most modern Linux systems.
The GRUB splash screen is often the first thing you see when you boot your computer. It has a simple menu where you can select some options. If you have multiple kernel images installed, you can use your keyboard to select the one you want your system to boot with. By default, the latest kernel image is selected.
The splash screen will wait a few seconds for you to select and option. If you don’t, it will load the default kernel image.
In many systems you can find the GRUB configuration file at /boot/grub/grub.conf or /etc/grub.conf . Here’s an example of a simple grub.conf file:
4. Kernel
The kernel is often referred to as the core of any operating system, Linux included. It has complete control over everything in your system.
In this stage of the boot process, the kernel that was selected by GRUB first mounts the root file system that’s specified in the grub.conf file. Then it executes the /sbin/init program, which is always the first program to be executed. You can confirm this with its process id (PID), which should always be 1.
The kernel then establishes a temporary root file system using Initial RAM Disk (initrd) until the real file system is mounted.
5. Init
At this point, your system executes runlevel programs. At one point it would look for an init file, usually found at /etc/inittab to decide the Linux run level.
Modern Linux systems use systemd to choose a run level instead. According to TecMint, these are the available run levels:
Run level 0 is matched by poweroff.target (and runlevel0.target is a symbolic link to poweroff.target).
Run level 1 is matched by rescue.target (and runlevel1.target is a symbolic link to rescue.target).
Run level 3 is emulated by multi-user.target (and runlevel3.target is a symbolic link to multi-user.target).
Run level 5 is emulated by graphical.target (and runlevel5.target is a symbolic link to graphical.target).
Run level 6 is emulated by reboot.target (and runlevel6.target is a symbolic link to reboot.target).
Emergency is matched by emergency.target.
systemd will then begin executing runlevel programs.
6. Runlevel programs
Depending on which Linux distribution you have installed, you may be able to see different services getting started. For example, you might catch starting sendmail …. OK .
These are known as runlevel programs, and are executed from different directories depending on your run level. Each of the 6 runlevels described above has its own directory:
- Run level 0 – /etc/rc0.d/
- Run level 1 – /etc/rc1.d/
- Run level 2 – /etc/rc2.d/
- Run level 3 – /etc/rc3.d/
- Run level 4 – /etc/rc4.d/
- Run level 5 – /etc/rc5.d/
- Run level 6 – /etc/rc6.d/
Note that the exact location of these directories varies from distribution to distribution.
If you look in the different run level directories, you’ll find programs that start with either an «S» or «K» for startup and kill, respectively. Startup programs are executed during system startup, and kill programs during shutdown.
That’s everything you need to know about the Linux booting process. Now go out there and make Tux proud.
If this article was helpful, tweet it.
Learn to code for free. freeCodeCamp’s open source curriculum has helped more than 40,000 people get jobs as developers. Get started
freeCodeCamp is a donor-supported tax-exempt 501(c)(3) nonprofit organization (United States Federal Tax Identification Number: 82-0779546)
Our mission: to help people learn to code for free. We accomplish this by creating thousands of videos, articles, and interactive coding lessons — all freely available to the public. We also have thousands of freeCodeCamp study groups around the world.
Donations to freeCodeCamp go toward our education initiatives and help pay for servers, services, and staff.
Источник
A Basic Guide to Linux Boot Process
Every time you power on your Linux PC, it goes through a series of stages before finally displaying a login screen that prompts for your username or password. There are 4 distinct stages that every Linux distribution goes through in a typical boot-up process.
![]() User Login Prompt
User Login Prompt
In this guide, we will highlight the various steps taken by the Linux OS from the time it is powered on to the time you log in. Kindly note that this guide only takes into consideration the GRUB2 bootloader and systemd init as they are currently in use by a vast majority of modern Linux distributions.
The booting process takes the following 4 steps that we will discuss in greater detail:
- BIOS Integrity check (POST)
- Loading of the Boot loader (GRUB2)
- Kernel initialization
- Starting systemd, the parent of all processes
1. The BIOS Integrity Check (POST)
The boot process is usually initialized when a user presses the power-on button – if the PC was already shut down – or reboots the system using either the GUI or on the command line.
When the Linux system powers up, the BIOS (Basic Input Output System) kicks in and performs a Power On Self Test (POST). This is an integrity check that performs a plethora of diagnostic checks.
The POST probes the hardware operability of components such as the HDD or SSD, Keyboard, RAM, USB ports, and any other piece of hardware. If some hardware device is not detected, or if there’s a malfunction in any of the devices such as a corrupt HDD or SSD, an error message is splashed on the screen prompting your intervention.
In some cases, a beeping sound will go off especially in the event of a missing RAM module. However, if the expected hardware is present and functioning as expected, the booting process proceeds to the next stage.
2. The Bootloader (GRUB2)
Once the POST is complete and the coast is clear, the BIOS probes the MBR (Master Boot Record) for the bootloader and disk partitioning information.
The MBR is a 512-byte code that is located on the first sector of the hard drive which is usually /dev/sda or /dev/hda depending on your hard drive architecture. Note, however, that sometimes the MBR can be located on a Live USB or DVD installation of Linux.
There are 3 main types of bootloaders in Linux: LILO, GRUB, and GRUB2. The GRUB2 bootloader is the latest and primary bootloader in modern Linux distributions and informs our decision to leave out the other two which have become antiquated with the passage of time.
GRUB2 stands for GRand Unified Bootloader version 2. Once the BIOS locates the grub2 bootloader, it executes and loads it onto the main memory (RAM).
The grub2 menu allows you to do a couple of things. It allows you to select the Linux kernel version that you’d want to use. If you have been upgrading your system a couple of times, you might see different kernel versions listed. Additionally, it gives you the ability to edit some kernel parameters by pressing a combination of keyboard keys.
![]() Select Kernel Version
Select Kernel Version
Also, in a dual-boot setup where you have multiple OS installations, the grub menu allows you to select which OS to boot into. The grub2 configuration file is the /boot/grub2/grub2.cfg file. GRUB’s main objective is to load the Linux kernel onto the main memory.
3. Kernel Initialization
The kernel is the core of any Linux system. It interfaces the PC’s hardware with the underlying processes. The kernel controls all the processes on your Linux system. Once the selected Linux kernel is loaded by the bootloader, it must self extract from its compressed version before undertaking any task. Upon self-extracting, the selected kernel mounts the root file system and initializes the /sbin/init program commonly referred to as init.
![]() Kernel Initialization Process
Kernel Initialization Process
Init is always the first program to be executed and is assigned the process ID or PID of 1. It’s the init process that spawns various daemons & mounts all partitions that are specified in the /etc/fstab file.
The kernel then mounts the initial RAM disk (initrd) which is a temporary root filesystem until the real root filesystem is mounted. All kernels are located in the /boot directory together with the initial RAM disk image.
4.Starting Systemd
The kernel finally loads Systemd, which is the replacement of the old SysV init. Systemd is the mother of all Linux processes and manages among other things mounting of file systems, starting and stopping services to mention just a few.
Systemd uses the /etc/systemd/system/default.target file to determine the state or target that the Linux system should boot into.
- For a desktop workstation (with a GUI) the default target value is 5 which is the equivalent of run level 5 for the old SystemV init.
- For a server, the default target is multi-user.target which corresponds to run level 3 in SysV init.
Here’s a breakdown of the systemd targets:
- poweroff.target (runlevel 0): Poweroff or Shutdown the system.
- rescue.target (runlevel 1): launches a rescue shell session.
- multi-user.target (runlevel 2,3,4): Configures the system to a non-graphical (console) multi-user system.
- graphical.target (runlevel 5): Set the system to use a graphical multi-user interface with network services.
- reboot.target (runlevel 6): reboots the system.
To check the current target on your system, run the command:
![]() Check Run Level
Check Run Level
You can switch from one target to another by running the following command on the terminal:
For example, init 3 configures the system to a non-graphical state.
The init 6 command reboots your system and init 0 powers off the system. Be sure to invoke sudo command when you want to switch to these two targets.
The booting process ends once systemd loads all the daemons and sets the target or run level value. It’s at this point you are prompted for your username and password upon which you gain entry to your Linux system.
If You Appreciate What We Do Here On TecMint, You Should Consider:
TecMint is the fastest growing and most trusted community site for any kind of Linux Articles, Guides and Books on the web. Millions of people visit TecMint! to search or browse the thousands of published articles available FREELY to all.
If you like what you are reading, please consider buying us a coffee ( or 2 ) as a token of appreciation.

We are thankful for your never ending support.
Источник


