- How to boot from ISO disk to fix Windows boot issue
- Replies (6)
- How to Boot From a USB Drive or CD on Any Computer
- On a Windows PC
- Restart your computer
- Wait a second
- Select ‘Boot Device’
- Choose the right drive
- Exit the BIOS
- Reboot
- On a Mac
- Boot Disk – Guide for Windows XP, Vista, 7, 8, 8.1, 10
- What is a boot disk
- Download boot disk
- Create boot disk for Windows XP
- Create boot disk for Windows Vista
- Prerequisites
- Creating a boot disk
- Create boot disk for Windows 7
- Create boot disk for Windows 8/8.1/10
- Create the disk as a CD/DVD
- Create a boot disk as a USB drive
- More Information
- Support Links
- Applicable Systems
How to boot from ISO disk to fix Windows boot issue
How do you boot up from the iso disk that was created from another pc. trying to fix win10. Okay got to advanced options and there is not automatic repair option. system restore
Startup repair can not repair no operating system
Replies (6)
![]()
9 people found this reply helpful
Was this reply helpful?
Sorry this didn’t help.
Great! Thanks for your feedback.
How satisfied are you with this reply?
Thanks for your feedback, it helps us improve the site.
How satisfied are you with this reply?
Thanks for your feedback.
You need to first prepare the ISO file:
Prepare Windows 10 ISO file
After you have downloaded the Windows 10 ISO, you need prepare it, this is especially important for Windows 7 users..
After obtaining the .iso file you can use the built in Disc Image burning tool or Microsoft .iso to USB/DVD tool to create a bootable DVD or USB (requires a blank DVD or USB flash stick of at least 4 GB).
After downloading the .ISO file, right click it and click Burn disc image
Insert a blank DVD
Windows 8/8.1 users can mount the .ISO file and start the upgrade automatically. Learn more here

Important:
If you are creating a bootable USB thumb drive, make sure the thumb drive is first formatted as FAT32.
Connect the thumb drive
Right click thumbdrive
Make sure FAT32 is selected as the file system.
For UEFI based systems
If your computer is UEFI based, these are normally systems that come pre-loaded with Windows 8 or later, you will need to prepare the ISO file for such a configuration or you will receive an error message during setup. The thumbdrive needs to be formatted as FAT32 and use the GPT partitioning scheme. To do this, you need to use Rufus, a small tool you can download for free.

Rufus — credit: Pete Batard/Akeo
After you have installed Rufus:
- Launch it
- Select ISO Image
- Point to the Windows 10 ISO file
- Check off Create a bootable disk using
- Select GPT partitioning for EUFI firmware as the Partition scheme
- Choose FAT32 NOT NTFS as the File system
- Make sure your USB thumbdrive in the Device list box
- Click Start
- Close when complete
Once you have your Windows 10 installation media ready, all you need to do is boot from the disc or USB thumb drive to begin setup.
To learn how to change your BIOS options to boot from the DVD drive, see the following tutorial:

Once your computer is set to boot from the DVD, you should see this option.
If you are installing from a thumb drive, see the following instructions how to prepare your computer to boot from one:
How to Boot From a USB Drive or CD on Any Computer
When you’re troubleshooting your computer or installing a new operating system, you may need to “boot from a disc” or USB device (like an external hard drive or flash drive). Here’s what that means—and how to do it.
When you press the power button on your computer, it boots up from its internal hard drive, where your operating system (usually Windows or macOS) is stored. But sometimes you need to boot into something different. Maybe you need to boot from your Windows installation disc to reinstall Windows, or perhaps you need to boot from a system rescue disc to solve a problem with your machine. You may simply want to run a different operating system on your computer.
On a Windows PC
Every Windows PC is different. Some PCs are already set up to search for a USB option before defaulting to the operating system on the internal hard disk. But once you get into your system’s boot menu, you should be able to find what you’re looking for.
Here’s how to boot from a CD or USB drive on a PC:
Restart your computer
Restart your computer and wait for that first screen to pop up. Often, it’ll say something like “Press F12 to Choose Boot Device” somewhere on the screen—the requested function key could vary depending on your machine. Press that key now.
Wait a second
Give it a moment to continue booting, and you should see a menu pop up with a list of choices on it. Highlight your preferred CD or USB drive and press Enter.
Alternatively, you can set your computer to always check for a bootable CD or USB drive and change the boot order. That way, when you have an external disc inserted, your machine will boot from it automatically, and when you don’t, it’ll head into your regular operating system. To set this up, follow these instructions.
Restart your computer and watch for the first screen that shows up when you boot. You should see a message like “Press DEL to enter SETUP” or something similar (the requested key may vary depending on your machine). Press the noted key on your keyboard and wait for setup to start.
Select ‘Boot Device’
You should see a new screen pop up, called your BIOS. This is where you set a lot of low-level settings for your computer. BIOS menus are configured differently across machines, but you should see instructions for how to navigate yours (i.e., which keystrokes to use) somewhere in the window.
Using those instructions, look through your menu options (be careful not to change anything else) for a setting called “Boot Device,” “Boot Order,” or something similar. Select that option.
Choose the right drive
From the menu that pops up, choose your computer’s disc drive and press Enter. If you’re trying to boot from a USB drive, choose that option. It might be listed on its own or under a sub-menu like “Removable Devices.” Press Enter. Depending on your BIOS, you may need to use the Page Up and Page Down or +/- keys to move your selection to the top of a list instead. Again, use the directions listed on your specific machine.
Exit the BIOS
Follow instructions to exit out of your BIOS and save your changes. Usually, this option is under “Exit” or “Save and Exit” on the main menu or available via a keyboard shortcut listed somewhere on your screen. Depending on your BIOS, you may have to confirm your selection again.
Reboot
Your computer should restart automatically. Make sure your CD or USB drive is in your computer. If you’re prompted to “Press any key to boot from external device,” do so. Your computer should boot into the CD or USB drive instead of your normal operating system.
From there, you can follow the on-screen instructions to install Windows, troubleshoot issues, or do whatever else it is you need to do.
On a Mac
Booting from a USB or CD is very, very easy on a Mac. One way to do this is to open System Preferences > Startup Disk. You’ll see your built-in hard disk as well as any compatible operating systems and external drives.
Click the lock icon at the bottom-left corner of the window, enter your admin password, select the startup disk you want to boot from, and hit Restart. This method will save your startup disk preference until you go through this process again to choose a different option.
To do a one-off boot from a USB, you’ll use the Startup Manager instead. Here’s how it works:
Boot Disk – Guide for Windows XP, Vista, 7, 8, 8.1, 10
This guide is about boot (or startup) disks for the following Windows versions: Windows XP, Vista, 7, 8, 8.1 or 10.
What is a boot disk
A boot disk (or a startup disk) is a recovery media (CD, DVD or floppy disk for older Windows versions) that you can use to start Windows, if it became damaged or corrupted somehow.
The term “boot disk” was mostly used in connection with Windows XP (and older versions) and, in some cases, with Windows Vista. For Windows 7, Windows 8 and Windows 10 the “boot disk” term is mostly replaced with the term “recovery disk” (sometimes also named as a “repair disk” or “restore disk”).
NeoSmart Technologies has extensive guides on how to create recovery media for all major PC manufacturers that have their own software for recovery procedures and a recovery disk for all Windows versions (XP, Vista, 7, 8, 10).
If you have a computer from any of the following manufacturers, read that guide too. Most PC manufacturers with computers that have Windows installed also have a recovery partition that you can make use of to restore or repair your computer. Some older models had only a recovery disk (as a CD, DVD etc.) or only the recovery partition.
Our list of recovery media guides for specific PC manufacturers: Dell (including the guide on the recovery partition), Acer, Asus, Gateway, Toshiba, HP, Lenovo.
A boot or startup disk is not an installation disk! You can not use a boot disk to install Windows. To install Windows, use your original Windows installation disk.
You can use the following formats to create a disk:
- CD or diskette (floppy disk) for Windows XP
- CD or DVD for Windows Vista
- CD or DVD for Windows 7
- CD or DVD or USB for Windows 8
- USB for Windows 8.1 or Windows 10
Download boot disk
If you aren’t able to boot into Windows or don’t access to the recovery partition to create a system recovery disk, you can use our recovery and repair disk Easy Recovery Essentials to repair and restore your computer.
Easy Recovery Essentials is compatible with the following Windows versions: Windows 10, Windows 8 or 8.1, Windows 7, Windows Vista, Windows XP or Windows Server 2003, 2008 and 2012.
Features of Easy Recovery Essentials include:
- Automatically find and fix boot errors
- Works even when you can’t get into Windows
- Recover from virus infections
- Restore your PC to a working state
- Access and backup your important data
- Advanced tools for IT experts
Easy Recovery Essentials is an ISO download image ready to be burned directly to a CD, DVD or a USB flash drive.
With Easy Recovery Essentials you can:
- Find and fix errors automatically with Automated Repair
- Recover your PC from infections with the built-in antivirus
- Restore your PC to a working state
- Access and backup your most important data (like documents, pictures, music, videos and so on)

Screenshot of Easy Recovery Essentials
Note: Easy Recovery Essentials can not be used to install or reinstall Windows.
Windows XP users
Easy Recovery Essentials can be used as a boot disk (or recovery disk) for computers with Windows XP installed to repair the computer, including the full list of Windows XP editions with Service Packs installed:
- Microsoft Windows XP SP1 (Service Pack 1)
- Microsoft Windows XP SP2 (Service Pack 2)
- Microsoft Windows XP SP3 (Service Pack 3)
It’s compatible with both the Home and Professional editions of Windows XP:
- Microsoft Windows XP Home
- Microsoft Windows XP Professional
Windows Vista users
Easy Recovery Essentials works with Windows Vista computers and the version for the x86 and x64 platforms. It works with all Windows Vista editions, including the 32-bit and 64-bit editions:
- Microsoft Windows Vista Ultimate (32-bit and 64-bit editions)
- Microsoft Windows Vista Enterprise (32-bit and 64-bit editions)
- Microsoft Windows Vista Business (32-bit and 64-bit editions)
- Microsoft Windows Vista Home Premium (32-bit and 64-bit editions)
- Microsoft Windows Vista Home Basic (32-bit and 64-bit editions)
- Microsoft Windows Vista Starter (32-bit edition)Note: Windows Vista Starter doesn’t have a 64-bit edition.
It’s compatible with the available Service Packs of Windows Vista:
- Microsoft Windows Vista Service Pack 1 (SP1)
- Microsoft Windows Vista Service Pack 2 (SP2)
Windows 7 users
Easy Recovery Essentials is compatible with Windows 7 and supports both x86 and x64 platforms and is compatible with the full list of Windows 7 editions, including the 32-bit and the 64-bit:
- Microsoft Windows 7 Ultimate (32-bit and 64-bit editions)
- Microsoft Windows 7 Enterprise (32-bit and 64-bit editions)
- Microsoft Windows 7 Professional (32-bit and 64-bit editions)
- Microsoft Windows 7 Home Premium (32-bit and 64-bit editions)
- Microsoft Windows 7 Home Basic (32-bit and 64-bit editions)
- Microsoft Windows 7 Starter (32-bit edition)Note: Windows 7 Starter is only available in the 32-bit edition.
It’s compatible with the Service Pack 1 for Windows 7:
- Microsoft Windows 7 Service Pack 1 (SP1)
Windows 8 or 8.1 users
You can use Easy Recovery Essentials as a boot or startup disk (now known as a recovery media) for computers with Windows 8/8.1 installed to repair or restore your computer.
It supports the x86 and x64 platforms and all the Microsoft Windows 8 editions (8 and 8.1), including the 32-bit and the 64-bit editions:
- Microsoft Windows 8 (32-bit and 64-bit editions)
- Microsoft Windows 8.1 (32-bit and 64-bit editions)
Windows 10 users
You can use Easy Recovery Essentials as a boot or startup disk (now known as a recovery media) for computers with Windows 10 installed to repair or restore your computer.
Create boot disk for Windows XP
The original Windows XP installation CD itself acts as a boot or startup disk that you can use and run Recovery Console (Command Prompt) to repair your computer with.
If you already have the installation CD, follow these steps to boot into Recovery Console and the Command Prompt of Windows XP:
- Insert the CD in the disk drive and restart your computer
- Press any key, when prompted to boot from the CD
- Press R to open Recovery Console, at the “Welcome to Setup” screen
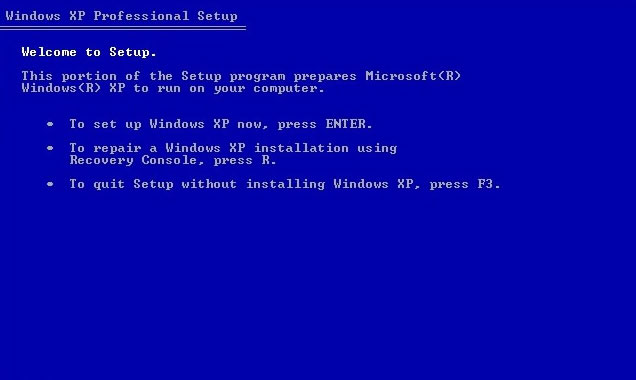
Windows XP Press R for Recovery Console
If you don’t have the CD, you can create a bootable diskette if your computer has a floppy disk drive to boot into MS-DOS. You need to be able to boot into Windows XP to create this diskette.
To create the boot diskette for Windows XP, follow these steps:
- Insert a diskette in your computer’s floppy disk drive
- Go to My Computer
- Right click on A:\ , this is usually the drive letter that holds the diskette
- Click Format
- Check the “Create an MS-DOS startup disk” option
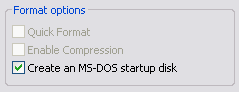
Create MS-DOS startup disk option
Once you have the diskette created, follow these instructions to use it when you need it:
- Make sure the disk is in write-protect mode
- Insert the disk in the floppy disk
- Restart your computer
- Follow the instructions on the screen as you boot the system from the diskette
You can also create a set of setup/boot disks that will allow you to bypass the need for a bootable CD-ROM (and then continue a reinstallation of Windows XP) by following these instructions:
- Download the setup program file for the Windows XP you have installed:
- Windows XP Home Edition with Service Pack 2
- Windows XP Professional with Service Pack 2
- Extract the files
- Type the drive where your floppy disks is – example: A: – and hit Enter when you receive this message:
- Insert the first blank disk in the floppy drive when you receive this message:
- Continue with the process until all 6 disks are created
- Boot from the first created diskette. Make sure you have the installation CD at hand to be used during a reinstallation process.
Create boot disk for Windows Vista
If you already have the Windows Vista installation disk, you can use it to recover or restore your computer.
If not, go to the Create the disk section instructions to learn how you can create the disk (read Prerequisites before).
If you don’t have the installation disk and can’t boot into Windows, go to Download boot disk and use Easy Recovery Essentials’ Automated Repair function to fix boot errors automatically.
To repair your computer, if you have the Windows Vista installation disk, follow these steps:
- Insert the disk
- Restart your computer
- Press any key to start Windows from the disk. If the “Press any key” message doesn’t appear, please check your BIOS settings as you need to boot from the DVD first.

If you don’t have the installation disk, but your computer has the recovery options preinstalled, you can follow these steps:
- Restart your computer. Remove all CDs, DVDs or USB flash drives from your computer first.
- Press and hold the F8 key as your computer boots up. You need to press this key before the Windows Vista logo appears on your screen.
- At the Advanced Boot Options screen, select Repair your computer.
If the “Repair your computer” option isn’t available, your computer doesn’t have any recovery options preinstalled. If so, go to Download boot disk.
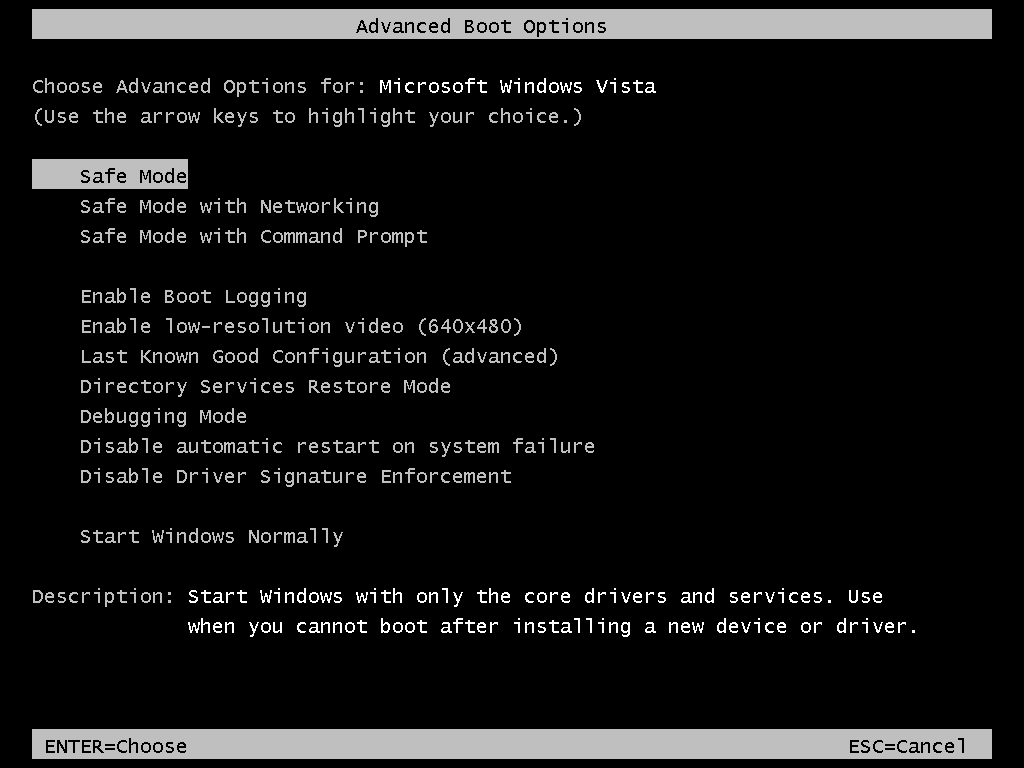
The Advanced Boot Options screen in Windows Vista
If you want to create a boot disk, follow the instructions from Prerequisites and then the Create the disk instructions.
Prerequisites
You must verify what version of Windows Vista you have before you create the boot or startup disk. If you have any Service Packs installed, you need the recdisc.exe file from the System32 folder to be from a Windows Vista system without any Service Packs (SP) installed.
To verify this, follow these steps:
- Go to Control Panel
- Click on System
- Go to the System type section
- Check if you run a “32-bit” Windows Vista or a “64-bit” Windows Vista
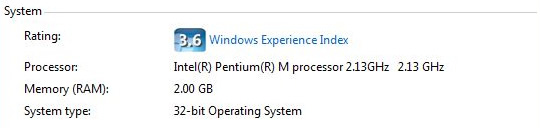
Windows Vista System Type
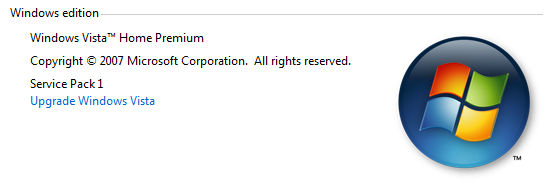
The Windows Vista – Windows Edition section
If you have the Windows Vista with Service Pack 1 (SP1) or Service Pack 2 (SP2) installed, you need to replace the recdisc.exe file.
Your Windows Vista has SP1 or SP2 installed only if it’s mentioned in the Windows edition section, above the “System type” section.
If you have a Service Pack installed, follow these steps to replace the recdisc.exe file before you continue with the Create the disk section steps:
- Copy an original recdisc.exe file from a Windows Vista without SP. This file will be replaced with your current recdisc.exe.
- Copy this file to your Desktop
- Right-click on the file > Properties
- Go to the General tab
- Click Unblock. If this option – Unblock – doesn’t exist in the General tab, skip this step.
- Click OK
- Go to C:\Windows\System32\ (from My Computer > C:\ > Windows > System32)
- Find the recdisc.exe file from this folder
- Make sure you have permissions to make modifications to this file. Right-click on this file > Properties
- To have a backup of your original recdisc.exe file, rename it to recdisc.exe.backup or similar
- Go to the copied recdisc.exe file and copy it (Right-click > Copy)
- Paste it in the System32 folder, to overwrite your current recdisc.exe file
- If you didn’t renamed the original file, confirm that you want to replace it (click Copy and Replace, when prompted)
Once these steps have been completed, move to Create the disk below to create the boot/startup disk for Windows Vista.
Creating a boot disk
Please read Prerequisites above before continuing with these instructions.
These steps allow you to create the boot or startup disk (a recovery media) for Windows Vista that you can use in emergency cases.
- At Start, type recdisc.exe in the search field
- When the search results appears, click on the top result item
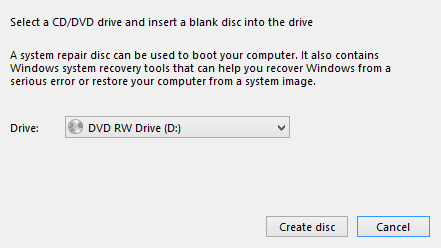
- Insert a blank DVD in the disk tray. You can use CDs or DVDs for this
- Select the disk drive from the “Drive:” list
- Click Create disc. If after clicking Create disc, the system shows a message about the installation disk – Insert Windows installation disc – you need the original installation disk as your version of Windows Vista is missing the necessary files to continue with the process.
- Wait for the recdisc.exe utility software to finish the procedure
- Click Close, at the “Using the system repair disc” screen
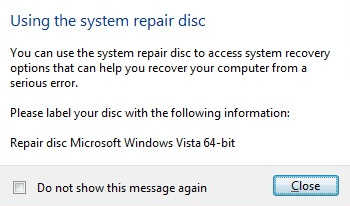
Windows Vista – Using the system repair disc
Create boot disk for Windows 7
If you already have the original installation DVD of Windows 7, you can use that DVD as the boot disk to repair your computer.
If you want to repair your computer and have the installation disk at hand, follow these steps to boot into the System Recovery Options of your computer:
- Insert the installation disk (DVD or USB flash drive)
- Restart your computer
- Press any key to boot from the disk, when prompted
- Choose your language preferences
- Click Next
- Click Repair your computer
If you don’t have the installation disk, but your system has the system recovery options pre-installed, follow these steps:
- Remove all CDs, DVDs and USB flash drives from your computer
- Restart the computer
- Press and hold the F8 key as your computer boots. You must press and hold the F8 key before the Windows 7 logo appears.
- Select Repair your computer, at the Advanced Boot Options screen
If the “Repair your computer” option isn’t listed, it means that your Windows 7 version doesn’t have the necessary files for this procedure. If so, go to Download boot disk.

Advanced Boot Options on Windows 7
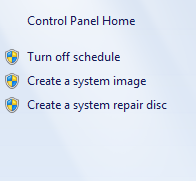
You can create the boot disk for Windows 7 by following these steps:
- Boot into Windows 7 and login as an administrator or any user who has administrative rights to the system
- Insert a blank DVD in the disk tray
- At Start, type recdisc.exe in the Search field
- Click on the first result, the recdisc.exe item. It should usually be the first result item available.
- If the “Create a system repair disc” screen doesn’t show up, follow these steps instead:
- Go to Control Panel
- Go to Backup and Restore
- Click on Create a system repair disc

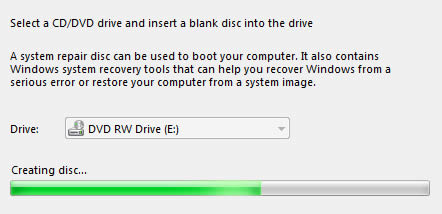
Windows 7 – Create a system repair disc item
Windows 7 – Create disc progress bar
Create boot disk for Windows 8/8.1/10
In Windows 8 or 8.1, you can refresh, reset or restore your computer. These three actions have different outcomes:
- Refresh will not affect your files. Windows 8/8.1 will reinstall any applications you installed and create a copy of these applications on your desktop. Even so, backup your data before you do a refresh.
- Reset will remove all your personal files and delete any settings or configuration you did on your computer.
- Restore will restore your computer to an earlier point in time, if System Restore is available and enabled.By default, Windows 8/8.1 creates restore points whenever you install new applications or do Windows updates. If you haven’t disabled System Restore, restoring your computer via this utility should work.
If you want to create the boot disk, find the instructions below:
- If you have Windows 8, not 8.1, follow Create the disk as a CD/DVD
- If you have Windows 8.1, not 8.0, follow Create the disk as a USB drive. For Windows 8.1 you can only use USB drivers to create the disk.
Refresh
How to refresh the Windows 8 or 8.1 on your computer:
- Boot your computer
- Go to Settings
- Go to Change PC Settings
- Click Update and recovery
- Click Recovery
- Find the Refresh your PC without affecting your files section
The Refresh your PC option in Windows 8
Reset
How to reset Windows 8 or Windows 8.1:
- Boot your computer
- Go to Settings
- Go to Change PC Settings
- Click on Update and recovery
- Click on Recovery
- At the Remove everything and reinstall Windows section, click on the Get started button
The Remove everything option in Windows 8
Restore
For information on how to restore a Windows 8 or Windows 8.1 system, follow our instructions from the guide we did on Windows System Restore here.
Create the disk as a CD/DVD
If you have Windows 8, and not 8.1, you can use CDs or DVDs to create the boot disk (now commonly known as a recovery media):
- Boot into Windows 8 and log in with an administrator account
- Unplug any USB flash drives
- Insert a blank CD or DVD. It’s recommended that you use DVDs, and not CDs, as you will need lots of CDs in the process, if you choose the CD option
- Press the Windows and R key to open the Charm Bar. Or go to the Run utility.
- Type recdisc
- If the “Create a system repair” screen doesn’t appear, follow these steps instead:
- Open Control Panel
- Go to Recovery
- Click on Create a recovery drive
- Click Next
- Click Create a system repair disc with a CD or DVD instead to create the disc as a CD or DVD and not as a USB flash drive, at the “Connect a USB flash drive” screen
- Select the CD/DVD drive from the list
Windows 8 – Select CD for System Repair
Create a boot disk as a USB drive
These steps are for Windows 8.1 users which can only use USB flash drives to create the boot/startup disk. You need a USB drive with at least 256 MB in size, blank.
To create the disk, follow these steps:
- Boot into Windows 8.1
- Press the Windows + R key to open the Charm Bar
- Type RecoveryDrive.exe
- Select Create a recovery drive
- If the Recovery Drive utility doesn’t appear, follow these steps instead:
- Go to Control Panel
- Go to Recovery
- Click Create a recovery drive
- Click Next
- Click Next, at the Create a recovery drive screen
- Select the USB drive from the list
- Click Next
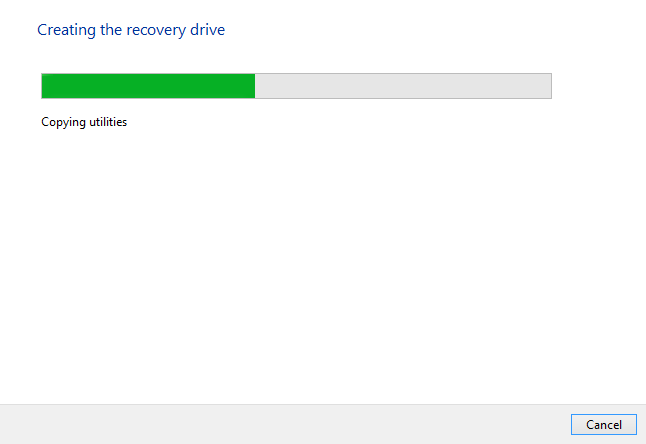
- Click Create
- Wait for the software to finish
Windows 8 – Create disc progress bar
More Information
Support Links
It’s an easy-to-use and automated diagnostics disk. It’s available for Windows 8, Windows 7 and Windows Vista. It’s also available for Windows XP and Windows Server.
Read more at Windows Recovery Disks.
- The NeoSmart Support Forums, member-to-member technical support and troubleshooting.
- Get a discounted price on replacement setup and installation discs: Windows XP, Windows Vista, Windows 7, Windows 8, Windows 10.
- Windows XP (all editions)
- Windows Vista (all editions)
- Windows 7 (all editions)
- Windows 8 (all editions)
- Windows 8.1 (all editions)
- Windows 10 (all editions)
Applicable Systems
This Windows-related knowledgebase article applies to the following operating systems: