- Опции загрузки
- МБР (Master Boot Record)
- Загрузочный сектор раздела
- Boot Загрузочный Floppy диск (или образ дискеты)
- Загрузка с CD-ROM
- Загрузка Windows NT/2K/XP
- Загрузка Консоли восстановления (cmdcons)
- Загрузка Windows Vista
- Загрузка Linux
- Boot windows те from dos
- Загрузочная флешка с DOS
- Создание загрузочной флешки с DOS
Опции загрузки
Grub4dos использует два различных метода загрузки операционных систем — которые можно применять из командной строки или из конфигурационного файла. Оба метода связаны с использованием команды chainloader , один для загрузки устройства, другой для загрузки ядра ОС или загрузочных файлов. Последовательной загрузкой (chainloading) устройства Grub4dos может загружать даже неподдерживаемые устройства, если эти устройства загружаются из MBR и/или загрузочный сектор раздела является частью механизма загрузки. Последовательная загрузка возможна для устройств, относящихся к следующим разделам:
Последовательная загрузка файлов ОС, более перспективна, чем загрузка устройства, Например загрузка флоппи диска (или образа флоппи диска) с повреждённым загрузочным сектором, будет успешна, пока файловая система в порядке.
ПРИМЕЧАНИЕ — Все следующие примеры, это примеры пунктов загрузки конфигурационного файла, однако они могут быть легко изменены, для запуска из командной строки. Чтобы запустить эти пункты из командной строки, удалите из них всю сторку title . Затем введя команды, потребуется их загрузить командой boot command (чего не требуется в конфигурационном файле).
Внизу пример menu.lst :
А в переводе на командную строку будем вводить: chainloader (hd0)+1 [enter], rootnoverify (hd0) [enter], boot [enter].
МБР (Master Boot Record)
Главная загрузочная запись (кратко MBR) это первый сектор жёсткого диска (sector 1). Она содержит таблицу разделов, в каторой отмечено, какой из разделов активный (активный раздел, он же загрузочный раздел). Загрузить MBR жёсткого диска как раз можно командой chainloader . Чтобы загрузить MBR первого жёсткого диска, мы воспользуемся вот этим примером:
Где (hd0) целый первый жёсткий диск, (hd1) — это выбор загрузки второго жёсткого диска и.т.д. Символ «+» используется для блок списка — в этом случае +1 это первый сектор устройства (hd0). Блок список используется для указания файла, который не фигурирует в файловой системе, как chainloader.
Загрузочный сектор раздела
В ходе установки Windows загрузочный сектор прописывается впервый сектор раздела на который ставится ОС (больше чем один загрузочный сектор может быть использован на файловой системе NTFS). Обычно, загрузочный сектор раздела (PBS),определяет, какой файл будет использоваться как часть загрузочного процесса — Когда загружается например Windows XP то PBS загружает NT загрузчик ntldr . Имя файла «ntldr» забито в PBS, и может быть просмотрено в hex редакторе. GRUB и Linux загрузчики, могут быть только записаны в PBS. Чтобы загрузить первый раздел первого устройства смотрите пример:
Читайте предыдущий пункт «МБР (Master Boot Record)» для подробностей по «+1» (блок списки).
Boot Загрузочный Floppy диск (или образ дискеты)
Чтобы грузиться с первого флоппи дисковода (fd0) пишите команду:
Чтобы замапить образ дискеты win98.ima на устройстве (hd0,0) в виде виртуального флоппи дисковода (fd0), делаем следующим образом:
Обратитесь к разделу «Маппинг» Здесь для более детального объяснения вышелседующего примера.
Как альтернатива — memdisk (часть пакета Syslinux) можно использовать для загрузки образов дисков. Следующий пример использует memdisk для загрузки образа диска win98.ima (на устройстве (hd0,0)):
Загрузка с CD-ROM
Загружаемся с CD/DVD:
Если устройство (cd) не найдено, или верхний пример не работает, пробуем:
Если CD всё равно не загружается и вы возвращаетесь в меню (или командную строку), привод будет продолжать работать. Чтобы остановить cdrom введите команду,
map —unhook [enter], cdrom —stop [enter].
Для загрузки CD каторый Grub4dos не смог загрузить, попробуйте BCDL (Bootable CD Loader) — Взять можно Здесь (или Здесь).
Программа выглядит как образ флоппи диска, каторый грузится командой «map», Например:
Или используйте задавленный gzip-ом образ, Например:
ПРИМЕЧАНИЕ — Новая версия BCDL (2.01a) работала на тестах, а (стабильная) версия 1.50z, нет.
Загрузка Windows NT/2K/XP
Чтобы последовательно загрузить NT загрузчик ntldr (установленный на первый раздел первого жёсткого диска) используем команду:
Если установлена только одна Windows, следующая команда тоже может быть полезной (если ОС Windows больше одной штуки, то загружена будет первая найденная):
ПРИМЕЧАНИЕ — NT-система, должна быть установлена на вервый жёсткий диск — попытка загрузиться со второго жёсткого диска не удастся. Можно загрузить Windows с устройства (hd1) Ремапингом (hd0) – Смотрим Сюда.
Загрузка Консоли восстановления (cmdcons)
Для загрузки Windows NT/2000/XP Recovery Console, делаем следующим образом:
Загрузка Windows Vista
Процесс загрузки Vista-систем похож на загрузку NT-систем и файлы ОС должны быть на первом жёстком диске (или заремапленом диске).
Для загрузки Vista последовательно загружаем загрузочный сектор раздела/MBR, или последовательно загружаем загрузчик Висты bootmgr .
Для загрузки bootmgr с первого раздела первого жёсткого диска (device (hd0,0)):
Загрузка Linux
Чтобы загрузить Linux мы должны использовать команды kernel и initrd – с путями до требуемых файлов.
Например: Для загрузки Puppy Linux (файл ядра vmlinuz и initrd файл initrd.gz ) с флешки (определяемой в BIOS-е как второй жёсткий диск с одним разделом) используем команду:
Из-за множества вариантов Linux-подобных ОС, трудно перечислить все возможные способы их загрузки. С каждой ОС нужно разбираться в отдельности вручную подбирая параметры загрузки, в этом может помочь документация по конкретному дистрибутиву.
Boot windows те from dos
The MS-DOS Boot Process
If you have arrived here through a search engine, and there’s no menu to the left click here!
The System Boot Sequence consists of a series of events that the system performs when it is turned on (or rebooted with the reset switch). This always starts with the special boot program software that is in the system BIOS ROM on the motherboard. The BIOS performs several steps to test the system and make it ready before an operating system can be loaded. These steps are explained in detail here: The Master Boot Record and the System Boot Sequence.
Once the BIOS has completed its testing and system configuration, it begins the process of loading the operating system. The BIOS accomplishes this by searching the installed drives for a Master Boot Record in which is contained a boot code. Once found, the boot code is executed and the system is boot into the operating system. When looking for this Master Boot Record, the BIOS will search for boot devices (drives) in the order specified in the BIOS configuration settings controlling this aspect of the boot sequence. If it cannot find a boot device it will terminate with an error.
If the operating system is MS-DOS В® , or any variant of Windows В® other than Windows В® NT or Windows В® 2000, that starts out by booting the equivalent of DOS, then a specific operating system load sequence commences, which is referred to as the DOS Boot Process. If you are booting into Windows, additional steps are performed after the underlying MS-DOS В® operating system has loaded.
The steps below takes you through the boot process from the hard disk. If you were to boot from a floppy disk, the steps would only differ slightly in the first few steps, as the floppy disk structures are slightly different. Floppies cannot be partitioned, and hence have no master boot record or partitions. This means that the master boot record issues are skipped.
MS-DOS boot process:
- The BIOS, having completed its test and setup functions, loads the boot code found in the master boot record and then transfers control of the system to it. At that point, the master boot record code is executed. If the boot device is a floppy disk, the process skips to step 7 below.
The next step in the process is the master boot code examining the master partition table. It first must determine if there is an extended DOS partition, then it must determine if there is a bootable partition specified in the partition table.
If the master boot code locates an extended partition on the disk, it loads the extended partition table that describes the first logical volume in the extended partition. This extended partition table is examined to see if it points to another extended partition table. If it does, this second table is examined for information about the second logical volume in the extended partition. Logical volumes in the extended partition have their extended partition table chained together one to the next. This process continues until all of the extended partitions have been loaded and recognized by the system.
Once the extended partition information (if any) has been loaded, the boot code attempts to start the primary partition that is marked active, referred to as the boot partition. If no boot partitions are marked active, then the boot process will terminate with an error. The error message is often the same as that which occurs if the BIOS could not locate a boot device, generally shown on screen as «No boot device», but also can show up as «NO ROM BASIC — SYSTEM HALTED». If there is a primary partition marked active and there is an installed operating system, the boot code will boot it. The rest of the steps presume this example is of an MS- DOS primary partition.
At this stage, the master or volume boot sector is loaded into memory and tested, and the boot code that it contains is given control of the remainder of the boot process.
The boot code examines the disk structures to ensure that everything is correct. If not, the boot process will end in an error here.
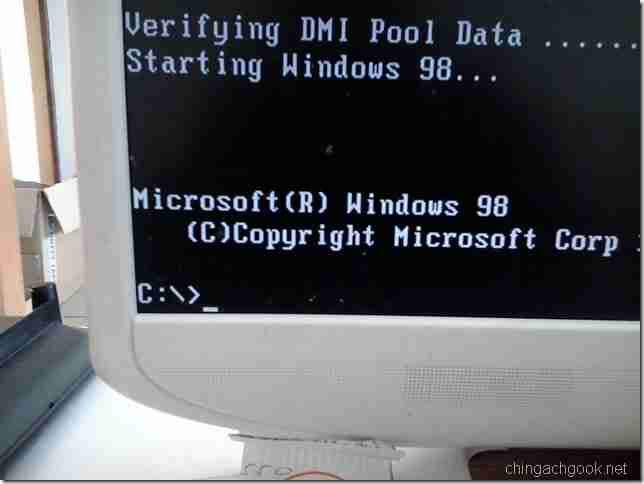
During the next step, the boot code searches the root directory of the device being booted for the operating system files that contain the operating system. For MS-DOS, these are the files «IO.SYS», «MSDOS.SYS» and «COMMAND.COM».
If no operating system files are found, the boot program will display an error message similar to «Non-system disk or disk error — Replace and press any key when ready». Keep in mind that his message does not means that the system was never booted. It means that the BIOS examined the floppy disk for example and just rejected it because it couldn’t boot an operating system. The volume boot code was indeed loaded and executed, as that is what posts the message when it can’t find the operating system files.
If any of the Windows 95/98/ME versions were being started, the above would only be the beginning of the startup process. When MS-DOS starts in anticipation of loading these Windows versions, there are many more routines that are loaded and executed as part of the boot process, which includes such tasks such as reading the system registry, initializing hardware devices and starting the graphical user interface or operating system shell. We hope this has given you a better understanding of what occurs during the boot or startup process of your computer.

Notice: WindowsВ® 95, WindowsВ® 98, WindowsВ® NT, WindowsВ® 2000 and
MicrosoftВ® Office are registered trademarks or trademarks of the Microsoft Corporation.
All other trademarks are the property of their respective owners.
Copyright В©1995-2001 DEW Associates Corporation. All rights reserved.
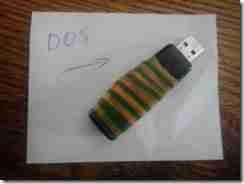
Загрузочная флешка с DOS
 Пошаговая инструкция по созданию загрузочной флешки с DOS.
На работе возникла необходимость в использовании древней консольной программы для программирования оборудования. Под Windows она работала некорректно, поэтому пришлось вспомнить молодость и создать загрузочный носитель с DOS.
Так как дискеты благополучно ушли в небытие, необходимо было создать загрузочную флешку с DOS.
Ну раз надо — значит сделаем. Тем более это не сложно.
Все необходимое, для создания загрузочной флешки с DOS, находится в архиве.
usb_dos_boot_flashka.rar (586,4 KiB, 35 640 hits)
Создание загрузочной флешки с DOS
Далее опишу все пошагово
- Скачиваем архив и распаковываем
- Подключаем USB флешку к компьютеру
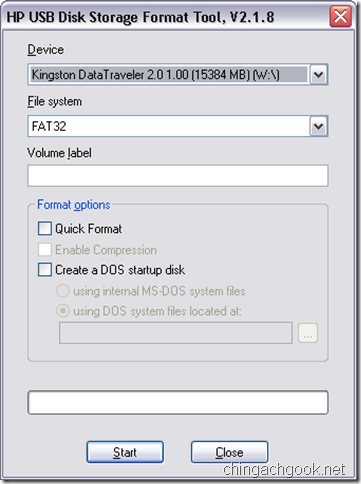
- Запускаем файл HPUSBFW.EXE

- Проверяем, что в поле Device выбрана нужная флешка
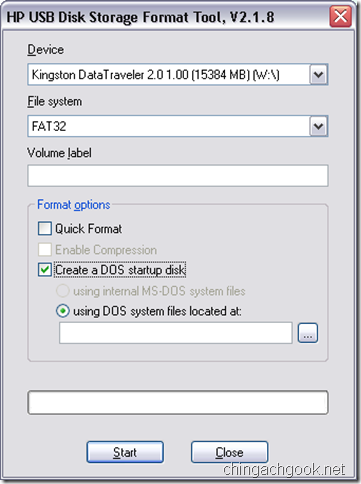
- Ставим галочку на Create a DOS startup disk
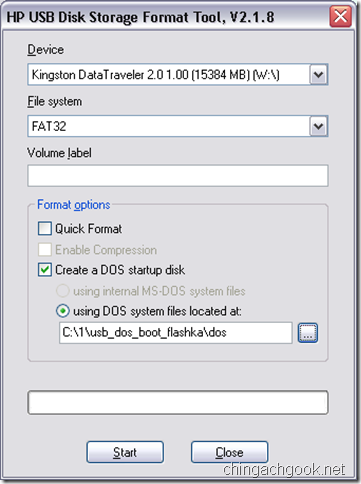
- В поле using DOS system files located at: выбираем путь к папке \dos\, которая была в архиве
- Жмем на кнопку Start
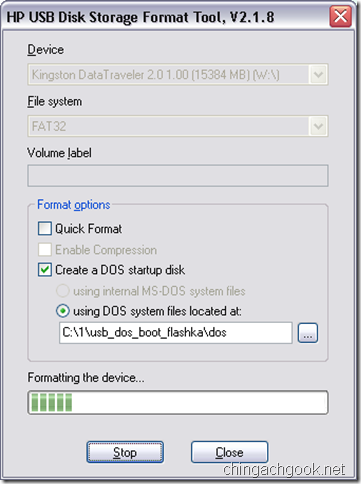
- Соглашаемся с предупреждением
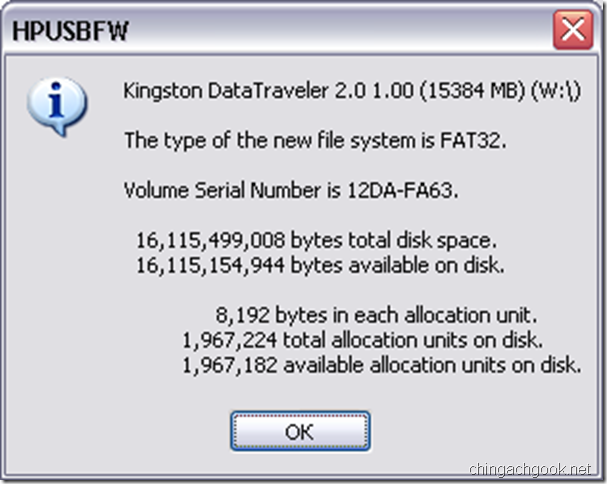
- Начнется процесс форматирования и копирования необходимых файлов
- После завершения выскочит информационное окно
- Закрываем программу
- Перезагружаем компьютер
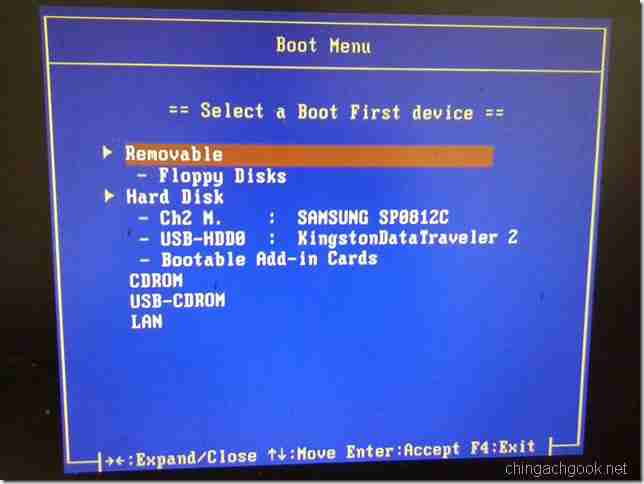
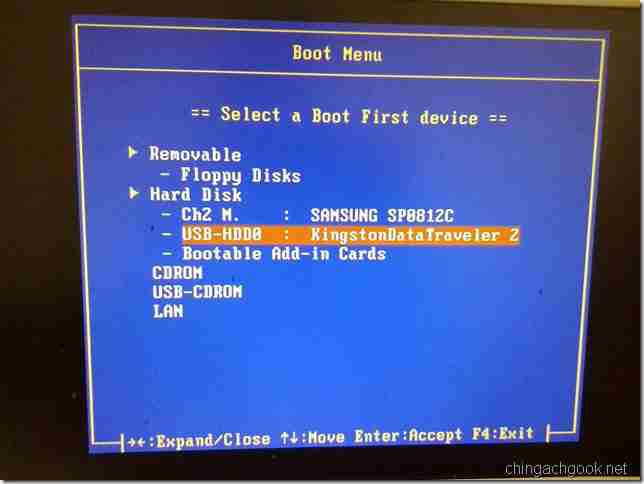
- При начале загрузки жмем на клавишу Esc или F12 (зависит от вашего BIOS-а), пока не появится окно выбора загрузочного устройства
- Выбираем нашу флешку и жмем Enter
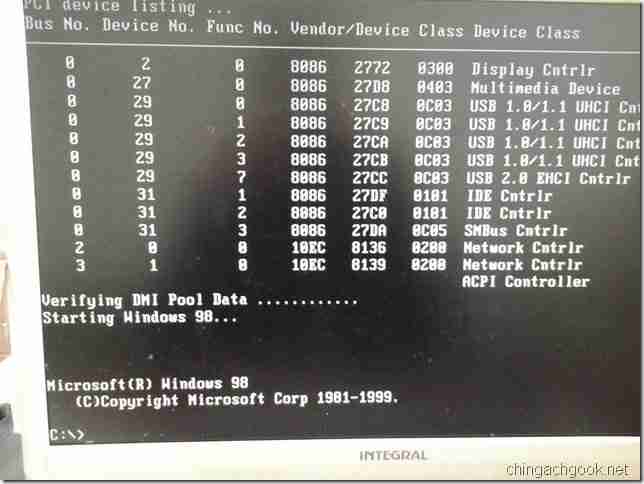
- Все, DOS запущен