- Mac startup key combinations
- On a Mac with Apple silicon
- On an Intel-based Mac
- How to create a bootable installer for macOS
- What you need to create a bootable installer
- Download macOS
- Use the ‘createinstallmedia’ command in Terminal
- How to repair a Mac disk with Disk Utility
- Open Disk Utility
- Select your disk in Disk Utility
- Repair volumes, then containers, then disks
- If Disk Utility found errors that it can’t repair
- If your disk doesn’t appear in Disk Utility
- BDU: Создание загрузочной флешки macOS через Boot Disk Utility
- Boot with disk utility mac os
Mac startup key combinations
Learn about the Mac features and tools that you can access by holding down one or more keys during startup.
On a Mac with Apple silicon
Turn on your Mac with Apple silicon and continue to press and hold the power button until you see the startup options window. From there you can start up from a different disk, start up in safe mode, use macOS Recovery, and more. Learn more about these options, including macOS Recovery.
On an Intel-based Mac
To use any of these key combinations, press and hold the keys immediately after pressing the power button to turn on your Mac, or after your Mac begins to restart. Keep holding until the described behavior occurs.
- Command (⌘)-R: Start up from the built-in macOS Recovery system. Or use Option-Command-R or Shift-Option-Command-R to start up from macOS Recovery over the internet. macOS Recovery installs different versions of macOS, depending on the key combination you use. If your Mac is using a firmware password, you’re prompted to enter the password.
- Option (⌥) or Alt: Start up to Startup Manager, which allows you to choose other available startup disks or volumes. If your Mac is using a firmware password, you’re prompted to enter the password.
- Option-Command-P-R:Reset NVRAM or PRAM. If your Mac is using a firmware password, it ignores this key combination or starts up from macOS Recovery.
- Shift (⇧): Start up in safe mode. Disabled when using a firmware password.
- D: Start up to the Apple Diagnostics utility. Or use Option-D to start up to this utility over the internet. Disabled when using a firmware password.
- N: Start up from a NetBoot server, if your Mac supports network startup volumes. To use the default boot image on the server, press and hold Option-N instead. Disabled when using a firmware password.
- Command-S: Start up in single-user mode. Disabled in macOS Mojave or later, or when using a firmware password.
- T: Start up in target disk mode. Disabled when using a firmware password.
- Command-V: Start up in verbose mode. Disabled when using a firmware password.
- Eject (⏏) or F12 or mouse button or trackpad button: Eject removable media, such as an optical disc. Disabled when using a firmware password.
If a key combination doesn’t work at startup, one of these solutions might help:
- Press and hold all keys in the combination together, not one at a time.
- Shut down your Mac. Then press the power button to turn on your Mac. Then press and hold the keys as your Mac starts up. You might need to wait a few seconds before pressing the keys, to give your Mac more time to recognize the keyboard as it starts up. Some keyboards have a light that flashes briefly at startup, indicating that the keyboard is recognized and ready for use.
- If you’re using a wireless keyboard, plug it into your Mac, if possible. Or use your built-in keyboard or a wired keyboard. If you’re using a keyboard made for a PC, such as a keyboard with a Windows logo, try a keyboard made for Mac.
- If you’re using Boot Camp to start up from Microsoft Windows, set Startup Disk preferences to start up from macOS instead. Then shut down or restart and try again.
Источник
How to create a bootable installer for macOS
You can use an external drive or secondary volume as a startup disk from which to install the Mac operating system.
These advanced steps are primarily for system administrators and others who are familiar with the command line. You don’t need a bootable installer to upgrade macOS or reinstall macOS, but it can be useful when you want to install on multiple computers without downloading the installer each time.
What you need to create a bootable installer
- A USB flash drive or other secondary volume formatted as Mac OS Extended, with at least 14GB of available storage
- A downloaded installer for macOS Big Sur, Catalina, Mojave, High Sierra, or El Capitan
Download macOS
- Download: macOS Big Sur, macOS Catalina, macOS Mojave, or macOS High Sierra
These download to your Applications folder as an app named Install macOS [ version name ]. If the installer opens after downloading, quit it without continuing installation. To get the correct installer, download from a Mac that is using macOS Sierra 10.12.5 or later, or El Capitan 10.11.6. Enterprise administrators, please download from Apple, not a locally hosted software-update server. - Download: OS X El Capitan
This downloads as a disk image named InstallMacOSX.dmg. On a Mac that is compatible with El Capitan, open the disk image and run the installer within, named InstallMacOSX.pkg. It installs an app named Install OS X El Capitan into your Applications folder. You will create the bootable installer from this app, not from the disk image or .pkg installer.
Use the ‘createinstallmedia’ command in Terminal
- Connect the USB flash drive or other volume that you’re using for the bootable installer.
- Open Terminal, which is in the Utilities folder of your Applications folder.
- Type or paste one of the following commands in Terminal. These assume that the installer is in your Applications folder, and MyVolume is the name of the USB flash drive or other volume you’re using. If it has a different name, replace MyVolume in these commands with the name of your volume.
Big Sur:*
Catalina:*
Mojave:*
High Sierra:*
El Capitan:
* If your Mac is using macOS Sierra or earlier, include the —applicationpath argument and installer path, similar to the way this is done in the command for El Capitan.
After typing the command:
- Press Return to enter the command.
- When prompted, type your administrator password and press Return again. Terminal doesn’t show any characters as you type your password.
- When prompted, type Y to confirm that you want to erase the volume, then press Return. Terminal shows the progress as the volume is erased.
- After the volume is erased, you may see an alert that Terminal would like to access files on a removable volume. Click OK to allow the copy to proceed.
- When Terminal says that it’s done, the volume will have the same name as the installer you downloaded, such as Install macOS Big Sur. You can now quit Terminal and eject the volume.


Источник
How to repair a Mac disk with Disk Utility
Use the First Aid feature of Disk Utility to find and repair disk errors.
Disk Utility can find and repair errors related to the formatting and directory structure of a Mac disk. Errors can lead to unexpected behavior when using your Mac, and significant errors might even prevent your Mac from starting up completely.
Before proceeding, make sure that you have a current backup of your Mac, in case you need to recover damaged files or Disk Utility finds errors that it can’t repair.
Open Disk Utility
In general, you can just open Disk Utility from the Utilities folder of your Applications folder. However, if your Mac doesn’t start up all the way, or you want to repair the disk your Mac starts up from, open Disk Utility from macOS Recovery:
- Determine whether you’re using a Mac with Apple silicon, then follow the appropriate steps:
- Apple silicon: Turn on your Mac and continue to press and hold the power button until you see the startup options window. Click the gear icon labeled Options, then click Continue.
- Intel processor: Turn on your Mac, then immediately press and hold these two keys until you see an Apple logo or other image: Command (⌘) and R.
- You may be asked to select a user you know the password for. Select the user, then click Next and enter their administrator password.
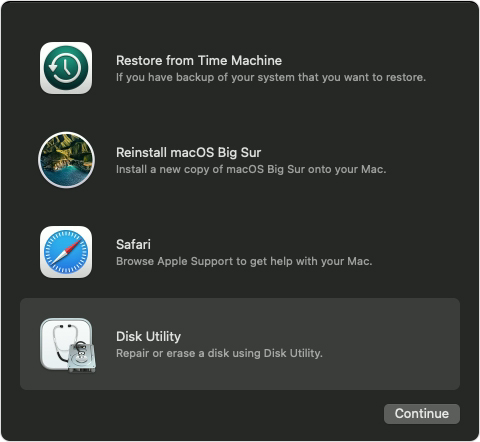
- From the utilities window in macOS Recovery, select Disk Utility and click Continue.
Select your disk in Disk Utility
Choose View > Show All Devices (if available) from the menu bar or toolbar in Disk Utility.
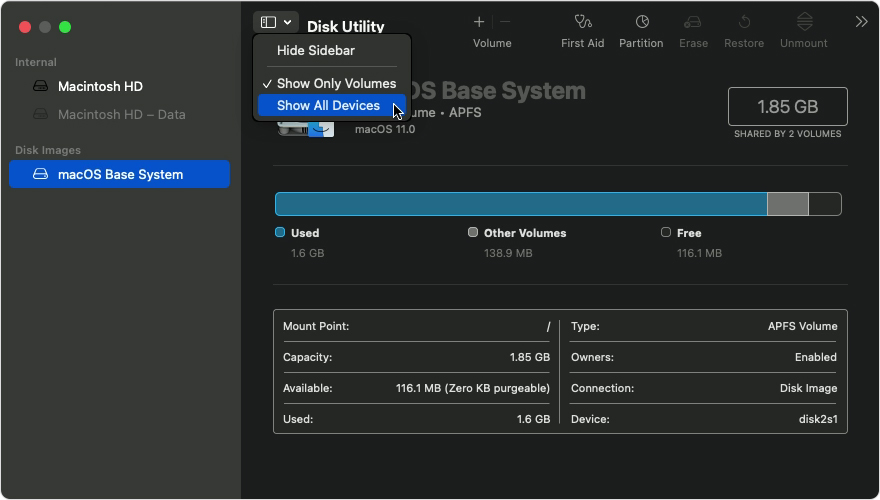
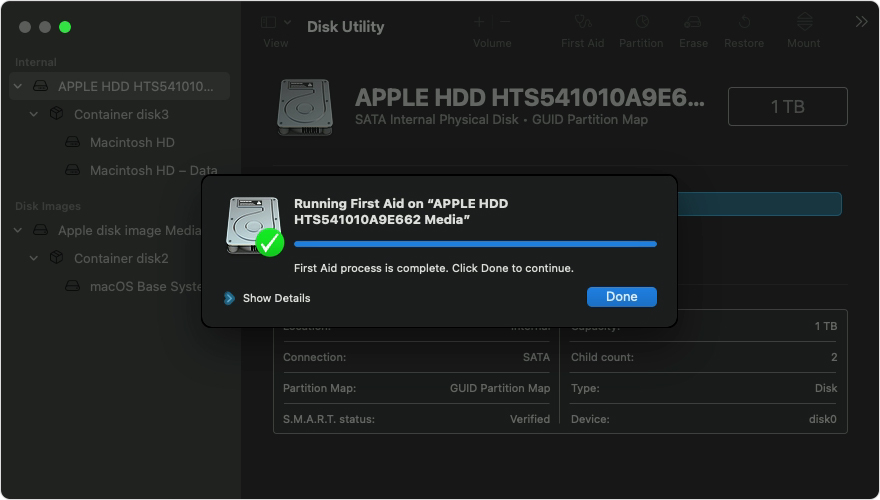
The sidebar in Disk Utility should now show each available disk or other storage device, beginning with your startup disk. And beneath each disk you should see any containers and volumes on that disk. Don’t see your disk?
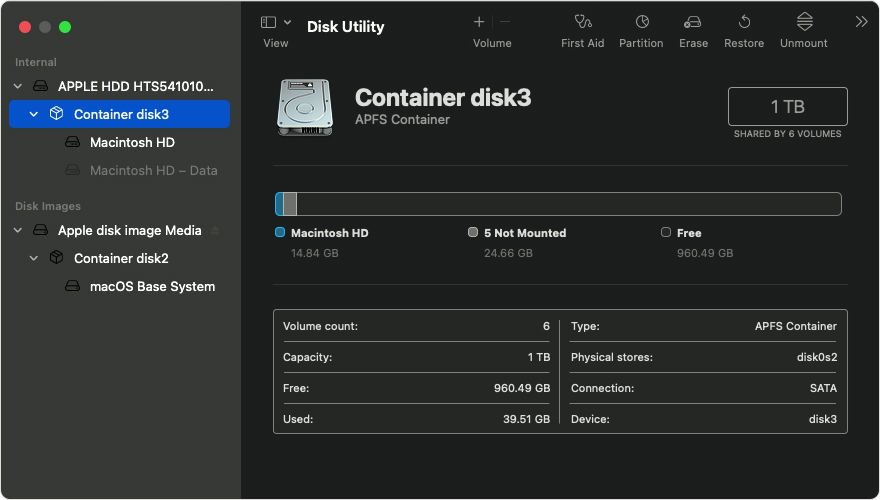
In this example, the startup disk (APPLE HDD) has one container and two volumes (Macintosh HD, Macintosh HD — Data). Your disk might not have a container, and it might have a different number of volumes.
Repair volumes, then containers, then disks
For each disk that you’re repairing, start by selecting the last volume on that disk, then click the First Aid button or tab.
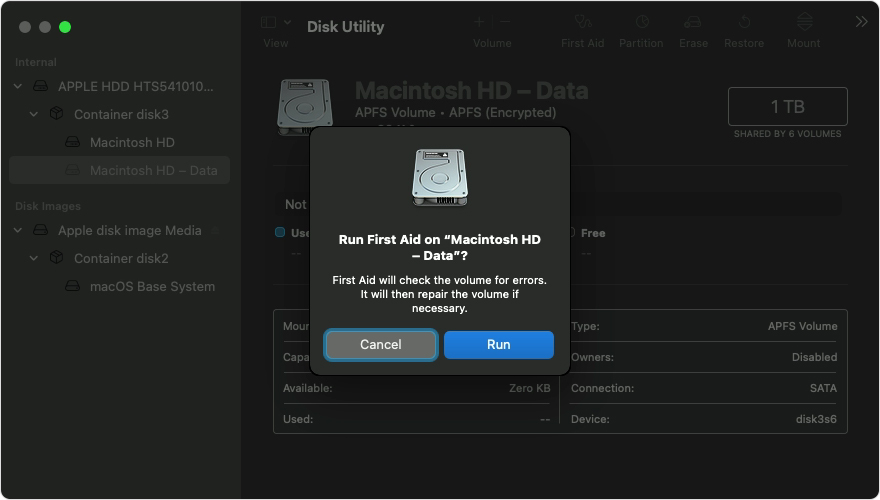
In this example, the last volume on the disk is Macintosh HD — Data.
Click Run to begin checking the selected volume for errors.
- If there is no Run button, click the Repair Disk button instead.
- If the button is dimmed and you can’t click it, skip this step for the disk, container, or volume you selected.
- If you’re asked for a password to unlock the disk, enter your administrator password.
After Disk Utility is done checking the volume, select the next item above it in the sidebar, then run First Aid again. Keep moving up the list, running First Aid for each volume on the disk, then each container on the disk, then finally the disk itself.
In this example, the repair order is Macintosh HD — Data, then Macintosh HD, then Container disk3, then APPLE HDD.
If Disk Utility found errors that it can’t repair
If Disk Utility found errors that it could not repair, use Disk Utility to erase (format) your disk.
If your disk doesn’t appear in Disk Utility
If Disk Utility can’t see your disk, it also can’t see any containers or volumes on that disk. In that case, follow these steps:
- Shut down your Mac, then unplug all nonessential devices from your Mac.
- If you’re repairing an external drive, make sure that it’s connected directly to your Mac using a cable that you know is good. Then turn the drive off and back on.
- If your disk still doesn’t appear in Disk Utility, your Mac might need service. If you need help, please contact Apple Support.
Источник
BDU: Создание загрузочной флешки macOS через Boot Disk Utility
Мы шаг за шагом рассказываем вам, о том как установить на ваш еще пока Windows компьютер, ОС macOS. Сегодня же статья будет о создание загрузочной флешки macOS через Boot Disk Utility (BDU) в Windows.
Ранее мы рассказывали что необходимо, чтобы установить хакинтош:
- Теперь распакуйте архив с программой BDU в любую папку.
- Вставьте USB флешку в компьютер объемом не менее 8 GB, на которую будет записан установщик.
- Теперь вам необходимо скачать установочный образ macOS, мы уже предлагали вам свой вариант, но будет нужна небольшая доработка для BDU (читайте далее в статье), либо же скачать HFS-образ с торрента.
- Когда HFS образ macOS загружен на компьютер можно приступать к записи. Запустите BDU ( флешка в компьютере), кликаем по необходимой флешки, чтобы выбрать и после форматируем ее «Format Disk».
- На появляющиеся окна Windows с предложением форматировать диск отказываемся.
- После чего на флешке будет создано два раздела.
- Первый раздел будет с загрузчиком с Clover, а второй пока что пустой, на него и будет записываться образ macOS.
- Выбирай 2 раздел и кликаем по кнопке «Restore Partiton»
- Откроется окно проводника, выбираем скачанный ранее HFS образ macOS Подтверждаем что мы действительно хотим записать образ на данную флешку.
- Ожидаем пока образ для будущего Хакинтош запишется на флеш накопитель. Вам удалось создание загрузочной флешки mac os из под windows!
У вас еще остались дополнительные вопросы? Задавайте их в комментариях, рассказывайте о том, что у вас получилось или наоборот!
Вот и все! Оставайтесь вместе с сайтом Android +1, дальше будет еще интересней! Больше статей и инструкций читайте в разделе Статьи и Хаки Android.
Источник
Boot with disk utility mac os

- UEFI bios:
- Скидываем все настройки в default.
- AHCI — enable;
- Vt-d: Disable (+ в Clover дропнуть DMAR таблицу)
- Vt-x: Enable (только для 10.13 и если используете виртуальные машины)
- Intel Virtualization Technology — Enable
- Serial-port: Disable
- XHCI Hand-off: Disable (рекомендуеться)
- XHCI Hand-off: Enabled (только если что то не работает в режиме Disable )
- IOAPIC 24-119 Entries: Enabled (подмечено что у многих с этим пунктом паникует, поэтому тестируйте)
- CSM: Disable (по возможности)
- Fasboot: Disable
- Secure boot: Disable or Other OS
Legacy bios:
. .
[i]Примечание:
- HDD должен быть подключен к SATA-0, контролер Intel.
- . [/i]
Для установки потребуется флешка не менее 8Гб.
- ПК на ОС Windows XP/7/8.
- Скачать утилиту Boot Disk Utility с страницы разработчика cvad или с форума applelife.ru со страницы посвящённой данной утилите.
- Установить по инструкции
- Зайти на флешку в папку EFI\CLOVER\ и удалить папку OEM и файл config-sample (не путать с config.plist).
- Зайти на https://github.com/aci…pleSupportPkg/releases скачать ApfsDriverLoader.efi и скопировать его в папку EFI\CLOVER\drivers64UEFI (необходимо для macOs 10.13 и выше!)
- Добавить в EFI\CLOVER\Kext\Other https://github.com/acidanthera/Lilu/releases
- Добавить в EFI\CLOVER\Kext\Other https://github.com/aci…WhateverGreen/releases
- Скачать образ Mac OS X по указанным ссылкам:
Нажми и качай! - Развернуть скаченный образ на подготовленную флешку.
- Инструкция с applelife.ru пункт «Заливка дистрибутива macOS на второй том загрузочного USB Flash drive:«:
- Перед распаковкой образа необходимо нажать кнопку ^Format disk^.
- В основном окне программы -> Destination Disk — выбираем наш USB Flash Drive -> Part2.
- Нажимаем кнопку «Restore Partition».
- В открывшемся окне проводника выбираем распакованный файл с расширением *.hfs.
- Тем, кто устанавливает на ноутбук (или имеет PS/2 мышь или клавиатуру) , обязательно скачать VoodooPS2Controller.kext.zip ( 97,46 КБ )
, новая версия:VoodooPS2Controller.kext.zip ( 93,86 КБ )
положить в папку EFI/CLOVER/KEXT/10.X или Other - Всё, установочная флешка готова, можно приступать к установке.
 VoodooPS2Controller.kext.zip ( 97,46 КБ )
За данный споcоб установки благодарим cvad и Skvo
Данная инструкция написана по материалам с applelife.ru
Установить один из загрузчиков на диск (если он не входит в состав сборки) :
— Загрузчик №1 — Clover (рекомендуется для большинства пользователей);
Как это сделать: UEFI, Legacy BIOS.
— Загрузчик №2 — OpenCore (для опытных пользователей)
— Загрузчик №3 — Chameleon (на данный момент существует для очень старых систем и особых случаев);
*загрузчик устанавливаем только один, на ваш выбор
После входа в macOS первое, что делаем:
- Устанавливаем кекст для сетевой карты;
- Настраиваем SMbios;
- «Заводим» видео-карту (разрешение должно быть правильным, и верхняя строка прозрачная);
- Поднимаем «нативное управление питанием» процессора;
- Поднимаем звук через AppleALC или VoodooHDA
.
21. Ставим програмулинки и «рюшечки».
Источник


