- How to Free Resize Bootcamp Partition without Reinstalling Windows?
- What is Boot Camp Assistant and Bootcamp Partition?
- Why Need to Resize your Bootcamp Partition?
- Best way to resize Bootcamp partition without reinstalling Windows
- Steps to resize Bootcamp partition
- If Boot Camp Assistant says that your disk could not be partitioned
- Use Disk Utility to check for errors
- Check for unallocated free space
- Turn off Time Machine temporarily
- Install Windows 10 on your Mac with Boot Camp Assistant
- What you need to install Windows 10 on Mac
- How to install Windows 10 on Mac
- 1. Check your Secure Boot setting
- 2. Use Boot Camp Assistant to create a Windows partition
- 3. Format the Windows (BOOTCAMP) partition
- 4. Install Windows
- 5. Use the Boot Camp installer in Windows
- How to switch between Windows and macOS
- Learn more
- Как изменить размер уже созданного Boot Camp. 3 способа
- 1. Управление размером разделов Boot Camp через Camptune X
- 2. Изменение размера раздела Boot Camp c Windows через Winclone
- 3. Корректировка размеров разделов Boot Camp через iPartition
- Бонус 1. Создание резервной копии раздела Windows через OS X в Boot Camp c Hard Disk Manager
- Бонус 2. Полноценный кроссплатформенный доступ к данным с помощью драйверов для файловых систем
- Всегда есть какие-то обходные пути
- Николай Грицаенко
How to Free Resize Bootcamp Partition without Reinstalling Windows?
Sometims, you might need to resize Bootcamp partition to make it bigger, then you can use the free AOMEI Partition software, and it allows you to add more space to Bootcamp partition with simple steps.

By Ailsa  / Last Updated December 2, 2020
What is Boot Camp Assistant and Bootcamp Partition?
Bootcamp partition is a NTFS partition for installing Microsoft Windows operating system on an Intel-based Macintosh computer. Why you want to install and run Windows on a Mac computer? If you want to install some applications that only work on Windows or just want to make it different from OS X something like that, it’s a good choice for you.
Why you need to create a new partition on your Mac? That’s because the Windows and the Mac works on different format. Mac runs on Mac OS X, and Windows runs on NTFS.
Speaking of Bootcamp partition, you have to know the Boot Camp Assistant. The Apple’s Boot Camp Assistant provides you with 3 functions to run Windows on Mac, including help you to partition your Mac hard drive into 2 partitions (the Mac hard drive must be formatted as Mac OS Extended), install Windows device drivers for Apple hardware and allow you to select which operating system to boot.
Why Need to Resize your Bootcamp Partition?
After you create a NTFS Bootcamp partition using Boot Camp Assistant, you can install Windows on this Bootcamp partition. You may underestimate the size of the Bootcamp partition when you creating the partition for Windows. Thus, with your daily use, the Bootcamp partition might run out of the free space quickly Then, it is necessary to increase the Bootcamp partition to make it bigger.
For this, you can delete the current Bootcamp partition and create a new bigger one again, but that will delete all data and you have to reinstall Windows operating system and other programs from scratch. So, many users are looking for a way to resize Boot Camp partition without reinstalling Windows or losing data. In this article, we will walk you through the details about resizing NTFS Bootcamp partition.
Best way to resize Bootcamp partition without reinstalling Windows
Typically, you may turn to the Disk Utility for help to resize Mac partition, you can locate its location /Applications/Utilities. However, Disk Utility can’t expand or shrink the Bootcamp partition due to it’s a NTFS file system partition. So, it’s not an easy job to resize Bootcamp partition.
If you ask Apple for help, the solution could be backup your data on the Bootcamp partition, remove it, then create a new Bootcamp partition with the size you want and reinstall Windows. As we mentioned before, it’s not the ideal solution for vast majority of users.
Thus, you can turn to the free partition manager: AOMEI Partition Assistant Standard. It is a free yet professional software to resize the Bootcamp partition without losing data or deleting Windows. The instructions listed below as you can see. To resize BootCamp partition in Windows 10/8/7, there are two ways: increase Bootcamp partition size, and decrease Bootcamp partition size. Here, we mainly show how to increase Bootcamp partition size.
Steps to resize Bootcamp partition
Before you do:
1. Backup your valuable files or documents in case of data loss cause by incorrect human operation.
2. Please release some unallocated space for Bootcamp partition from other Mac partitions with Mac Disk Utility, which is necessary for resizing the Bootcamp partition.
3. Set the Bootcamp as the boot disk, restart the Mac computer into Windows environement.
Step 1. Free download AOMEI Partition Assistant Standard, install it on your Windows, and launch it to enter its main interface.
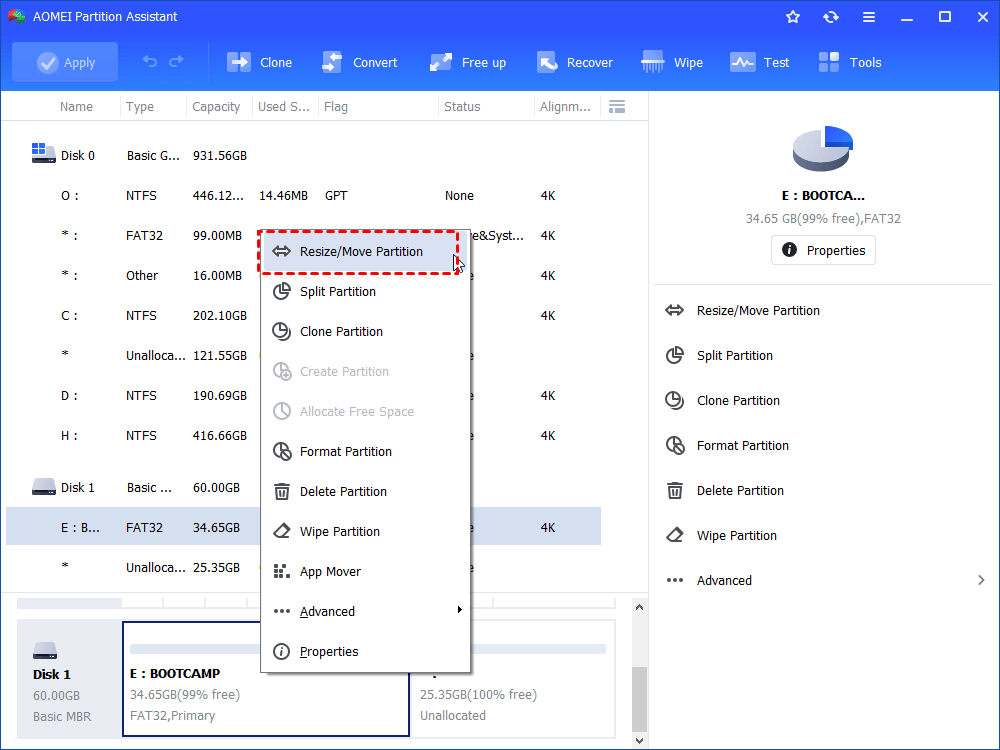
Step 2. Right click the Bootcamp partition and choose Resize/Move Partition. Or click Bootcamp partition and select Resize Partition at the left column.
Step 3. Drag the double-arrow rightward to increase Bootcamp partition size with an unallocated space as you want. Click OK to go on.
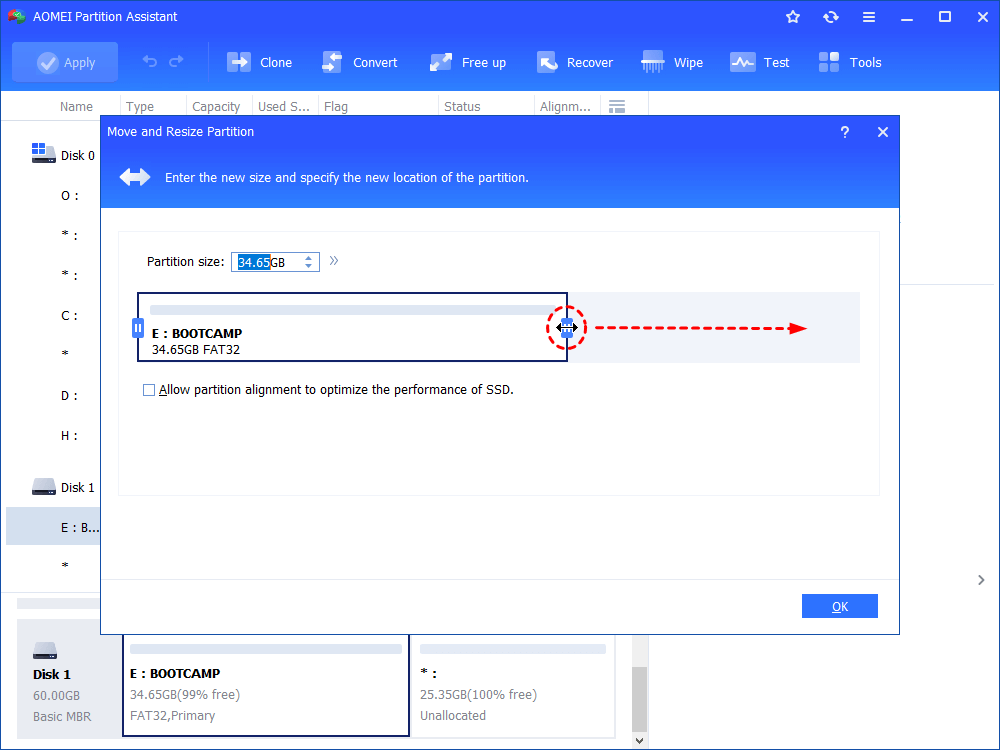
Tip: Drag the double-arrow leftward will shrink the Bootcamp partition if you would like to.
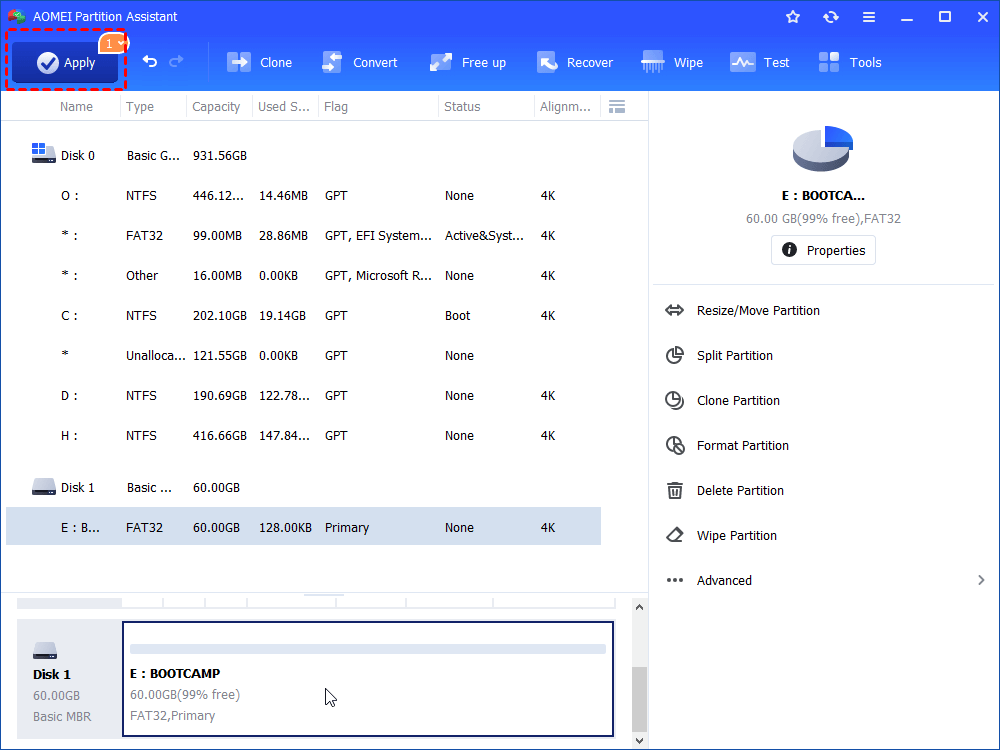
Step 4. Press Apply to expand the Bootcamp partition.
At this moment, with the help of AOMEI Partition Assistant Standard, you can resize Bootcamp partition without reinstalling Windows or losing data in Windows 7/8/10. In addition, if you upgrade to Professional edition, you can enjoy more advanced functions like: split Windows partition, extend system partition, allocate free space from one to the other, migrate OS to SSD between MBR and GPT, convert primary partition to logical without losing data, and more.
If Boot Camp Assistant says that your disk could not be partitioned
Boot Camp Assistant might say that an error occurred while partitioning the disk for Windows.
When attempting to create a Windows partition, Boot Camp Assistant might show the alert ”Your disk could not be partitioned. An error occurred while partitioning the disk. Please run First Aid from within Disk Utility to check and fix the error.”
Use Disk Utility to check for errors
- Install the latest macOS updates.
- Use Disk Utility to repair your startup disk.
- If Disk Utility found no errors or repaired all errors, try again to use Boot Camp Assistant to install Windows.
- If Boot Camp Assistant still gives the partitioning error, continue to the steps below.
Check for unallocated free space
- Open Disk Utility, which is in the Utilities folder of your Applications folder.
- In the Disk Utility sidebar, select the name of your internal disk, container, or volume, such as Macintosh HD.
- Click Partition in the toolbar.
- If you see a message about Apple File System space sharing, click Partition to confirm that you want to partition instead of add a volume.
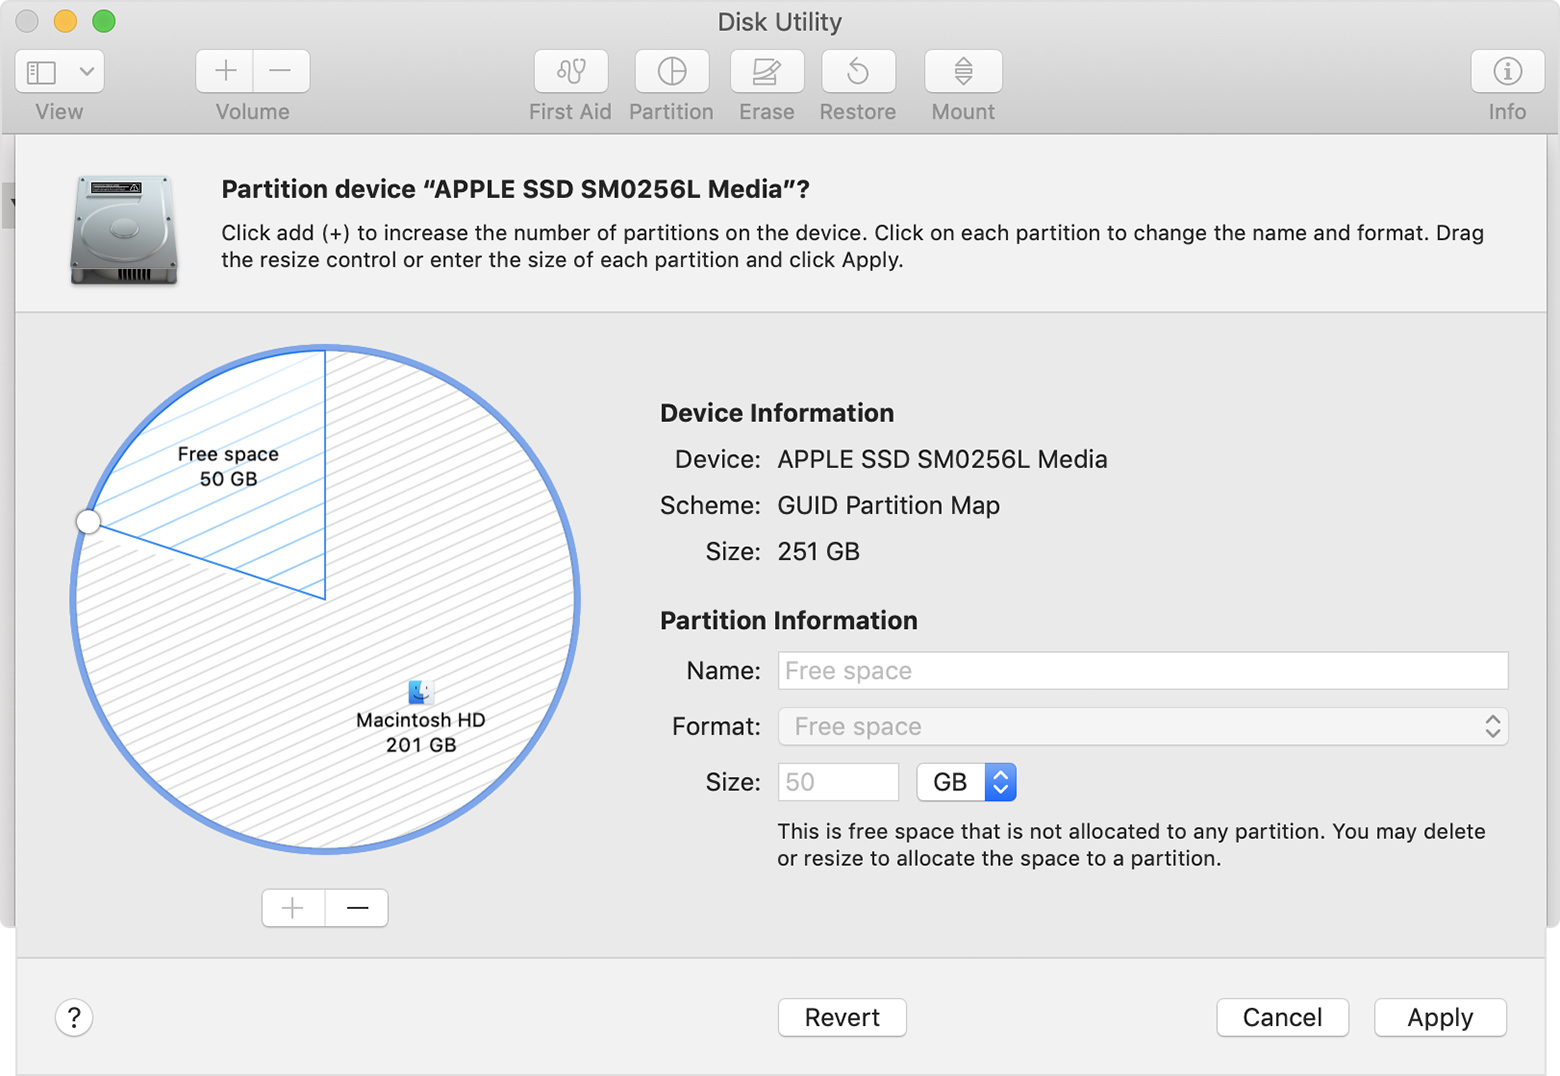
- If the pie chart shows a section labeled ”Free space,” click to select it. ”Free space” should now also appear in the Partition Information shown on the right.

- After selecting the ”Free space” section of the chart, click the remove (–) button beneath the chart. Removing this unallocated free space makes that space available for your use again. Then click Apply and quit Disk Utility.
- Try again to use Boot Camp Assistant to install Windows.
- If Boot Camp Assistant still gives the same partitioning error, continue to the steps below.
Turn off Time Machine temporarily
If you use Time Machine with macOS Mojave or High Sierra, either upgrade to macOS Catalina 10.15 or later, or follow these steps:
- Open Time Machine preferences from the Time Machine menu in the menu bar. Or choose Apple menu > System Preferences, then click Time Machine.
- Deselect ”Back Up Automatically” to turn off Time Machine.
- Wait a few minutes, then try again to use Boot Camp Assistant to install Windows.
- After installation is complete, you can turn on Time Machine again.
 in the menu bar. Or choose Apple menu > System Preferences, then click Time Machine.
Install Windows 10 on your Mac with Boot Camp Assistant
With Boot Camp, you can install Microsoft Windows 10 on your Mac, then switch between macOS and Windows when restarting your Mac.
What you need to install Windows 10 on Mac
- MacBook introduced in 2015 or later
- MacBook Air introduced in 2012 or later
- MacBook Pro introduced in 2012 or later
- Mac mini introduced in 2012 or later
- iMac introduced in 2012 or later 1
- iMac Pro (all models)
- Mac Pro introduced in 2013 or later
The latest macOS updates, which can include updates to Boot Camp Assistant. You will use Boot Camp Assistant to install Windows 10.
64GB or more free storage space on your Mac startup disk:
- Your Mac can have as little as 64GB of free storage space, but at least 128GB of free storage space provides the best experience. Automatic Windows updates require that much space or more.
- If you have an iMac Pro or Mac Pro with 128GB of memory (RAM) or more, your startup disk needs at least as much free storage space as your Mac has memory. 2
An external USB flash drive with a storage capacity of 16GB or more, unless you’re using a Mac that doesn’t need a flash drive to install Windows.
A 64-bit version of Windows 10 Home or Windows 10 Pro on a disk image (ISO) or other installation media. If installing Windows on your Mac for the first time, this must be a full version of Windows, not an upgrade.
- If your copy of Windows came on a USB flash drive, or you have a Windows product key and no installation disc, download a Windows 10 disk image from Microsoft.
- If your copy of Windows came on a DVD, you might need to create a disk image of that DVD.

![]()
How to install Windows 10 on Mac
To install Windows, use Boot Camp Assistant, which is included with your Mac.
1. Check your Secure Boot setting
Learn how to check your Secure Boot setting. The default Secure Boot setting is Full Security. If you changed it to No Security, change it back to Full Security before installing Windows. After installing Windows, you can use any Secure Boot setting without affecting your ability to start up from Windows.
2. Use Boot Camp Assistant to create a Windows partition
Open Boot Camp Assistant, which is in the Utilities folder of your Applications folder. Follow the onscreen instructions.
- If you’re asked to insert a USB drive, plug your USB flash drive into your Mac. Boot Camp Assistant will use it to create a bootable USB drive for Windows installation.
- When Boot Camp Assistant asks you to set the size of the Windows partition, remember the minimum storage-space requirements in the previous section. Set a partition size that meets your needs, because you can’t change its size later.
3. Format the Windows (BOOTCAMP) partition
When Boot Camp Assistant finishes, your Mac restarts to the Windows installer. If the installer asks where to install Windows, select the BOOTCAMP partition and click Format. In most cases, the installer selects and formats the BOOTCAMP partition automatically.
4. Install Windows
Unplug any external devices that aren’t necessary during installation. Then click Next and follow the onscreen instructions to begin installing Windows.
5. Use the Boot Camp installer in Windows
After Windows installation completes, your Mac starts up in Windows and opens a ”Welcome to the Boot Camp installer” window. Follow the onscreen instructions to install Boot Camp and Windows support software (drivers). You will be asked to restart when done.
- If the Boot Camp installer never opens, open the Boot Camp installer manually and use it to complete Boot Camp installation.
- If you have an external display connected to a Thunderbolt 3 port on your Mac, the display will be blank (black, gray, or blue) for up to 2 minutes during installation.
How to switch between Windows and macOS
Restart, then press and hold the Option (or Alt) ⌥ key during startup to switch between Windows and macOS.
Learn more
If you have one of these Intel-based Mac models using OS X El Capitan or later, you don’t need a USB flash drive to install Windows:
- MacBook introduced in 2015 or later
- MacBook Air introduced in 2017 or later 3
- MacBook Pro introduced in 2015 or later 3
- iMac introduced in 2015 or later
- iMac Pro (all models)
- Mac Pro introduced in late 2013 or later
For more information about using Windows on your Mac, open Boot Camp Assistant and click the Open Boot Camp Help button.
1. If you’re using an iMac (Retina 5K, 27-inch, Late 2014) or iMac (27-inch, Late 2013) or iMac (27-inch, Late 2012) with a 3TB hard drive and macOS Mojave or later, learn about an alert you might see during installation.
2. For example, if your Mac has 128GB of memory, its startup disk must have at least 128GB of storage space available for Windows. To see how much memory your Mac has, choose Apple menu > About This Mac. To see how much storage space is available, click the Storage tab in the same window.
3. These Mac models were offered with 128GB hard drives as an option. Apple recommends 256GB or larger hard drives so that you can create a Boot Camp partition of at least 128GB.
Information about products not manufactured by Apple, or independent websites not controlled or tested by Apple, is provided without recommendation or endorsement. Apple assumes no responsibility with regard to the selection, performance, or use of third-party websites or products. Apple makes no representations regarding third-party website accuracy or reliability. Contact the vendor for additional information.
Как изменить размер уже созданного Boot Camp. 3 способа
А также как создать резервную копию Windows в Boot Camp и получить доступ к данным раздела Windows в Boot Camp через OS X.
Многие владельцы Mac так или иначе устанавливают операционную систему Windows.
Некоторым она нужна для запуска современных компьютерных игр, однако большинство использует платформу для специального узконаправленного софта, которого нет на OS X (или уже на macOS).
Для этого и нужен Boot Camp — специальный программный продукт Apple, который поможет установить на Mac Windows XP Service Pack 2 Home или Professional, Windows Vista, Windows 7, Windows 8, а также Windows 10.
Он не просто создает виртуальное пространство, а дает возможность работы на полноценной ОС.
С помощью Boot Camp можно:
- Создать отдельный раздел на жестком диске для установки Windows, «откусив» часть места у HFS+;
- Установить Windows со всеми необходимыми драйверами для того или иного оборудования;
- Выбирать необходимую операционную систему (OS X и Windows) при перезапуске компьютера.
Как и в любом другом программном продукте Apple в Boot Camp есть целый ряд ограничений. И здесь все просто — чужую среду никто не жалует.
И вот основные проблемы Boot Camp:
- Отсутствие встроенной возможности изменения размера уже созданных разделов Boot Camp;
- Невозможность создания резервной копии данных раздела не самой стабильной Windows через OS X;
- Закрытый доступ к данным одной операционной системы для другой и наоборот.
- И каждый из возникших вопросов можно решить с помощью стороннего программного обеспечения.
Мы не только выделили три ключевых способа изменения размера разделов Boot Camp, но и отметили пару утилит, которые пригодятся для комфортной работы с конфигурацией.
Обратите внимание! Почти весь представленный здесь софт ранее распространялся абсолютно свободно. Тем не менее, уже сегодня разработчики требуют заплатить за него.
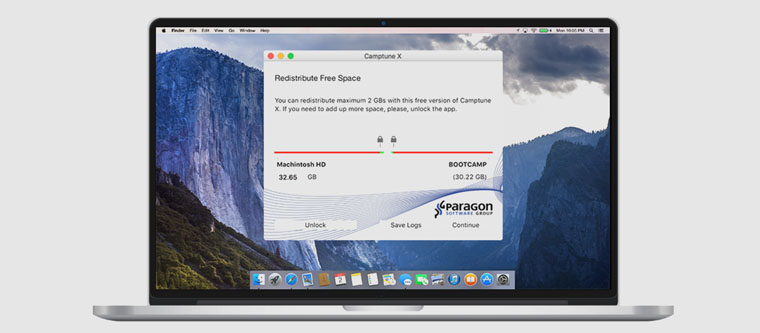
1. Управление размером разделов Boot Camp через Camptune X
Раньше перераспределение размера разделов Windows и OS X в Boot Camp было достаточно трудоемкой задачей, которую сама Apple без фактической переустановки считает невозможной.
А необходимость в этом встречается очень часто.
Но с Camptune X увеличение или уменьшение размеров разделов операционных систем в Boot Camp сильно упрощается. После изменения объема памяти утилите потребуется несколько минут — даже не нужно перезагружать компьютер.
Нюансы использования Camptune X:
- Для изменения размера разделов используется обычный слайдер;
- Если разделы Boot Camp не были найдены, нужно перейти в меню помощи и изменить параметры поиска на предложенные варианты;
- Во время перераспределения памяти разделы Boot Camp проверяются на ошибки, которые будет предложено устранить с помощью отдельного софта.
Более подробная информация о Camptune X доступна на официальном сайте Paragon.
2. Изменение размера раздела Boot Camp c Windows через Winclone
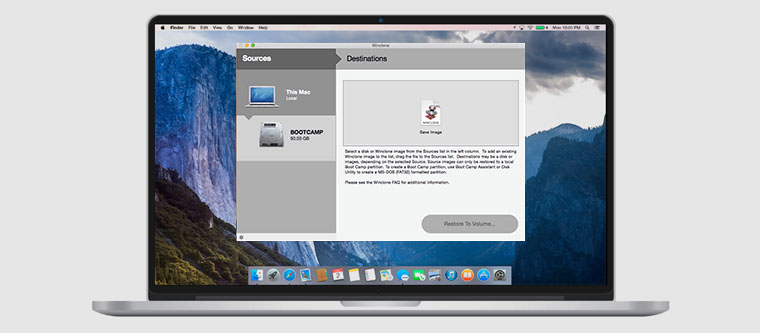
Более трудоемким способом изменения размера разделов Boot Camp является утилита Winclone. С его помощью можно сохранить все данные Windows на внешний накопитель, чтобы потом восстановить его.
В данном случае используется связка встроенных средств операционной системы и стороннего программного обеспечения.
Последовательность действий при изменении размера разделов с Winclone:
- Клонируем раздел Windows в Boot Camp через Winclone на внешний носитель;
- Удаляем раздел Windows в Boot Camp с помощью стандартной «Дисковой утилиты»;
- Создаем раздел Windows в Boot Camp желаемого размера через «Ассистента Boot Camp»;
- После создания раздела отказываемся от установки Windows;
- Восстанавливаем образ Windows в новый раздел Boot Camp через Winclone.
Более подробная информация о Winclone доступна на официальном сайте Twocanoes.
3. Корректировка размеров разделов Boot Camp через iPartition
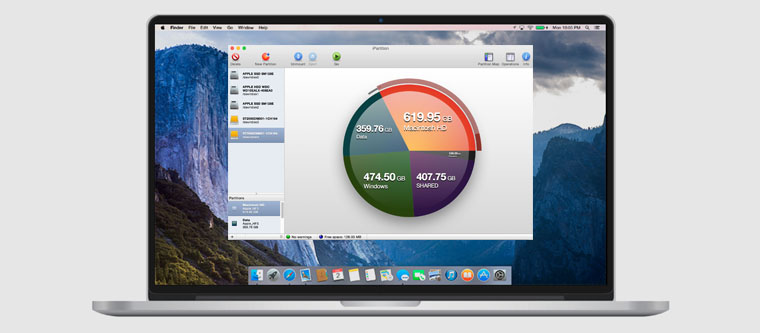
Еще один простой способ изменения разделов Boot Camp — приложение iPartition.
Он не требует удаления Windows и создание нового раздела Boot Camp необходимого размера. И без проблем работает с файловыми системами HFS, HFS +, FAT и NTFS.
Рекомендации при работе с iPartition:
- Для изменения размеров разделов дисков Mac достаточно перетянуть соответствующий ползунок;
- iPartition не работает с Fusion Drive и File Vault 2 — лучше даже не пробовать;
- Программа не работает с блоками Drobo — попытка изменить их повлечет за собой потерю данных.
Более подробная информация о iPartition доступна на официальном сайте Coriolis Systems.
Бонус 1. Создание резервной копии раздела Windows через OS X в Boot Camp c Hard Disk Manager

Ключевая проблема резервного копирования встроенными средствами кроется в файловой системе — Time Machine не поддерживает NTFS, за которую «держится» Windows.
Учитывая подверженность операционной системы вирусам и другим многочисленным проблемам, вероятность потери данных достаточно велика.
Тем не менее, в данном случае компания Paragon предлагает специальную утилиту, которая разрабатывалась на протяжении нескольких последних лет — Hard Disk Manager. Что интересно, она работает на секторном уровне, поэтому обеспечивает максимальную скорость работы.
При использовании Hard Disk Manager нужно обратить внимание:
- Поиск конфигурации Boot Camp происходит в автоматическом или ручном режиме;
- Нужно отдельно вручную указать расположение для резервных копий;
- Утилита позволяет настроить планировщик для автоматического регулярного резервного копирования;
- Несколько созданных утилитой резервных копий можно объединить в одну для более быстрого восстановления данных;
- Утилита может использоваться для перенесения образа Windows в Boot Camp с одного Mac на другой.
Более подробная информация о Hard Disk Manager доступна на официальном сайте Paragon.
Бонус 2. Полноценный кроссплатформенный доступ к данным с помощью драйверов для файловых систем
OS X не видит данные операционной системы Windows в Boot Camp и наоборот. Несовместимость файловых систем — самое досадное ограничение этого программного обеспечения.
Для этих нужд многие используют облачные хранилища данных, но они в данном случае вызывают куда больше трудностей, чем приносят фактической пользы.
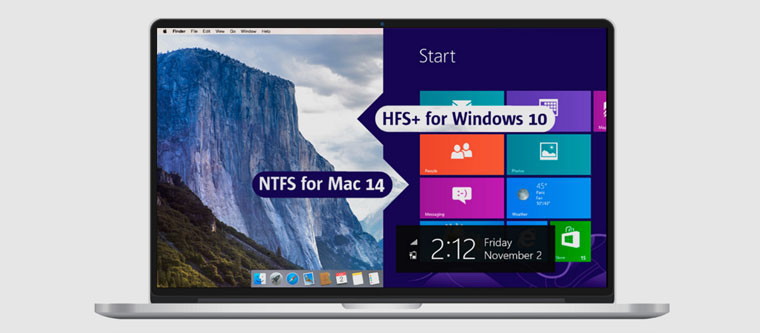
Именно для этого компания Paragon разработала два простых драйвера — один добавляет поддержку HFS+ в Windows, а второй учит OS X работать с NTFS. С ними каждый из нас будет иметь высокоскоростной доступ для чтения и записи любых файлов вне зависимости от раздела, на котором они находятся.
Более подробная информация о HFS+ для Windows и NTFS для Mac доступна на официальном сайте Paragon.
Всегда есть какие-то обходные пути
Относительная открытость операционной системы OS X (macOS) позволяет обойти практически все ограничения Apple — спасибо разработчикам стороннего софта. Более того, с его помощью можно сильно упростить работу с системой и устранить ее недоработки.
Что еще интересно, несмотря на общую простоту использования OS X, некоторые нюансы для неподготовленного пользователя могут стать настоящим сюрпризом.
Обязательно ознакомьтесь и с другими нашими советами по работе на Mac:
![]()
Николай Грицаенко
Кандидат наук в рваных джинсах. Пишу докторскую на Mac, не выпускаю из рук iPhone, рассказываю про технологии и жизнь.


