- How to create a bootable installer for macOS
- What you need to create a bootable installer
- Download macOS
- Use the ‘createinstallmedia’ command in Terminal
- How to start up your Mac from a bootable CD/DVD, USB thumb drive or external storage device
- Requirements
- How to start up your Mac from a bootable CD/DVD
- How to start up your Mac from an external USB storage device
- How to start up your Mac from an external volume using System Preferences
- Troubleshooting startup issues
- Is the storage device to an external power supply?
- Is the storage device connected and turned on?
- Does your disk need repair?
- Did you try using a different USB port?
- Has the disk been formatted with a GUID partition type?
- Does your Mac shut down automatically upon connecting the disk?
- Are you using Boot Camp?
- Are you using an external USB hub?
- Is the disk connected to the keyboard’s USB port?
- Is the disk bootable?
- Are you using wireless keyboard?
- Other ways to start up your Mac
- Safe Mode
- Verbose Mode
- Target Disk Mode
- Startup Manager
- System Preferences
- See also:
- Install, Boot, and Run Mac OS X From an External Hard Drive
- Format External Hard Disk
- Install OS X
How to create a bootable installer for macOS
You can use an external drive or secondary volume as a startup disk from which to install the Mac operating system.
These advanced steps are primarily for system administrators and others who are familiar with the command line. You don’t need a bootable installer to upgrade macOS or reinstall macOS, but it can be useful when you want to install on multiple computers without downloading the installer each time.
What you need to create a bootable installer
- A USB flash drive or other secondary volume formatted as Mac OS Extended, with at least 14GB of available storage
- A downloaded installer for macOS Big Sur, Catalina, Mojave, High Sierra, or El Capitan
Download macOS
- Download: macOS Big Sur, macOS Catalina, macOS Mojave, or macOS High Sierra
These download to your Applications folder as an app named Install macOS [ version name ]. If the installer opens after downloading, quit it without continuing installation. To get the correct installer, download from a Mac that is using macOS Sierra 10.12.5 or later, or El Capitan 10.11.6. Enterprise administrators, please download from Apple, not a locally hosted software-update server. - Download: OS X El Capitan
This downloads as a disk image named InstallMacOSX.dmg. On a Mac that is compatible with El Capitan, open the disk image and run the installer within, named InstallMacOSX.pkg. It installs an app named Install OS X El Capitan into your Applications folder. You will create the bootable installer from this app, not from the disk image or .pkg installer.
Use the ‘createinstallmedia’ command in Terminal
- Connect the USB flash drive or other volume that you’re using for the bootable installer.
- Open Terminal, which is in the Utilities folder of your Applications folder.
- Type or paste one of the following commands in Terminal. These assume that the installer is in your Applications folder, and MyVolume is the name of the USB flash drive or other volume you’re using. If it has a different name, replace MyVolume in these commands with the name of your volume.
Big Sur:*
Catalina:*
Mojave:*
High Sierra:*
El Capitan:
* If your Mac is using macOS Sierra or earlier, include the —applicationpath argument and installer path, similar to the way this is done in the command for El Capitan.
After typing the command:
- Press Return to enter the command.
- When prompted, type your administrator password and press Return again. Terminal doesn’t show any characters as you type your password.
- When prompted, type Y to confirm that you want to erase the volume, then press Return. Terminal shows the progress as the volume is erased.
- After the volume is erased, you may see an alert that Terminal would like to access files on a removable volume. Click OK to allow the copy to proceed.
- When Terminal says that it’s done, the volume will have the same name as the installer you downloaded, such as Install macOS Big Sur. You can now quit Terminal and eject the volume.


Источник
How to start up your Mac from a bootable CD/DVD, USB thumb drive or external storage device
macOS can start up your Mac in a myriad of ways. We’ve already covered some of them in detail, such as using built-in Startup Manager to pick a disk to startup your Mac from and booting into Safe, Verbose and Target Disk modes.
In this article, we get to talk about starting your Mac up from external storage like optical media or an external USB-based hard drive or flash storage. Booting from an external storage allows you to start up your Mac in another version or copy of macOS, Additionally, it can help you troubleshoot certain issues, and more.
Requirements
Starting up your Mac from an external disk requires the following:
- Intel-based Mac
- Bootable optical media (CD or DVD) on Macs equipped with Apple’s Super Drive or a USB thumb drive formatted with a GUID partition type and containing a macOS installer or a usable operating system.
Apple advises against booting from external storage containing a version of macOS earlier than the one your Mac shipped with.
How to start up your Mac from a bootable CD/DVD
1) Firstly, turn on your Mac, or restart it if it’s already on by choosing Restart in the Apple menu.
2) Secondly, press and hold the C key on your keyboard immediately upon hearing the startup chime. Your Mac should start up from the macOS installer CD/DVD media. You can also press the left mouse button on a wired mouse during startup to open the disc tray.
Tip: You can easily burn a bootable image of macOS to a DVD using Disk Utility.
How to start up your Mac from an external USB storage device
If your USB thumb drive, USB external disk or flash storage contains a usable operating system or a macOS installer, you can select it at boot time using macOS’ built-in feature called Startup Manager, which can be invoked via a simple keystroke.
1) Turn on or restart your Mac.
2) Press and hold the Option key immediately upon hearing the startup chime. Release the key after Startup Manager appears. Startup Manager will scan and list connected drives and volumes that can be booted from, as shown below.
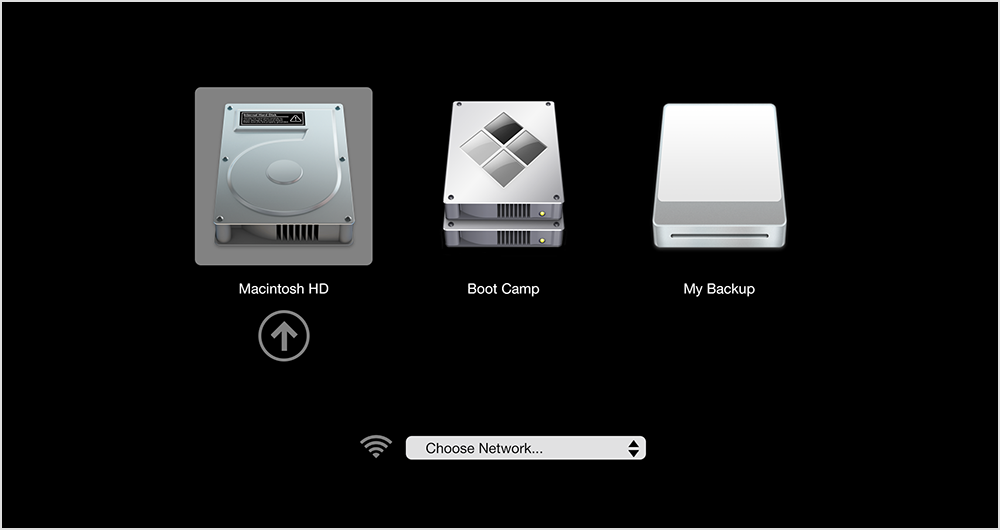
3) Highlight the volume you want to use by using your mouse or trackpad, or left and right arrow keys on the keyboard.
4) Double-click or press the Return key to boot your Mac from the selected volume.
Tip: If there are several USB storage devices connected to your Mac, Startup Manager will only list the ones containing bootable volumes.
How to start up your Mac from an external volume using System Preferences
You can use System Preferences to tell your Mac to automatically use optical media or an USB-based external disk or flash storage every time it’s restarted.
1) Open the System Preferences application in the Dock.
2) Now click the Startup Disk pane. You will be presented with various disk icons.
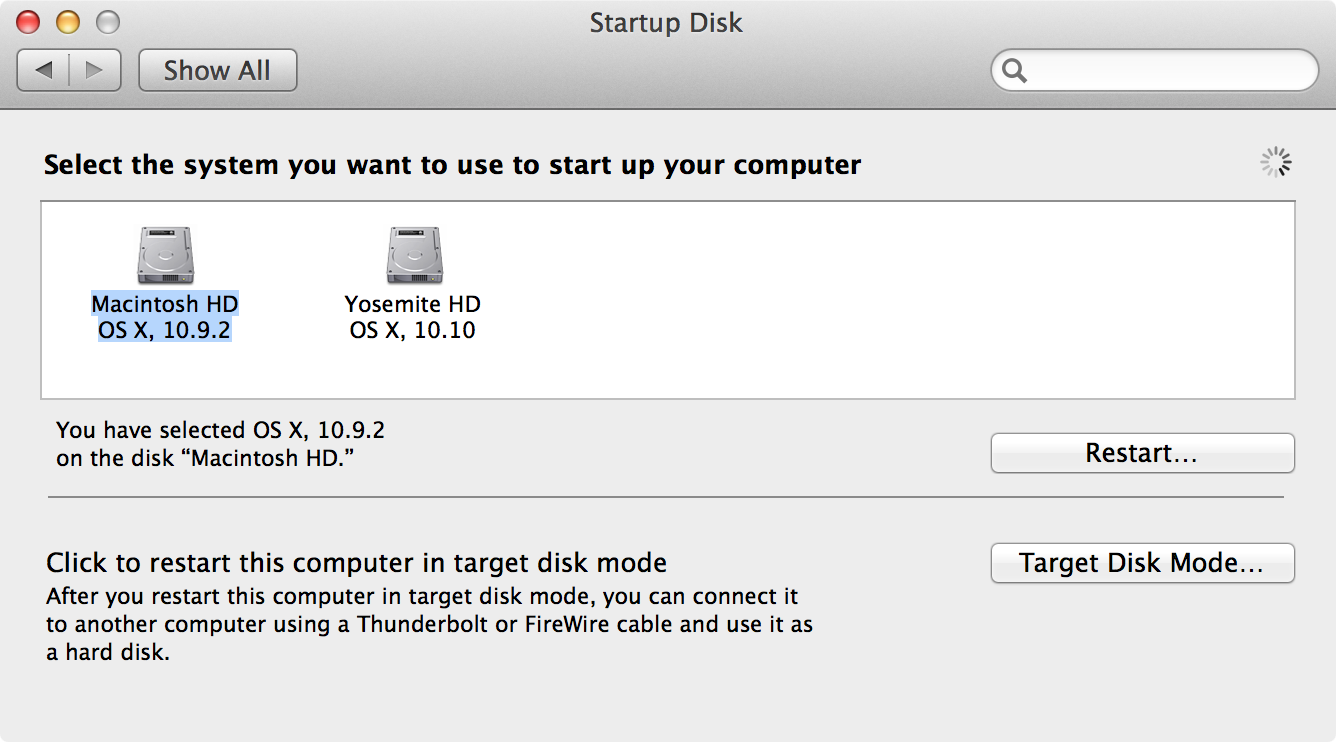
3) Select the system you would like to use to start your computer up.
4) Now click the Restart button to start up your Mac using the chosen volume.
Tip: Your Mac will now always boot into the selected startup disk. However, you can change that in System Preferences, or temporarily override it through Startup Manager.
Troubleshooting startup issues
Should you run into problems whilst attempting to boot your Mac from an external storage device, consult our FAQ below. It will help troubleshoot any start up issues you may be plagued with.
Is the storage device to an external power supply?
Depending on its model and power requirements, it may be necessary to connect your USB storage device to an external power supply.
Is the storage device connected and turned on?
Make sure your external storage is turned on and connected to your Mac. USB-based external hard disks usually have the power on/off button at the back of the enclosure.
Does your disk need repair?
If your Mac doesn’t boot from an external volume or the drive doesn’t show up in Startup Manager even though it contains a bootable copy of macOS, it might need repair.
The first order of business should be attempting to repair disk permissions in Disk Utility. In the worst case scenario, you might need to reinstall macOS on the external volume.
Did you try using a different USB port?
If you own a MacBook or MacBook Pro, try using a different USB port if you cannot startup from the external USB storage device.
Has the disk been formatted with a GUID partition type?
Intel-based Macs support starting from an external USB storage device’s volume that has been formatted with a GUID partition type.
Does your Mac shut down automatically upon connecting the disk?
Apple states that a MacBook Air contains a preventive measure which prompts the computer to shut down automatically if the connected USB storage device has issue or if the USB port on the MacBook Air itself is damaged.
Are you using Boot Camp?
If you’re using Boot Camp in a dual-boot Windows/macOS environment, you may be unable to boot natively into supported versions of Microsoft Windows XP, Windows Vista or Windows 10 operating systems installed on external USB hard drive.
Are you using an external USB hub?
Using an external hub to connect several USB devices may cause your Mac to fail recognizing them at boot time. Try connecting the USB drive to another port on the hub. Should that fail, connect the disk directly into your Mac’s USB port. Keep in mind that some USB hubs and external USB storage devices need an external power supply, depending on their power requirements.
Is the disk connected to the keyboard’s USB port?
Both wired and wireless Apple Keyboard, and some other keyboards with built-in USB ports, may not supply enough power to some external USB hard drives.
Is the disk bootable?
Make sure the external drive you’re trying to start from contains a usable operating system. Volumes that aren’t bootable and don’t contain a copy of a valid operating system aren’t listed in Startup Disk or Startup Manager.
Are you using wireless keyboard?
If you use an Apple Wireless Keyboard or another Bluetooth keyboard with your Mac, keystrokes won’t be recognized during the startup process because Bluetooth isn’t initialized at boot time. Connect a wired keyboard or use the built-in keyboard if you own a Mac notebook. The same disclaimer applies to holding the left button on a wireless mouse during bootup to open the disc tray.
Other ways to start up your Mac
In addition to what we already discussed above, your Mac can start up in a number of different ways, including the following methods that our tutorials provide step-by-step instructions for:
Safe Mode
You can invoke it by pressing and holding the Shift key after hearing the startup chime. Safe Mode disables certain features of macOS and loads only essential components to make troubleshooting software issues simpler. It also includes an automatic disk check and repair which might resolve boot problems and allow you to start up your computer successfully.
Verbose Mode
Verbose Mode is a text-only environment which displays status messages as the startup process progresses. Press and hold the Command – V key combination after hearing the startup chime to enter Verbose Mode. You can use this mode to troubleshoot startup issues and resolve problems with kernel extensions and custom hardware while allowing you to see exactly what’s going on behind the scenes as macOS loads its components.
Target Disk Mode
Target Disk Mode allows a Mac to be used as an external hard disk connected to another Mac. To enter Target Disk Mode, turn on your Mac and hold down the T key immediately upon hearing the startup chime. Once the computer is in Target Disk Mode and available as an external volume to the host Mac, you can copy files to or from that volume. You can start up any Mac with a FireWire or Thunderbolt port in Target Disk Mode.
Startup Manager
macOS’ built-in Startup Manager allows you pick a volume to start your Mac up from at boot time, which temporarily overrides your startup disk defaults set in System Preferences. Just turn on your Mac, hold the Option key after the startup chime and release it after Startup Manager appears.
System Preferences
To change your default startup disk, use the Startup Disk pane in the System Preferences application. Your Mac will boot into the selected disk until you choose another one or temporarily override your selection using Startup Manager at boot time.
See also:
Please bookmark the article for later as you never know when it might come in handy.
Источник
Install, Boot, and Run Mac OS X From an External Hard Drive
Great for troubleshooting or having a virtual OS
Looking for a way to install and run OS X on an external hard drive? This can be useful for a couple of different reasons. Firstly, it allows you to run another copy of OS X without needing any additional Mac computer.
Also, since you can run a full copy of OS X on the external drive, it can be used for troubleshooting purposes on other Macs or it can be as a kind of virtual OS X. I’ve already written about how you can install OS X in VMware Fusion, but that takes up space on your Mac. Using an external drive, you can save space on your Mac, though it might be a bit slower if you are using USB 2.0.
In this article, I’ll walk you through the requirements and steps to install OS X onto an external hard drive.
Format External Hard Disk
The first thing you’re going to need to do is format the external hard drive properly. The file format has to be Mac OS X Journaled and you have to use the GUID partition map. To do this, open Disk Utility and connect the drive to your Mac.
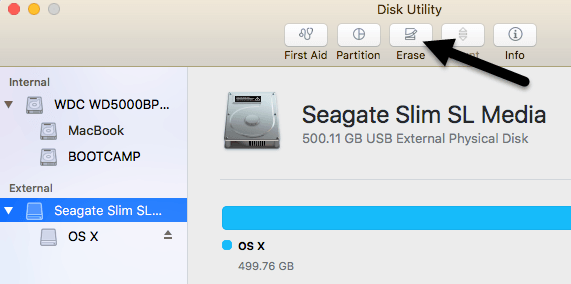
Under External in the left hand menu, click on your external hard drive and then click on the Erase button. Make sure you backup any data before you erase the drive. When you click Erase, a dialog will pop up where you can configure some options.
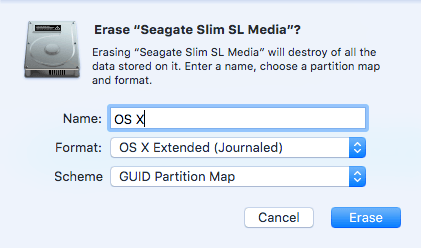
Give your drive a name, choose OS X Extended (Journaled) for Format and GUID Partition Map for Scheme. It should only take a minute or two for the drive to be erased and reformatted. Now your drive is ready for OS X.
Install OS X
There are two ways you can install OS X on to your external hard disk: by reinstalling OS X from the OS X Utilities repair screen or by downloading OS X from the App Store and running the installer. I’ll show you both methods in case one isn’t working for you.
The easiest way is to download OS X from the App Store. Once you open the App Store, you’ll see a link on the right for the latest version of OS X (El Capitan as of this writing).

Go ahead and click the Download button to start downloading the installer. Note that if you already have that version of OS X installed, you’ll see a popup message appear asking if you still want to continue or not. Just click Continue.
Once it has been downloaded, just double-click the installer, which will be located in the Applications folder.

Keep clicking past the license agreement, etc., until you get to the screen that asks you which disk to install OS X on. By default, it is set to MacBook.
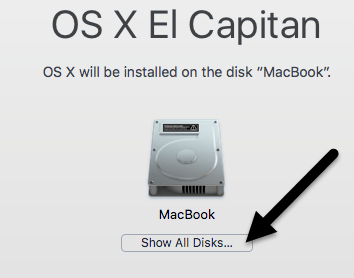
Click on the Show All Disks button and you’ll see an icon for the different disks and partitions on the Mac. I named my external hard drive OS X and that shows up in the middle.
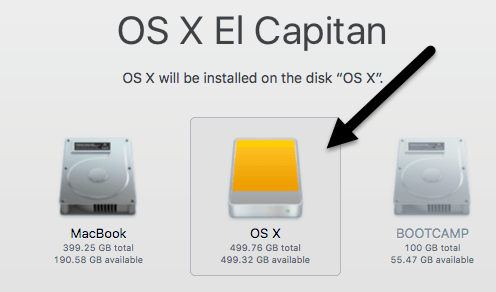
You can also tell it’s an external hard disk because it uses the icon with the orange hard drive. Click Continue and then follow the instructions to complete the installation. Note that your computer may restart during the install and you don’t have to do anything. OS X will automatically continue installing onto the external hard drive rather than booting up to your internal version of OS X.
At the end of this article, I’ll show you how to boot up to the external hard drive, so skip down if you ended up using the App Store method. Note that by default, the Mac will start booting up directly to the external hard drive until you change it.
The second method to install OS X is to restart the Mac and press and hold the COMMAND + R keys. This will load up OS X Recovery.

The OS X Utilities screen will appear and here you want to click on Reinstall OS X. Again, you’ll go through some basic screens, but when you get to the hard disk screen, click on Show All Disks again.

Using this method, you’ll have to login using your Apple ID and password so that the entire OS X installer can be downloaded off of Apple’s servers. Whichever method you choose, it will take anywhere from 15 to 30+ minutes to install OS X onto your external hard drive.
While OS X is installing, your computer will restart a couple of times. Note that when it finally boots into OS X, that is the version running off your external drive. To switch back and forth between the internal and external drive, you have to restart your computer and hold down the OPTION key.

When you do that, you should see at least four icons. In my case, I have five because I have Windows installed using Boot Camp. Anyway, the grey MacBook and Recovery 10.11.2 icons are for my internal OS X and the orange OS X and Recovery 10.11.3 are for the version installed on my external drive.
Use the arrow keys to select which drive to boot from and then simply press Enter. If you have a newer Mac and a USB drive that supports USB 3.0, everything should run fairly fast. Overall, it’s a fairly straight-forward process and took me less than an hour to get everything working. If you have any questions, feel free to comment. Enjoy!
Founder of Online Tech Tips and managing editor. He began blogging in 2007 and quit his job in 2010 to blog full-time. He has over 15 years of industry experience in IT and holds several technical certifications. Read Aseem’s Full Bio
Источник


