- Как загрузить и установить Linux на компьютер с UEFI и Secure Boot
- Как работает режим Secure Boot
- Варианты установки Linux
- Как отключить режим Secure Boot
- Загрузка со сменного носителя
- EFISTUB
- Contents
- Preparing for EFISTUB
- Booting EFISTUB
- Using a boot manager
- Using UEFI directly
- efibootmgr
- efibootmgr with .efi file
- kesboot
- More tools
- Using UEFI Shell
- Using a startup.nsh script
- Troubleshooting
- Cannot create a new boot entry with efibootmgr
- Newly created boot entries are removed
- EFISTUB does not work on some Dell systems
Как загрузить и установить Linux на компьютер с UEFI и Secure Boot
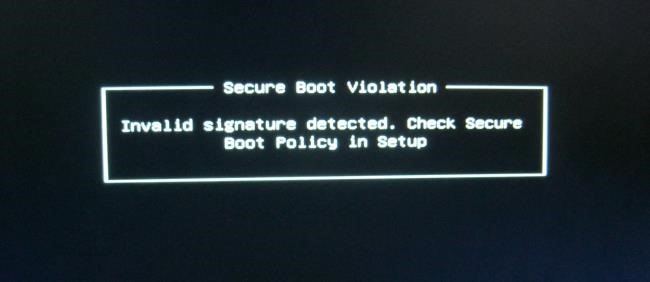
Новые компьютеры с системой Windows поставляются с прошивкой UEFI и с включенной загрузкой Secure Boot. Режим Secure Boot предотвращает загрузку операционных систем, если они не подписаны ключом, загруженным в UEFI; сразу «из коробки» можно загрузить только программное обеспечение, подписанное фирмой Microsoft.
Фирма Microsoft требует, чтобы производители компьютеров позволяли пользователям отключить режим Secure Boot, поэтому вы можете отключить режим Secure Boot или добавить свой собственный ключ для того, чтобы обойти это ограничение. Режим Secure Boot нельзя отключить на устройствах ARM под управлением Windows RT.
Как работает режим Secure Boot
Компьютеры, которые поставляются с системами Windows 8 и Windows 8.1 имеют прошивку UEFI вместо традиционного BIOS. По умолчанию прошивка UEFI машины будет загружать только загрузчики, подписанные ключом, встроенным в прошивку UEFI. Эта особенность известна как «Secure Boot» (безопасная загрузка) или «Trusted Boot» (проверенная загрузка). На традиционных компьютерах без этой функции безопасности, руткит может установить себя и стать загрузчиком boot loader. После этого BIOS компьютера будет загружать руткит в процессе загрузки, во время которой происходит загрузка самого загрузчика и загрузка Windows, скрывая себя от операционной системы и внедряя себя глубоко в систему.
Режим Secure Boot блокирует это — компьютер будет загружать только проверенное программное обеспечение, поэтому вредоносные начальные загрузчики не смогут заразить систему.
На компьютерах Intel x86 (а не на компьютерах ARM) у вас есть возможность управлять режимом Secure Boot. Вы можете выбрать вариант отключения этого режима или даже добавить ключ со своей собственной подписью. Организации могут использовать свои собственные ключи для того, чтобы обеспечить, чтобы могли загружаться только одобренные операционные системы Linux, например
Варианты установки Linux
У вас есть несколько вариантов установки Linux на компьютер с режимом Secure Boot:
- Выберите дистрибутив, в котором поддерживается режим Secure Boot: современные версии Ubuntu, начиная с Ubuntu 12.04.2 LTS и 12.10, будет загружаться и нормально устанавливаться на большинстве ПК с включенным режимом Secure Boot. Это объясняется тем, что загрузчик EFI первоначального этапа загрузки в Ubuntu подписан фирмой Microsoft. Впрочем, один из разработчиков Ubuntu отмечает , что загрузчик в Ubuntu не подписан ключом, который необходим согласно процессу сертификации Microsoft, а просто одним из ключей, о которых говорят, что он «рекомендован» фирмой Microsoft. Это означает, что Ubuntu не обязана загружаться на всех компьютерах с UEFI. Для того, чтобы использовать Ubuntu на некоторых компьютерах, пользователям, возможно, придется отключить режим Secure Boot.
- Отключение режима Secure Boot: Режим Secure Boot можно отключить, что позволит позволить превратить преимущество безопасной загрузки в возможность иметь что-нибудь свое для загрузки компьютера точно также, как это делается на старых компьютерах с традиционным BIOS. Это также потребуется сделать, если вы хотите установить старую версию Windows, которая не разрабатывалась с врозможностью использовать режим Secure Boot, например, Windows 7.
- Добавить в прошивку UEFI подписанный ключ: Некоторые дистрибутивы Linux позволяют подписывать свои загрузчики с помощью их собственного ключа, который вы можете добавить в свою прошивку UEFI. На данный момент, это, кажется, не является обычной практикой.
Вы должны проверить, какой из этих вариантов рекомендуется использовать для вашего дистрибутива Linux. Если вам нужно загрузить старый дистрибутив Linux, в котором нет никакой информации об этом, вы нужно будет просто отключить режим Secure Boot.
На большинстве новых компьютеров у вас должна иметься возможность устанавливать без каких-либо проблем текущие версии Ubuntu — либо релиз LTS, либо последний релиз. Инструкции о том, как загружаться со сменного носителя, смотрите в последнем разделе.
Как отключить режим Secure Boot
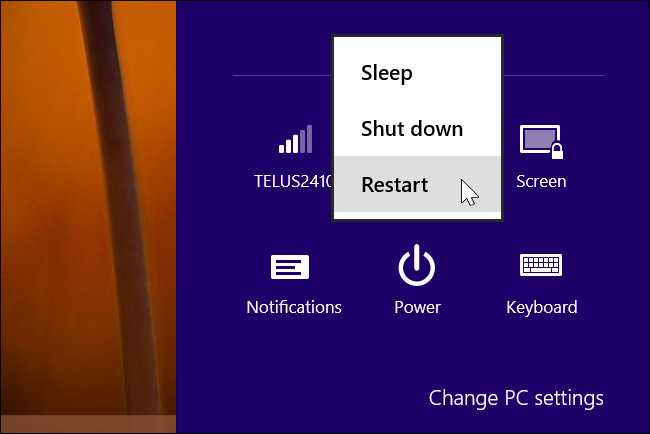
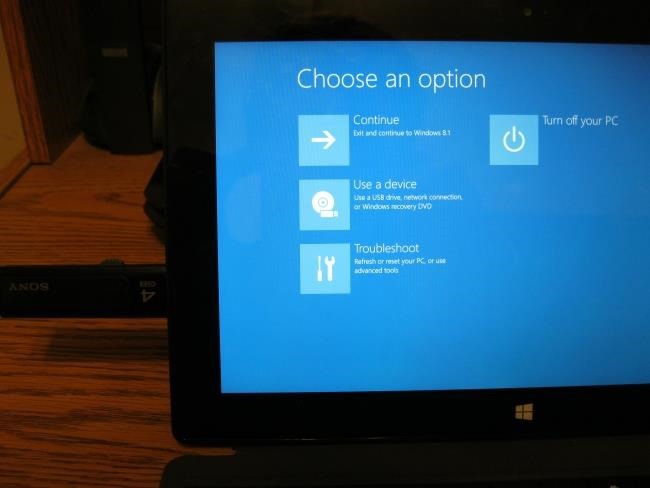
Вы можете управлять режимом Secure Boot из вашего экрана настройки прошивки UEFI — UEFI Firmware Settings. Для доступа к этому экрану, вам нужно будет в Windows 8 получить доступ к меню параметров загрузки. Чтобы сделать это, откройте страницу Settings (Настройки) — чтобы попасть на эту страницу, нажмите клавишу Windows Key + I, затем нажмите кнопку питания, а затем нажмите и удерживайте клавишу Shift и одновременно щелкните мышкой по кнопке Restart (Перезагрузка).
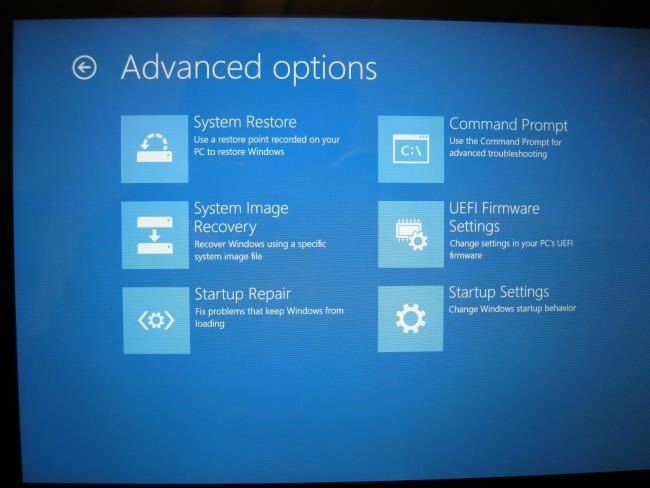
Ваш компьютер будет перезагружен в экран расширенных параметров загрузки. Выберите вариант Troubleshoot (Диагностика), выберите вариант Advanced options (Дополнительные параметры), а затем выберите пункт UEFI Settings (Настройки UEFI). На некоторых компьютерах с системой Windows 8 вы можете не увидеть пункт UEFI Settings, даже если эти компьютеры поставляются с UEFI — в этом случае для того, чтобы получить информацию о том, как добраться до его экрана настроек UEFI, обратитесь к документации разработчика.
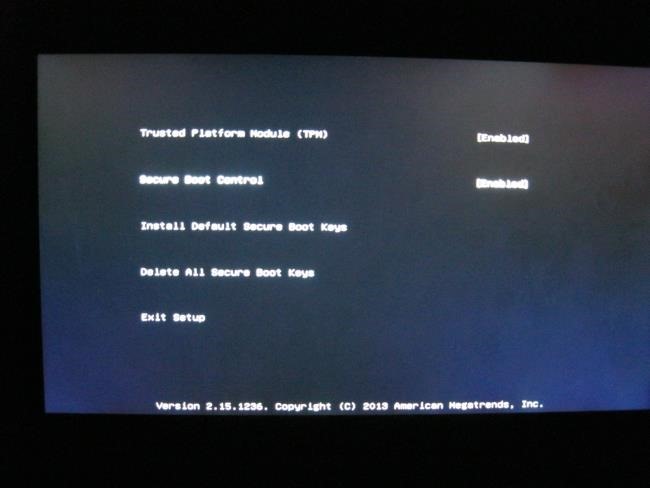
Вы попадете на экран настроек UEFI, где вы можете выбрать отключение режима Secure Boot или добавление своего собственного ключа.
Загрузка со сменного носителя
Вы можете загрузиться со сменного носителя при помощи точно такого же доступа к меню параметров загрузки — удерживайте нажатой клавишу Shift и щелкните мышкой по кнопке Restart (Перезагрузка). Подключите загрузочное устройство, выберите вариант Use a device (Использовать устройство), и выберите устройство, с которого необходимо загрузиться.
После загрузки со сменного носителя вы можете установить Linux точно также, как и обычно, или просто можете использовать живую среду сменного носителя (устройство live), не устанавливая его.
Имейте в виду, что режим Secure Boot является полезной функцией безопасности. Вы должны оставить эту возможность включенной в случае, если вам не требуется запускать операционные системы, которые не будут загружаться с включенным режимом Secure Boot.
Источник
EFISTUB
The Linux kernel supports EFISTUB booting which allows EFI firmware to load the kernel as an EFI executable. The option is enabled by default on Arch Linux kernels, or if compiling the kernel one can activate it by setting CONFIG_EFI_STUB=y in the Kernel configuration. See The EFI Boot Stub for more information.
With EFISTUB a kernel can be booted directly by a UEFI motherboard or indirectly using a boot loader. Using a boot loader is recommended if you have multiple kernel/initramfs pairs and your motherboard’s UEFI boot menu is not easy to use.
Contents
Preparing for EFISTUB
First, you must create an EFI system partition and choose how it is mounted. See EFI system partition#Mount the partition for all available ESP mounting options.
Booting EFISTUB
Using a boot manager

There are several UEFI boot managers which can provide additional options or simplify the process of UEFI booting — especially if you have multiple kernels/operating systems. See Arch boot process#Boot loader for more information.
Using UEFI directly
UEFI is designed to remove the need for an intermediate bootloader such as GRUB. If your motherboard has a good UEFI implementation, it is possible to embed the kernel parameters within a UEFI boot entry and for the motherboard to boot Arch directly. You can use efibootmgr or UEFI Shell v2 to modify your motherboard’s boot entries.
efibootmgr
To create a boot entry with efibootmgr that will load the kernel:
or create a boot entry with efibootmgr and hibernation on swap partition:
Where /dev/sdX and Y are the drive and partition number where the ESP is located. Change the root= and resume= parameters to reflect your Linux root and swap partitions, see kernel parameters for supported device name formats, and persistent block device naming for how to obtain the corresponding value. If omitted, then the first partition on /dev/sda is used as the ESP.
Note that the -u / —unicode argument in quotes is just the list of kernel parameters, so you may need to add additional parameters (e.g. for suspend to disk or microcode).
After adding the boot entry, you can verify the entry was added properly with:
To set the boot order:
Where XXXX is the number that appears in the output of efibootmgr command against each entry.
efibootmgr with .efi file

If using cryptboot AUR and sbupdate-git AUR to generate your own keys for Secure Boot and sign the initramfs and kernel then create a bootable .efi image, efibootmgr can be used directly to boot the .efi file:
See efibootmgr(8) for an explanation of the options. To include microcode in a unified kernel image, concatenate it with the initramfs and use the resultant image with objtool.
Some UEFI implementations make it difficult to modify the NVRAM successfully using efibootmgr. If efibootmgr cannot successfully create an entry, you can use the bcfg command in UEFI Shell v2 (i.e., from the Arch Linux live iso).
First, find out the device number where your ESP resides with:
In this example, 1 is used as the device number. To list the contents of the ESP:
To view the current boot entries:
To add an entry for your kernel, use:
Where N is the location where the entry will be added in the boot menu. 0 is the first menu item. Menu items already existing will be shifted in the menu without being discarded.
Add the necessary kernel options by creating a file on your ESP:
In the file, add the boot line. For example:
Press F2 to save and then F3 to exit.
Add these options to your previous entry:
Repeat this process for any additional entries.
To remove a previously added item do:
kesboot
You can also simplify and automate the work with EFISTUB using a script from the kesboot-git AUR package. It also contains a pacman hook that can add and remove EFI variables during actions with packages.
First, install the package, and then configure the /etc/kesboot.conf file:
The package also contains a program for the initial configuration of the EFI boot. After mounting the ESP directory, run
More tools

Some of the tools above, and more, are briefly discussed in rEFInd#Tools.
Using UEFI Shell
If you do not want to create a permanent boot entry it is possible to launch the kernel from UEFI Shell as if it is a normal UEFI application:
In this case, the kernel parameters are passed as normal parameters to the launched EFISTUB kernel file.
To avoid needing to remember all of your kernel parameters every time, you can save the executable command to a shell script such as archlinux.nsh on your UEFI System Partition, then run it with:
Using a startup.nsh script
Some UEFI implementations do not retain EFI variables between cold boots (e.g. VirtualBox before version 6.1) and anything set through the UEFI firmware interface is lost on poweroff.
The UEFI Shell Specification 2.0 establishes that a script called startup.nsh at the root of the ESP partition will always be interpreted and can contain arbitrary instructions; among those you can set a bootloading line. Make sure you mount the ESP partition on /boot and create a startup.nsh script that contains a kernel bootloading line. For example:
This method will work with almost all UEFI firmware versions you may encounter in real hardware, you can use it as last resort. The script must be a single long line. Sections in brackets are optional and given only as a guide. Shell style linebreaks are for visual clarification only. FAT filesystems use the backslash as path separator and in this case, the backslash declares the initramfs is located in the root of the ESP partition. Only Intel microcode is loaded in the booting parameters line; AMD microcode is read from disk later during the boot process; this is done automatically by the kernel.
Troubleshooting
Cannot create a new boot entry with efibootmgr

Some kernel and efibootmgr version combinations might refuse to create new boot entries. This could be due to lack of free space in the NVRAM. You can try deleting any EFI dump files:
Or, as a last resort, boot with the efi_no_storage_paranoia kernel parameter. You can also try to downgrade your efibootmgr install to version 0.11.0. This version works with Linux version 4.0.6. See the bug discussion FS#34641, in particular the closing comment, for more information.
Newly created boot entries are removed

Some motherboards may remove boot entries after a couple of boots. This could be due to lack of free space in the NVRAM. To prevent this from occurring, it may help to reduce the amount of Linux boot entries being added by efibootmgr by minimizing your entry creation process, as well as reducing the amount of automatic drive boot entries by the Compatibility Support Module (CSM) by disabling it from your UEFI settings.
EFISTUB does not work on some Dell systems
Several generation Dell BIOSes are wrongly passing the arguments to the bootloader, thus making EFISTUB parse a null command line which normally means unbootable system (see the complete linux-efi thread).
A workaround has been found since Linux 5.10 to correct this behavior (see this commit ). For Linux See also
Источник
