- How to Create a Bootable Windows 10 USB in Linux
- Creating a Bootable Windows 10 USB in Linux
- Prerequisite: Get Microsoft Windows 10 ISO and a USB of at least 8 GB in size
- Step 2: Properly format the USB for creating bootable Windows USB
- Step 3: Copy the content of the ISO to USB
- Alternate Method: Creating Windows 10 bootable USB in Linux using WoeUSB
- Step 1: Install WoeUSB application
- Step 2: Format USB drive
- Step 3: Using WoeUSB to create bootable Windows 10
- Step 4: Using Windows 10 bootable USB
- Создаём загрузочный USB диск с Windows из под Linux
- Подготовка USB диска
- Копирование файлов Windows на USB диск
- Делаем USB-диск загрузочным
- Если создаем MBR загрузочный диск
- Если создаем UEFI загрузочный диск
- Ubuntu Documentation
- Outline
- Introduction
- Prerequisites
- Dummy headlines
- Notes about speed
- Notes about size
- Notes about bootability
- The flash hardware
- Creating a bootable Ubuntu USB flash drive from Windows
- Rufus
- balenaEtcher
- Pendrivelinux’s Universal USB Installer
- UNetbootin
- Win32 Disk Imager
- Creating a bootable Ubuntu USB flash drive from Ubuntu
- Install and run Startup Disk Creator alias usb-creator
- UNetbootin
- mkusb — dd image of iso file to USB device safely
- Creating a bootable Ubuntu USB flash drive from Mac OSX
- Test if running in UEFI mode
How to Create a Bootable Windows 10 USB in Linux
Last updated October 29, 2020 By Abhishek Prakash 417 Comments
Brief: This tutorial shows you how to create a bootable Windows 10 USB in Linux with and without a GUI tool called WoeUSB.
I have talked a lot about creating bootable USB of Linux in Windows. How about the other way round? How about creating a bootable Windows 10 USB in Linux?
If you are uninstalling Linux from dual boot or if you want to reinstall Windows completely or you simply want to have a Windows installation disk ready, you’ll need a bootable Windows 10 USB or DVD.
In this tutorial, I am going to show you how to create a Windows 10 bootable USB in Linux. I am using Ubuntu for this tutorial but the steps should be valid for other Linux distributions as well.
If you want to use WoeUSB graphical tool for creating Windows bootable USB, you can jump to that section directly. Personally, I don’t recommend WoeUSB.
Creating a Bootable Windows 10 USB in Linux

Prerequisite: Get Microsoft Windows 10 ISO and a USB of at least 8 GB in size
You can download Windows 10 ISO from Microsoft’s website. You have to specify the Windows 10 version, language and then you should see the link to download Windows 10.
Note that the Windows 10 ISO download link is valid for 24 hours only. So use a download manager in Linux to download the
5.6 GB file and finish it within 24 hours only.
Since the ISO and its content are more than 4 GB in size, I recommend a USB of at least 8 GB in size.
I have also made a video of this tutorial so that you can see the steps in action.
Step 2: Properly format the USB for creating bootable Windows USB
Insert your USB. You have to format it so make sure that you don’t have important data on the USB key.
In Ubuntu, press Super key (Windows key) and search for ‘Disks’. You have to use this tool to format the USB key.
In the Disks tool, make sure to select your USB drive and hit format.
It will ask to choose a partitioning scheme. It could be either MBR or GPT. Select one of them and hit Format.
It will show you a warning that you data will be erased.
 Format the USB
The formatting of USB is not over yet. Now, you need to create a partition on the newly formatted USB.
Select the entire USB disk as the partition size.
Give a name to your USB and hit Create button.
Once done, your USB should be automatically mounted. It is now ready for creating bootable Windows 10 USB disk.
Files larger than 4 GB?
Newer Windows 10 ISO might have files larger than 4GB. In that case, FAT filesystem won’t work as it doesn’t allow a single file of size greater than 4 GB.
You should then format the USB in ExFAT format. This newer format allows files bigger than 4 GB.
Step 3: Copy the content of the ISO to USB
Now it’s time to copy the content of the Windows 10 ISO to the newly formatted USB.
You may ask, Abhishek, there is only one file and that is the ISO file itself. What are you talking about?
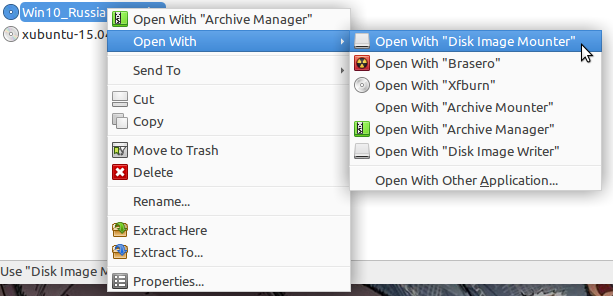
ISO is basically an archive format and you can see it’s content like any zip file in Linux. But to do that, you need to use ‘Disk Image Mounter’ tool that is installed by default in Ubuntu.
Go to your Windows 10 ISO, select it and right click on it. Now select ‘Open with other application’.
In the applications list, select Disk Image Mounter:
The ISO will be mounted. You may not see it in the left sidebar but if you click on the Other Locations, you should see it. Click on it to enter this mounted ISO folder.
You’ll see its content. All you need to do is to select all the files (Ctrl+A), copy it (Ctrl+C) and paste it in the USB drive (Ctrl+V).
Wait for the copying process to finish as it may take some time in copying 4-5 GB of data. Once it’s done, you have a bootable Windows 10 USB in your hand. Take out the USB and use it to any system you want, restart the system and change the boot settings to boot from the USB.
Alternate Method: Creating Windows 10 bootable USB in Linux using WoeUSB
You can also use a Graphical tool called WoeUSB for creating a bootable Windows USB in Linux. However, this tool might not work perfectly all the time. This is why I prefer the first method of mounting the Windows 10 ISO and copying its content to the USB.
If you are interesting in using WoeUSB, you can click on the next section to expand it and follow the steps.
You can also watch a video of creating Windows 10 bootable USB. Do subscribe to our YouTube channel for more Linux videos:
Let’s see how to create a bootable Windows 10 USB in Ubuntu and other Linux distribution.
Step 1: Install WoeUSB application
WoeUSB is a free and open source application for creating Windows 10 bootable USB. It is actually a fork of WinUSB tool that has been discontinued now.
Ubuntu and other Ubuntu-based Linux distributions such as Linux Mint, elementary OS etc have a PPA available. You can use the command below to install WoeUSB:
For other Linux distributions, you can check out the source code from the GitHub repository:
Step 2: Format USB drive
Now, plug in your USB key. You’ll have to format it first. I presume you know how to format a USB key in your Linux distribution.
Ubuntu users can simply right click on the USB and click format.

The important part here is that you should format it in NTFS:

Note: If you use Fat 32 file system for formatting, you may encounter the error below later on:

Step 3: Using WoeUSB to create bootable Windows 10
We have everything ready for us now. Start WoeUSB program.
Browse to the downloaded Windows 10 ISO file and select the USB drive on which you want to install it. Just click on Install to begin the process.

Note that it may take up to 15 minutes in creating the Windows 10 USB. Don’t get fooled by the ‘done’ on the screen.

That’s it. You should see a success message.

Step 4: Using Windows 10 bootable USB
Once the bootable USB is ready, restart your system. At boot time, press F2 or F10 or F12 repeatedly to go to the boot settings. In here, select to boot from USB.

You’ll see that Windows 10 is being booted and it gives you the option to install or repair your system. You know what to do now from here.

I hope you find this tutorial useful for creating bootable USB of Windows 10 in Linux . If you have questions or suggestions, please feel free leave a comment.
Like what you read? Please share it with others.
Создаём загрузочный USB диск с Windows из под Linux
В ubuntu уже есть приложение для создания образов дисков — Startup Disk Creator, но оно умеет создавать только загрузочные USB с Linux. Для создания загрузочного USB-диска с Windows из Linux, существует WinUSB, но она довольно давно не обновлялась, и честно говоря, у меня не заработала. Данный пост довольно подробный, и рассчитан преимущественно на людей, плохо знакомых с Linux.
Перед тем как я продолжу, следует указать что в Windows мире два метода загрузки:
- MBR, при котором в начале диска резервируется место, и располагается специальный загрузочный файл;
- EFI, при котором исполняемый файл загрузчика хранится в стандартном расположении на FAT32 файловой системе;
Если вы не знаете какой выбрать, то наиболее часто используемый вариант который работает без модификации файлов Windows — это msdos таблица разделов с fat32 файловой системой и загрузочным флагом.
Прежде всего USB-диск необходимо подготовить. В Linux наиболее простой и удобной для этих целей утилитой является gparted.
Ставим его если не установлен:
Подготовка USB диска
Выбираем нашу USB флэшку, отмонтируем её если она смонтирована:
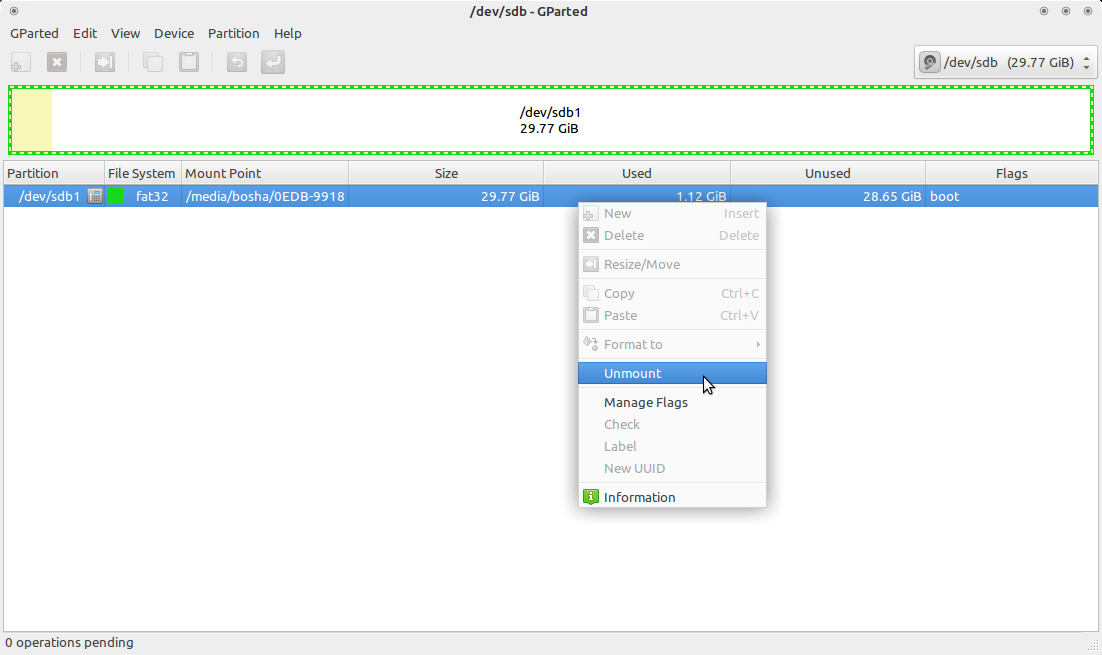
Отмонтирование USB диска в gparted
Теперь необходимо пересоздать таблицу разделов, при этом выбрать тип msdos . Заходим в меню Устройство (Device) и выбираем Создать таблицу разделов (Create partition table) :
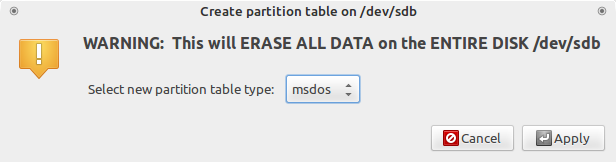
Gparted создание таблицы разделов
После этого выбираем неразмеченную область, нажимаем правой кнопкой мыши по ней же и выбираем пункт меню «Новый». В появившемся окне выбираем файловую систему NTFS или FAT32. Если у вас какая-то нестандартная сборка в которой могут быть файлы больше 4 гигабайт, то файловая система должна быть определенно NTFS, в противном случае, можно выбрать FAT32, и, тогда, так же можно будет загрузиться с UEFI. Так же необходимо указать метку для USB-диска. Важно: метка должна быть не просто «Windows», а какой либо более уникальной. Если файловая система FAT32, то метка должна быть указана заглавными буквами.
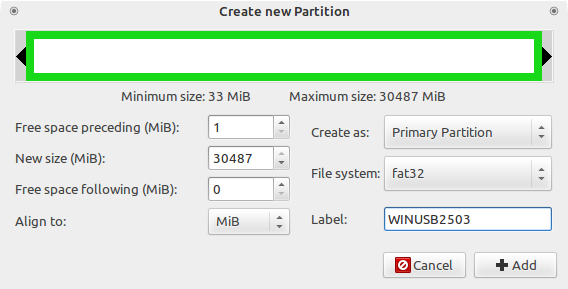
Создание нового раздела Gparted
Применяем все наши изменения:
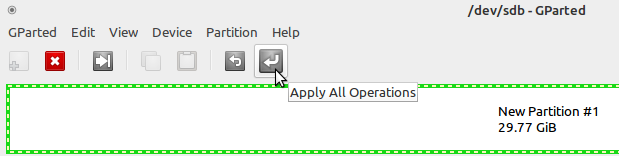
Применение изменений в Gparted
Выходим из gparted.
Копирование файлов Windows на USB диск
Теперь необходимо смонтировать образ с Windows и скопировать данные с него на наш подготовленный ранее usb диск. В большинстве современных рабочих окружений это можно сделать из файлового менеджера. По необходимому образу нажимаем правой кнопкой мыши, выбираем Открыть с помощью и выбираем Disk Image Mounter :
Монтирование образа с Windows в файлом менеджере Thunar
Если у вас нет такой утилиты, то можно смонтировать из командной строки:
Где $HOME/Загрузки/Windows.iso необходимо заменить на путь до образа с Windows. Образ будет смонтирован в директорию /mnt/cdrom .
Делаем USB-диск загрузочным
Если создаем MBR загрузочный диск
Для создания MBR загрузочной записи будем использовать grub:
- $user — имя текущего пользователя;
- $drive — название образа;
- /dev/sdX — расположение диска (в моем случае /dev/sdb ;
Если образ монтировали руками, то /media/$user/$drive/boot необходимо заменить на /mnt/cdrom/boot .
В случае, если не было никаких ошибок, то в консоли должны увидеть примерно следующее:
Теперь на USB-диске в директории boot/grub необходимо создать файл grub.cfg с таким содержимым:
В листинге выше, $USB_drive_label необходимо заменить на метку, которую мы присвоили диску на первом шаге. В данном случае WINUSB2503 .
Перезагружаемся, загружаемся с USB-диска и выбираем Start Windows Installation .
Если создаем UEFI загрузочный диск
С UEFI все несколько проще. Следует обратить внимание, что данный способ подходит только для Windows 7 x64 и выше.
После того, как все файлы скопировались, необходимо зайти в директорию efi/boot . Если в ней присутствуют файлы bootx64.efi или bootia32.efi то всё в порядке, можно пробовать загрузиться с диска.
Ubuntu Documentation
Outline
The general procedure to install Ubuntu (or Ubuntu flavour, Kubuntu, Lubuntu, Xubuntu, . ) from a USB flash drive is:
Get the correct Ubuntu installation file, ‘the iso file’, via this link or Ubuntu flavour via this link. Download the iso file into your running computer (for example into the directory Downloads in the internal drive, not into the USB flash drive that you want to make into a USB boot drive).
Check with md5sum (or another checksum tool) that the download was good.
Try Ubuntu (Kubuntu, Lubuntu, Xubuntu, . ) before installing it.
See also: Installation/FromUSBStickQuick for beginners starting from Windows.
Introduction
Ubuntu can be installed from a USB flash drive. This may be necessary for most new portable computers without DVD drives and is handy for others because a USB flash drive is so convenient. Also, you can configure Ubuntu on the USB flash drive to save changes you make, unlike a read-only CD/DVD disk.
Booting from a USB flash drive created with usb-creator alias Startup Disk Creator and mkusb will behave just as if you had booted from the install CD. It will show the language selection and then the install menu, from which you can install Ubuntu onto the computer’s hard drive or launch the LiveCD environment. Other utilities, e.g. UNetbootin, may create slightly different boot drives or if on UEFI might not work at all with Debian iso files due to a bug
Note: This article uses the term «USB flash drive» alongside USB stick, USB drive, USB device, USB pendrive and thumb drive.
Prerequisites
To create a USB installation device, you will need:
a 4 GB USB flash device/drive/stick. If the iso file is smaller than 2 GB, it is possible to use a 2 GB USB device, at least with some of the methods. Files on this USB device will be erased, so backup the files you want to keep before making the device bootable. Some of the tools require that this USB device is properly formatted and mounted while other tools will overwrite whatever is on the target device. Please follow the instructions for each tool.
an Ubuntu flavour ISO file downloaded from an official web page, ubuntu.com/download or http://releases.ubuntu.com, stored in your running computer (for example in the directory Downloads in the internal drive, not in the USB flash drive that you want to make into a USB boot drive).
Check with md5sum (or another checksum tool) that the download was good. In Linux there is the tool ‘md5sum’. In Windows you can do it with Rufus: click on the circle with a tick mark (more about Rufus here.)
Dummy headlines
After a major remake of this help page the following headlines are kept here because they may be linked to from other web sites. Several other headlines further down in the page are also kept for this reason.
Notes about speed
Notes about size
Notes about bootability
The flash hardware
There is a detailed description at the sub-page /pre
Creating a bootable Ubuntu USB flash drive from Windows
There are various methods available for Windows to create a bootable Ubuntu USB flash drive.
NEVER try to use one of your hard disk drives or partitions in this process unless you really know what you are doing, as data will get erased.
Rufus
Rufus is the tool in Windows that is recommended officially by Ubuntu. A tutorial is available from here.
balenaEtcher
Pendrivelinux’s Universal USB Installer
UNetbootin
Win32 Disk Imager
There is a detailed description at /fromWindows including Rufus, balena Etcher, Universal USB Installer, Unetbootin and Win32 Disk Imager.
Creating a bootable Ubuntu USB flash drive from Ubuntu
Install and run Startup Disk Creator alias usb-creator
The Ubuntu Startup Disk Creator is dedicated to creating USB boot drives for Ubuntu and Ubuntu family flavours (Kubuntu, Lubuntu . Xubuntu).
You can find usb-creator-gtk by typing «Startup Disk Creator» (Ubuntu Desktop) or usb-creator-kde in K-Menu—>Applications—>System—>Startup Disk Creator (Kubuntu). If it is not there, then you can install it using the Ubuntu Software Center.
- Insert and mount the USB drive. Inserting the USB drive should auto-mount it.
- Start the Startup Disk Creator
- In the top pane of the Startup Disk Creator, pick the .iso file that you downloaded.
- If the .iso file isn’t listed, click «Other» to locate and select the .iso file that you downloaded.
- In the bottom pane of the Startup Disk Creator, pick the target device, the USB flash drive. If more than one choice, please check carefully, until you are sure that you will be writing to the correct device.
- After checking that you are pointing to the correct target device, the USB flash drive, you can start the action.
You must enter a password because this is a risky operation. Use the password of the current user ID (the same as for login and running tasks with 'sudo'. Password is not required when installing from a ‘live’ system (booted from a DVD disk or another USB flash drive).
The Startup Disk Creator clones the iso file, which means that you need neither erase nor format the target drive. It will be completely overwritten anyway by the cloning process. The Startup Disk Creator looks like this in Ubuntu 18.04 LTS:
Notes
NEVER try to use one of your hard disk drives or SSDs or partitions in this process unless you really know what you are doing, as data will get erased.
There are bugs that affect the Ubuntu Startup Disk Creator, when you run it in old Ubuntu versions in BIOS mode and try to create USB boot drives with other versions. In the Ubuntu Startup Disk Creator version 0.3.2 in Ubuntu 16.04 LTS, these bugs are no longer a problem, so you can install any version of the Ubuntu flavours from 16.04 LTS and newer versions.
UNetbootin
Download UNetbootin
mkusb — dd image of iso file to USB device safely
If you want to clone from a general image file to a drive, you can use mkusb. It lets you clone to any drive that is not busy, also an internal drive, and there are very obvious warnings to prevent mistakes.
- run in Debian and many linux distros that are similar to Ubuntu and Debian,
- clone from iso files of most Linux distros to create USB boot drives,
- create persistent live drives of the Ubuntu family and Debian, using all available drive space for persistence and/or data storage,
- restore a USB boot drive to a standard storage device.
There is a detailed description at /fromUbuntu including the Startup Disk Creator, UNetbootin and mkusb.
Creating a bootable Ubuntu USB flash drive from Mac OSX
There is a good wiki page about booting with UEFI, and a good tutorial thread, UEFI Installing — Tips.
Test if running in UEFI mode
You may want to test if your Ubuntu flavour is running in [U]EFI mode. An installed system and a live system too is using the directory /sys/firmware/efi, so you can run the following command line,
The following command line is more robust and also easier to understand, so you may prefer it (if you copy & paste and are not bothered by typing a long command line),


