- UNetbootin
- Features
- Using UNetbootin
- Supported Distributions
- Installing Other Distributions Using UNetbootin
- Distribution X isn’t on the list of supported distributions, will it work?
- UNetbootin isn’t able to download the distribution, what should I do?
- My USB stick isn’t booting, what should I do?
- My USB stick/hard drive isn’t detected, what should I do?
- How do I use UNetbootin from the command line?
- How does UNetbootin work, and what does it do?
- Where can I report bugs, submit patches, etc?
- Does UNetbootin have any spyware, viruses, trojans, or other malware?
- What translations are available, and how can I use them?
- Can I help translate?
- Removal Instructions (Applicable only to Hard Disk installs)
- Where’s the source code, and how can I compile or modify it?
- License
- Other open-source projects from the creators of UNetbootin
- HabitLab
- Ubuntu Documentation
- Booting the Computer from USB
- Boot menu
- Hotkey
- Edit the BIOS settings
- Select ‘hard disk/USB-HDD0’
- Chainloading
- The 40_custom method
- The Chainloader
- PLoP Boot Manager
- Requirements
- Flow chart for trouble-shooting
- Ubuntu Documentation
- Outline
- Introduction
- Prerequisites
- Dummy headlines
- Notes about speed
- Notes about size
- Notes about bootability
- The flash hardware
- Creating a bootable Ubuntu USB flash drive from Windows
- Rufus
- balenaEtcher
- Pendrivelinux’s Universal USB Installer
- UNetbootin
- Win32 Disk Imager
- Creating a bootable Ubuntu USB flash drive from Ubuntu
- Install and run Startup Disk Creator alias usb-creator
- UNetbootin
- mkusb — dd image of iso file to USB device safely
- Creating a bootable Ubuntu USB flash drive from Mac OSX
- Test if running in UEFI mode
UNetbootin
UNetbootin allows you to create bootable Live USB drives for Ubuntu and other Linux distributions without burning a CD.
You can either let UNetbootin download one of the many distributions supported out-of-the-box for you, or supply your own Linux .iso file.
Features
UNetbootin can create a bootable Live USB drive
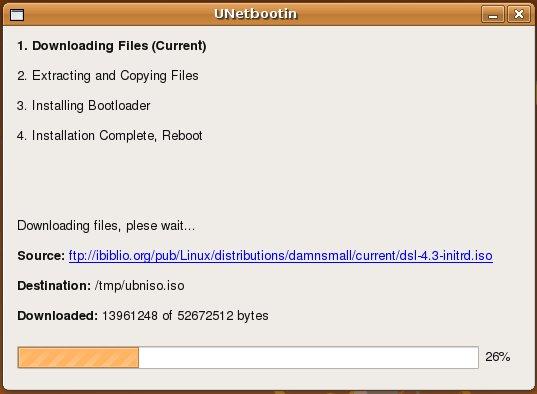
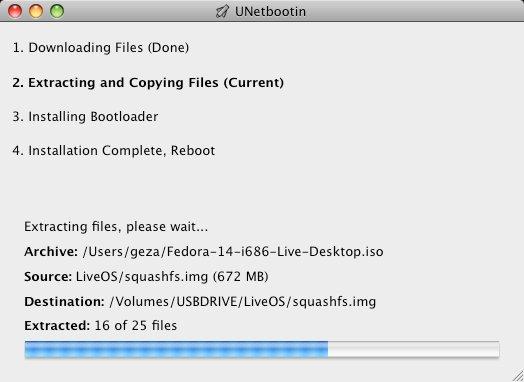
It loads distributions either by downloading a ISO (CD image) files for you, or by using an ISO file you’ve already downloaded.
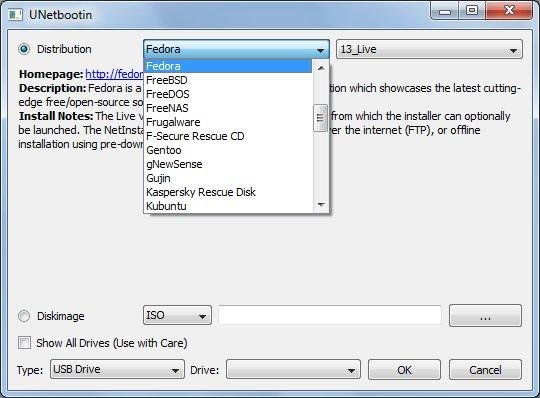
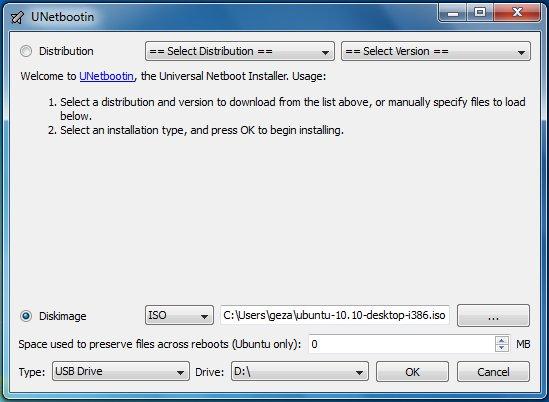
Using UNetbootin
Select an ISO file or a distribution to download, select a target drive (USB Drive or Hard Disk), then reboot once done. If your USB drive doesn’t show up, reformat it as FAT32.
If you used the «USB Drive» install mode: After rebooting, boot from the USB drive. On PCs, this usually involves pressing a button such as Esc or F12 immediately after you turn on your computer, while on Macs, you should hold the Option key before OSX boots.
If you used the «Hard Disk» install mode: After rebooting, select the UNetbootin entry from the Windows Boot Menu.
Supported Distributions
UNetbootin has built-in support for automatically downloading and loading the following distributions, though installing other distributions is also supported:
UNetbootin can also be used to load various system utilities, including:
Installing Other Distributions Using UNetbootin
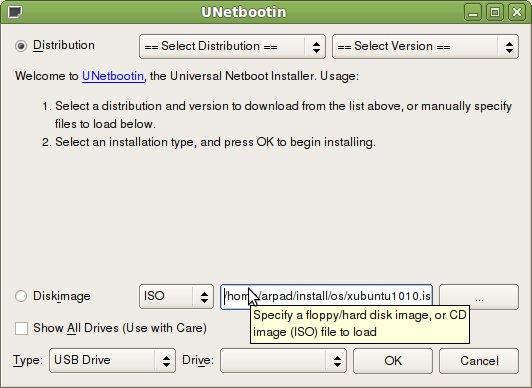
Download and run UNetbootin, then select the «disk image» option and supply it with an ISO (CD image).
UNetbootin doesn’t use distribution-specific rules for making your live USB drive, so most Linux ISO files should load correctly using this option. However, not all distributions support booting from USB, and some others require extra boot options or other modifications before they can boot from USB drives, so these ISO files will not work as-is. Also, ISO files for non-Linux operating systems have a different boot mechanism, so don’t expect them to work either.
Distribution X isn’t on the list of supported distributions, will it work?
UNetbootin isn’t able to download the distribution, what should I do?
Download the ISO straight from the website, then provide it to UNetbootin via the diskimage option.
My USB stick isn’t booting, what should I do?
Reformat the USB drive as FAT32, then use UNetbootin again to put your distribution on the USB stick.
My USB stick/hard drive isn’t detected, what should I do?
Reformat the USB drive as FAT32, then use UNetbootin again. If it still isn’t showing up, use the targetdrive command line option.
How do I use UNetbootin from the command line?
How does UNetbootin work, and what does it do?
Where can I report bugs, submit patches, etc?
First, make sure you are using the latest version available on this website.
» See Github Issues to file a bug report.
» See Github Pull Requests to submit a patch.
Does UNetbootin have any spyware, viruses, trojans, or other malware?
No; though some anti-virus products may raise «Trojan.generic» warnings due to the auto-uninstall feature, these are false positives. Just make sure you obtain UNetbootin from this site, not some shady third-party source. If you’re absolutely paranoid, you can check the source code and compile it yourself.


What translations are available, and how can I use them?
A number of translations are included in the latest UNetbootin release. See the Translations Page for the status of each.
If a translation corresponding to your system’s native language has already been included into UNetbootin, it should automatically load the corresponding translation. Alternatively, you can force the language to use via the lang=es command-line option, where you substitute es with the the 2-letter ISO 639-1 code for your language.
Can I help translate?
If you’d like to help translate this website, join the project on Transifex, then edit translations either on this website or on Transifex.
If you’d like to help translate the UNetbootin program itself, please use Launchpad Translations. If you are new to Launchpad, you will first have to join the corresponding Ubuntu Translators group for the language you intend to translate. For information on using the Launchpad Translations system, see the translations help page.
Removal Instructions (Applicable only to Hard Disk installs)
If using Windows, UNetbootin should prompt you to remove it the next time you boot into Windows. Alternatively, you can remove it via Add/Remove Programs in the Control Panel.
If using Linux, re-run the UNetbootin executable (with root priveledges), and press OK when prompted to uninstall.
Removal is only required if you used the «Hard Drive» installation mode; to remove the bootloader from a USB drive, back up its contents and reformat it.
Uninstalling UNetbootin simply removes the UNetbootin entry from your boot menu; if you installed an operating system to a partition using UNetbootin, removing UNetbootin will not remove the OS.
To manually remove a Linux installation, you will have to restore the Windows bootloader using «fixmbr» from a recovery CD, and use Parted Magic to delete the Linux partition and expand the Windows partition.
Where’s the source code, and how can I compile or modify it?
Source code is on Github, though you may prefer a tarball of the latest release.
License
UNetbootin was created and written by Geza Kovacs (Github: gkovacs, Launchpad: gezakovacs, contact info).
Translators are listed on the translations page.
UNetbootin is licensed under the GNU General Public License (GPL) Version 2 or above. Site materials, documentation, screenshots, and logos are licensed as Creative Commons Attribution-Share-Alike 3.0.
Other open-source projects from the creators of UNetbootin

HabitLab
A Chrome extension to help you waste less time online (on sites like Facebook, Youtube, etc) by experimenting with different interventions (news feed blockers, comment hiders, and more) to find the ones that work best for you.
Источник
Ubuntu Documentation
Booting the Computer from USB
Remove all unneeded USB items, but keep the network cable attached.
Boot menu
Instead of editing BIOS settings, you can choose a boot device from the boot menu. Press the function key to enter the boot menu when your computer is booting. Typically, the boot screen displays which key you need to press. It maybe one of F12, F10, F9.
Hotkey
Insert the bootable USB flash drive that you just created in your target computer and restart it. Most newer computers can boot from a USB flash drive. If your computer does not automatically do so, you might need to edit the BIOS settings.
Restart your computer, and watch for a message telling you which key, hotkey to press to enter the BIOS setup.
- It will usually be one of F1, F2, F9, F10, DEL, Enter or ESC.
- The hotkey should be described in the user manual provided by the manufacturer of the computer (a printed or electronic document).
You can also search your hardware on boot-keys.org.
Press this hotkey continuously or tap repeatedly (different between computers) while your computer is booting to edit your BIOS settings. (On HP Mini Netbooks, the correct key is usually F9.)
Edit the BIOS settings
Select ‘hard disk/USB-HDD0’
Note: with some motherboards you have to select ‘hard disk/USB-HDD0’ to choose the USB flash disk. It may work like this because the system sees the USB drive ‘a mass storage device’ as a hard disk drive, and it should be at the top of the boot order list.
So you need to edit the Boot Order. Depending on your computer, and how your USB key was formatted, you should see an entry for «removable drive» or «USB media». Move this to the top of the list to make the computer attempt to boot from the USB device before booting from the hard disk.
Normally you would enter into the BIOS/UEFI menus directly at boot as described above, but if you are running Windows, you can also get there according to this link.
Chainloading
The 40_custom method
In the particular case, that you have linux and grub installed there is also the 40_custom method. Some pendrives boot from grub even if they won’t boot from the computer’s own BIOS USB boot menu entry. See the following link for a background about grub Scripts: /etc/grub.d/
Add the following text to the file 40_custom (notice that it is important to keep the first lines, that come with the file)
and run the command
Then you will get a grub menu option to boot from a second drive (hd1), which could be a USB pendrive. If another drive is hd1, you can edit the line to (hd2) etc.
If there is no grub menu, press the left shift key during boot, and it should appear.
This chainloading method does not work in UEFI mode.
The Chainloader
This method is developed into a method to boot the computer with one USB drive that is a good booter, and chainload to another USB drive, where the operating system resides. See this link Howto help USB boot drives
PLoP Boot Manager
- For old computers that cannot boot from USB. Some computers can see the USB flash drive and may have the option to boot from USB but cannot actually do so. All hope is not lost.
Requirements
- Windows running on the computer
- USB flash drive, ready to boot (shown below)
PLoP Boot Manager — Your alternative USB boot method, https://www.plop.at/en/bootmanager/index.html
Just follow the instructions on the PLop website.
A detailed guide to make Plop Boot Manager work from GRUB by installing it on hard drive is available here — http://mgw.dumatics.com/how-to-boot-from-usb-when-bios-does-not-have-the-option/
Flow chart for trouble-shooting
There is a flow chart for trouble-shooting and corresponding lists of possible causes of problems to boot from USB at the following link,
Installation/FromUSBStick/bootUSB (последним исправлял пользователь nio-wiklund 2020-07-29 13:21:38)
The material on this wiki is available under a free license, see Copyright / License for details
You can contribute to this wiki, see Wiki Guide for details
Источник
Ubuntu Documentation
Outline
The general procedure to install Ubuntu (or Ubuntu flavour, Kubuntu, Lubuntu, Xubuntu, . ) from a USB flash drive is:
Get the correct Ubuntu installation file, ‘the iso file’, via this link or Ubuntu flavour via this link. Download the iso file into your running computer (for example into the directory Downloads in the internal drive, not into the USB flash drive that you want to make into a USB boot drive).
Check with md5sum (or another checksum tool) that the download was good.
Try Ubuntu (Kubuntu, Lubuntu, Xubuntu, . ) before installing it.
See also: Installation/FromUSBStickQuick for beginners starting from Windows.
Introduction
Ubuntu can be installed from a USB flash drive. This may be necessary for most new portable computers without DVD drives and is handy for others because a USB flash drive is so convenient. Also, you can configure Ubuntu on the USB flash drive to save changes you make, unlike a read-only CD/DVD disk.
Booting from a USB flash drive created with usb-creator alias Startup Disk Creator and mkusb will behave just as if you had booted from the install CD. It will show the language selection and then the install menu, from which you can install Ubuntu onto the computer’s hard drive or launch the LiveCD environment. Other utilities, e.g. UNetbootin, may create slightly different boot drives or if on UEFI might not work at all with Debian iso files due to a bug
Note: This article uses the term «USB flash drive» alongside USB stick, USB drive, USB device, USB pendrive and thumb drive.
Prerequisites
To create a USB installation device, you will need:
a 4 GB USB flash device/drive/stick. If the iso file is smaller than 2 GB, it is possible to use a 2 GB USB device, at least with some of the methods. Files on this USB device will be erased, so backup the files you want to keep before making the device bootable. Some of the tools require that this USB device is properly formatted and mounted while other tools will overwrite whatever is on the target device. Please follow the instructions for each tool.
an Ubuntu flavour ISO file downloaded from an official web page, ubuntu.com/download or http://releases.ubuntu.com, stored in your running computer (for example in the directory Downloads in the internal drive, not in the USB flash drive that you want to make into a USB boot drive).
Check with md5sum (or another checksum tool) that the download was good. In Linux there is the tool ‘md5sum’. In Windows you can do it with Rufus: click on the circle with a tick mark (more about Rufus here.)
Dummy headlines
After a major remake of this help page the following headlines are kept here because they may be linked to from other web sites. Several other headlines further down in the page are also kept for this reason.
Notes about speed
Notes about size
Notes about bootability
The flash hardware
There is a detailed description at the sub-page /pre
Creating a bootable Ubuntu USB flash drive from Windows
There are various methods available for Windows to create a bootable Ubuntu USB flash drive.
NEVER try to use one of your hard disk drives or partitions in this process unless you really know what you are doing, as data will get erased.
Rufus
Rufus is the tool in Windows that is recommended officially by Ubuntu. A tutorial is available from here.
balenaEtcher
Pendrivelinux’s Universal USB Installer
UNetbootin
Win32 Disk Imager
There is a detailed description at /fromWindows including Rufus, balena Etcher, Universal USB Installer, Unetbootin and Win32 Disk Imager.
Creating a bootable Ubuntu USB flash drive from Ubuntu
Install and run Startup Disk Creator alias usb-creator
The Ubuntu Startup Disk Creator is dedicated to creating USB boot drives for Ubuntu and Ubuntu family flavours (Kubuntu, Lubuntu . Xubuntu).
You can find usb-creator-gtk by typing «Startup Disk Creator» (Ubuntu Desktop) or usb-creator-kde in K-Menu—>Applications—>System—>Startup Disk Creator (Kubuntu). If it is not there, then you can install it using the Ubuntu Software Center.
- Insert and mount the USB drive. Inserting the USB drive should auto-mount it.
- Start the Startup Disk Creator
- In the top pane of the Startup Disk Creator, pick the .iso file that you downloaded.
- If the .iso file isn’t listed, click «Other» to locate and select the .iso file that you downloaded.
- In the bottom pane of the Startup Disk Creator, pick the target device, the USB flash drive. If more than one choice, please check carefully, until you are sure that you will be writing to the correct device.
- After checking that you are pointing to the correct target device, the USB flash drive, you can start the action.
You must enter a password because this is a risky operation. Use the password of the current user ID (the same as for login and running tasks with 'sudo'. Password is not required when installing from a ‘live’ system (booted from a DVD disk or another USB flash drive).
The Startup Disk Creator clones the iso file, which means that you need neither erase nor format the target drive. It will be completely overwritten anyway by the cloning process. The Startup Disk Creator looks like this in Ubuntu 18.04 LTS:
Notes
NEVER try to use one of your hard disk drives or SSDs or partitions in this process unless you really know what you are doing, as data will get erased.
There are bugs that affect the Ubuntu Startup Disk Creator, when you run it in old Ubuntu versions in BIOS mode and try to create USB boot drives with other versions. In the Ubuntu Startup Disk Creator version 0.3.2 in Ubuntu 16.04 LTS, these bugs are no longer a problem, so you can install any version of the Ubuntu flavours from 16.04 LTS and newer versions.
UNetbootin
Download UNetbootin
mkusb — dd image of iso file to USB device safely
If you want to clone from a general image file to a drive, you can use mkusb. It lets you clone to any drive that is not busy, also an internal drive, and there are very obvious warnings to prevent mistakes.
- run in Debian and many linux distros that are similar to Ubuntu and Debian,
- clone from iso files of most Linux distros to create USB boot drives,
- create persistent live drives of the Ubuntu family and Debian, using all available drive space for persistence and/or data storage,
- restore a USB boot drive to a standard storage device.
There is a detailed description at /fromUbuntu including the Startup Disk Creator, UNetbootin and mkusb.
Creating a bootable Ubuntu USB flash drive from Mac OSX
There is a good wiki page about booting with UEFI, and a good tutorial thread, UEFI Installing — Tips.
Test if running in UEFI mode
You may want to test if your Ubuntu flavour is running in [U]EFI mode. An installed system and a live system too is using the directory /sys/firmware/efi, so you can run the following command line,
The following command line is more robust and also easier to understand, so you may prefer it (if you copy & paste and are not bothered by typing a long command line),
Источник


