- Установка дистрибутива на компьютер с EFI
- Содержание
- how to install
- Управление списком загрузки
- Удаляем запись Windows Boot Manager
- Удаляем запись Linux
- Редактируем паузу
- How to Dual Boot Windows 10 and Linux Starting with Windows or Linux
- Dual Boot Linux with Windows 10 – Linux Installed First
- Create Bootable Windows 10 Install Media Using Unetbootin
- Create Bootable Windows 10 Install Media Using Brasero
- Dual Boot Linux with Windows 10 – Windows Installed First
- 4 Free Boot Managers – Dual Boot Windows And Linux
- ↓ 01 – Grub2Win | Free
- ↓ 02 – EasyBCD | Free Personal
- ↓ 03 – rEFInd Boot Manager | Free
- ↓ 04 – Clover EFI bootloader | Free
Установка дистрибутива на компьютер с EFI
Содержание
Сначала немного теории. Extensible Firmware Interface (EFI) — интерфейс между операционной системой и микропрограммами, управляющими низкоуровневыми функциями оборудования, его основное предназначение: корректно инициализировать оборудование при включении системы и передать управление загрузчику операционной системы. EFI предназначен для замены BIOS — интерфейса, который традиционно используется всеми IBM PC-совместимыми персональными компьютерами
Что это значит? Значит что способ описанный в Установка Ubuntu может не сработать. Кроме того, большие диски требуют использования GPT (вместо старой версии таблицы разделов в MBR, которая имеет ограничение адресуемого на диске пространства в 2,2 ТБ = 2,2 × 10¹² байт)
Поскольку EFI представляет собой специфический загрузчик, то он должен где то храниться, в нашем случае для него выделено отдельное место на жёстком диске с GPT таблицей разделов. Когда компьютер проходит процедуру POST, BIOS обнаруживает на подключённом носителе EFI раздел с установленным загрузчиком. Как следствие в самом BIOS в меню BOOT(У вас может называться по другому, там находиться порядок загрузки устройств) на ровне с устройствами появятся и дистрибутивы.
how to install
A. В начале нам понадобиться LiveCD(почему именно LiveCD? Смотри ниже) установочный образ , how to написано тут получение_ubuntu. Если у вас уже есть установочный диск/флешка, вам ниже.
B. Загружаемся, всё как при обычной установке → загрузка_с_livecd. Затем, если у кого то всё нормально и графический режим с выбором языка работает, то хорошо, у некоторых может появиться незнамо что (экран в пикселях, видно как ленточка выбора перемещается для выбора варианта загрузки)
Порядок надписей следующий:
Как следствие выбираем первую и загружаемся в графическом режиме.
C. Открываем центр приложений, ищем grub-pc удаляем, ищем grub-efi под нужную разрядность (64 или 32) ставим его.
UPD. можно оставить только grub-common остальные грабы он сам во время установки догрузит (у меня на всех работало (12.04-12.10 альфа 3),12.10 бета 1 «невозможно установить загрузчик….»)\\ Вариант не нужен и может даже навредить установке на 12.04.1 и 12.10 бета 2 и старше.
E. запускаем саму установку, выбираем «другой вариант» и вручную размечаем диск «разметка_диска». Так всё по плану:
Отлично, фарс почти закончился, в самом низу выбирается путь установки загрузчика (там должно быть что то вроде /dev/sda/
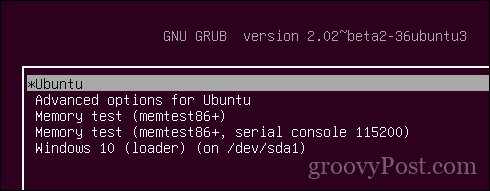
Устанавливаем, по окончанию перезагружаем, заходим в BIOS, там boot menu. Должны были появиться новые пункты «Linux» «Ubuntu», первым можно поставить Ubuntu
Управление списком загрузки
Способ подходит как для редактирования из установленной системы, так и с LiveCD Нам понадобиться следующая консольная утилита bootmgr.
bootmgr — это пользовательское приложение для редактирования Intel Extensible Firmware Interface (EFI) Boot Manager. Оно позволяет добавлять, изменять и удалять опции загрузки.
После установки открываем терминал и вбиваем туда:
Вот что оно вам выдаст.(С моими комментариями)
Как видно из этого у меня 2 ненужных записи(Windows, Linux), заглянем в официальную инструкцию.
хм.. я ничего не понял , но поковырявшись ещё немного вот что получилось: Чтобы удалить какую-либо запись нужно ввести команду вида:
Удаляем запись Windows Boot Manager
Где xxxx Это hex номер загрузочной записи, его можно сокращать, вот например в моём случае для удаления Windows нужно ввести:
Сразу после этого консоль отрапортует результат:
Удаляем запись Linux
Теперь удаляем запись Linux
После перезагрузки получим вот такую красоту:
Редактируем паузу
Если необходимо отредактировать паузу то делаем следующее:
How to Dual Boot Windows 10 and Linux Starting with Windows or Linux


A computer that boots both Windows 10 and Linux can easily be the best of both worlds. Having easy access to either of the operating systems lets you enjoy the benefits of both. You can hone your Linux skills and enjoy the free software only available for Linux platforms. Or, you can switch back to Windows 10 to use apps like Photoshop, AutoCAD or Microsoft Office. The beauty of dual booting is that it lets each operating system take full advantage of the hardware resources of your computer. While virtual machines and the Windows Subsystem for Linux can give you a taste of the Linux experience, dual booting lets you tap its full potential.
The good news is that Windows 10 and Linux live in harmony better than ever these days. Dual booting Windows 10 and Linux used to be a precarious process that could wreck your Windows installation, your Linux installation or both. While the process isn’t quite a smooth as dual booting macOS and Windows with Boot Camp, it comes close. In this article, we’ll show you how to safely install Windows 10 and Linux on the same hard drive. It doesn’t matter if you’re starting with Linux or starting with Windows—dual booting is easy to set up either way.
Dual Boot Linux with Windows 10 – Linux Installed First
Let’s start with the (slightly) harder way first; you already have a copy Linux installed and you want to install Windows on a partition. The first step is to create the partition where Windows 10 will be installed. We have covered how to create partitions in Linux, so, start by reviewing our article on how to do that.
Once you have your partition set up, you will need to purchase Windows 10, download the ISO file then create a bootable copy. Creating a bootable copy of Windows 10 on Linux can be done using the free Unetbootin (USB thumb drive) or Brasero software if you are installing from a DVD.
Create Bootable Windows 10 Install Media Using Unetbootin
Unetbootin can be downloaded from the Software Center in Ubuntu. Once you have it up and running, launch it. Make sure you are using a thumb drive with at least 8 GBs of free space.
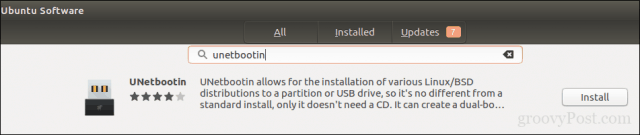
Select the Disk Image radio box, click the browse button (represented by an ellipsis …), browse to the ISO file then click Open. Chose the medium from the Type list box—in this case, your USB drive. Click on the drive list box then select your USB thumb drive.
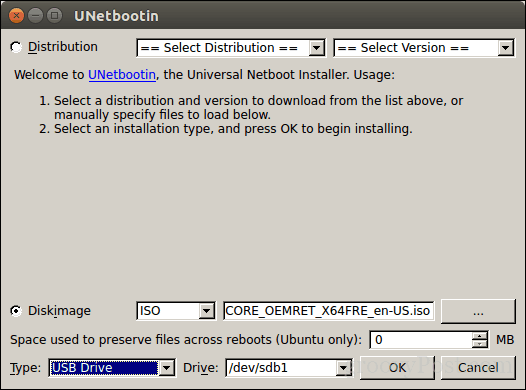
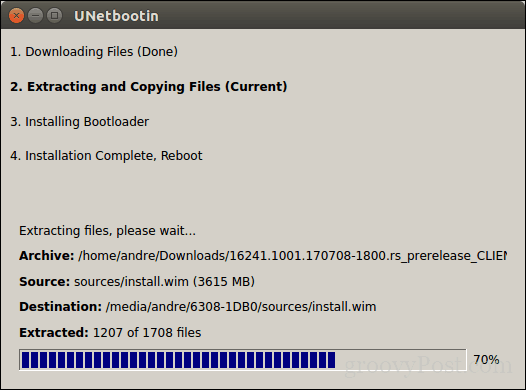
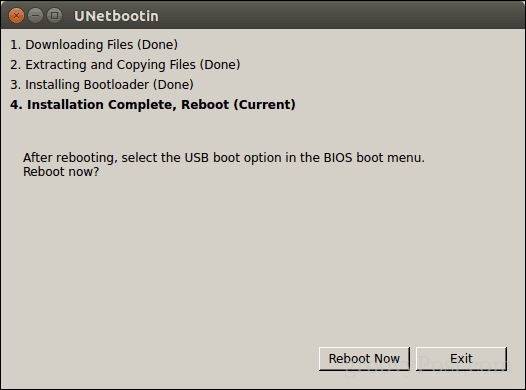
Click OK, then wait while the bootable copy is created.
When complete, click Exit.
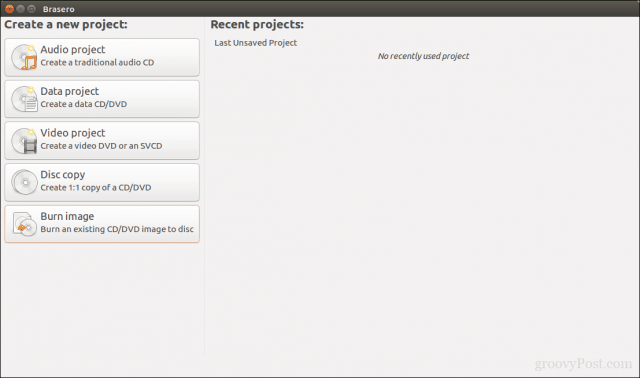
Create Bootable Windows 10 Install Media Using Brasero
If you already made a bootable USB with Unetbootin, you can skip this part. If you are still using an old school system with a DVD drive, you can use the Brasero DVD Burning software, which you can download from the Software Center also. Please keep in mind, Windows 10 ISO files are getting larger beyond the standard 4.7 GB DVDs. So, in some cases, it’s best you use 8.5 GB dual-layer DVDs if supported by your drive. If you can’t, then it’s best you use a USB thumb drive.
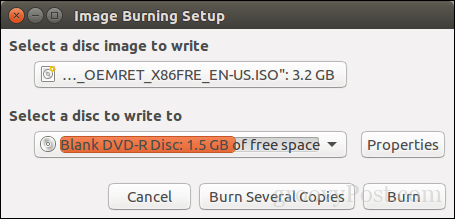
In Brasero, click Burn Image.
Select your disc image, make sure a blank DVD disc is inserted then click Burn.
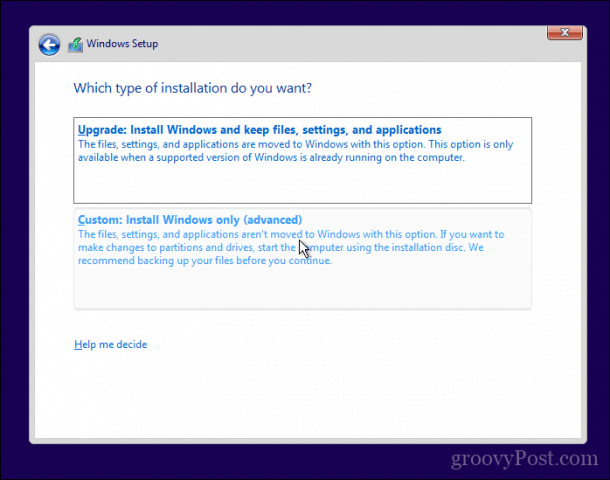
After preparing your install media, insert it or connect it. Reboot your computer, then configure your BIOS to boot from the drive. Windows 10 will boot into setup as it normally does. After you arrive at the setup screen, click Custom: Install Windows only (advanced).
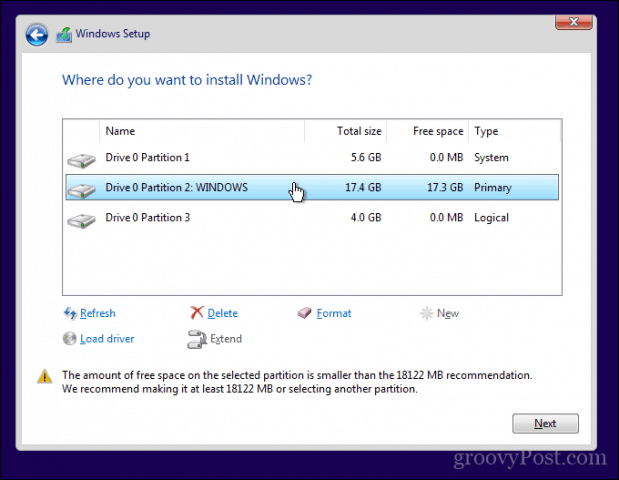
Make sure you select the right partition; don’t wipe out your Linux installation. Click Next then wait while Windows 10 Setup copies files to the drive. Your computer will be rebooted several times.
When setup is complete, follow the instructions to complete the out of box experience.
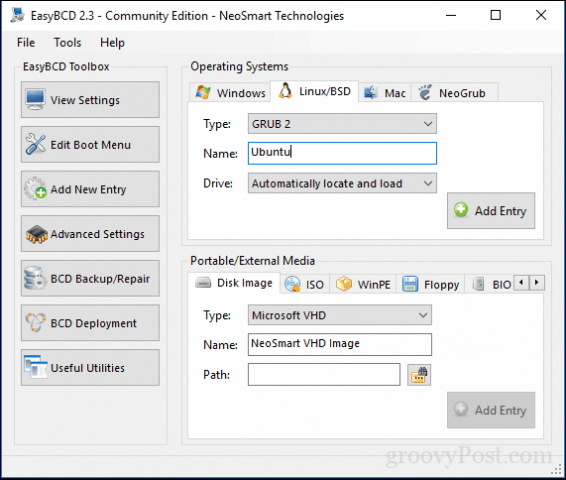
After that’s complete, you might notice the obvious—there is no way to boot into Linux anymore. Here is how you fix that. Download a free utility called EasyBCD from Neosmart Technologies. Proceed to install EasyBCD then launch it. Select the Linux/BSD tab. Click in the type list box, select Ubuntu; enter the name of the Linux distribution, choose automatically locate and load then click Add Entry. Reboot your computer.
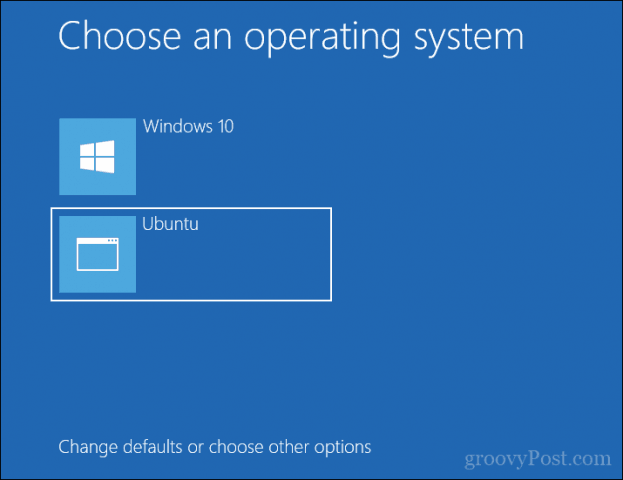
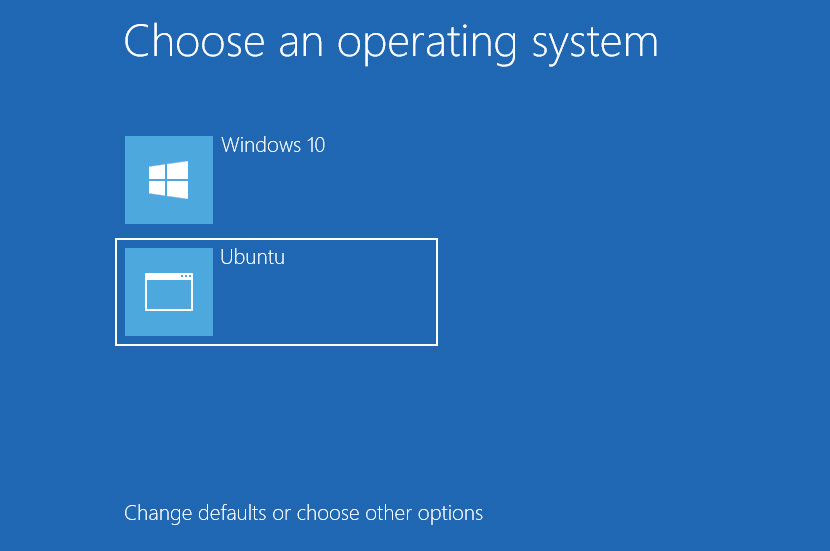
You will now see a boot entry for Linux on the Windows graphical boot manager.
Dual Boot Linux with Windows 10 – Windows Installed First
For many users, Windows 10 installed first will be the likely configuration. In fact, this is the ideal way to dual boot Windows and Linux. Again, I will be using the Ubuntu Linux distribution. You can download the Ubuntu Linux ISO image from Canonical’s web page then create a bootable copy using Unetbootin for Windows or burn to a blank DVD using disc image in Windows 10.
After creating your install media, configure your BIOS to boot from it. Ubuntu’s installation wizard intelligently detects existing Windows installations. It will ask you if you would like to install Ubuntu alongside Windows.
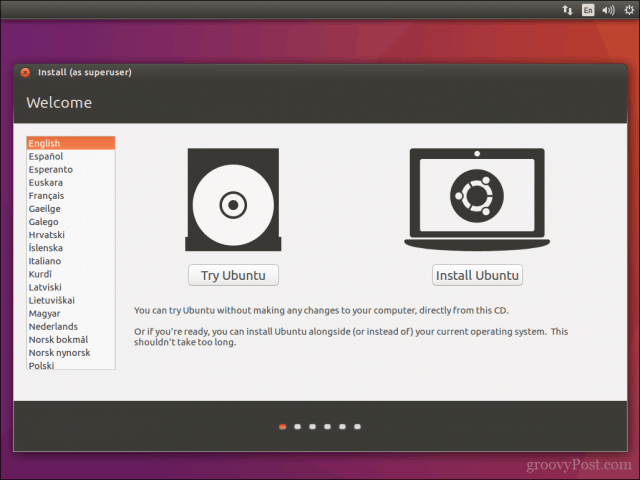
At the Ubuntu install screen, click Install Ubuntu.
Choose whether you want to download and install updates and third-party drivers and codecs then click Continue.

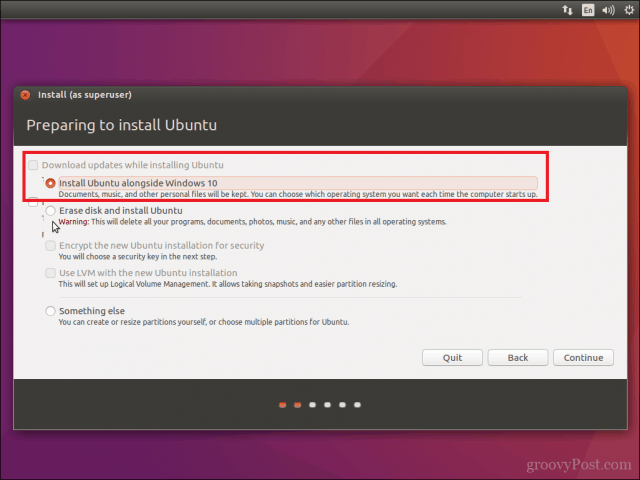
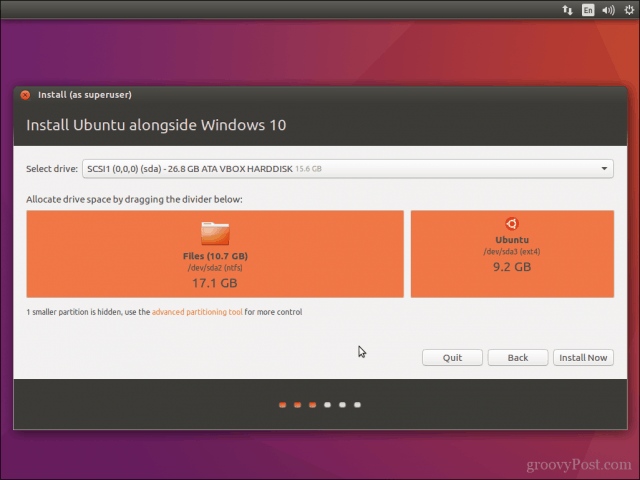
Select the option Install Ubuntu alongside Windows 10 then click Continue.
Ubuntu’s installer will set a default allocation of space for the installation. If you have enough space, you can resize the partition by placing your mouse between the divider then drag it left or right to make adjustments. Once you are satisfied with the allocated amount for your Ubuntu installation, click Install Now.
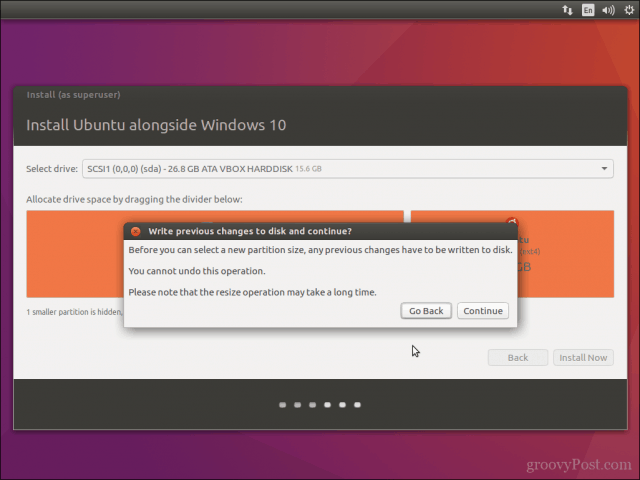
Click Continue to confirm changes.
Click Continue again.
Enter your time zone then click Continue.

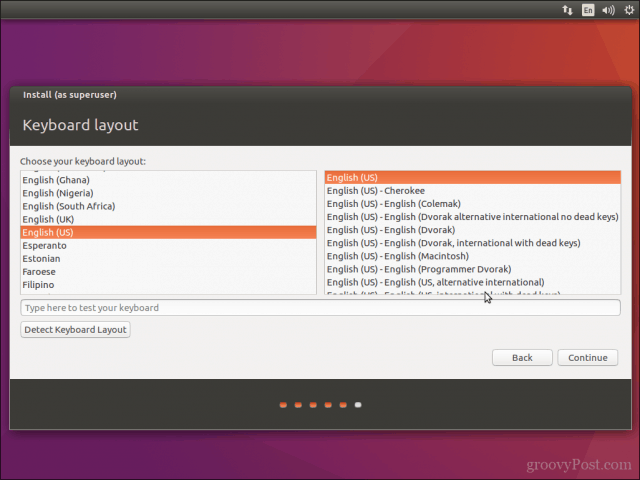
Select your keyboard layout, click Continue.
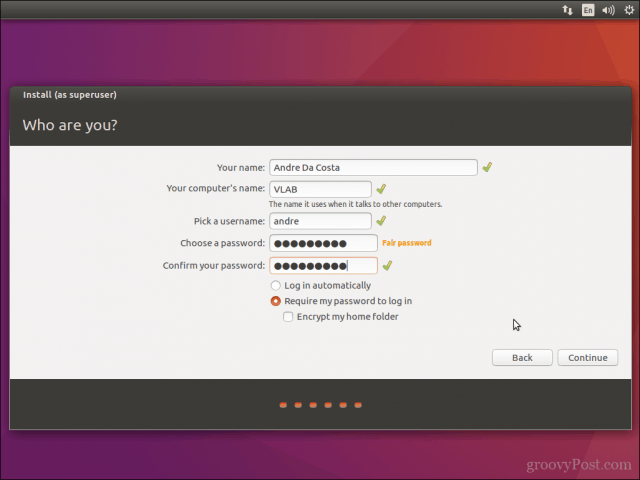
Create your user account by providing your full name, computer name, login name, and password. Choose whether you want to log in automatically or be prompted for a password. You can also encrypt your home folder for extra security. Click Continue.
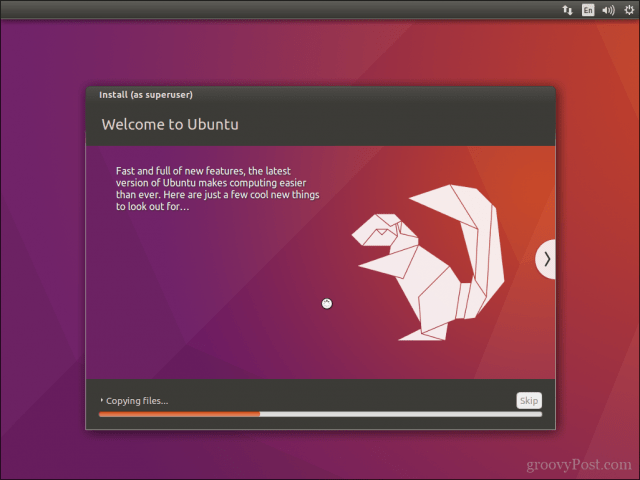
Wait while Ubuntu copies files.
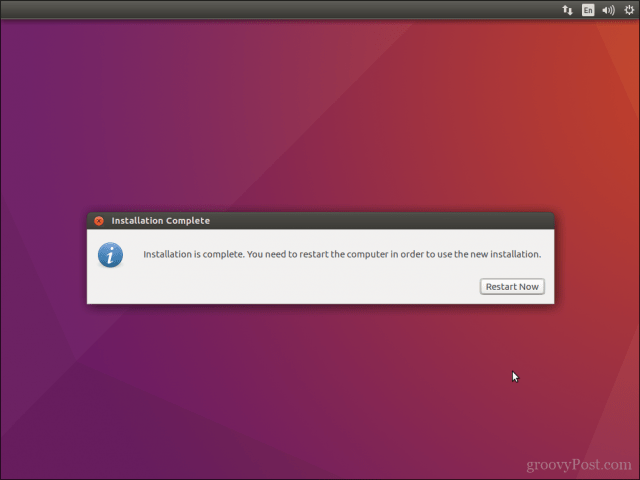
When complete, click Restart Now.
Ubuntu will add a boot entry for Windows 10 to the GRUB boot manager, which you can select using the up or down arrow then hitting Enter.
That’s it, Windows 10 and Ubuntu is now set up on your computer.
Let us know what you think. If you have done this before, share some of your tips with us. By the way, what’s your favorite distro?
4 Free Boot Managers – Dual Boot Windows And Linux
How to dual-boot Linux and Windows on the same hard disk? Typically a computer will have a single operating system installed on them, for those that wants to dual-boot multiple OS such as a combination of Windows and Linux, you will need to make some changes and enable the option to choose which OS to boot from during startup.
You can install 2 operating system provided that you partition your SSD or Hard Disk into 2 drives. When you install a Linux distribution, it typically installs the Grub boot loader. Grub loads instead of the Windows boot loader at boot time if Windows was already installed, allowing you to choose the operating system you want to boot by modifying the Boot Configuration Data.
↓ 01 – Grub2Win | Free

Grub2Win supports 64 and 32 bit EFI and BIOS on Windows 10, 8, 7 and XP. Safely dual boot Windows and Linux from GPT or MBR disks. Grub2Win boots native GNU Grub version 2 code. Everything is contained in a single 20 MB directory on your Windows C: drive. On EFI systems a few small modules are installed to your EFI partition.
Using the simple Windows GUI and instructions you can install Grub2Win quickly and safely. Select from many OS choices. Supports Antergos, Android, Ubuntu, Debian, Suse, Fedora, Mint, Clover and Windows. Also boots ISO files. You can enter your own custom commands for each menu entry.
- Supports 64 and 32 bit EFI as well as BIOS firmware.
- Installs to Windows 10, 8, 7 and XP.
- Requires just one directory on the Windows C: drive, about 20 MB disk space.
- Simple Windows GUI easily sets up Grub2Win in seconds.
- Lets you set your EFI firmware boot order from within Windows.
- Preview and customize the 9 included graphic background themes.
- Works with all filesystems including Mac hfs and Btrfs.
- Can search for and boot a partition by it’s label. Supports advanced scripting.
- Works with both GPT and MBR disks – up to 128 primary partitions per drive.
- Supports extremely large (over 40 TB) disks and partitions.
- Safely multiboot Windows, Antergos, Android, Ubuntu, Debian, Suse, Fedora, Mint, Clover and more.
- Grub customization is done from Windows – Configuration in Linux is not required.
↓ 02 – EasyBCD | Free Personal
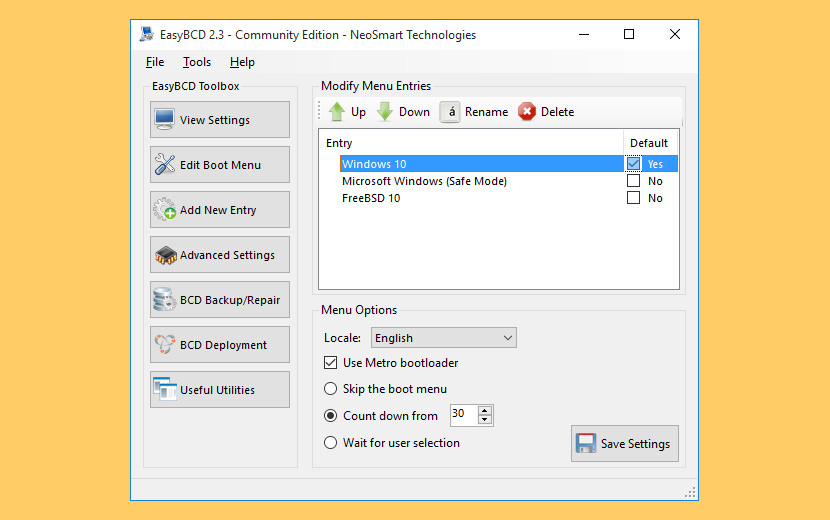
Take control of your boot loader, EasyBCD supercharges your Windows PC, allowing you to dual-boot to your heart’s content. Also boot into legacy systems Microsoft doesn’t support: MS-DOS, Windows 9x, Windows ME, and Windows 2000!
EasyBCD is geared for users of all kinds. Whether you just want to add an entry to your old XP partition or want to create a duplicate for testing purposes; if youre interested in debugging the Windows Kernel or septuple-booting your seven test operating systems, EasyBCD is the key.
- Boot anything – Windows, Linux, macOS, & BSD! Boot both from and into USB drives, ISO images, virtual disks, and more.
- Boot anywhere – Create bootable USB sticks with repair utilities that you can take with you anywhere.
- Protect against disaster – Create entries to boot into recovery utilities or safe mode to prepare for a rainy day.
- Painless editing – Add, rename, remove, configure, and reorder entries at whim.
- Solve difficult problems – Use EasyBCD to troubleshoot Windows, back up and repair the bootloader, and more.
- Powerful scripting with NeoGrub – You’ll have the power to hide partitions, change active flags, and create complex boot scenarios.
↓ 03 – rEFInd Boot Manager | Free
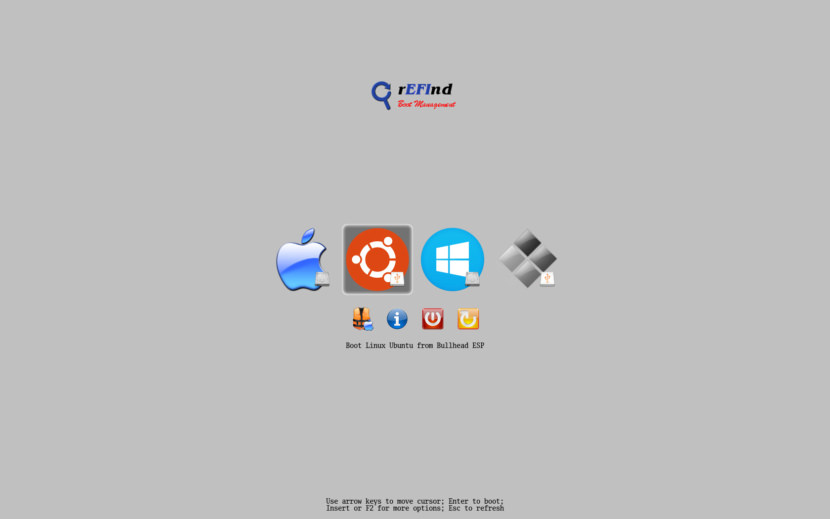
rEFInd is a fork of the Small rEFIt boot manager for computers based on the Extensible Firmware Interface (EFI) and Unified EFI (UEFI). Like rEFIt, rEFInd is a boot manager, meaning that it presents a menu of options to the user when the computer first starts up, as shown below. rEFInd is not a boot loader, which is a program that loads an OS kernel and hands off control to it.
↓ 04 – Clover EFI bootloader | Free
This is EFI-based bootloader for BIOS-based computers created as a replacement to EDK2/Duet bootloader. Clover is an operating system boot loader for computers already equipped with an UEFI firmware and for those equipped with legacy BIOS firmware. An operating system (OS) may support (U)EFI (macOS, Windows 7, 8, or 10, Linux) or not (Windows XP). Legacy boot is used for the last one, that is, the old BIOS system is used to handle boot sectors.
- Boot macOS, Windows, and Linux in UEFI or legacy mode on Mac or PC with UEFI or BIOS firmware
- Boot using UEFI firmware directly or CloverEFI UEFI firmware emulation
- Customizable GUI including themes, icons, fonts, background images, animations, and mouse pointers.
- Ability to boot previously selected boot entry after default timeout
- Boot entries menu scrolls if screen resolution is too low for menu
- Create custom boot entries for personalizing boot entries and add support for other operating systems
- Create Clover boot entry in NVRAM with tool from GUI


