- Установка полноценной Ubuntu на USB-накопитель
- Содержание
- Подготовка к установке
- Запись образа
- Загрузка
- Подготовка USB-накопителя
- Установка
- Ubuntu Documentation
- Quick Guide: Installing Ubuntu from a USB memory stick
- This guide will assume that you are running Windows
- What do I need to get started?
- Get a copy of the Ubuntu installer
- Put the installer on a memory stick
- Start the Ubuntu installer
- Install Ubuntu
- What next?
- What if things go wrong?
- I can’t boot from USB even though I have USB Disk (or similar) as the first option in my boot list
- Is it safer to resize my partition in Windows?
- References and further help
- Загрузочная флешка Windows в Linux
- Загрузочная флешка Windows в Linux
- Способ 1. Утилита USB Image Write
- Способ 2. Утилита WoeUSB
- Способ 3. Терминал и Gparted
- Выводы
Установка полноценной Ubuntu на USB-накопитель
Содержание
Очень часто у людей возникает желание или необходимость поставить Ubuntu на USB-накопитель и получить возможность пользоваться своей ОС на любом компьютере (лишь бы была возможность загрузится с USB).
В этой статье описывается процесс установки Ubuntu на USB-накопители.
Подготовка к установке
Скачайте образ системы отсюда. Если не планируете запускать систему на машинах с более 4 Гб оперативной памяти предпочтительней выбирать 32-х разрядную.
Запись образа
После того, как образ загрузился, его надо записать на CD или USB-накопитель.
На USB носитель образ проще всего записать при помощи UNetbootin. Эта программа существует под большинство популярных ОС (Windows, Linux, Mac) и достаточно проста в обращении. Все что потребуется – указать путь к скачанному образу и выбрать диск, на который будет записан образ.
Загрузка
Перед тем как загрузится, убедитесь, что в BIOS первым загрузочным устройством выбран USB или CD-ROM, в зависимости от того, с чего вы производите загрузку. В BIOS можно попасть нажав клавишу Del для стационарных компьютеров и F2 или F12 для ноутбуков. О том, как выбрать устройство для загрузки смотрите в интернете или читайте инструкцию к вашему компьютеру.
Если все правильно сделано, вы увидите перед собой загруженную с Live CD систему.
Подготовка USB-накопителя
Запустите программу GParted. 
Выберите устройство, на которое вы собираетесь установить Ubuntu. 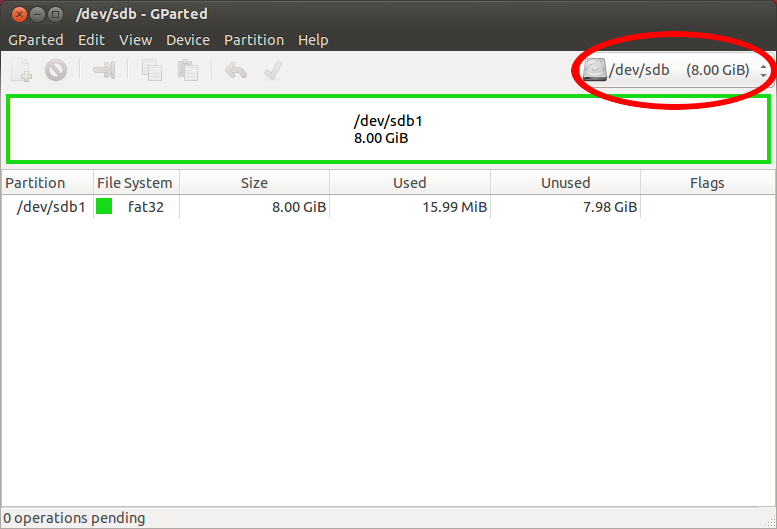
Отформатируйте его в файловую систему Ext2 или Ext4. Так-же можно разделить USB-диск на 2 раздела для того, чтоб его можно было использовать по прямому назначению (перенос файлов с одного компьютера на другой). Для этого первый раздел раздел отформатируйте в FAT32 (для того, чтобы раздел был виден в Windows), вторым разделом выберите файловую систему Ext2 или Ext4 под Ubuntu. На второй раздел желательно выделить минимум 6 Гб, чтобы можно было не переживать за нехватку места для установки дополнительных программ. 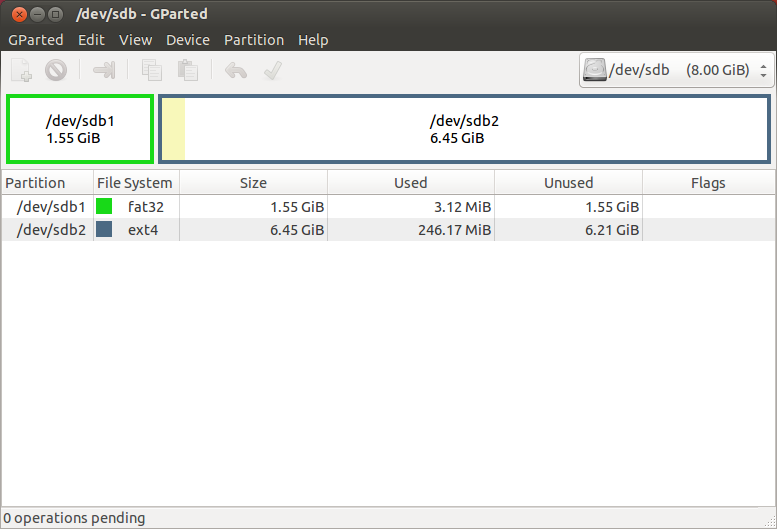
Установка
Дальнейшая установка Ubuntu ничем не отличается от установки на жесткий диск.
Выберите на рабочем столе Install Ubuntu и выполните установку по скриншотам:
Ubuntu Documentation
Quick Guide: Installing Ubuntu from a USB memory stick
This guide will help you install Ubuntu on your computer by using a USB memory stick. USB memory sticks are sometimes known as flash drives, memory pens or USB Mass Storage devices.
Installing from a memory stick is useful if you have a computer without a CD drive (such as a netbook), or prefer the convenience of a memory stick. Alternative methods are available.
It should take around 30 minutes to complete this process, plus the time it takes to download the 700MB installer file. Downloading from a torrent is by far the fastest way of getting it.
This guide will assume that you are running Windows
This guide will assume that you are running Windows. More comprehensive documentation which covers other operating systems is available at Installation/FromUSBStick.
What do I need to get started?
To install Ubuntu from a USB memory stick you need:
- A memory stick with a capacity of at least 2GB. It will be formatted (erased) during this process, so copy any files that you want to keep to another location. They will all be permanently deleted from the memory stick.
- A computer that can boot (start-up) from a USB memory stick. Many older computers can’t boot from USB – check the boot options in your BIOS (see Start the Ubuntu installer) to see if yours can.
- A computer with
- at least 384MB of system memory (RAM) for Lubuntu Alternate 32-bit. Other flavours of Ubuntu need at least 1 GB RAM, standard Ubuntu and Kubuntu need 2 GB RAM to work well.
- 6GB of available hard disk space and
- a 700MHz or faster x86 processor for Lubuntu. Other flavours of Ubuntu need a more powerful processor, at least a Pentium 4 or similar processor (made around 2004 or later). Most Intel and AMD processors are x86 processors. 32-bit and 64-bit processors are supported.
- standard Ubuntu wants 3-d graphics processing which means at least a core 2 duo processor or similar processor and/or a decent graphics card.
- A working Internet connection.
At least Windows recovery disks, and backup of all important personal data files.
Get a copy of the Ubuntu installer
You need a copy of the Ubuntu installer CD image (.iso) so that you can put it on a memory stick.
The version 16.04.1 LTS of standard Ubuntu or one of the community flavours (Kubuntu, Lubuntu . Xubuntu) is a good choice.
Choose your country (or one nearby) from the Download location drop-down list.
Click Begin download to download the .iso image file needed to install Ubuntu. This will be about 700MB in size.
You can choose other options, like a 64-bit CD image or a BitTorrent download, by clicking Alternative download options.
Put the installer on a memory stick
You need to download a program that can properly put the installer onto a memory stick. You can’t just copy the .iso file onto the memory stick.
Extract the iso file
- Plug-in your USB memory stick.
Go to https://rufus.akeo.ie/ and download the Rufus USB installer. Put it on your Desktop or somewhere convenient.
Alternative: Clone the iso file with Win32 Disk Imager according to https://wiki.ubuntu.com/Win32DiskImager/iso2usb
Start the Ubuntu installer
To start your computer from a memory stick, you might need to change the order of boot devices:

Figure 1 — The Ubuntu boot screen
- Plug-in the memory stick and restart your computer.
- BIOS mode: You should see a purple Ubuntu boot screen with white icons at the bottom (Figure 1).
- UEFI mode: You should see a black screen with a GNU GRUB menu.
- If your computer boots back into Windows, it is not yet set-up to boot from USB, so continue following these steps. Otherwise your computer has successfully booted from the memory stick. Skip to the Install Ubuntu section.
If your computer boots back into Windows, restart the computer again. As soon as the first text appears on the screen, press the button to enter your BIOS/system setup. There should be a message telling you how to do this. You normally need to press one of the following keys: F1, F2, Del, Esc, F10, F11, or F12.
A BIOS screen should appear. Find the option to change the Boot Order and change the first item in the boot order list to be USB Disk, or similar.
- The USB Disk option may have a different name on your computer, for example: Removable Drive; USB-HDD; USB Mass Storage; or USB.
If there is no option to boot from USB Disk, your computer may not be able to boot from USB. See the http://www.pendrivelinux.com/testing-your-system-for-usb-boot-compatibility/ for a tool to test if your computer can boot from USB.
Install Ubuntu
If you have successfully booted from your memory stick, you should now be looking at a menu with purple background in BIOS mode or black background in UEFI mode. To start the Ubuntu installer:
- In BIOS mode: Wait a few seconds and Ubuntu will start loading. Otherwise, you can press a key and a boot menu with more options will appear.
Press the F5 key to access universal access options like the screen reader and magnifier.
After a few second or a minute or two (depending on your hardware), an Install window will appear. Select your language from the list to the left of the screen and select
Try Ubuntu or
Install Ubuntu

Figure 2 — The partitioning screen
When you get to the Partitioning screen (Figure 2, full size), choose one of the following options to determine how to put Ubuntu on your hard disk:
If you want to keep Windows installed and choose whether to start Windows or Ubuntu each time you start the computer, choose Install Ubuntu alongside Windows. This is called a dual-boot setup. Use the slider in the next window to choose how to share disk space between Windows and Ubuntu (Ubuntu should have at least 8 GB of space. It works better with 16 GB or more, which should be possible in a not too old computer).
If you want to remove Windows and replace it with Ubuntu, choose Erase disk and install Ubuntu. All of the files on the disk will be deleted before Ubuntu is put on it, so make sure you have backup copies of anything you wanted to keep.
For more complicated disk layouts, choose Something Else. You can manually add, modify and delete disk partitions using this option.

Figure 3 — Partitioning warning message
When you click Forward, you may receive a message saying that the changes will be applied (Figure 3). This normally happens if you resized a partition. If you click Continue, your hard disk will be changed permanently and you won’t be able to go back. Make sure you’re happy with any changes that you made.
Follow the rest of the instructions to choose a username and password and migrate files and settings from Windows.
Click Install. The installation will begin, and should take 10-20 minutes to complete. When it is finished, choose to restart the computer and then remove your memory stick. Ubuntu should start to load.
What next?
You should now be able to log in to Ubuntu and start using it. Here are some tips to help you get started:
Click the Applications menu at the top of the screen to start a program.
Click the Network Manager icon (near to the speaker icon) at the top right of the screen to connect to the Internet.
Use the System menu to change settings.
You can find help by clicking System -> Help and Support.
What if things go wrong?
I can’t boot from USB even though I have USB Disk (or similar) as the first option in my boot list
Sometimes the memory stick will not be recognized when you boot. Leave it plugged in for 30 seconds or so, then restart with it left plugged-in. Or, unplug the memory stick, restart the computer and then plug it in as soon as anything appears on the screen (i.e. as early in the boot process as possible).
Also, some BIOS options could interfere with USB booting. Go into the BIOS and try enabling or disabling options like Fast Boot, USB keyboard support and USB 2.0 support. Finally, make sure you haven’t selected a USB-FDD or USB-ZIP boot option. These will not work.
Is it safer to resize my partition in Windows?
Some people experience problems when booting into Windows, after they have resized the Windows partition using the Ubuntu installer. See HowtoResizeWindowsPartitions for a guide on an alternative method of resizing a Windows partition which is less likely to cause problems.
References and further help
Installation/FromUSBStickQuick (последним исправлял пользователь ister-kokos 2017-02-04 14:16:21)
The material on this wiki is available under a free license, see Copyright / License for details
You can contribute to this wiki, see Wiki Guide for details
Загрузочная флешка Windows в Linux
Бывают случаи, когда вам нужно записать Windows на флешку в Linux, например, когда вы хотите поставить эту систему второй для использования специализированных программ, или вам нужно переустановить операционку своим знакомым. Или же есть пользователи Linux, которые решили вернуться на Windows, но единственную флешку уже перезаписали под Linux LiveUSB.
Загрузочная флешка Windows в Linux создается достаточно просто. Я предлагаю несколько способов решения этой проблемы. Все их я перечислил ниже.
Загрузочная флешка Windows в Linux
Загрузочную флешку можно создать с помощью терминала или специальных графических утилит. Настоятельно рекомендую отформатировать флешку в Fat32 (или Exfat) перед использованием любого из предложенных методов. Форматирование можно выполнить через Gparted, сfdisk+mkfs или через usb stick formatter (форматирование USB флеш накопителя).

Способ 1. Утилита USB Image Write
Для создания флешки можно воспользоваться утилитой Запись образа на USB. В некоторых дистрибутивах она уже предустановленна (Ubuntu, Mint и др.):
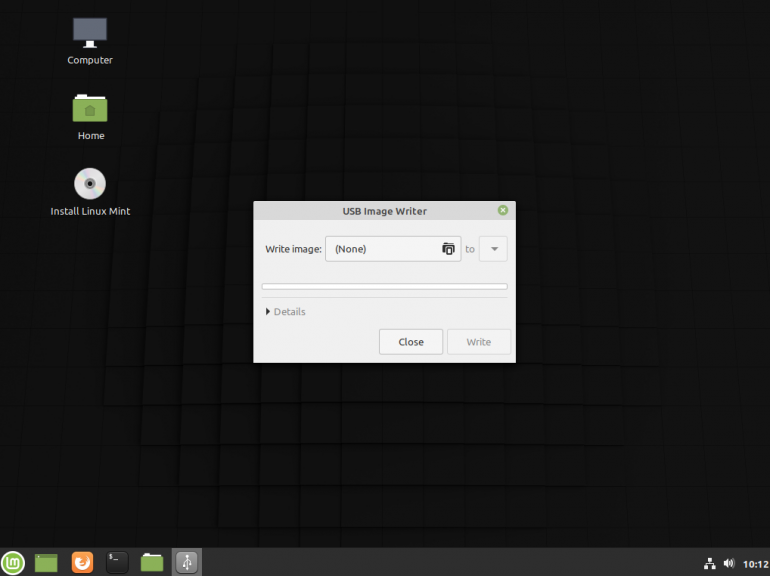
Выбрать образ в графе Write image образ и в поле to выбрать флешку. Далее нажимаем Write.
Способ 2. Утилита WoeUSB
Пожалуй, это самый простой способ создания. Установка в Ubuntu выполняется с помощью таких команд:
sudo add-apt-repository ppa:nilarimogard/webupd8
sudo apt update
sudo apt install woeusb
Откройте утилиту в меню приложений:
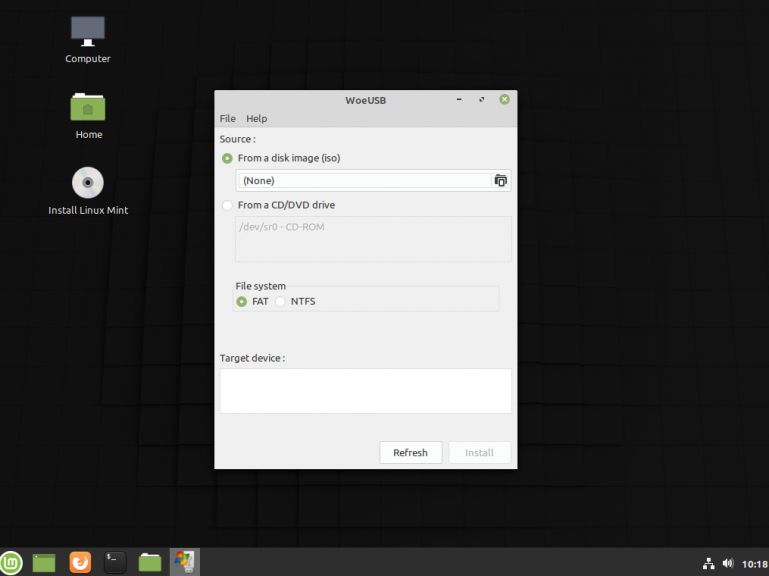
Интерфейс простой. Нажмите на кнопку Обзор со значком папки и выберите образ. Target device это флешка, на которую будет идти запись, если у вас их несколько выберите нужную. Ещё есть поле File system, где нужно выбрать какую файловую систему будете использовать. Рекомендую FAT. Затем нажмите Install и дождитесь окончания.
При появлении ошибки с кодом 256 Source media is currently mounted, размонтируйте образ ISO с Windows, если вы его смонтировали. При ошибке Target device is currently busy, извлеките флешку, затем снова подключите её. Если не сработало, попробуйте отформатировать её.
Способ 3. Терминал и Gparted
Положите образ в домашнюю папку и переименуйте его в windows.iso во избежание проблем с пробелами. Затем перейдите в терминале в домашнюю папку
Запустите терминал через главное меню или с помощью сочетания клавиш Ctrl + Alt + T затем используйте команду dd для записи образа на флешку:
dd if=/windows.iso of=/dev/sdX
Замените X на букву вашей флешки! Узнать её можно через Gparted. В правом верхнем углу есть кнопка переключения дисков:
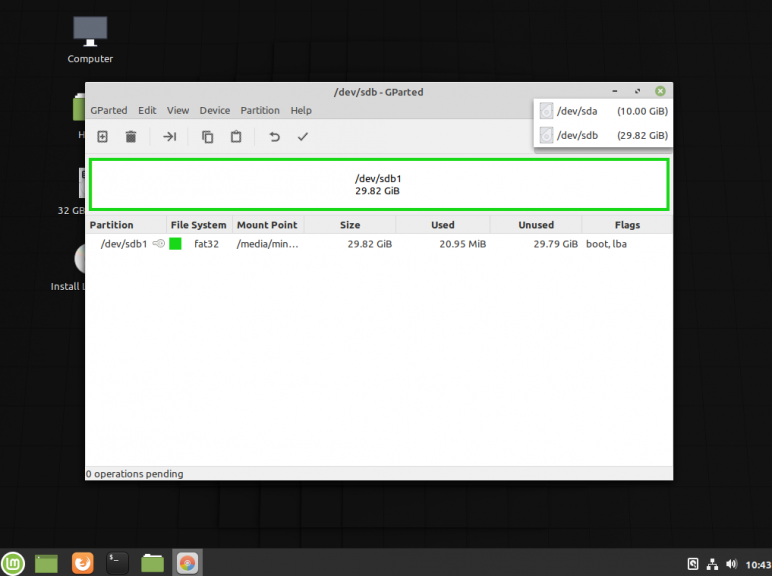
Тот диск который соответствует размеру вашей флешки и есть ваша флешка. В моем случае флешка на 32 гб это /dev/sdb. Значит команда будет иметь вид:
dd if=/windows.iso of=/dev/sdb
Дождитесь окончания записи и извлеките флешку.
Выводы
Как видите, создание загрузочной флешки Windows в Linux не представляет сложности. Это были все способы, которые я знаю. Если они вам помогли, напишите об этом. Если вы знаете еще способы, обязательно напишите о них в комментариях!


