- How to install Node on Mac using NVM and Homebrew
- Step 1: Install NVM
- Step 2: Create a directory for NVM
- Step 3: Configure your environmental variables
- Step 4: Double-check your work
- Step 5: Install Node
- Step 6: Set Node Globally
- Troubleshooting
- Error Example #1
- Error Example #2
- How To Install NVM on macOS with Homebrew
- Prerequisites
- Step 1 – Remove existing Node Versions
- Step 2 – Install NVM on macOS
- Step 3 – Install Node.js with NVM
- Topheman. js
- Posts about web development by Christophe Rosset
- Install nvm with Homebrew to use multiple versions of node and iojs easily
- nijicha / install_nodejs_and_yarn_homebrew.md
- This comment has been minimized.
- Riiiad commented Jun 17, 2019
- This comment has been minimized.
- ghost commented Jun 18, 2019
- This comment has been minimized.
- prinze77 commented Jun 25, 2019
- This comment has been minimized.
- ghost commented Jun 25, 2019 •
- This comment has been minimized.
- ankryption commented Jul 16, 2019 •
- This comment has been minimized.
- nijicha commented Jul 18, 2019
- This comment has been minimized.
- ASH-Michael commented Jul 24, 2019
- This comment has been minimized.
- joadr commented Jul 26, 2019
- This comment has been minimized.
- WDever commented Jul 29, 2019 •
- This comment has been minimized.
- nijicha commented Jul 30, 2019
- This comment has been minimized.
- TempD commented Aug 13, 2019
- This comment has been minimized.
- joekarasek commented Aug 27, 2019
- This comment has been minimized.
- qasimalbaqali commented Sep 17, 2019
- This comment has been minimized.
- nijicha commented Sep 23, 2019
- This comment has been minimized.
- satishnani commented Nov 9, 2019
- This comment has been minimized.
- nijicha commented Nov 9, 2019
- This comment has been minimized.
- Edmund1645 commented Nov 30, 2019
- This comment has been minimized.
- nijicha commented Nov 30, 2019 •
- This comment has been minimized.
- ziruihao commented Dec 1, 2019
- This comment has been minimized.
- nijicha commented Dec 2, 2019
- This comment has been minimized.
- zmaleki commented Jun 28, 2020 •
- This comment has been minimized.
- nijicha commented Jun 29, 2020
How to install Node on Mac using NVM and Homebrew
Install multiple versions of Node and Node Package Manager on a Mac using Node Version Manager (nvm).

Node Version Manager makes it easy to install multiple Node versions on a Mac. You install NVM using Homebrew, and if you don’t have Homebrew installed yet, read this article.
Step 1: Install NVM
Install node version manager.

Step 2: Create a directory for NVM
Step 3: Configure your environmental variables
Either create or open your .bash_profile .
Execute the content we just pasted.
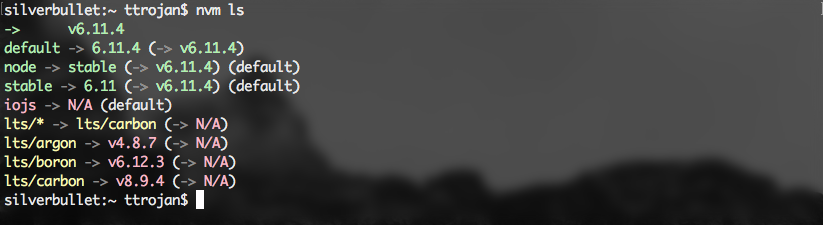
Step 4: Double-check your work
If you’ve done everything correctly, you should be able to run the nvm command and ask it to list which versions node are available.

Step 5: Install Node
You can see a list of previously released Node versions from the NodeJS release page
Install Node 6.x.x.

Install Node 8.x.x
Double-check your installation.
Step 6: Set Node Globally
You can set a specific version of Node as your default.
Troubleshooting
Error Example #1
If you are having issues with npm , then you might want to try this.
Install Node version 12.
Add this to your local variables so that npm and global npm are usable.
Error Example #2
If you see an error like this, then checkout this StackOverflow solution
Источник
How To Install NVM on macOS with Homebrew
The NVM (Node Version Manager) is a shell script used for installing and managing Node.js on a Linux based system. The macOS users can install NVM using the homebrew.
This tutorial help you to install NVM on your macOS system and manage Node.js versions.
Prerequisites
You must have macOS desktop access with administrator privileges.
Login to the macOS desktop system and install Homebrew on your system (if not already installed)
Step 1 – Remove existing Node Versions
If your system already have node installed, uninstall it first. My system already have installed node via Homebrew. So uninstalling it first. Skip if not already installed.
Step 2 – Install NVM on macOS
Now, you system is ready for the installation. Update the Homebrew package list and install NVM.
Next, create a directory for NVM in home.
Now, configure the required environment variables. Edit the following configuration file in your home directory
and, add below lines to
/.zshrc for macOS Catalina or later)
Press ESC + :wq to save and close your file.
Next, load the variable to the current shell environment. From the next login, it will automatically loaded.
That’s it. The NVM has been installed on your macOS system. Go to next step to install Node.js versions with the help of nvm.
Step 3 – Install Node.js with NVM
First of all, see what Node versions are available to install. To see available versions, type:
Now, you can install any version listed in above output. You can also use aliases names like node for latest version, lts for latest LTS version, etc.
After installing you can verify what is installed with:
If you have installed multiple versions on your system, you can set any version as the default version any time. To set the node 14.X as default version, simply use:
Similarly, you can install other versions like Node 12.X or Node 15 and switch between them.
Источник
Topheman. js
Posts about web development by Christophe Rosset
Install nvm with Homebrew to use multiple versions of node and iojs easily
Less than a month ago, iojs was released (multiple releases followed) and 6 days ago, the v0.12.0 of node was released.
I still had the same v0.10.x (can’t remember the patch 🙂 ) of node on my computer I installed a few months ago … As a nodejs developer, I decided it was time to get rid of my old version and switch to nvm so that I could test my projects (websites and node modules) on different engines and versions – moreover not to be stuck in the case some module should only work on one or an other …
This post is more a reminder for future me when I’ll make the install again, though it could help some people.
First, you’ll need Homebrew. If you’re a MacPorts user (or a Linux user), I assume it’s nearly the same, you may even have your own way which is faster and better, no need to troll 😉 – for Windows users, you have some alternatives.
In your .bash_profile file (you may be using an other file, according to your shell), add the following :
Back to your shell, activate nvm and check it (if you have other shells opened and you want to keep them, do the same) :
Now, you can install node :
From now on, you’re using the v0.12.x of node on this shell, you can install your global dependencies such as grunt-cli (they will be tied up to this version of node).
You may want to install other versions, just do :
You’ll have to npm install -g your global dependencies for each version.
Switch of node version with nvm use 0.10 (more infos here).
To have a node activated by default (not to have to nvm use on each new shell), run this (stable being the id of the version):
Now, you can run multiple versions of node on your computer.
Источник
nijicha / install_nodejs_and_yarn_homebrew.md
[DEPRECATED] Install NVM, NodeJS, Yarn via Homebrew
Dear all Github friends,
I moved this gist to the Github repository.
Thanks for star me 😃
- Homebrew should be installed (Command line tools for Xcode are included).
Part A: Install NVM and NodeJS
Install nvm via Homebrew
$ brew install nvm
Create system directory for nvm
Add following line to your profile. ( .profile or .zshrc or .zprofile )
Close and open your terminal again. Or Choose one from the following command once for reload your profile. ( .profile or .zshrc or .zprofile )
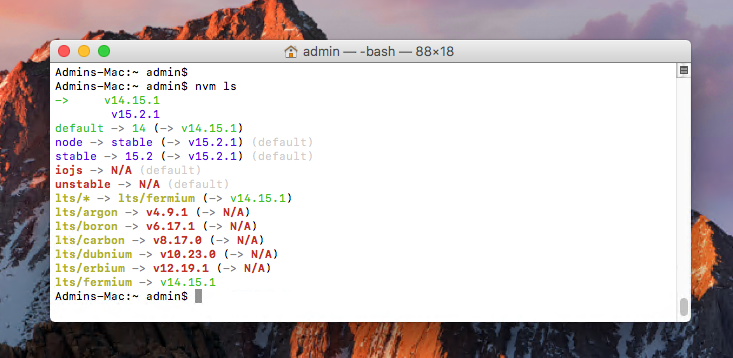
Verify nvm is installed
Check all avaliable version by this command
Install NodeJS (Recommended to install LTS version. Current LTS is Dubnium)
$ nvm install —lts=’Dubnium’
Check installed NodeJS in your machine.
Set global nodejs version to environment.
$ nvm use default
Part B: Install Yarn
Install yarn via Homebrew and remove node dependencies from Homebrew
$ brew install yarn
$ brew uninstall node —ignore-dependencies
Checkout node in environment $PATH
It should be return => /User/ /.nvm/versions/node/ /bin/node
Checkout brew doctor there should show message WARNING missing yarn dependencies
Create symbol link from nvm for Homebrew. Pick a choice which suitable for you.
a. This is for those who installed only one version via nvm
b. If you installed multiple node versions via nvm . You should create symbol link by current global version. Following this commands
$ nvm current => v10.16.0 (Latest LTS: Dubnium) (This should be Global node version)
Checkout brew doctor again. There shouldn’t have WARNING message.
This comment has been minimized.
Copy link Quote reply
Riiiad commented Jun 17, 2019
Uninstalling all brew installed node version helps. As when you run ln -s
/.nvm/versions/node/ /usr/local/Cellar/ it will tell you that it already exists.
So you should run brew uninstall —ignore-dependencies node and brew uninstall —force node to have a clean start.
This comment has been minimized.
Copy link Quote reply
ghost commented Jun 18, 2019
Uninstalling all brew installed node version helps. As when you run ln -s
/.nvm/versions/node/ /usr/local/Cellar/ it will tell you that it already exists.
So you should run brew uninstall —ignore-dependencies node and brew uninstall —force node to have a clean start.
Thanks !
This option —ignore-dependencies . No longer available.
This comment has been minimized.
Copy link Quote reply
prinze77 commented Jun 25, 2019
Uninstalling all brew installed node version helps. As when you run ln -s
/.nvm/versions/node/ /usr/local/Cellar/ it will tell you that it already exists.
So you should run brew uninstall —ignore-dependencies node and brew uninstall —force node to have a clean start.
Thanks !
This option —ignore-dependencies . No longer available.
For me it worked
This comment has been minimized.
Copy link Quote reply
ghost commented Jun 25, 2019 •
Uninstalling all brew installed node version helps. As when you run ln -s
/.nvm/versions/node/ /usr/local/Cellar/ it will tell you that it already exists.
So you should run brew uninstall —ignore-dependencies node and brew uninstall —force node to have a clean start.
Thanks !
This option —ignore-dependencies . No longer available.
Oh sorry guys. I mean to this brew install yarn —ignore-dependencies is unsupported.
This comment has been minimized.
Copy link Quote reply
ankryption commented Jul 16, 2019 •
Thanks for creating this awesome gist, live long 🙂
Correct way to check nvm version is nvm —version
This comment has been minimized.
Copy link Quote reply
nijicha commented Jul 18, 2019
Thanks for creating this awesome gist, live long 🙂
Correct way to check nvm version is nvm —version
This comment has been minimized.
Copy link Quote reply
ASH-Michael commented Jul 24, 2019
What is the purpose for creating the symbol link here? It’s not really explained.
This comment has been minimized.
Copy link Quote reply
joadr commented Jul 26, 2019
What is the purpose for creating the symbol link here? It’s not really explained.
remove the homebrew warning of missing dependencies
This comment has been minimized.
Copy link Quote reply
WDever commented Jul 29, 2019 •
I follow all of this gist. When Finally, I ran brew doctor , I can get
So I ran brew link —overwrite node . And then the warning is removed.
Is this right way? I dont know
This comment has been minimized.
Copy link Quote reply
nijicha commented Jul 30, 2019
@WDever Oh sorry, You should not follow all of this Gist XD.
BTW. I edited this gist.
Following to
Part B > 4. > Pick a Choice
This comment has been minimized.
Copy link Quote reply
TempD commented Aug 13, 2019
Everything worked for me except the linking step that was supposed to clear out the missing dependency warning from brew doctor .
By executing this line: ln -s
/.nvm/versions/node/v10.16.2/bin/node /usr/local/Cellar/node/ I was able to see it referenced correctly by yarn versions :
The warning is still there, but yarn works just fine! 🍺
This comment has been minimized.
Copy link Quote reply
joekarasek commented Aug 27, 2019
Thanks for the great guide. Something I look up every time I have to set up a new laptop.
One quick note/suggestion: I always seem to end up with issues down the road if I install yarn through homebrew, as it inevitably binds to a specific version of node, and when I switch between projects with different node versions I end up getting strange errors from yarn. The solution I found is to install yarn as a global dependency of node: npm install -g yarn .
You will need to repeat this for each version of node you are using.
This comment has been minimized.
Copy link Quote reply
qasimalbaqali commented Sep 17, 2019
This comment has been minimized.
Copy link Quote reply
nijicha commented Sep 23, 2019
Dear all Github friends,
I decided to move this gist to the Github repository.
Thanks for star me 😃
This comment has been minimized.
Copy link Quote reply
satishnani commented Nov 9, 2019
why can you do it as an automated script it will be more convenient and easy to use.
This comment has been minimized.
Copy link Quote reply
nijicha commented Nov 9, 2019
The automated script I would like to do it too. But I don’t have a plan to do that for now. Lets me explain about this gist 🙂
This is a simple step (The step are outdated. Move to repo) for peoples who would like to install yarn and nvm and node with Homebrew. Just an option.
Anyway, there have many solutions to install your node .
And the purpose of starting to write down this gist. I just noted for my self
I had noted this gist for two years ago and I forgot about this.
One day I found many stargazers to this gist.
So I just answer their question who asked me in this thread.
BTW, I have a recommended automated script repository. Maybe you can check out here thoughtbot/laptop
This comment has been minimized.
Copy link Quote reply
Edmund1645 commented Nov 30, 2019
Thanks a lot for this gist.
I wanted to ask, is there an absolute need to install yarn?
This comment has been minimized.
Copy link Quote reply
nijicha commented Nov 30, 2019 •
Answer is no, yarn is optional.
BTW, my opinion is yarn is suitable for me rather than npm
If you love npm Just install node via nvm then enjoy ❤️
Here is yarn usage that I loving it.
yarn add *somethings* 😃
npm install —save *somethings* 🙈
Note: I moved this gist to the Github repository.
This comment has been minimized.
Copy link Quote reply
ziruihao commented Dec 1, 2019
For linking yarn and node: ln -s
/.nvm/versions/node/ / /usr/local/Cellar/node , do we have to do this every time we change our node version?
This comment has been minimized.
Copy link Quote reply
nijicha commented Dec 2, 2019
Yes, Because This gist linking node from nvm alias as yarn Homebrew dependencies
This comment has been minimized.
Copy link Quote reply
zmaleki commented Jun 28, 2020 •
It’s not clear how to add the nvm path to your profile. This worked for me:
Now add these lines to
/.zshrc for macOS Catalina or later)
This comment has been minimized.
Copy link Quote reply
nijicha commented Jun 29, 2020
It’s not clear how to add the nvm path to your profile. This worked for me:
Now add these lines to
/.zshrc for macOS Catalina or later)
Thanks for your advice.
This depends on Unix user (Actually, I meant to Mac user) who uses the shell either bash / zsh / fish or others shell
You added those lines to
/.bash_profile because you use the bash .
macOS Catalina changed the default shell to zsh
I had used zsh since macOS Mavericks
BTW
This gist is outdated.
This moved from the gist to the Github repository.
Try again at https://github.com/nijicha/install_nodejs_and_yarn_homebrew
You can’t perform that action at this time.
You signed in with another tab or window. Reload to refresh your session. You signed out in another tab or window. Reload to refresh your session.
Источник


