- 6 ways to open the Run command window in Windows
- 1. Open the Run command window with a keyboard shortcut
- 2. Use Search to open the Run command window
- 3. Open the Run command window from the Start Menu
- 4. Use the Command Prompt (CMD) to open the Run window
- 5. Open the Run command window with PowerShell
- 6. Use the WinX power user menu to open the Run window in Windows 10
- What do you want to access using the Run window?
- iSumsoft
- Tell You More about IT World
- 4 Ways to Open Run Dialog Box in Windows 10
- 4 Ways to Open Run dialog box in Windows 10
- Way 1: using Win + R
- Way 2: using Win + X
- Way 3: by the Search bar
- Way 4: through the Start menu
- Windows: Bring Off-Screen Window Back Onto Screen
- Fix 1 – Resolution Trick
- Windows 10 & 8
- Windows 7
- Fix 2 – Show Desktop Toggle
- Fix 3 – Move Option 1
- Fix 4 – Move Option 2
- Fix 5 – Cascade Windows
- Fix 6 – Maximize
- How to run a .py file in windows command line?
- 3 Answers 3
- How to get Windows 10 up and running on Mac using Boot Camp
- Comments (12)
- cogitodexter
- corradokid
- MacPro
- dewme
- macxpress
6 ways to open the Run command window in Windows
The Run command window allows you to launch programs, open files and folders, and access internet resources in Windows. Just type a path or a quick command into the Windows Run box, and then click OK or press Enter to use a Run command. Although the Run shortcut is not as easy to find in recent Windows versions, the tool still exists, and there are plenty of ways to access it. This tutorial illustrates how to open Run in Windows 10 and Windows 7:
1. Open the Run command window with a keyboard shortcut
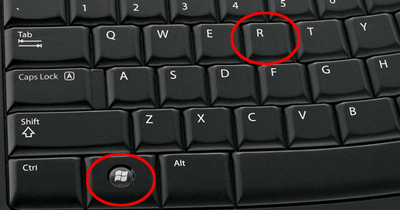
The fastest way to access the Run command window is to use the keyboard shortcut Windows + R. On top of being very easy to remember, this method is universal for all versions of Windows. Hold down the Windows key and then press R on your keyboard.
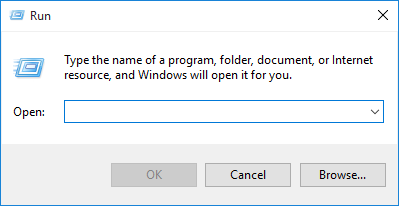
The Run window is immediately displayed in the lower-left corner of the screen.
2. Use Search to open the Run command window
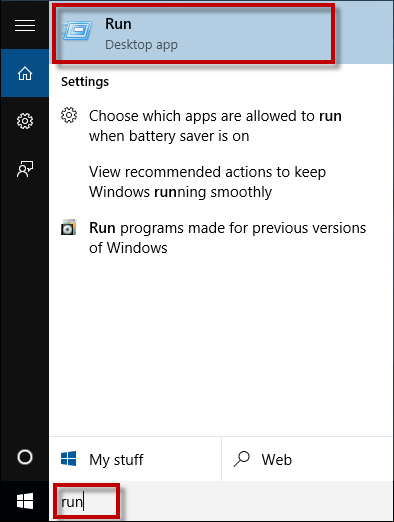
As always in Windows, Search is a great idea to find just about anything. If you are using Windows 10, first type the word “run” inside the Search bar.
Then, click or tap on the relevant search result or press Open from the pane on the right.
In Windows 7, click the Start button and type the word “run” in the Start Menu Search box. Then, click the appropriate result to launch the Run command window.
3. Open the Run command window from the Start Menu
The Start Menu is a reliable way to access features on your Windows computer or device, including the Run window. In Windows 10, access the Start Menu by clicking or tapping on the Windows logo in the lower-left corner or by pressing the Windows button on your keyboard. Then, scroll down to the letter W, open the Windows System folder, and press Run.
In Windows 7, open the Start Menu and then access “All Programs -> Accessories -> Run” to launch the window.
Alternatively, you can also customize your Windows 7 Start Menu to permanently display a Run shortcut in the right-hand pane. To learn how to do that, read The complete guide to the Windows 7 Start Menu.
4. Use the Command Prompt (CMD) to open the Run window
Some of my colleagues love the CMD, so we decided to put this in for other fans, even if it’s not as easy to remember as the other ways illustrated in this article. To open the Windows Run, you can also launch the Command Prompt and enter the following:
explorer.exe Shell.
This method works both in Windows 10 and Windows 7.
5. Open the Run command window with PowerShell
Wondering how to open Run from PowerShell in Windows 10 and Windows 7? First, start PowerShell. Then, copy/paste or type in the following command:
(New-Object -ComObject “Shell.Application”).FileRun()
Press Enter on your keyboard, and the Run command window is immediately opened in the bottom-left corner.
6. Use the WinX power user menu to open the Run window in Windows 10
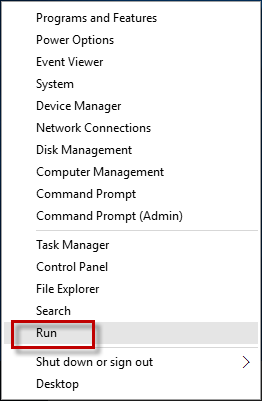
Windows 10 has a hidden power user menu that includes a shortcut for the Run command window. There are many ways to access this menu, the easiest being to use the Windows + X keyboard shortcut. Then, click or tap on Run or press R on your keyboard to open the Run box in Windows 10.
If the WinX power user menu interests you, you can learn more by reading: What is the WinX menu and how to open it.
What do you want to access using the Run window?
The Run command window was first introduced by Microsoft in Windows 95 and has been with us ever since. Some of us access it pretty often, but plenty of people don’t realize its potential and usefulness yet. We’re happy this feature caught your eye, but we are curious what brought you here. Are you looking for new ways to open the Windows Run command window or are you trying something new on your computer? Let us know in the comments.
iSumsoft
Tell You More about IT World
- Blog>
- Windows 10>
- 4 Ways to Open Run Dialog Box in Windows 10
4 Ways to Open Run Dialog Box in Windows 10
Windows comes with the Run command dialog box, which is usually used to quickly open some Windows programs, folders, documents, or internet resource. In this post, we will show you four different ways to open the Run dialog box in Windows 10.
4 Ways to Open Run dialog box in Windows 10
Way 1: using Win + R
Simultaneously press the Windows and R keys on your keyboard to quickly bring up the Run dialog box.
Way 2: using Win + X
Simultaneously press the Windows and X keys to open the power user menu, from which you can select the “Run” to open the Run dialog box.
Way 3: by the Search bar
1) Start typing “run” (without quotation marks) in the Search box on the left side of the Windows 10 taskbar.
2) When the “Run (Desktop app)” appears in the search results, click on it to open the Run dialog box.
Way 4: through the Start menu
1) Open the Start menu by clicking the Windows icon in the lower-left corner of the Windows 10 desktop or pressing the Windows key on your keyboard.
2) Click “All apps”, click “Windows System”, and then click the “Run” to open it.
Windows: Bring Off-Screen Window Back Onto Screen
By Mitch Bartlett 115 Comments
While using Microsoft Windows, I had a window that had somehow fallen completely off of my screen. Right-clicking the window in the Taskbar and selecting Maximize brought it back, but there was no way I could get the window restored to where I could move it around my screen with my mouse.
Luckily, there are a couple of ways to bring off-screen windows back to the desktop screen.
Fix 1 – Resolution Trick
Windows 10 & 8
- Start the problematic application.
- Right-click a blank area of the Desktop, then choose “Display settings“.
- Select “Advanced display settings” at the bottom of the window.
- Temporarily change the “Resolution” to another value, then choose “Apply“.
- See if you can see the window on your screen now.
- Change the resolution back to the previous value, then select “OK“.
Windows 7
- Start the problematic application.
- Right-click a blank area of the Desktop, then choose “Screen Resolution“.
- Temporarily change the “Resolution” to another value, then choose “Apply“.
- See if you can see the window on your screen now.
- Change the resolution back to the previous value, then select “OK“.
Fix 2 – Show Desktop Toggle
- Hold down the Windows Key, then press “D“. Repeat these steps to see if it makes the window you are looking for reappear.
- Alternately, you can right-click a blank area of the taskbar, then choose “Show the desktop“, then repeat.
Fix 3 – Move Option 1
- Select the program in the task bar.
- Hold the Windows Key while pressing Left Arrow or Right Arrow repeatedly to move the window back into view.
Fix 4 – Move Option 2
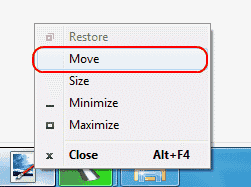
- In Windows 10, 8, 7, and Vista, hold down the “Shift” key while right-clicking the program in the taskbar, then select “Move“. In Windows XP, right-click the item in the task-bar and select “Move“. In some instances, you may have to select “Restore“, then go back and select “Move“.

- Use your mouse or the arrow keys on your keyboard to move the window back onto the screen.
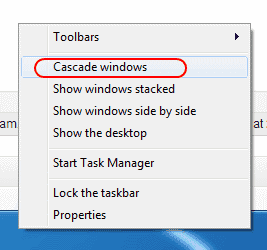
Fix 5 – Cascade Windows
- Right-click a blank area of the task-bar, then select “Cascade windows“.
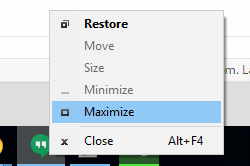
Fix 6 – Maximize
Sometimes a single app will get stuck in a state where it cannot redraw onto the Window. You can usually alleviate this by doing the following.
- Hold “Shift” and right-click on the program icon in the taskbar, then choose “Maximize“.
How do I prevent my application from starting off the screen every time I launch it?
Most applications will stop doing this if you properly exit out of the application while it is on the screen. If you have already properly exited the application, you might need to uninstall and reinstall it.
Otherwise, you can try right-clicking the icon for the application, then choosing “Properties“. Under the “Shortcut” tab, change the “Run” setting to “Maximized“, then select “OK“. 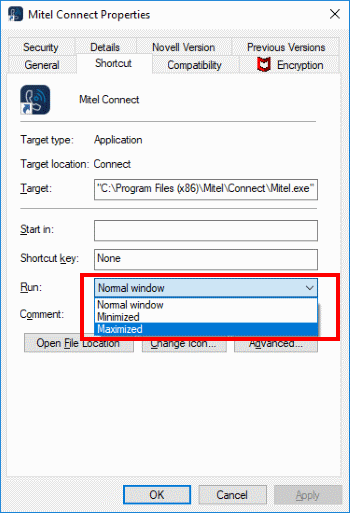
How to run a .py file in windows command line?
I have written a simple python program using IDLE to run it from command line. I don’t have permission to save .py file in python directory (C:\program files\python33) so I saved it to C:\Pyscripts.
Also python was already been added to the PATH and I can run a simple print («Hello») in command line. I have saved this line into a py file and Now I want to run it from command prompt but I have faced different errors! I have searched and tested different ways but they didn’t work!
3 Answers 3
- Start cmd.exe
- cd C:\Pyscripts
- python filename.py
For basics like print ‘hello’ , you don’t need any library import statements but for slightly more complex things you will.
Which python do you have installed?
You don’t want to save files in c:\program files under windows. That isn’t a good practice. Setting up a dev directory like you did or under your user directory is a much better option.
Have you added python to the path setting? If you start a command prompt (cmd.exe, not IDLE and type python , what do you get? If you haven’t set the python path, see http://docs.python.org/2/using/windows.html or http://www.katsbits.com/tutorials/blender/setting-up-windows-python-path-system-variable.php. Just update the settings to the version of python you are using e.g c:\python27.
Get a text editor instead of using IDLE. textpad, textedit, vim, emacs ,context, geanie, sublime, and many many more. Or get an IDE. Aptana’s studio 3 is easy to use and free (eclipse with plugins already installed) or the free community version of pycharm.
How to get Windows 10 up and running on Mac using Boot Camp
Choosing between a Windows computer and a Mac can be a tough decision. Some users think they’ll be giving up features or apps they enjoyed on Windows when making the switch to Mac. Luckily, you can have the best of both worlds by running Windows on a Mac using Apple’s Boot Camp.
Why would you want to run Windows on an Apple machine in the first place? First of all, there’s quite a large number of programs and apps that only work on Windows, especially professional software. If you’re a gamer, you can’t go without Windows as the selection of games on macOS is extremely limited.
So why not just buy a Windows computer? Well Apple computers are known for their reliability and they hold their value very well compared to PCs. Some people still buy used Apple laptops that are a few years old, something almost unheard of for Windows laptops.
Mac owners can use Apple’s built-in Boot Camp Assistant to install Windows for free. The first-party assistant makes installation easy, but be forewarned that you will need to restart your Mac whenever you want to access the Windows provision.
Another option is Parallels Desktop, a third-party service that allows you to switch back and forth between macOS and Windows without having to reboot, but that product requires an annual subscription.
Before we begin installing Windows using Boot Camp, make sure you’re on an Intel-based Mac, have at least 55GB of free disk space on your startup drive, and have backed up all of your data.
The first thing we need is a Windows disc image file, or ISO. Use Google to search and find the «Download Windows 10 ISO» file page on Microsoft’s website. Once there, select «Windows 10,» and hit «Confirm.» Choose your language and select «64 bit» unless you’re running an older Mac that only supports 32 bit programs.
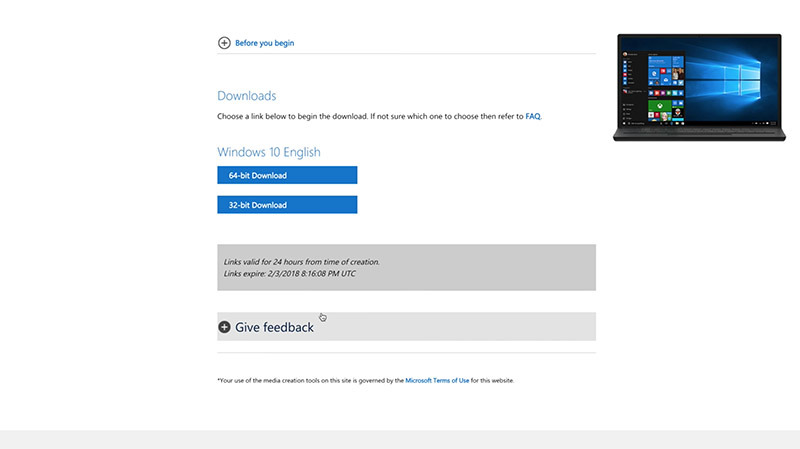
If you’re not sure, click the Apple logo at the upper-left hand corner of your Mac’s home screen and select «About this Mac.» If it says «Core Duo» in the processor section, then your Mac is 32-bit.
If you’re running OS X El Capitan 10.11 or later on a Mac, Windows installation is going to be a breeze since those models use the computer’s internal drive to temporarily store Windows installation files. If not, you’ll need to insert a blank 16GB or larger USB flash drive or external SSD to complete the installation.
Once your ISO file is done downloading, open Spotlight Search or Launchpad and search for «Boot Camp Assistant.»
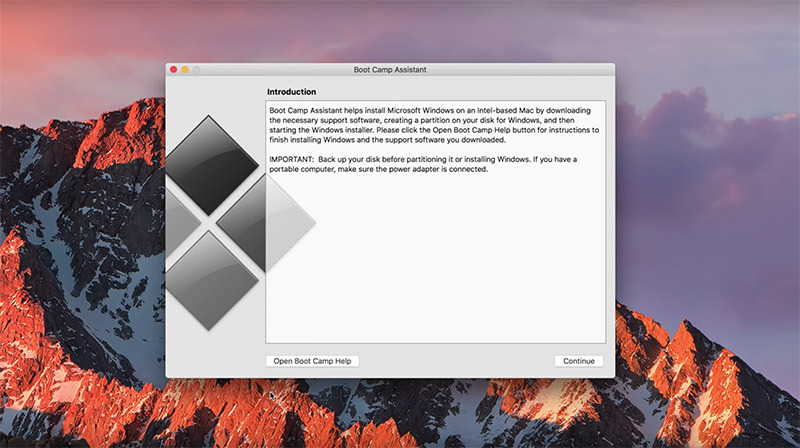
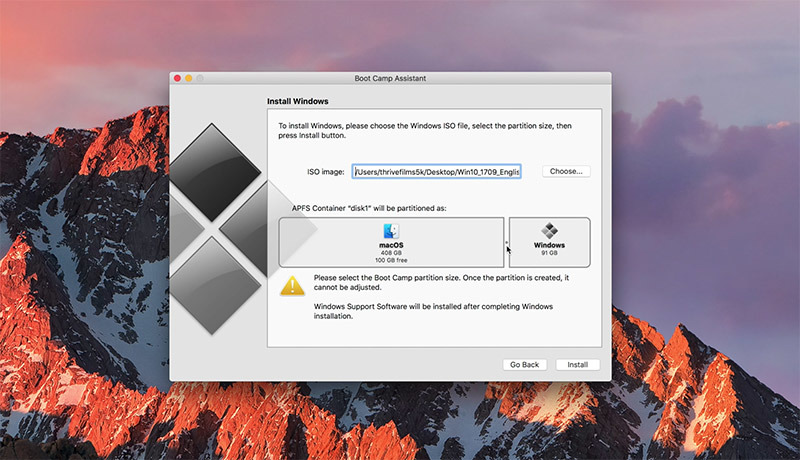
Click continue, then click choose and select your newly downloaded ISO file. Next, Boot Camp will ask you to adjust the size of your Windows partition. You should make it larger if you plan on downloading and playing games or using professional software.
If you’re on an older Mac operating system, you’ll see some options to create an install disk and download the latest Windows support software. Make sure all of them are checked, then click continue.
Now choose your ISO image file, and the destination disk, which is your USB Flash drive. Then click continue, choose the partition size for Windows 10, and click install.
If the installation is successful, the system will ask for your Mac’s password. Make sure to save any important documents or files, as your Mac will instantly restart into Windows once you enter your password.
After the reboot, you’ll be greeted with the windows setup menu. If your mouse isn’t working, click a couple of times and the mouse pointer should show up.
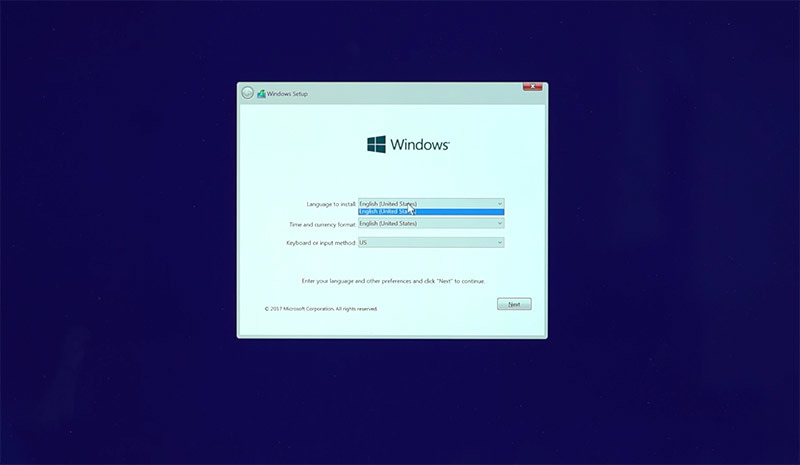
Click Next, then enter your Windows 10 activation key if you have it. If you don’t have one yet, click «I don’t have a product key.» In that case, choose which version of Windows 10 you want to install. We chose Windows 10 Home. Accept the terms and click next on the next page to begin the installation.
When it’s finished, Windows will automatically restart and bring you through the rest of the installation. Once at the Windows desktop, the boot camp installation program will show up. This will install all the necessary drivers for Windows to run properly.
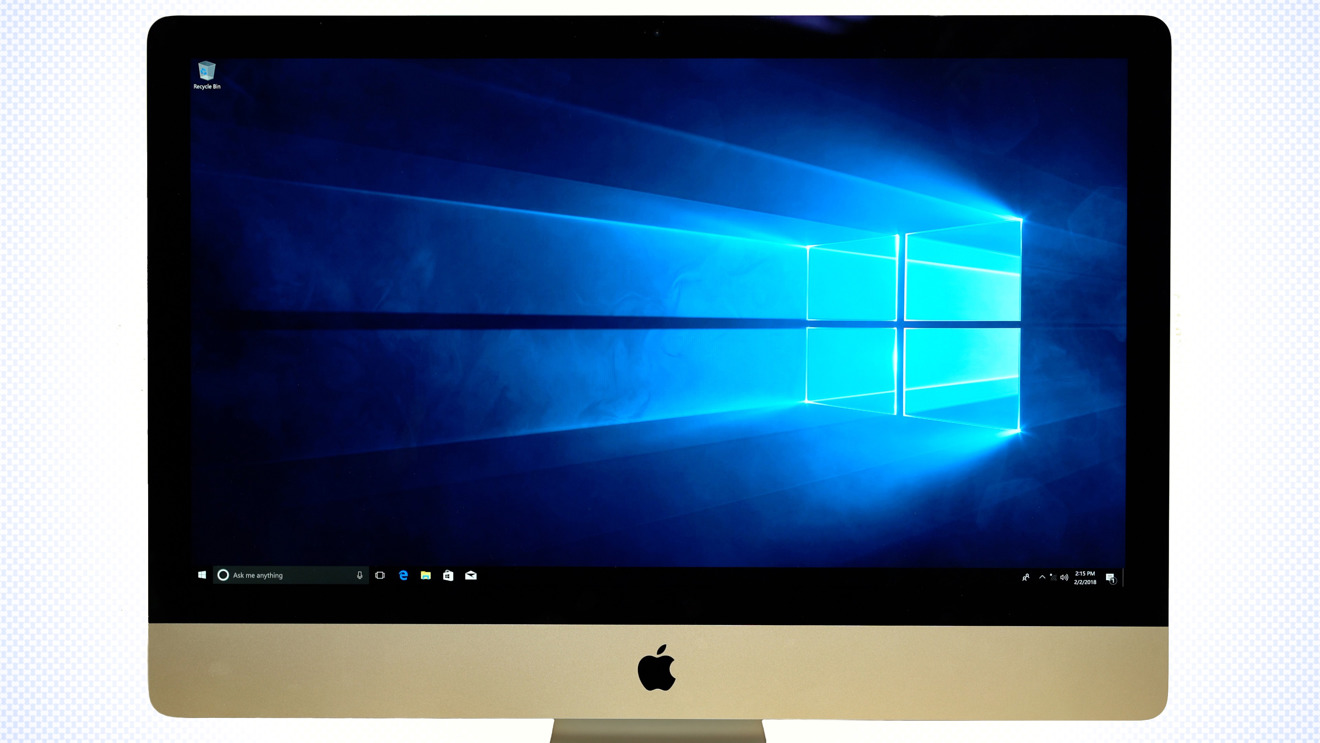
Your system will restart one more time and then Windows is ready for use!
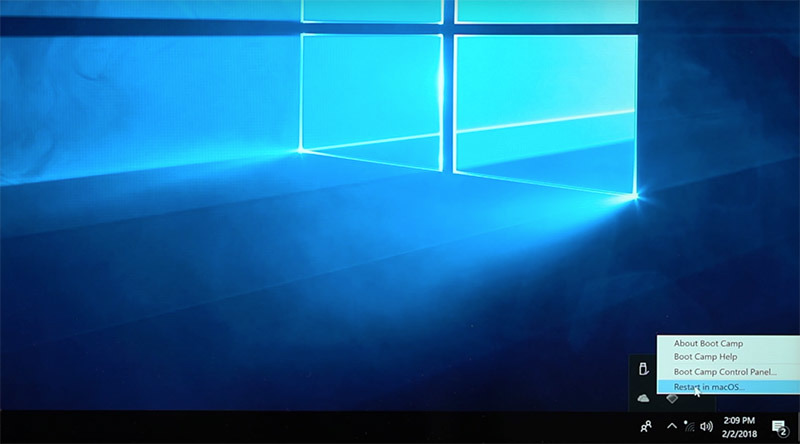
To get back to macOS, find boot camp at the bottom right hand corner of the screen, right click on it? And click «Restart in MacOS»
If you get an error message, don’t worry. Just restart your system while holding down the option key to choose which operating system to start up in.
To get back to Windows from macOS, you can either use the restart while holding the option key method, or you can use Spotlight search to open the Startup Disk settings. Click the lock and authenticate to unlock the settings, then click on Bootcamp, and click restart.
If you want to completely remove the Boot Camp partition, open Boot Camp Assistant again and click Restore. Just remember that this operation will delete all data and contents on the Windows partition.
AppleInsider has affiliate partnerships and may earn commission on products purchased through affiliate links. These partnerships do not influence our editorial content.
Comments (12)
cogitodexter
Parallels isn’t the only virtualisation application available for the Mac — you’ve also got VMWare Fusion, which is absolutely excellent and comes in two versions depending on what features you want and isn’t too expensive (I use it all the time). There’s also VirtualBox, which is free.
corradokid
According to Apple’s support page, not all 64-bit Macs support 64-bit Windows 10 via Bootcamp. The only ones that do are:
MacBook Pro (2012 and later), MacBook Air (2012 and later), MacBook (2015 and later), iMac Pro (2017), Mac (2012 and later), Mac mini (2012 and later), Mac mini Server (Late 2012), Mac Pro (Late 2013)
MacPro
Nice article. I’ve added Boot Camp and Windows 10 to a whole bunch of Macs ranging in age I would add that a MacBook Pro 2010 cannot use an iso insisting on using an optical disk. Each Mac seems to have different methodologies and some such as my Mac mini 2012 failed at the last stage due to an EFI issue according to the Windows installation setup. This I cured by actually removing the partition Boot Camp had created using Terminal and allowing Windows to see a area of ‘free space’ which it then formatted correctly and went well after that. All good fun but not one Mac I used was the same procedure. The easiest by far was a new Mac Pro cylinder which literally did everything unattended up to where the Windows welcome screen takes over.
I must say Windows 10 is very nice and simple to use after decades of hating Windows with a passion I actually enjoy using it, albeit only on a Mac and my Mac Pro cylinder runs Steam and the likes of GTA V very well indeed. One thing that I find annoying is the Home edition not supporting Remote Desktop which I use to access a headless Windows 10 WAMP server (a Mac mini). There is a free and extremely well done patch to fix this here that works flawlessly for anyone interested, you just run this on a Windows 10 Home edition to free up the actual genuine RDT that Microsoft suppressed on the Home edition: https://www.ctrl.blog/entry/how-to-rdpwrapper-win10-home
dewme
Since I’m not into gaming I’ve never found a need to use BootCamp but I understand where it fits in the mix. I’ve been using VMWare Fusion since it first arrived and in similar fashion to VMWare Workstation on Windows it works very well for Windows and Linux guests. As MacPro mentioned the free Windows Remote Desktop (RDP) is also an option for driving a remote Windows PC with very good performance compared to any VNC solution I’ve ever used. I’m always surprised at how well RDP works over WiFi/LAN using decade old PCs with Linux to drive Windows 10 Pro computers. Heck, even the iPhone/iPad Microsoft Windows Remote Desktop app works very well (for me) as RDP clients. I wish Apple had its own free Remote Desktop apps for macOS and iOS that worked as well as the Microsoft free solution.
macxpress
Ew Windows 10. Looks decent, operates like crap! Unfortunately, I have to use and support it daily.
I really wish Microsoft would decide to build a new OS from the ground up and stop piling crap on top of crap. I know its a huge project, but they can pull it off if done correctly.


