- How to Fix Linux Broken Pipe Errors
- Method 1: Inspecting the Typed Command
- Method 2: Recovering from Broken Pipe Errors Caused by File System Dysfunctions
- Fixing Broken Pipe Error With SSH Connection
- Fixing broken pipe error with SSH
- Method 1: Client side SSH configuration change
- Method 2: Server side SSH config change
- How to fix Broken Pipe Error in Linux
- Inspecting the Command
- Fixing a Problem with File System
- Afterwords
How to Fix Linux Broken Pipe Errors
While it’s quite rare, it’s possible that you’ll find yourself unable to install any packages at all in an otherwise seemingly stable installation of Linux. Debian, Ubuntu and those distributions derived from them rely on the apt-get package manager. Generally, if you have administrator superuser access, then typing apt-get install -f should install additional packages if needed. However, as rare as it is, you might get a message that reads dpk-deb: error and then proceeds to instruct that you have a broken pipe.
Usually the term broken pipe refers to a misuse of the character | at the command line, which is often called a pipe, especially to those with a background in MS-DOS. In this case, though, you might not have typed a command incorrectly. Rather, if you didn’t use the | character when typing the apt-get command, then you might have a problem involving your file system that forced a read-only mount. While it might seem embarrassing, the first step is to check and ensure you’ve typed the installation command correctly before proceeding. If there’s no problem, then the next step is to inspect the file system.
Method 1: Inspecting the Typed Command
While more than likely this isn’t the case, it’s important to make sure that you typed the installation command correctly before you assume the worst. Even the most elite programmers sometimes end up mistyping something, and it’s easy to type the | character by mistake. Don’t push up on the keyboard to recall the last command. Type it again individually. Try running apt-get install -f or apt-get update, since these commands aren’t destructive. If you still get the error after repeatedly reissuing it, then try rebooting the machine. If you still receive it, then you might be suffering from a file system problem. The broken pipe error message might be nothing more than a symptom of a bigger problem.
Method 2: Recovering from Broken Pipe Errors Caused by File System Dysfunctions
Should you be unable to fix it merely by typing the command over again, then pay special attention to whether or not you see some sort of an error that reads “Read-only file system” in the terminal output. This indicates that, for whatever reason, your boot partition is mounted as a read-only volume. Generally, this means it’s suffered some sort of file system problem and the GNU/Linux operating system doesn’t feel it’s safe to write to it. This safety mechanism means that while some data might be corrupt, Linux has done it’s best to salvage your install.

You might possibly receive some kind of strange message when you try to use the sudo command that is also caused by this same type of error. Such a message would begin with “sudo: unable to open” followed by the name of some resource. Since all resources in Unix are stored as files, a read-only partition mount might keep sudo from working.

If either of these cases is true, then you need to shutdown your system. If you have a pre-made USB drive with an ISO of a clean Linux install, then insert it and hold down whichever key your BIOS or UEFI system requires to boot from a removable device. Should you instead have a separate Linux partition on your boot drive, then you should access this through GRUB when you restart. In either case, you need to have a stable environment to work from that can access the damaged partition without booting from it.
Assuming you have some type of data that you haven’t backed up yet, then take this opportunity to back that data up to another partition or a removable device if Linux allows you to attach mounted devices in this state. Usually you can’t mount devices to a read-only file system, so you will have needed to reboot your system into a live USB or potentially DVD environment to perform backups. You’ll want to run the appropriate fsck command for the file system installed on your boot drive to restore it to a stable state. For instance, let’s assume you have a damaged /dev/sda1 partition that you formatted with an ext4 file structure. If that’s the case, then from a root terminal inside of the live USB or DVD environment you could issue fsck.ext4 -fv /dev/sda1 to check the file system. You can also use fsck.ext2 or fsck.ext3 if you booted from either of these two types of ext file system. In theory, all three of these call the e2fsck program anyway, and may just be soft links.
This will provide verbose output and force it to scan even if it appears clean. You may be interested in using -c or -ck to run a surface scan with the badblocks program in case you suspect that there was some sort of geometry problem with the disk. Once you’ve run the program, reboot from the partition if it’s stable and then issue the sudo mount -o rw,remount / command from a terminal inside this boot to restore read-write access. You’ll need root access to look in the /lost+found directory, but it’s important you do since fsck.ext# might have put some lost clusters there. If you’re missing files once you’re back inside of your GNU/Linux install, then they might be here, though they’ll be renamed. Use the file command in the terminal to tell which type each is if at all possible.
If you don’t have a live USB or DVD to boot from, then you’ll need to make one from a clean machine from an ISO downloaded for a distribution of Linux. Since you’re only using terminal commands, you might not even need a boot device for your distribution. Some, like KNOPPIX, are designed explicitly for fixing problems like this. If you’re working with a netbook or laptop that features an SD or microSD card slot, then you could also boot from an ISO burned to an SDHC or microSDHC card. The same goes for, say, Ubuntu tablets that have such a slot.
Источник
Fixing Broken Pipe Error With SSH Connection
If you use SSH to connect to remote Linux servers, you’ll notice that if you keep your SSH session inactive for some time and then try to use it again, the SSH session disconnects with an error message like this:
On some systems, it will display ‘Write failed: Broken pipe’ or ‘Connection closed by remote host’.
Let’s see what causes this error and how to go about keeping your SSH connection alive.
Fixing broken pipe error with SSH
As you may have guessed, the SSH connection is closed because of inactivity. There is no set value but it usually around 5 minutes or so.
What you can do to avoid the SSH session disconnection is to send an ‘alive message’ either from the server to client ( ClientAliveInterval ) or from client to server ( ServerAliveInterval ) at certain time interval.
This way, you keep the SSH session alive because there is a communication between the client and server and the server understands that client is still there.
Now, there are two ways to do that. Either you send the alive message from the client to the server or from the server to the client.
- If you connect to multiple servers via SSH, set it on your machine.
- If you are a sysadmin and several of users complain about frequent SSH connection disconnect, you may set it on the server.
Method 1: Client side SSH configuration change
Let’s say you want to keep your SSH connection alive with up to 10 minutes (600 seconds) of idle time.
While connecting to the remote Linux system through SSH, you can mention the ServerAliveInterval value like this:
Now, this thing work but manually entering this option each time you connect to the server is tiresome. Why not make it permanent?
I hope you are aware of the SSH config files. On the client side, you can take advantage of it to set certain SSH parameters for specific connections or all of them. I have explained SSH config file in detail here.
First, make sure that you have the ssh config file. If not create it:
It is important to give it the correct file permissions otherwise you’ll have permission denied error while connecting via SSH.
Use the chmod command and add the following file permission to it:
If you’re feeling lazy or don’t want to go in detail, use this command to set the alive interval to 600 seconds (10 minutes):
This will set the ServerAliveInterval value to 10 minutes for all SSH connection you’ll use. Give it a try if you want to.
If you want to make it more proper, you should add it like this:
Method 2: Server side SSH config change
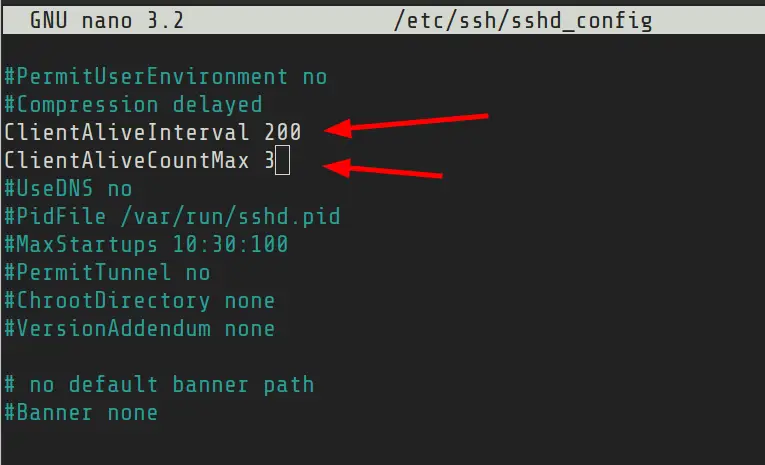
The SSH config file for the server is usually located at /etc/ssh/sshd_config.
If you open this file, you’ll find two parameters of interest here:
- ClientAliveInterval : This is the inactivity time period after which the server will send an alive message to the ssh connected client.
- ClientAliveCountMax : This is the number of attempts the server will make to send the alive message.
Say, you set ClientAliveInterval to 200 seconds and ClientAliveCountMax to 3. This means the server will send alive message after 200 seconds. If there is no activity from the client, it will again send an alive message at 400 seconds. No response/activity from the client and another alive message is sent at 600 seconds. After this (600 seconds) the SSH connection is disconnected.
You can edit the /etc/ssh/sshd_config file in your favorite terminal based text editor like Vim. Look for ClientAliveInterval and ClientAliveCountMax entries. Remove the # key at the beginning of the lines and give them the appropriate value.
Save and exit the file.
Please do not set the SSH connection timeout to several hours. That would be a waste of resources.
I hope this tutorial helped you to fix the broken pipe error issue with SSH connection. Your feedback is welcome.
Источник
How to fix Broken Pipe Error in Linux
Have you ever encountered a situation in which you were unable to download any package on your Linux machine ? Or you might have probably seen an error like package not installed? This kind of error can easily be fixed with a command like “sudo apt install –f”. On rare occasions, you may have experienced a broken pipe error.
A pipe in Linux / Unix connects two processes , one of them has read-end of the file and the other one has the write-end of the file. When a process writes to a Pipe, it gets stored in a buffer and gets retrieved by the other process. Broken pipe occurs when a process prematurely exits from either end and the other process has not yet closed the pipe.
Example use case:
A user has just recently reinstalled RVM (Ruby Version Manager) after he performed a fresh install of Ubuntu.
He then opened up the terminal and issued the command:
type rvm | head -1
This issued the following error:
rvm is a function -bash: type: write error: Broken pipe
What happened here is that when the user runs the command type rvm | head -1 , bash has actually executed type rvm in one process and head -1 in another process. The stdout of the type part is connected to the “write” end of a pipe whereas the stdin of the head part is hooked up to the “read” end. Note that the two processes have run concurrently ( at the same time ).
The head -1 process has carried out a read operation of data from stdin , then prints out a single line (as dictated by the -1 option) before exiting, causing therefore the “read” end of the pipe to be closed. Since the rvm function has quite a long data stream (about 11 kB after having been bash parsed and reconstructed), which means that head exits yet at the same time type still has some data to write out (few KB).
Since type is trying to carry out a write operation to a pipe whose other end has therefore been closed – a brokenpipe routine or the write() function that it invoked, will return an EPIPE error which is known as “Broken pipe”.
Inspecting the Command
In most cases, this might not be the case but the first step you should check is whether the command issued was right or not. You should reissue the command and check whether it gets executed or not. You can also try issuing commands like “sudo apt update” and “sudo apt install –f” as these commands are not destructive in nature. If your problem still persists, try rebooting the machine and see whether the problem was resolved or not.
Fixing a Problem with File System
When you have issued the commands mentioned earlier multiple times and you still get the error, check whether the error reads something like “read-only file system” in the terminal output. This may be caused when your boot partition gets mounted as read-only for some reason. The problem could be caused by some faulty software installation when the system decides that it is not safe to write to the drive.
The other cause might be when you try to install something from apt and the installer needs to access some resource in read mode, but cannot perform the read operation properly. It may throw an error like “sudo: cannot mount”. This error occurs because most of the ‘entities’ in Linux are files and in order to read a resource, Linux would need to open that file and read it. If however another process is currently using that resource, then it may not be possible to read the file. Also, when the reading process exits abruptly and does not close the file, it may corrupt the file until the next boot.
If you still cannot access the files even after rebooting, then the problem could be bigger than anticipated. You may have a broken file system. To resolve this issue, you may need a stable Linux environment in order to work on the broken system. The best way to do this is to boot from a Live Linux USB drive and work from it.
This is the right moment to backup all your data. Although the following steps are safe, you should make sure to store your data on a secure device.
Once you boot into a Live USB drive you should start to check for the partitions with a corrupt file system. To do so, issue the following command:
sudo fsck.ext4 -fv /dev/sdaX”
Note that here X stands for the partition that you are trying to scan. Note that this command is for partitions of type ext4. If you have a partition of type ext3 or ext2 you will need to replace the command with “fsck.ext3” and “fsck.ext2” respectively. This will scan your drive and print the output on the terminal (note the -v flag). Alternatively, you can specify a -c flag to surface-scan the drive; it will look for bad sectors on the drive.
Once you have done this, your partition should hopefully been fixed. Now Boot into your machine and issue the command:
sudo mount -o rw,remount /
This will restore the read/write permission on your drive and will therefore solve the broken pipe issue.
Afterwords
You have just seen one solution to resolve the broken pipe issue, but a broken pipe is not a problem, it could be a symptom of a larger problem more often than not. You can have a broken pipe whenever you are trying to read a stream like resource that gets closed prematurely. .
If you like the content, we would appreciate your support by buying us a coffee. Thank you so much for your visit and support.
Источник


