- CMake — создание динамических библиотек
- Введение
- Динамические библиотеки. Теория
- Динамические библиотеки. Практика
- Writing Shared Libraries With D On Linux
- Statically Linking C
- Statically Loading a Shared library in C
- Dynamically Loading a Shared library in C
- Dynamically Loading a C++ Shared library in C
- Statically Linking D Program With libphobos2.a
- Statically Linking D Program With libphobos2.so
- Creating a D Shared Library and Statically Linking With libphobos2.so
- Dynamically Loading a C++ DLL From a D Program
- Dynamically Loading a D DLL From a C Program
- Dynamically Loading a D DLL From a D Program
- Build dll on linux
- How to Use the Dynamic Link Library in C++ Linux (gcc compiler)?
- Creating *.so on Windows
- How to Use the Dynamic Link Library in C++ Linux (gcc compiler)?
- Build dll on linux
CMake — создание динамических библиотек
Введение
CMake (от англ. cross platform make) — это кроссплатформенная система автоматизации сборки программного обеспечения из исходного кода.
CMake не занимается непосредственно сборкой, a лишь генерирует файлы управления сборкой из файлов CMakeLists.txt.
Динамические библиотеки. Теория
Создание динамических библиотек со статической линковкой в ОС Windows отличается от ОС GNU/Linux.
На ОС Windows для этого требуется связка .dll (dynamic link library) + .lib (library) файлов.
На ОС GNU/Linux для этого нужен всего лишь один .so (shared object) файл.
Динамические библиотеки. Практика
На практике хочется писать удобный, одинаковый код на обеих ОС.
В каждом проекте (или на несколько проектов одна) присутствовала условная компиляция:
Соответственно, для каждого экспортируемого класса из библиотеки необходимо прописать данный макрос:
В данном случае, на ОС Windows экспортируются все классы/методы, которые помечены данным макросом, а на ОС GNU/Linux, по умолчанию, всё экспортируется, т.к. нет макроса для скрытия классов/методов.
С выходом CMake версии 3.4.0, стало возможным создание библиотек с классами, которые экспортируются по умолчанию. Для этого в каждой цели (target), которые объявлены как SHARED (динамическая библиотека), необходимо включить свойство:
Пример небольшой библиотеки:
И убрать определение и использование макросов из кода:
Данное свойство автоматически создает module definition (.def) со всеми глобальными символами из .obj файла для динамической библиотеки на ОС Windows.
Далее данный файл (.def) передается компоновщику для создания .lib файла. На выходе на ОС Windows получается связка .lib + .dll
Источник
Writing Shared Libraries With D On Linux
For comparison purposes and looking at the mechanics, here’s how it’s done in C first.
Statically Linking C
To statically link a C module with a C program,
main.c: dll.c: Build: Results:
Statically Loading a Shared library in C
(The source files, run, and results should be identical.)
-rpath is used to embed the path to libdll.so into main, so that it can be found at runtime. Other ways to do it are (but are not discussed further here):
- Setting the environment variable LD_LIBRARY_PATH.
- Copy shared library to a standard location and use ldconfig to modify ld.so.
Dynamically Loading a Shared library in C
Add code to main.c to load the library at runtime:
main.c: Build: Results:
Dynamically Loading a C++ Shared library in C
The complication here is noting when the shared library’s static constructors and destructors are run. Instrument dll.c, which is now C++ code, with those static constructors and destructors:
dll.c: Build: Results:
Statically Linking D Program With libphobos2.a
Statically Linking D Program With libphobos2.so
Creating a D Shared Library and Statically Linking With libphobos2.so
When using D shared libraries, the code must be linked with libphobos2.so, not libphobos2.a. This is so that there will be only one instance of the garbage collector.
Dynamically Loading a C++ DLL From a D Program
Dynamically Loading a D DLL From a C Program
Note that libphobos2.so gets automatically dynamically loaded as well.
Dynamically Loading a D DLL From a D Program
It is important to link the main program with libphobos2.so, not libphobos2.a. Otherwise, the result will be multiple instances of the D runtime conflicting with each other.
main.d: Build: Results:
Note how the DLL’s static constructors are called before dlopen() returns, and the static destructors are called by dlclose().
Источник
Build dll on linux
Copy raw contents
Copy raw contents
gRPC C++ — Building from source
This document has detailed instructions on how to build gRPC C++ from source. Note that it only covers the build of gRPC itself and is mostly meant for gRPC C++ contributors and/or power users. Other should follow the user instructions. See the How to use instructions for guidance on how to add gRPC as a dependency to a C++ application (there are several ways and system wide installation is often not the best choice).
If you plan to build using CMake
If you are a contributor and plan to build and run tests, install the following as well:
On a Mac, you will first need to install Xcode or Command Line Tools for Xcode and then run the following command from a terminal:
To build gRPC from source, you may need to install the following packages from Homebrew:
If you plan to build using CMake, follow the instructions from https://cmake.org/download/
Tip: when building, you may want to explicitly set the LIBTOOL and LIBTOOLIZE environment variables when running make to ensure the version installed by brew is being used:
To prepare for cmake + Microsoft Visual C++ compiler build
- Install Visual Studio 2015 or 2017 (Visual C++ compiler will be used).
- Install Git.
- Install CMake.
- Install nasm and add it to PATH ( choco install nasm ) — required by boringssl
- (Optional) Install Ninja ( choco install ninja )
Clone the repository (including submodules)
Before building, you need to clone the gRPC github repository and download submodules containing source code for gRPC’s dependencies (that’s done by the submodule command or —recursive flag). Use following commands to clone the gRPC repository at the latest stable release tag
NOTE: The bazel build tool uses a different model for dependencies. You only need to worry about downloading submodules if you’re building with something else than bazel (e.g. cmake ).
Build from source
In the C++ world, there’s no «standard» build system that would work for in all supported use cases and on all supported platforms. Therefore, gRPC supports several major build systems, which should satisfy most users. Depending on your needs we recommend building using bazel or cmake .
Building with bazel (recommended)
Bazel is the primary build system for gRPC C++ and if you’re comfortable with using bazel, we can certainly recommend it. Using bazel will give you the best developer experience as well as faster and cleaner builds.
You’ll need bazel version 1.0.0 or higher to build gRPC. See Installing Bazel for instructions how to install bazel on your system. We support building with bazel on Linux, MacOS and Windows.
From the grpc repository root
NOTE: If you are gRPC maintainer and you have access to our test cluster, you should use the our gRPC’s Remote Execution environment to get significant improvement to the build and test speed (and a bunch of other very useful features).
Building with CMake
Linux/Unix, Using Make
Run from grpc directory after cloning the repo with —recursive or updating submodules.
If you want to build shared libraries ( .so files), run cmake with -DBUILD_SHARED_LIBS=ON .
Windows, Using Visual Studio 2015 or 2017
When using the «Visual Studio» generator, cmake will generate a solution ( grpc.sln ) that contains a VS project for every target defined in CMakeLists.txt (+ few extra convenience projects added automatically by cmake). After opening the solution with Visual Studio you will be able to browse and build the code.
Using gRPC C++ as a DLL is not recommended, but you can still enable it by running cmake with -DBUILD_SHARED_LIBS=ON .
Windows, Using Ninja (faster build).
Please note that when using Ninja, you will still need Visual C++ (part of Visual Studio) installed to be able to compile the C/C++ sources.
Using gRPC C++ as a DLL is not recommended, but you can still enable it by running cmake with -DBUILD_SHARED_LIBS=ON .
Windows: A note on building shared libs (DLLs)
Windows DLL build is supported at a «best effort» basis and we don’t recommend using gRPC C++ as a DLL as there are some known drawbacks around how C++ DLLs work on Windows. For example, there is no stable C++ ABI and you can’t safely allocate memory in one DLL, and free it in another etc.
That said, we don’t actively prohibit building DLLs on windows (it can be enabled in cmake with -DBUILD_SHARED_LIBS=ON ), and are free to use the DLL builds at your own risk.
- you’ve been warned that there are some important drawbacks and some things might not work at all or will be broken in interesting ways.
- we don’t have extensive testing for DLL builds in place (to avoid maintenance costs, increased test duration etc.) so regressions / build breakages might occur
gRPC’s CMake build system has two options for handling dependencies. CMake can build the dependencies for you, or it can search for libraries that are already installed on your system and use them to build gRPC.
This behavior is controlled by the gRPC_ _PROVIDER CMake variables, e.g. gRPC_CARES_PROVIDER . The options that these variables take are as follows:
- module — build dependencies alongside gRPC. The source code is obtained from gRPC’s git submodules.
- package — use external copies of dependencies that are already available on your system. These could come from your system package manager, or perhaps you pre-installed them using CMake with the CMAKE_INSTALL_PREFIX option.
For example, if you set gRPC_CARES_PROVIDER=module , then CMake will build c-ares before building gRPC. On the other hand, if you set gRPC_CARES_PROVIDER=package , then CMake will search for a copy of c-ares that’s already installed on your system and use it to build gRPC.
Install after build
Perform the following steps to install gRPC using CMake.
- Set -DgRPC_INSTALL=ON
- Build the install target
The install destination is controlled by the CMAKE_INSTALL_PREFIX variable.
If you are running CMake v3.13 or newer you can build gRPC’s dependencies in «module» mode and install them alongside gRPC in a single step. Example
If you are building gRPC
You can use CMake to cross-compile gRPC for another architecture. In order to do so, you will first need to build protoc and grpc_cpp_plugin for the host architecture. These tools are used during the build of gRPC, so we need copies of executables that can be run natively.
You will likely need to install the toolchain for the platform you are targeting for your cross-compile. Once you have done so, you can write a toolchain file to tell CMake where to find the compilers and system tools that will be used for this build.
This toolchain file is specified to CMake by setting the CMAKE_TOOLCHAIN_FILE variable.
A note on SONAME and its ABI compatibility implications in the cmake build
Best efforts are made to bump the SONAME revision during ABI breaches. While a change in the SONAME clearly indicates an ABI incompatibility, no hard guarantees can be made about any sort of ABI stability across the same SONAME version.
Building with make on UNIX systems (deprecated)
NOTE: make used to be gRPC’s default build system, but we’re no longer recommending it. You should use bazel or cmake instead. The Makefile is only intended for internal usage and is not meant for public consumption.
From the grpc repository root
NOTE: if you get an error on linux such as ‘aclocal-1.15: command not found’, which can happen if you ran ‘make’ before installing the pre-reqs, try the following:
A note on protoc
By default gRPC uses protocol buffers, you will need the protoc compiler to generate stub server and client code.
If you compile gRPC from source, as described above, the Makefile will automatically try compiling the protoc in third_party if you cloned the repository recursively and it detects that you do not already have ‘protoc’ compiler installed.
Источник
How to Use the Dynamic Link Library in C++ Linux (gcc compiler)?
The Dynamic Link Library (DLL) is stored separately from the target application and shared among different applications, compared to Static Library. The DLL is the file extension on Windows while on Linux, it is *.so (Shared Object).
The *.so/*.dll can be loaded right before the application starts or during the application’s runtime. On Windows, the Win32 API LoadLibrary is used while on Linux gcc compiler, the dlopen function is used.
Creating *.so on Windows
There are many ways and many languages to create a *.so on Linux e.g. You can write a C or C++ source code and compile it with the following command:
Example hello.c that exports the hello function:
Let’s do this slightly differently. In this post, we learn that you can now use Delphi to compile the source code into Linux 64-bit Server native code directly.. So, let’s do this by creating a tiny Delphi DLL/*.so library. This library exports a single function that takes a double and returns its double value.
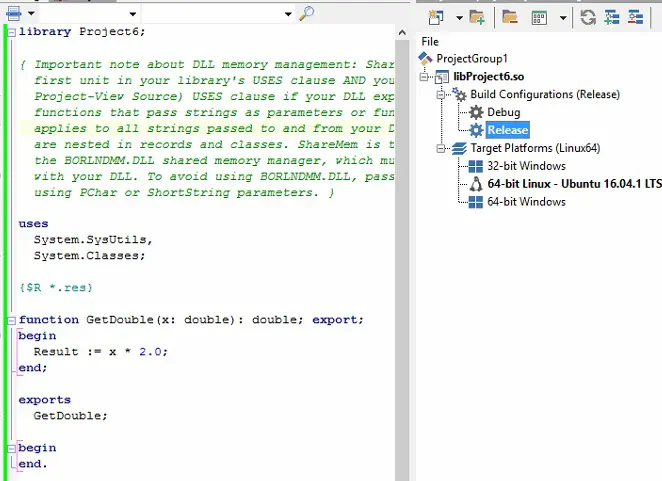
And, as you hit F9 to build, you will have the libProject6.so file, the Linux *.so library (if you change target platform to Windows, the code will be compiled into Project6.dll automatically, that is the beauty of the Delphi IDE).
How to Use the Dynamic Link Library in C++ Linux (gcc compiler)?
Copy the file to Ubuntu and create the following C/C++ source code in the same directory.
The RTLD_LAZY resolves undefined symbols when code from the dynamic library is executed, which is faster to open. Alternatively, RTLD_NOW resolves all undefined symbols before dlopen returns and fails if this cannot be done.
Compile the source code using (-ldl, the Interfaces for Dynamic Loader):
Источник
Build dll on linux
Porting Windows Dynamic Link Libraries to Linux
This repository contains a library that allows native Linux programs to load and call functions from a Windows DLL.
As a demonstration, I’ve ported Windows Defender to Linux.
How does it work?
The peloader directory contains a custom PE/COFF loader derived from ndiswrapper. The library will process the relocations and imports, then provide a dlopen -like API. The code supports debugging with gdb (including symbols), basic block coverage collection, and runtime hooking and patching.

The intention is to allow scalable and efficient fuzzing of self-contained Windows libraries on Linux. Good candidates might be video codecs, decompression libraries, virus scanners, image decoders, and so on.
- C++ exception dispatch and unwinding.
- Loading additional symbols from IDA.
- Debugging with gdb (including symbols), breakpoints, stack traces, etc.
- Runtime hooking and patching.
- Support for ASAN and Valgrind to detect subtle memory corruption bugs.
If you need to add support for any external imports, writing stubs is usually quick and easy.
Distributed, scalable fuzzing on Windows can be challenging and inefficient. This is especially true for endpoint security products, which use complex interconnected components that span across kernel and user space. This often requires spinning up an entire virtualized Windows environment to fuzz them or collect coverage data.
This is less of a problem on Linux, and I’ve found that porting components of Windows Antivirus products to Linux is often possible. This allows me to run the code I’m testing in minimal containers with very little overhead, and easily scale up testing.
This is just personal opinion, but I also think Linux has better tools. ¯\_(ツ)_/¯
MsMpEng is the Malware Protection service that is enabled by default on Windows 8, 8.1, 10, Windows Server 2016, and so on. Additionally, Microsoft Security Essentials, System Centre Endpoint Protection and various other Microsoft security products share the same core engine.
The core component of MsMpEng responsible for scanning and analysis is called mpengine. Mpengine is a vast and complex attack surface, comprising of handlers for dozens of esoteric archive formats, executable packers, full system emulators for various architectures and interpreters for various languages. All of this code is accessible to remote attackers.
To build the test client, simply type make .
Note that the .i686 or :i386 suffixes are important, we need the 32bit libraries to use the 32bit dll.
| Fedora / RedHat | Ubuntu / Debian | Comment |
|---|---|---|
| glibc-devel.i686 | libc6-dev:i386 / libc6-dev-i386 | Name varies with version. |
| libgcc.i686 | gcc-multilib | |
| readline-devel.i686 | libreadline-dev:i386 | Optional, used in mpscript. |
| cabextract | cabextract | Used to extract definitions. |
You will need to download the 32-bit antimalware update file from this page:
This should be a direct link to the right file:
This will download a file called mpam-fe.exe , which is a cabinet file that can be extracted with cabextract . Extract the files into the engine directory:
If you want to know which version you got, try this:
The main mpengine loader is called mpclient , it accepts filenames to scan as a parameter.
There are some other sample tools, mpstreamfuzz and mpscript .
If you want to debug a crash, single step through a routine or set breakpoints, follow these examples. First, you need a map file from IDA.
Microsoft doesn’t release public symbols for every build, and sometimes the symbols lag behind for a few months after release. Make sure you’re using an mpengine version with public symbols available.
Use the following sample commandline to generate map and idb files.
If you generate the map files on Windows, you’ll get CRLF line terminators, fix them like this:
When you run mpclient under gdb, it will detect a debugger and print the commands you need to enter to teach gdb about the symbols:
If you enter the commands it shows into gdb, you will have symbols available.
Note that genmapsym.sh assumes you’re using GNU awk.
Then you can continue, and it will run as normal.
Breakpoints, watchpoints and backtraces all work as normal, although it may be more reliable to use hardware breakpoints than software breakpoints.
To use hardware breakpoints in gdb, you just use hb or hbreak instead of break . Note that you only get a limited number of hardware breakpoints.
What about Wine and Winelib?
This project does not replace Wine or Winelib.
Winelib is used to port Windows C++ projects to Linux, and Wine is intended to run full Windows applications. This project is intended to allow native Linux code to load simple Windows DLLs.
The closest analogy would be ndiswrapper but for userspace.
Источник


