- Configuring CMake to build OpenCV on Windows
- General procedure
- Configuration details
- BUILD group
- ENABLE group
- INSTALL group
- MATLAB group
- OPENCV group
- WITH group
- Intel TBB
- SSARCandy / opencv_with_cmake.md
- This comment has been minimized.
- mosharaf13 commented Dec 13, 2017
- This comment has been minimized.
- AyOne commented Dec 16, 2017
- This comment has been minimized.
- momonala commented Feb 22, 2018
- This comment has been minimized.
- TILhub commented Mar 20, 2018
- This comment has been minimized.
- MrfksIv commented Mar 31, 2018
- Installation by Using the Pre-built Libraries
- Installation by Using git-bash (version>=2.14.1) and cmake (version >=3.9.1)
- Installation by Making Your Own Libraries from the Source Files
- Building the library
- Set the OpenCV environment variable and add it to the systems path
Configuring CMake to build OpenCV on Windows
General procedure
Start the GUI version of CMake (cmake-gui).
Select the folder C:\OpenCV\sources as the source directory.
Select the folder C:\OpenCV\builds as the build directory.
Enable the Grouped and Advanced checkboxes just below the build directory name. These will impact the way the packages information will be displayed in the CMake GUI in the following steps.
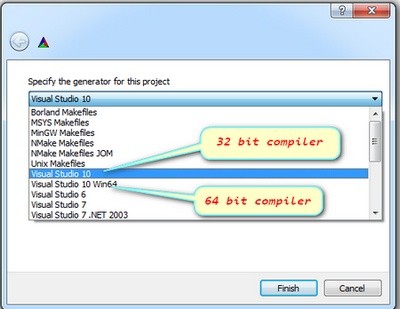
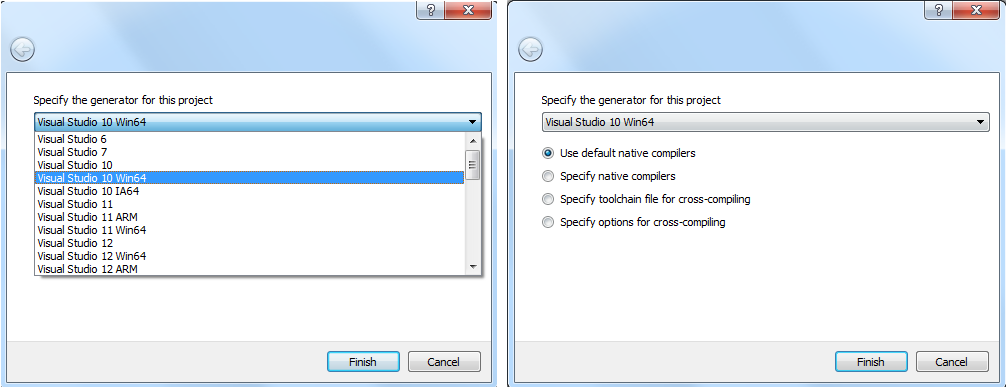
Press the “Configure” button. A window pops up, letting you specify the compiler (and IDE) you want to use. Pick Visual Studio 10, 32-bit or 64-bit according to your Matlab version. Select also “Use default native compilers” and click Finish.
In case you would like to redo all the steps from the beginning (if you made a mistake somewhere, for instance), you can clear CMake cache in the menu option “File > Delete Cache”.
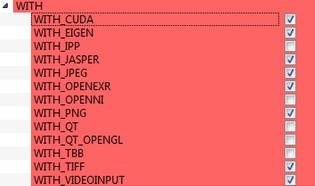
CMake will start out and based on your system variables will try to automatically locate as many packages as possible. You can modify the packages to use for the build in the WITH > WITH_X menu points (where X is the package abbreviation).
Configure CMake until all the elements are found. Follow the instructions below.
If you don’t need it, you might want to deactivate the Python module both in 32-bit and 64-bit versions since it might not build correctly.
Once you are comfortable with your CMake configuration, press Generate and close CMake.
Here is an alternate version of those instructions, but it does not goes as deep in the details as this tutorial: http://seevisionc.blogspot.co.uk/2014/03/compiling-opencv-30-with-matlab-support.html.
Configuration details
BUILD group
Activate everything except:
- BUILD_CUDA_STUBS
- BUILD_DOCS
- BUILD_OPENEXR
- BUILD_TBB
- BUILD_WITH_DYNAMIC_IPP
- BUILD_opencv_apps
- BUILD_opencv_python2
- BUILD_opencv_python3
- BUILD_opencv_ts
- BUILD_opencv_world
For more info about what each OpenCV module does, please visit http://docs.opencv.org/.
To build the doc, Doxygen must be installed. This is why I disabled it, because the doc is easily accessible online anyway.
The Python interface does not build properly on my machine, this is why I have disabled both items about Python. However, feel free to enable the one corresponding to your Python installation (python2 or python3).
ENABLE group
Make sure to check ENABLE_SOLUTION_FOLDERS.
INSTALL group
Check INSTALL_C_EXAMPLES and INSTALL_TESTS.
MATLAB group
Make sure every field is populated here (should be the case automatically).
OPENCV group
Complete the entry OPENCV_EXTRA_MODULES_PATH with the path to the extra modules: C:\OpenCV\contrib\modules .
WITH group
Activate the following items (15 in total):
- WITH_DIRECTX
- WITH_DSHOW
- WITH_EIGEN
- WITH_FFMPEG
- WITH_IPP
- WITH_JASPER
- WITH_JPEG
- WITH_OPENCL
- WITH_OPENCLAMDBLAS
- WITH_OPENCLAMDFFT
- WITH_PNG
- WITH_TBB
- WITH_TIFF
- WITH_VFW
- WITH_WIN32UI
Intel TBB
From CMake, configure one time OpenCV (should already be done).
Be careful NOT enabling BUILD_TBB: the automatic downloading and building of OpenCV failed miserably for me despite many efforts. If you had previously enabled BUILD_TBB, my suggestion is to restart from the beginnning, clearing cmake cache.
Configure a second time OpenCV.
Then a new group should appear (in red), named “Ungrouped Entries”. If the TBB include directory is not found, this group will have the option “TBB_INCLUDE_DIRS” with the value “TBB_INCLUDE_DIRS-NOTFOUND”.
Click on the value and then on the tiny button ”. ” appearing on the right-side of the field. Provide the path to the TBB headers, which should be C:\OpenCV\tbb\include .
When done, press the “Configure” button again.
Now, CMake should have been able to locate the TBB headers (include dir). Therefore, a new group “TBB” should appear in the interface. If it is not the case, then retry to locate the TBB headers. They should lie in some include directory within the tbb folder.
In the “TBB” group, there are two new variables whose default values are correct. Note that the value of TBB_LIB_DIR depends on your compiler.
The “TBB” group is now complete. Here are the three variables it contains with their values:
SSARCandy / opencv_with_cmake.md
Setting up OpenCV with Cmake GUI
- Download OpenCV and Cmake
- Build opencv with cmake


- Press configure , choose visual studio 2015 , finish
- Then press generate
- Open OpenCV.sln under build/
- Build it using Debug , Release

- right click > build
- switch to Release mode and build again
- [Windows] Setting up environment variable
- add /bin into PATH
- add new env named OpenCV_DIR , value as /build
- it may need logout to apply setting, you can check it by echo %PATH% , echo %OpenCV_DIR%

Build with EXTRA MODULES
- In step 2. Build opencv with cmake , press configure
- Set up OPENCV_EXTRA_MODULES_PATH to proper path( /modules )
- Press configure again, then generate

To see more details instructions, see opencv_contrib README
This comment has been minimized.
Copy link Quote reply
mosharaf13 commented Dec 13, 2017
followd all the steps above.now after creating a new project on my vs17 how can i link my «opencv» with that project?
This comment has been minimized.
Copy link Quote reply
AyOne commented Dec 16, 2017
Same question as mosharaf13
This comment has been minimized.
Copy link Quote reply
momonala commented Feb 22, 2018
Same question as Ay00One
This comment has been minimized.
Copy link Quote reply
TILhub commented Mar 20, 2018
Worst tutorial ever
This comment has been minimized.
Copy link Quote reply
MrfksIv commented Mar 31, 2018
@TILhub @momonala after a bit of digging in the microsoft docs I found how to include opencv to a new project.
In the solution explorer, right-click on Solution ‘OpenCV’ > Add > New Project.
You can’t perform that action at this time.
You signed in with another tab or window. Reload to refresh your session. You signed out in another tab or window. Reload to refresh your session.
Installation by Using the Pre-built Libraries
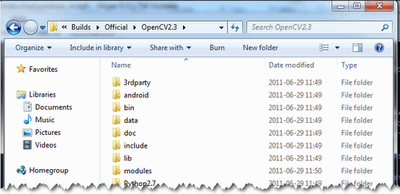
You can check the installation at the chosen path as you can see below.
Installation by Using git-bash (version>=2.14.1) and cmake (version >=3.9.1)
- You must download cmake (version >=3.9.1) and install it. You must add cmake to PATH variable during installation
- You must install git-bash (version>=2.14.1). Don’t add git to PATH variable during installation
- Run git-bash. You observe a command line window. Suppose you want to build opencv and opencv_contrib in c:/lib
- In git command line enter following command (if folder does not exist) :
Installation by Making Your Own Libraries from the Source Files
You may find the content of this tutorial also inside the following videos: Part 1 and Part 2, hosted on YouTube.
These videos above are long-obsolete and contain inaccurate information. Be careful, since solutions described in those videos are no longer supported and may even break your install.
If you are building your own libraries you can take the source files from our Git repository.
Building the OpenCV library from scratch requires a couple of tools installed beforehand:
- An IDE of choice (preferably), or just a CC++ compiler that will actually make the binary files. Here we will use the Microsoft Visual Studio. However, you can use any other IDE that has a valid CC++ compiler.
- CMake, which is a neat tool to make the project files (for your chosen IDE) from the OpenCV source files. It will also allow an easy configuration of the OpenCV build files, in order to make binary files that fits exactly to your needs.
- Git to acquire the OpenCV source files. A good tool for this is TortoiseGit. Alternatively, you can just download an archived version of the source files from our page on Sourceforge
OpenCV may come in multiple flavors. There is a «core» section that will work on its own. Nevertheless, there is a couple of tools, libraries made by 3rd parties that offer services of which the OpenCV may take advantage. These will improve its capabilities in many ways. In order to use any of them, you need to download and install them on your system.
- The Python libraries are required to build the Python interface of OpenCV. For now use the version 2.7.
. This is also a must if you want to build the OpenCV documentation. - Numpy is a scientific computing package for Python. Required for the Python interface.
- Intel Threading Building Blocks (TBB) is used inside OpenCV for parallel code snippets. Using this will make sure that the OpenCV library will take advantage of all the cores you have in your system’s CPU.
- Intel Integrated Performance Primitives (IPP) may be used to improve the performance of color conversion, Haar training and DFT functions of the OpenCV library. Watch out, since this is not a free service.
- OpenCV offers a somewhat fancier and more useful graphical user interface, than the default one by using the Qt framework. For a quick overview of what this has to offer, look into the documentations highgui module, under the Qt New Functions section. Version 4.6 or later of the framework is required.
- Eigen is a C++ template library for linear algebra.
- The latest CUDA Toolkit will allow you to use the power lying inside your GPU. This will drastically improve performance for some algorithms (e.g the HOG descriptor). Getting more and more of our algorithms to work on the GPUs is a constant effort of the OpenCV team.
- OpenEXR source files are required for the library to work with this high dynamic range (HDR) image file format.
- The OpenNI Framework contains a set of open source APIs that provide support for natural interaction with devices via methods such as voice command recognition, hand gestures, and body motion tracking. Prebuilt binaries can be found here. The source code of OpenNI and OpenNI2 are also available on Github.
- Doxygen is a documentation generator and is the tool that will actually create the OpenCV documentation.
Now we will describe the steps to follow for a full build (using all the above frameworks, tools and libraries). If you do not need the support for some of these, you can just freely skip this section.
Building the library
- Make sure you have a working IDE with a valid compiler. In case of the Microsoft Visual Studio just install it and make sure it starts up.
- Install CMake. Simply follow the wizard, no need to add it to the path. The default install options are OK.
- Download and install an up-to-date version of msysgit from its official site. There is also the portable version, which you need only to unpack to get access to the console version of Git. Supposing that for some of us it could be quite enough.
- Install TortoiseGit. Choose the 32 or 64 bit version according to the type of OS you work in. While installing, locate your msysgit (if it does not do that automatically). Follow the wizard – the default options are OK for the most part.
- Choose a directory in your file system, where you will download the OpenCV libraries to. I recommend creating a new one that has short path and no special characters in it, for example D:/OpenCV . For this tutorial, I will suggest you do so. If you use your own path and know, what you are doing – it is OK.
- Clone the repository to the selected directory. After clicking Clone button, a window will appear where you can select from what repository you want to download source files (https://github.com/opencv/opencv.git) and to what directory ( D:/OpenCV ).
- Push the OK button and be patient as the repository is quite a heavy download. It will take some time depending on your Internet connection.
- In this section, I will cover installing the 3rd party libraries.
- Download the Python libraries and install it with the default options. You will need a couple other python extensions. Luckily installing all these may be automated by a nice tool called Setuptools. Download and install again.
- The easiest way to install Numpy is to just download its binaries from the sourceforge page. Make sure your download and install exactly the binary for your python version (so for version 2.7 ).
-
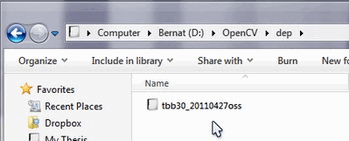
For the Intel Threading Building Blocks (TBB) download the source files and extract it inside a directory on your system. For example let there be D:/OpenCV/dep . For installing the Intel Integrated Performance Primitives (IPP) the story is the same. For extracting the archives, I recommend using the 7-Zip application.
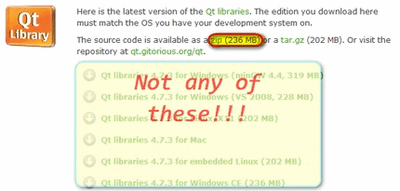
In case of the Qt framework you need to build yourself the binary files (unless you use the Microsoft Visual Studio 2008 with 32 bit compiler). To do this go to the Qt Downloads page. Download the source files (not the installers. ):
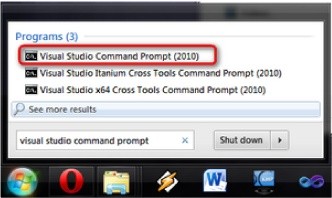
Extract it into a nice and short named directory like D:/OpenCV/dep/qt/ . Then you need to build it. Start up a Visual Studio Command Prompt (2010) by using the start menu search (or navigate through the start menu All Programs –> Microsoft Visual Studio 2010 –> Visual Studio Tools –> Visual Studio Command Prompt (2010)).
Now navigate to the extracted folder and enter inside it by using this console window. You should have a folder containing files like Install, Make and so on. Use the dir command to list files inside your current directory. Once arrived at this directory enter the following command:
Completing this will take around 10-20 minutes. Then enter the next command that will take a lot longer (can easily take even more than a full hour):
After this set the Qt environment variables using the following command on Windows 7:
Also, add the built binary files path to the system path by using the PathEditor. In our case this is D:/OpenCV/dep/qt/qt-everywhere-opensource-src-4.7.3/bin .
Note If you plan on doing Qt application development you can also install at this point the Qt Visual Studio Add-in. After this you can make and build Qt applications without using the Qt Creator. Everything is nicely integrated into Visual Studio.
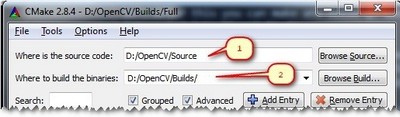
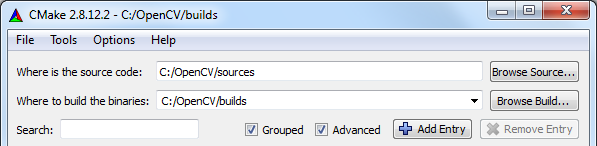
Now start the CMake (cmake-gui). You may again enter it in the start menu search or get it from the All Programs –> CMake 2.8 –> CMake (cmake-gui). First, select the directory for the source files of the OpenCV library (1). Then, specify a directory where you will build the binary files for OpenCV (2).
Press the Configure button to specify the compiler (and IDE) you want to use. Note that in case you can choose between different compilers for making either 64 bit or 32 bit libraries. Select the one you use in your application development.
CMake will start out and based on your system variables will try to automatically locate as many packages as possible. You can modify the packages to use for the build in the WITH –> WITH_X menu points (where X is the package abbreviation). Here are a list of current packages you can turn on or off:
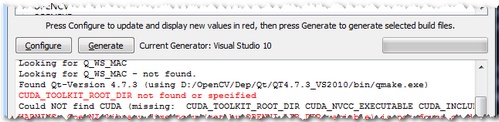
Select all the packages you want to use and press again the Configure button. For an easier overview of the build options make sure the Grouped option under the binary directory selection is turned on. For some of the packages CMake may not find all of the required files or directories. In case of these, CMake will throw an error in its output window (located at the bottom of the GUI) and set its field values to not found constants. For example:
For these you need to manually set the queried directories or files path. After this press again the Configure button to see if the value entered by you was accepted or not. Do this until all entries are good and you cannot see errors in the field/value or the output part of the GUI. Now I want to emphasize an option that you will definitely love: ENABLE –> ENABLE_SOLUTION_FOLDERS. OpenCV will create many-many projects and turning this option will make sure that they are categorized inside directories in the Solution Explorer. It is a must have feature, if you ask me.
Furthermore, you need to select what part of OpenCV you want to build.
- BUILD_DOCS -> It creates two projects for building the documentation of OpenCV (there will be a separate project for building the HTML and the PDF files). Note that these are not built together with the solution. You need to make an explicit build project command on these to do so.
- BUILD_EXAMPLES -> OpenCV comes with many example applications from which you may learn most of the libraries capabilities. This will also come handy to easily try out if OpenCV is fully functional on your computer.
- BUILD_PACKAGE -> Prior to version 2.3 with this you could build a project that will build an OpenCV installer. With this, you can easily install your OpenCV flavor on other systems. For the latest source files of OpenCV, it generates a new project that simply creates a zip archive with OpenCV sources.
- BUILD_SHARED_LIBS -> With this you can control to build DLL files (when turned on) or static library files (*.lib) otherwise.
- BUILD_TESTS -> Each module of OpenCV has a test project assigned to it. Building these test projects is also a good way to try out, that the modules work just as expected on your system too.
- BUILD_PERF_TESTS -> There are also performance tests for many OpenCV functions. If you are concerned about performance, build them and run.
- BUILD_opencv_python -> Self-explanatory. Create the binaries to use OpenCV from the Python language.
- BUILD_opencv_world -> Generate a single «opencv_world» binary (a shared or static library, depending on BUILD_SHARED_LIBS) including all the modules instead of a collection of separate binaries, one binary per module.
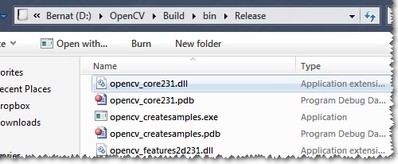
Press again the Configure button and ensure no errors are reported. If this is the case, you can tell CMake to create the project files by pushing the Generate button. Go to the build directory and open the created OpenCV solution. Depending on just how much of the above options you have selected the solution may contain quite a lot of projects so be tolerant on the IDE at the startup. Now you need to build both the Release and the Debug binaries. Use the drop-down menu on your IDE to change to another of these after building for one of them.
In the end, you can observe the built binary files inside the bin directory:
For the documentation, you need to explicitly issue the build commands on the doxygen project for the HTML documentation. It will call Doxygen to do all the hard work. You can find the generated documentation inside the build/doc/doxygen/html .
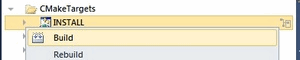
To collect the header and the binary files, that you will use during your own projects, into a separate directory (similarly to how the pre-built binaries ship) you need to explicitly build the Install project.
This will create an Install directory inside the Build one collecting all the built binaries into a single place. Use this only after you built both the Release and Debug versions.
To test your build just go into the Build/bin/Debug or Build/bin/Release directory and start a couple of applications like the contours.exe. If they run, you are done. Otherwise, something definitely went awfully wrong. In this case you should contact us at our Q&A forum. If everything is okay, the contours.exe output should resemble the following image (if built with Qt support):
Set the OpenCV environment variable and add it to the systems path
First we set an environment variable to make easier our work. This will hold the build directory of our OpenCV library that we use in our projects. Start up a command window and enter:
Here the directory is where you have your OpenCV binaries (extracted or built). You can have different platform (e.g. x64 instead of x86) or compiler type, so substitute appropriate value. Inside this, you should have two folders called lib and bin. The -m should be added if you wish to make the settings computer wise, instead of user wise.
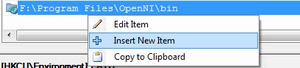
If you built static libraries then you are done. Otherwise, you need to add the bin folders path to the systems path. This is because you will use the OpenCV library in form of *»Dynamic-link libraries»* (also known as DLL). Inside these are stored all the algorithms and information the OpenCV library contains. The operating system will load them only on demand, during runtime. However, to do this the operating system needs to know where they are. The systems PATH contains a list of folders where DLLs can be found. Add the OpenCV library path to this and the OS will know where to look if he ever needs the OpenCV binaries. Otherwise, you will need to copy the used DLLs right beside the applications executable file (exe) for the OS to find it, which is highly unpleasant if you work on many projects. To do this start up again the PathEditor and add the following new entry (right click in the application to bring up the menu):
Save it to the registry and you are done. If you ever change the location of your build directories or want to try out your application with a different build, all you will need to do is to update the OPENCV_DIR variable via the setx command inside a command window.
Now you can continue reading the tutorials with the How to build applications with OpenCV inside the «Microsoft Visual Studio» section. There you will find out how to use the OpenCV library in your own projects with the help of the Microsoft Visual Studio IDE.