- Building OpenJDK on Windows
- Windows SDK for Windows 7.1
- Microsoft VisualC++ 2010 Express
- Cygwin (64 bit)
- freetype
- Hg/Ant/JDK7
- Getting OpenJDK sources
- Configure
- Build it
- How to download and install prebuilt OpenJDK packages
- JDK 9 & Later
- JDK 8
- Debian, Ubuntu, etc.
- Fedora, Oracle Linux, Red Hat Enterprise Linux, etc.
- JDK 7
- Debian, Ubuntu, etc.
- Fedora, Oracle Linux, Red Hat Enterprise Linux, etc.
- JDK 6
- Debian, Ubuntu, etc.
- Fedora, Oracle Linux, Red Hat Enterprise Linux, etc.
- BSD Port
- Technology and fun
- Building OpenJDK 8 for Windows using MSYS
Building OpenJDK on Windows
Tomorrow I’ll be enjoying an OpenJDK hack session with Martijn Verburg (aka The Diabolical Developer). To prepare for this session he told us to follow the AdoptOpenJDK build instructions.
Most cool developers today seem to be using OS/X, but some of us are stuck on Windows laptops. I actually choose to stick with Windows 7 because every single client I’ve worked for has Windows workstations and only require the application to run on Windows. But anyway Martijn said: “Getting OpenJDK to build on Linux/Mac would be easy, Windows can be dicey”
With a bit of Googling and some small problems I’ve got it working just fine on my Windows 7 (64 bit). Most information I got was from this write-up, but I encountered some problems and could skip some steps I didn’t need.
All the tools mentioned are free, but you will have to install some Microsoft Visual C++ packages to compile (which most Java programmers try to avoid).
Windows SDK for Windows 7.1
Instead of the blogpost above mentioning this step second, I recommend doing it first. If you install VisualC++ 2010 Express first this step might fail with some weird error. The solution? Uninstall VisualC++ 2010 Express and first install Windows SDK for Windows 7.1.
Microsoft VisualC++ 2010 Express
Cygwin (64 bit)
For some reason I ran into problems early on using the 64 bit Cygwin, so I decided to install the 64 bit version as well. This worked, so I recommend doing this.
During the installation you’ll need to add some development packages:
I might have forgotten one or two, this will probably popup during the ‘configure’ step below. If you find a missing package, please tell me and I’ll update the post.
The version of ‘make’ that is packaged with Cygwin doesn’t work with OpenJDK. Instead we need to download the source from http://ftp.gnu.org/gnu/make/. I picked version 3.82 (this one is mentioned on the OpenJDK page). I downloaded and unzipped the source code here: C:\Projects\OpenJDK\make-3-82
To compile, fire up Cygwin and type:
Now you could take the generated ‘make.exe’ and place it into the Cygwin bin directory, but this isn’t needed.
freetype
Next we need to have Freetype, this step is done exacly like descriped here. Only do the ‘Freetype’ chapter generating the lib and dll.
Once you’ve generated the lib+dll, make a new directory (I used C:\Projects\OpenJDK\freetype). Add the ‘include’ directory from the freetype source code used in the step before. Also create a ‘lib’ directory and place the generated lib and dll in it.
Hg/Ant/JDK7
The other article mentions you’ll need to install TortoiseHg, Apache Ant and a current JDK 7 (as bootstrap). I didn’t have to do this because I already had all three installed. But please go ahead, they are probably needed:
Getting OpenJDK sources
The other article mentions a lot of PATH requirements that need to be set. I didn’t encounter this at all because I configured my build in another way. First we’ll need to get the OpenJDK source code.
This will create a new directory: /cygdrive/C/Projects/OpenJDK/jdk8_tl with all the sources!
Configure
Now we need to configure a build for OpenJDK. Instead of just calling ‘./configure’ we’ll need to add a few extra options, we’ll need to point it to the correct MAKE directory and we need to include our custom build freetype.
This will throw a lot of warnings, but in the end it should print something like this:
After the configure step you should have a new build directory added.
Mine was located at: /cygdrive/C/Projects/OpenJDK/jdk8_tl/build/windows-x86_64-normal-server-release
Build it
The next thing I did was to build everything, this can take anywhere from 10 to 40 minutes, my build took 20 minutes.
After a long wait and a lot of warnings and messages it says it created your very own JDK 8 build. Time to give it a try:
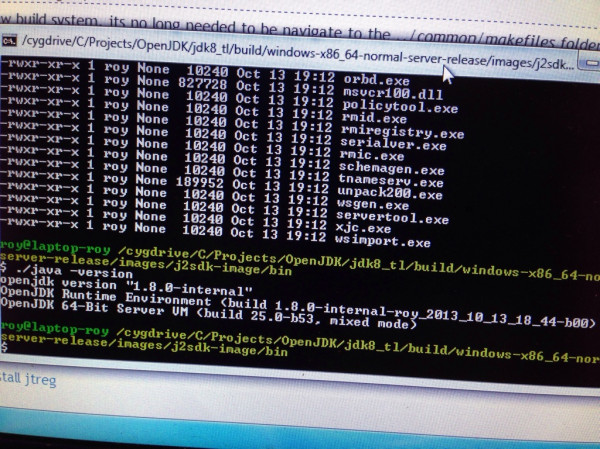
It worked!
Like I said before, I encountered some problems and errors along the way. Most involved the wrong Cygwin (32 bit), this caused bash to crash (STATUS_ACCESS_VIOLATION) during the configure phase. Also I ran into a problem installing ‘Microsoft SDK for Windows 7.1’ which required me to first uninstall Microsoft VisualC++ 2010. Another problem was not installing ‘diff’ in Cygwin (diffutils) so the build found some other diff.exe (from Git?) which gave differences during the actual build causing it to stop.
I might have forgotten to write down some step, if you encounter any problem (and solve them) please tell me so I can update this post!
One thing I should add is ‘ccache’. This tool greatly improves the build speed because it caches all unchanged classes/files. It was in Cygwin (32 bit) but it is missing in Cygwin (64 bit)… I’ll have to compile and install it myself. This is one thing I haven’t tried yet, but I probably should do!
Update: I’ve tried compiling and using ccache-3.1.9, but this broke the build. I might try different versions but for now I’ll just skip ‘clean’-ing altogether 🙂
How to download and install prebuilt OpenJDK packages
JDK 9 & Later
Oracle’s OpenJDK JDK binaries for Windows, macOS, and Linux are available on release-specific pages of jdk.java.net as .tar.gz or .zip archives.
As an example, the archives for JDK 13 may be found on jdk.java.net/13 and may be extracted on the command line using
depending on the archive type.
JDK 8
Debian, Ubuntu, etc.
On the command line, type:
The openjdk-8-jre package contains just the Java Runtime Environment. If you want to develop Java programs then please install the openjdk-8-jdk package.
Fedora, Oracle Linux, Red Hat Enterprise Linux, etc.
On the command line, type:
The java-1.8.0-openjdk package contains just the Java Runtime Environment. If you want to develop Java programs then install the java-1.8.0-openjdk-devel package.
JDK 7
Debian, Ubuntu, etc.
On the command line, type:
The openjdk-7-jre package contains just the Java Runtime Environment. If you want to develop Java programs then install the openjdk-7-jdk package.
Fedora, Oracle Linux, Red Hat Enterprise Linux, etc.
On the command line, type:
The java-1.7.0-openjdk package contains just the Java Runtime Environment. If you want to develop Java programs then install the java-1.7.0-openjdk-devel package.
JDK 6
Debian, Ubuntu, etc.
On the command line, type:
The openjdk-6-jre package contains just the Java Runtime Environment. If you want to develop Java programs then install the openjdk-6-jdk package.
Fedora, Oracle Linux, Red Hat Enterprise Linux, etc.
On the command line, type:
The java-1.6.0-openjdk package contains just the Java Runtime Environment. If you want to develop Java programs then install the java-1.6.0-openjdk-devel package.
BSD Port
For a list of pointers to packages of the BSD Port for DragonFly BSD, FreeBSD, Mac OS X, NetBSD and OpenBSD, please see the BSD porting Project’s wiki page.
Technology and fun
software development and computer gaming
Building OpenJDK 8 for Windows using MSYS
This article will describe how to build OpenJDK 8 on Windows using MSYS. Since the building itself is performed by build scripts, we will focus on two things: installation of necessary libraries and compilers, and fixing build scripts, since they don’t work out of the box. As most of my articles, this one is written for my future self, because I’m sure I’ll get back to this task in future, and I don’t like solving problems I know I’ve solved before and I don’t remember how. Also this article is not a simple list of steps, I’ve tried to explain the reasons behind the actions. Readme file of OpenJDK says that “building the source code for the OpenJDK requires a certain degree of technical expertise”, so let’s make ourselves this expertise by learning while doing.
Getting the source.
The first step is to get the source. OpenJDK developers use Mercurial version control system as a code storage. You can open this URL: http://hg.openjdk.java.net/ in browser to see a list of projects hosted by OpenJDK. The project you need is jdk8. If you click on jdk8, you’ll see a list of repositories which jdk8 consists of. The top one is called jdk8, which makes a full URL: http://hg.openjdk.java.net/jdk8/jdk8/. You may wonder why there are two jdk8 directories in the URL? This remained from some old times when there were so called “gate” repositories to which changes were pushed for integration, and once those changes were verified, they were merged into read-only main repositories. So, jdk8/jdk8 is a read-only repository. Gate repositories approach was abandoned, but for OpenJDK 8 the path to read-only repository remains the same. If you are curious, you can read more about OpenJDK Mercurial repositories here.
So, let’s get ourselves this respository. You will need Mercurial tools for this. I like GUI tools, so I’ve downloaded SmartGit/Hg. It took me a while to figure out why there are no Mercurial option when you try to clone a remote repository. To make this work, you need to download and install official Mercurial command-line tools, and then go to settings of SmartGit and point it to hg.exe tool. This will make Mercurial to appear in a list of VCSes. Thus, GUI tools are not a full replacement for command-line tools, they just make life a little easier. If you don’t like GUIs, you can skip them and use command-line Mercurial tools, that’s quite easy. So go ahead and clone a repository http://hg.openjdk.java.net/jdk8/jdk8/ to some local directory.
Structure of OpenJDK build
The top repository jdk8/jdk8 contains only build infrastructure, it doesn’t contain any real source code, which is sorted into several additional other repositories. So, from this point we can either download those repositories, or we can do that later, when we will prepare everything. Let’s take a second approach, and start with preparing for a build. Take a look at a repository we just cloned. There are two readme files: a short text file and a bigger HTML file. Both are worth reading. Also there are two directories: common and make, and three scripts. The script named get_source.sh will download all remaining sources using Mercurial command-line tools, and we will postpone this until later. Two remaining scripts are the core of build process.
C is not a Java, there are many aspects of the language which are not defined and compiler-specific, like, for example, size of int value. So C programmers achieve portability by having special cases for compiler-dependent things. This is usually done “on source level”: a compiler-specific information is moved to dedicated header file. So to port a C program to another compiler requires changing compiler-dependent info and recompilation. To simplify this task programs used scripts which probe the compiler they are running on and generate a compiler-dependent header files. By convention these scripts are called configure. And OpenJDK has this script. We need to run it at least once. After that we have to use make tool to build everything, becase we have a script for it, called Makefile. Such two-stage comfigure/make approach is standard in Unix world for open-source software.
Let’s take a look at configure file. It is a unix shell script which prepares a build. It is very small, all it does is executing another configure script, located in common/autoconf. This second configure does a little more, like parsing command-line parameters, of which you can read more in readme.html. The main job is done by big script called generated-configure.sh. So, in order to run these scripts we need some Unix-like environment on Windows. There are two options: Cygwin and MSYS. Both environments are quite similar: each provides a shared library (dll) which implements some set of POSIX functions on Windows, and a set of Unix tools compiled as Windows executables, which rely on that dll. Cygwin is bigger, provides a larger set of POSIX calls and includes more Unix tools, so it’s like a complete unix-like environment. MSYS (which means “minimal system”) supports a smaller set of POSIX calls and provides a set of Unix tools just enough to be able to run typical configure scripts. I like everything minimal, so I prefer MSYS.
Installing MSYS and dealing with configure.
MSYS itself is not an independent project, it is a part of another project called MinGW (Minimalist Gnu for Windows), which is a quite interesting story worth telling. Most of the application programs written in C use standard library, and there are many reasons for that. On Unix systems it’s a convenient and portable way to do system calls. Standard library also includes lots of useful functions, like string manipulation. Since standard library relies on OS services, the OS kernel itself cannot use standard library. Windows provides it’s own set of services for applications, called Win32 API, but their compiler suite provides a standard library for compatibility and convenience. Some standard libraries are tied to specific compilers, but there are independent libraries: newlib, uClibc, dietlibc, mucl. When choosing a standard library one has to consider its features, performance, size, support of particular OS/CPU, and also the licence. For example, using library released with GPL requires you to release your program under GPL. The licence terms may be different depending on how you link against a library. There are two options: static linking (library will be included into executable) and dynamic linking. Licensing terms for dynamic linking are usually less restrictive then for static linking. However, if you choose dynamic linking you should somehow ensure that library is installed on computers where your program will run. So, knowing all this we can now get to MingGW. It is a version of GCC compiler which produces Windows executables dynamically linked with standard library supplied with Microsoft Visual C v 6.0 (msvcrt.dll). The license allows any code to dynamically link against it, and practically this library is present in all Windows systems (used by Microsoft’s own applications), so you don’t need to distribute it yourself. Thus MinGW produces executables which can be released under any license and distributed in a very simple way. Technically MinGW consists of a set of header files for standard library, an import library for mscvrt.dll and a version of GCC which produces Windows executables linked with import library. Later some additional libraries were ported to MinGW and now are provided as a part of it. Also MinGW was extended with include files and import libraries for Windows API, so now you can use it to write native Windows software. MinGW made it easier to port software written in C from Unix to Windows, but that was not enough. Thus MSYS was born, it is an environment for running configure scripts.
OK, back to building OpenJDK. Go to MinGW site and download installer. Run it. It will show a list of packages you can install. You don’t actually need MinGW compilers, since they are not used by OpenJDK built, but I advice you to install them. You’ll definitely need make and autoconf. Also you’ll need basic MSYS, and several specific MSYS packages: bsd cpio, mktemp, zip, unzip.
Now, as you have installed MSYS, you can start it’s shell (bash). You can use your windows paths in a special way, for example “C:\projects\openjdk” should be used as “/c/projects/openjdk”. You can try to run configure script right away. At the beginning this script will check availability of required tools, so if you forgot to install abovementioned cpio, mktemp, zip and unzip, then configure will complain (that’s how I learned that I need them). So here we will encounter a first problem with OpenJDK build environment which requires manual intervention. The script will fail finding cpio.
Learning autoconf
The script will fail finding cpio, since it is called bsdcpio. If you’ll try to track the problem (either by looking at source code or by reading log file) you’ll get to a script generated-configure.sh. To fix our problem, we need to modify this generated-configure.sh script. However, editing it directly is a wrong way. This script is generated (hence the name) by a tool called autoconf from sources located in OpenJDK folder common/autoconf. So, let’s get there and edit the sources. The actual change should be made in file basics.m4. Replace cpio with bsdcpio.
To generate new generated-configure.sh you should execute autogen.sh. But attempt to do it will fail, autogen.sh will complain that it can’t find autoconf. The reason is simple: autoconf was installed into MinGW location which is not available for MSYS by default. So, you should go to MSYS installation directory and find “etc” directory (on my machine it is located at c:\tools\mingw\msys\1.0\etc). Here you should create a file called fstab which will configure mounting of windows directories to msys filesystem. Take a look at fstab.sample to see how to do it, you may even copy it as fstab and edit it. Your task is to map root MinGW folder as /mingw. To apply changes in fstab you should restart MSYS bash. There is another file in etc called profile, which configures bash. By default this profile will add /mingw/bin into search path. So, if you did everything right, the result of “which autoconf” should be something like “/mingw/bin/autoconf”. Now you can get back and use autogen.sh to generate build script. Do it. Oops, another error.
This time autogen will complain that autoconf 2.69 or higher is required. However, MinGW includes version 2.68. When I encountered this error I’ve decided to try with 2.68, and believe me, it works perfectly fine. So, let’s hack OpenJDK build scripts and fix the required version. It is specified in file configure.ac. Again execute autogen.sh. This time it should work. Ignore output about no custom hook found.
We just fixed our first configure-stage error, and there will be more. To simplify troubleshooting, you should take a look at file called config.log, which contains output produced by conifugure script. If this log is not verbose enough, you can start the configure with command-line argument –debug-configure. It will make the script to produce additional log called debug-configure.log which is very verbose.
Installing bootstrap JDK.
Large part of JDK is written in Java,including the compiler. So building JDK requires you to have some bootstrap JDK. I’ve never got any problems installing it. You can even install it into default directory, and at any path, even the one which includes spaces.
Having fun with Microsoft Windows 7 SDK.
MinGW provides a C and C++ compilers for Windows, but the only officially supported by OpenJDK is Microsoft Visual C++ compiler, and we are going to use it. Otherwise configure will complain that it cannot find Visual Studio and quit. If you own Visual Studio, that’s great, and you can skip this part. However, in this article I’ll describe how to use minimalist development tools. So, we will use Microsoft Windows 7 SDK, which includes command-line C and C++ compilers from Visual Studio 2010. And it is free! You should download it from official site of Microsoft. There are web installer and several ISO images: for 32-bit systems, for Itanium and for 64-bit systems (amd-64). During the installation you can select which components to install, and I suggest to keep default settings, which include all necessary libraries and the compiler. If you will encounter some problems during the installation, check installation logs for exact description of the failure. I’ve got an error saying that SDK can’t install redistributable runtime libraries. Even de-selecting these libraries in a list of installed components doesn’t help. This happens because you already have a more recent version of those libraries installed (I had version 10.0.40219, and SDK will install 10.0.30319). It’s a shame for Microsoft to keep such bugs in installer. The only workaround is to uninstall your current redistributable of Microsoft Visual C runtime libraries, then install Windows SDK, and then download and install latest version of runtime library.
Now let’s check if compilers are working. If you will skip this part, you may get nasty errors much later. So, go to “c:\Program files (x86)\Microsoft Visual Studio 10.0\VC\bin\amd64” and launch cvtres.exe. If it has started successfully, that’s good. But on some systems it fails with application error. In fact you can skip this error, since it will not manifest at configure stage, but you’ll get strange error messages later on make stage, so let’s fix it now. Careful investigation with Dependency Walker tool shows that cvtres.exe imports a bunch of functions from msvcr100_clr0400.dll, and this dll doesn’t have any exported functions. Actually a version of this library included in SDK is OK, but some update for Microsoft .Net framework overwrites it with no-export version. Nice. In order to fix this, you need to download a patch from Microsoft called Microsoft Visual C++ 2010 Service Pack 1 Compiler Update for the Windows SDK 7.1. It will fix dependency problem for cvtres.exe, it will use another version of runtime dll. Download the update, install it and check that cvtres.exe works.
No, that’s not all. The update we just applied broke another thing. Unbelievable. I’ve created an empty file called ammintrin.h just to get around this annoying thing.
Patching the build scripts
Having Windows SDK will let you get further with configure, but eventually it will fail. That happens because scripts for building OpenJDK 8 using MSYS have errors. These errors were fixed in scripts for OpenJDK 9. The link to fixes could be found in this mail thread. Initial letter from Volker Simonis contains change request, and in subsequent messages Eric Joelsson extended it. Here is a list of changes:


