- Create films with Video Editor
- Create your video
- To create a new video that you can edit from start to finish
- Add text
- Add music
- Add effects
- To add 3D objects
- Publish your video
- Effects
- What are Direct2D effects?
- More effects topics
- Applying an effect to an image
- Spatial Transforms
- Compositing images
- Pixel adjustments
- Building effect graphs
- Optimize Windows 10 Performance by tweaking Visual Effects
- Disable visual effects in Windows 10
- Enable Windows 10 Fluent Design Acrylic Effects in VirtualBox
- About Sergey Tkachenko
Create films with Video Editor
Windows 10 includes Video Editor, a full-featured set of video creation and editing tools that tell your story with music, text, motion, and 3D effects. Video Editor is the successor to Movie Maker on Windows 10, with a focus on easy-to-use creative tools that enable you to tell your story.
Create your video
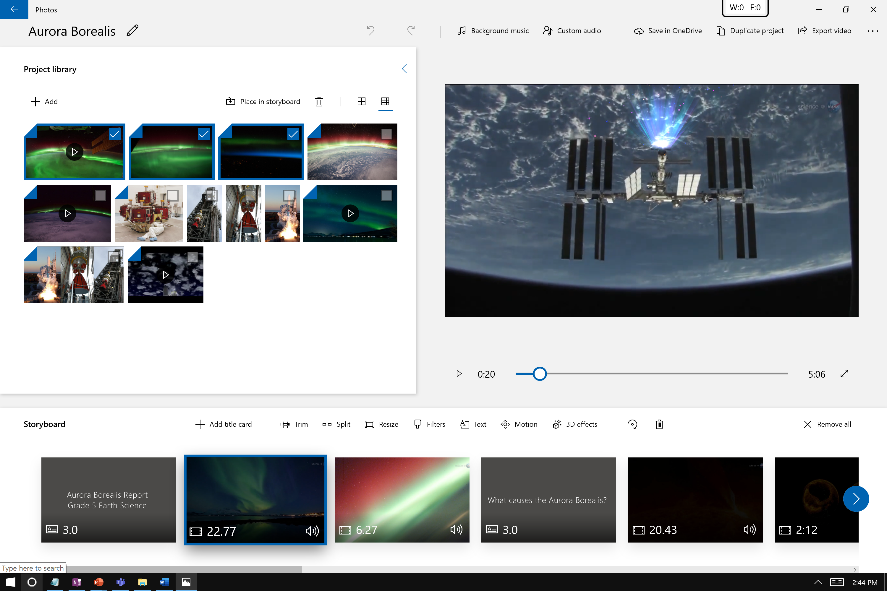
To create a new video that you can edit from start to finish
Type video editor into the Search bar and select Video Editor to launch the app, or launch from the Start menu.
Select New video project.
Name your video.
Select the photos and videos you want to add to your Storyboard. You can even use Add from web to find content on Bing.
Once you have organized your Storyboard, you can change the look and feel of each photo or video clip.
Select a button like Trim or Split for editing (video clips only).
Select Duration to change the length of time a photo is displayed, or select multiple photos and then select Duration to change their duration all at once.
Add text
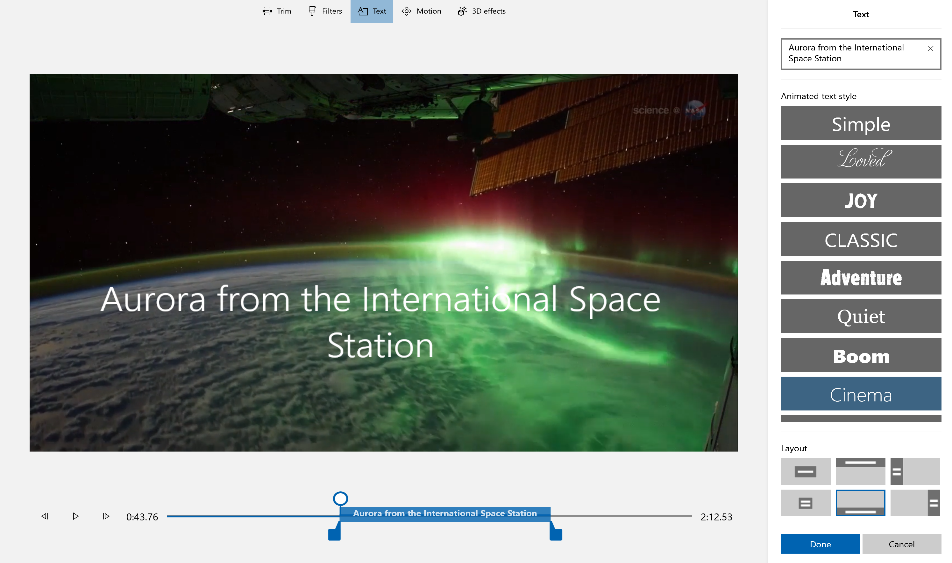
You can add Text to photos and video clips with ease. You can also create a Title Card from the Storyboard if you’d like to add text to a plain colored background.
Simply select Text, type a title or phrase, then select a style and layout. You can also time the text to appear exactly when you want within your film.
Add music
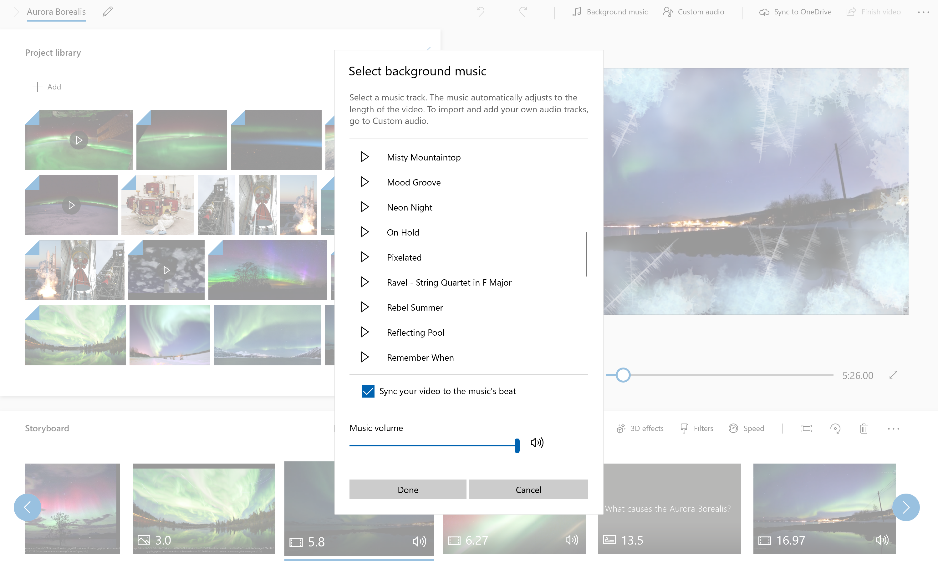
Select Background music to choose from several tracks and sync your video to the beat or select Custom audio to add and time your own music tracks, narration, or sound effects.
Add effects
Using the power of Windows 10, you can add 3D objects or special effects to your photos and video clips. Use Filters to change your video clip or photo to black & white or other visual treatments. Select Motion to give photos more visual interest. Select Speed to speed up or slow down a video clip. If you want to change the orientation of a photo or video, just select the Rotate icon. If your photo or video is a different aspect ratio than your project, you can select the Remove or show black bars icon to zoom in and remove the letterboxing effect.
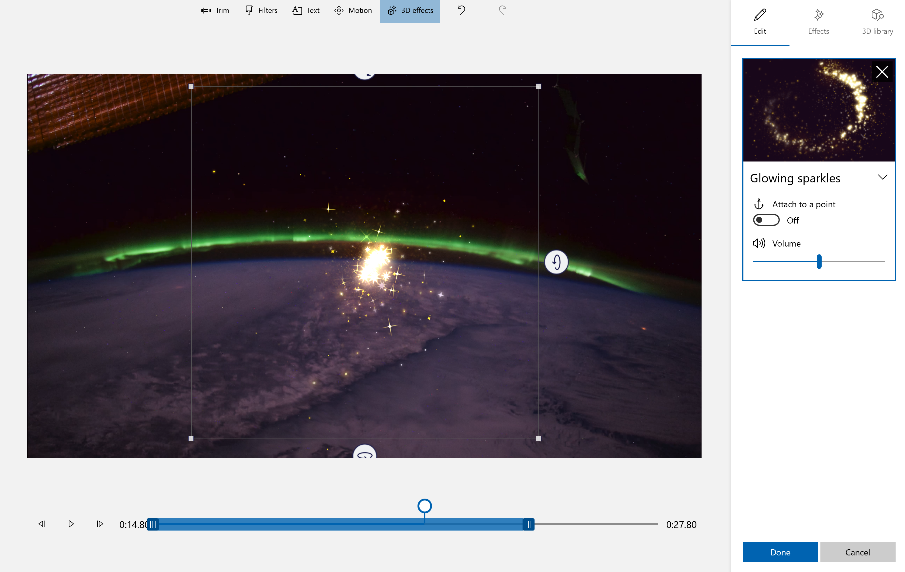
To add 3D objects
Select 3D library.
Rotate and size the object and add animations as well. You can also add, move, and size 3D effects. You can also anchor an effect to a point in a video clip and watch the effect move along.
Publish your video
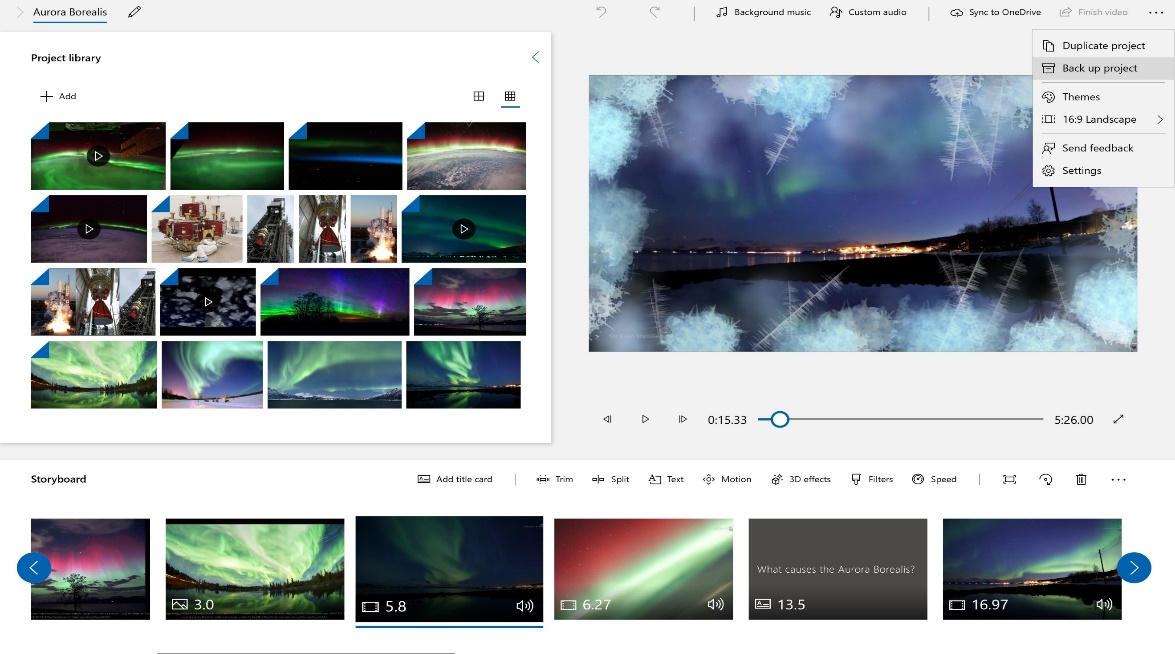
When you have completed your project, select Finish video to publish your film. You can control video quality if you wish.
Additionally, you can Duplicate project to copy your video, and use Back up project to share your project with or save your progress to share between multiple users and devices. You can use Import backup to open one of your backed-up projects and continue working.
Effects
What are Direct2D effects?
You can use Direct2D to apply one or more high quality effects to an image or a set of images. The effects APIs are built on Direct3D 11 and take advantage of GPU features for image processing. You can chain effects in an effect graph and compose or blend the output of effects.
A Direct2D effect performs an imaging task, like changing brightness, de-saturating an image, or creating a drop shadow. Effects can accept zero or more input images, expose multiple properties that control their operation, and generate a single output image.
Each effect creates an internal transform graph made up of individual transforms. Each transform represents a single image operation. The main purpose of a transform is to house the shaders that are executed for each output pixel. These shaders can include pixel shaders, vertex shaders, the blend stage of a GPU, and compute shaders.
Both the Direct2D built-in effects and custom effects you can make using the custom effects API work this way.
There are a range of built-in effects from categories like the ones here. See the Built-in Effects section for a full list.
You can apply effects to any bitmap, including: images loaded by the Windows Imaging Component (WIC), primitives drawn by Direct2D, text from DirectWrite, or scenes rendered by Direct3D.
With Direct2D effects you can write your own effects that you can use for your applications. A custom effect framework allows you to use GPU features such as pixel shaders, vertex shaders, and the blending unit. You can also include other built-in or custom effects in your custom effect. The framework for building custom effects is the same one that was used to create the built-in effects of Direct2D. The Direct2D effect author API provides a set of interfaces to create and register effects.
More effects topics
The rest of this topic explains the basics of Direct2D effects, like applying an effect to an image. The table here has links to additional topics about effects.
| Topic | Description |
|---|---|
| Effect Shader Linking | Direct2D uses an optimization called effect shader linking which combines multiple effect graph rendering passes into a single pass. |
| Custom effects | Shows you how to write your own custom effects using standard HLSL. |
| How to load an image into Direct2D Effects using the FilePicker | Shows how to use the Windows::Storage::Pickers::FileOpenPicker to load an image into Direct2D effects. |
| How to save Direct2D content to an image file | This topic shows how to use IWICImageEncoder to save content in the form of an ID2D1Image to an encoded image file such as JPEG. |
| How to Apply Effects to Primitives | This topic shows how to apply a series of effect to Direct2D and DirectWrite primitives. |
| Controlling Precision and Numerical Clipping in Effect Graphs | Applications that render effects using Direct2D must take care to achieve the desired level of quality and predictability with respect to numerical precision. |
Applying an effect to an image
You can use the Direct2D effects API to apply transforms to images.
This example assumes that you already have ID2D1DeviceContext and IWICBitmapSource objects created. For more information on creating these objects see How to load an image into Direct2D effects using the FilePicker and Devices and Device Contexts.
Set the BitmapSource property to the WIC bitmap source using the ID2D1Effect::SetValue.
Declare an ID2D1Effect variable and then create the gaussian blur effect.
Set the input to receive the image from the bitmap source effect. Set the blur amount the SetValue method and the standard deviation property.
Use the device context to draw the resulting image output.
The DrawImage method must be called between the ID2DDeviceContext::BeginDraw and EndDraw calls like other Direct2D render operations. DrawImage can take an image or the output of an effect and render it to the target surface.
Spatial Transforms
Direct2D provides built-in effects that can transform images in 2D and 3D space, as well as scaling. The scale and transform effects offer various quality levels like: nearest neighbor, linear, cubic, multi-sample linear, anisotropic, and high quality cubic.
Anisotropic mode generates mipmaps when scaling, however, if you set the Cached property to true on the effects that are input to the transform the mipmaps won’t be generated every time for sufficiently small images.
This use of the 2D affine transform effect rotates the bitmap counterclockwise slightly.
| Before |
|---|
 |
| After |
Compositing images
Some effects accept multiple inputs and composite them into one resulting image.
The built-in composite and arithmetic composite effects provide various modes, for more info see the composite topic. The blend effect has a variety of GPU accelerated modes available.
The composite effect combines images in various different ways according to the mode you specify.
Pixel adjustments
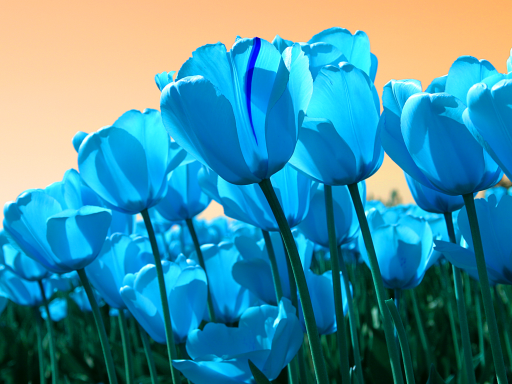
There are a few built-in Direct2D effects that allow you to alter the pixel data. For example, the color matrix effect can be used to change the color of an image.
This code takes the image and alters the color as shown in the example images here.
| Before |
|---|
|
| After |
 |
See the color built-in effects section for more info.
Building effect graphs
You can chain effects together to transform images. For example, the code here applies a shadow and a 2D transform, then composites the results together.
Here is the result.

Effects take ID2D1Image objects as input. You can use an ID2D1Bitmap because the interface is derived from ID2D1Image. You can also use the ID2D1Effect::GetOutput to get the output of an ID2D1Effect object as an ID2D1Image or use the SetInputEffect method, which converts the output for you. In most cases an effect graph consists of ID2D1Effect objects directly chained together, which makes it easy to apply multiple effects to an image to create compelling visuals.
Optimize Windows 10 Performance by tweaking Visual Effects
Windows 10 is the most optimized and fastest OS provided by them, there will always be tweak enthusiasts and power users who want to squeeze out the last drop of performance to make Windows 10 run faster. Windows 10 too offers some visual effects, animations, and features can be disabled to improve its performance – similar to what was being offered in Windows 8/7.
Today in this article, we’re going to talk about the visual performance optimization of Windows 10/8.
Disable visual effects in Windows 10
1. Press Windows Key + X combination to see the following menu. Select System in the bottom left corner.
2. In the System window, in the left pane, click on Advanced system settings.
3. In the System Properties window, pick Settings for Performance.
4. In the Performance Options window, you will see 3 options:
- Let Windows choose what’s best for my computer
- Adjust for best appearance
- Adjust for best performance.
Selecting Adjust for best performance may make your Windows perform slightly better, but you will have to sacrifice on the visual effect – and that maybe something you may not want to do.
Here are the settings I prefer to uncheck. Feel free to change them and make them suit your needs.
I prefer to remove checkmarks from the following options:
- Fade out menu items after clicking
- Enable transparent glass (you will lose the cool Aero look though)
- Animations in the taskbar
- Fade or slide menus into view
- Fade or slide Tool Tips into view
- Animate windows when minimizing and maximizing
- Show shadows under windows
- Slide open combo boxes
Finally, click Apply and then OK. Now you could access to Desktop, if you like using Windows + D key combination.
You’ll now see that performance of your Windows 10 may have increased marginally.
You also have another way and that is as follows:
Open Control Panel > Ease of Access > Make the computer easier to see.
Here you will see a Turn off all unnecessary animations (when possible) setting. Check the box and click Apply.
This setting is, of course, available in Windows 8/7 too!
See this post if you frequently receive 100% Disk Usage message.
Enable Windows 10 Fluent Design Acrylic Effects in VirtualBox
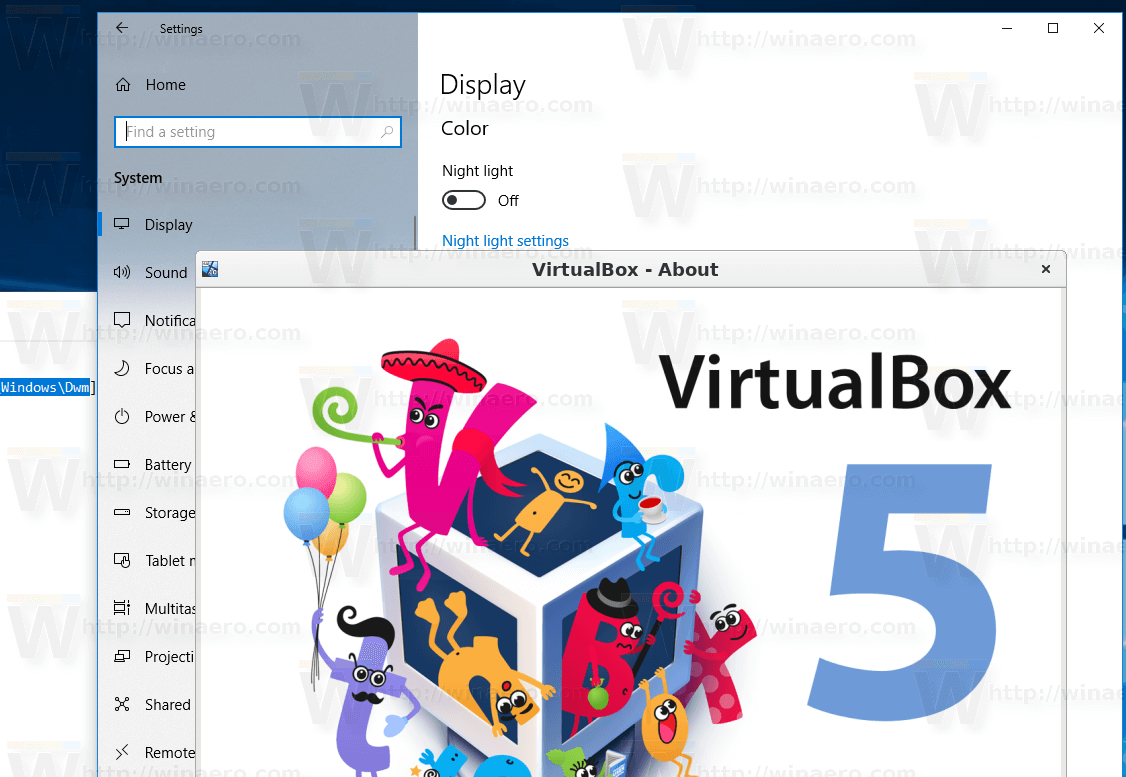
VirtualBox is my virtualization software of choice. It is free and feature-rich, so all my virtual machines are created in VirtualBox. VirtualBox users must know that Windows 10 doesn’t enable rich visual effects when running inside a VirtualBox virtual machine. Here is a workaround which forces the operating system to have a nice and fancy look.
Fluent Design is the modern Windows 10 UI, previously known by its code name «Project NEON». It is a new design language which is focused on simplicity and consistency along with cool animations. It also adds Windows 7’s Aero Glass-like effects to the Universal app frame and controls.
Key aspects of the Microsoft Fluent Design System are as follows.
Material: A graphical solution which emulates the «sensory and invigorating» feel of the materials that things around us are made of.
Motion: A set of animations which give an idea on how to interact with new UI elements like an app menu opening or drawing the user’s attention to controls and flyouts which appear on the screen.
Light: Soft highlights of important buttons and features to draw the user’s attention.
Depth: Transition animations which make an impression of opening the next level or layer of data presented by the app.
Another example is the UWP File Explorer app.
These effects rely on transparency and blur effects in Windows 10.
Unfortunately, VirtualBox graphics drivers don’t support reveal and transparency effects out of the box. Let’s force enable these effects.
You must be signed in with an administrative account to your guest Windows 10 OS to continue.
To enable Windows 10 Fluent Design Acrylic effects in VirtualBox, do the following.
- Open the Registry Editor app in your guest Windows 10.
- Go to the following Registry key.
See how to go to a Registry key with one click.
Note: Even if you are running 64-bit Windows you must still create a 32-bit DWORD value.
Set its value to 2 in decimal.
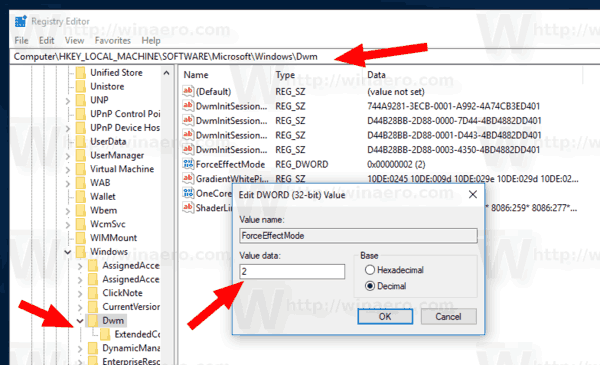
After restart, you will get all the effects enabled.
You can download the following ready-to-use Registry files to save your time.
The undo tweak is included. Don’t forget to restart the guest OS after applying them.
The following video demonstrates the effects in action. Note: My VM is running under Linux, so the guest OS has visual glitches. It is a long standing bug in VirtualBox for Linux.
This way, you can try to enable Fluent Design/Acrylic Effects on unsupported hardware or in other virtualization software like Microsoft’s Hyper-V. Thanks to Rafael for this tip!
Winaero greatly relies on your support. You can help the site keep bringing you interesting and useful content and software by using these options:
Share this post
About Sergey Tkachenko
Sergey Tkachenko is a software developer from Russia who started Winaero back in 2011. On this blog, Sergey is writing about everything connected to Microsoft, Windows and popular software. Follow him on Telegram, Twitter, and YouTube.


