- Building with cmake windows
- Running CMake for Windows / Microsoft Visual C++ (MSVC)
- Running CMake on Unix
- Running CMake from the command line
- What is the CMake cache?
- Utility Targets produced
- Preshing on Programming
- The Source and Binary Folders
- The Configure and Generate Steps
- Running CMake from the Command Line
- Running cmake-gui
- Running ccmake
- Building with Unix Makefiles
- Building with Visual Studio
- Built-In CMake Support in Visual Studio 2017
- Building with Xcode
- Building with Qt Creator
- Other CMake Features
- Recent Posts
Building with cmake windows
Once CMake has been installed on your system using it to build a project is easy. We will cover the process for Windows and then UNIX.
Running CMake for Windows / Microsoft Visual C++ (MSVC)
Run cmake-gui.exe, which should be in your Start menu under Program Files, there may also be a shortcut on your desktop, or if you built from source, it will be in the build directory. A GUI will appear similar to what is shown below. The top two entries are the source code and binary directories. They allow you to specify where the source code is for what you want to compile and where the resulting binaries should be placed. You should set these two values first. If the binary directory you specify does not exist, it will be created for you.

Running CMake on Unix
On most unix platforms, if the curses library is supported, cmake will build an executable called ccmake. This interface is a terminal based text application that is very similar to the windows GUI. To run ccmake, change directories into the directory where you want the binaries to be placed. This can be the same directory as the source code for what we call in-place builds (the binaries are in the same place as the source code) or it can be a new directory you create. Then run ccmake with either no arguments for an in-place-build, or with the path to the source directory on the command line. This will start the text interface that looks something like this: 
If you hit the “c” key, it will configure the project. You should use that as you change values in the cache. To change values, use the arrow keys to select cache entries, and the enter key to edit them. Boolean values will toggle with the enter key. Once you have set all the values as you like, you can hit the ‘G” key to generate the makefiles and exit. You can also hit “h” for help, “q” to quit, and “t” to toggle the viewing of advanced cache entries.
Two examples of CMake usage on the Unix platform follow for a hello world project called Hello. In the first example, and in-place build is performed, i.e., the binaries are placed in the same directory as the source code.
In the second example, an out-of-place build is performed, i.e., the source code, libraries, and executables are produced in a directory separate from the source code directory(ies).
Running CMake from the command line
From the command line, cmake can be run as an interactive question and answer session or as a non-interactive program. To run in interactive mode, just pass the option “-i” to cmake. This will cause cmake to ask you to enter a value for each value in the cache file for the project. The process stops when there are no longer any more questions to ask.
Using CMake to build a project in non-interactive mode is a simple process if the project does not have many options. For larger projects like VTK, using ccmake, cmake -i, or CMakeSetup is recommended. This is because as you change options in the CMakeCache.txt file, cmake may add new entries to that file. It can be difficult to know when to stop the run cmake, edit the cache file cycle without the aid of an interface.
To build with just cmake change directory into where you want the binaries to be placed. For an in-place build you then run cmake and it will produce a CMakeCache.txt file that contains build options that you can adjust using any text editor. For non in-place builds the process is the same except you run cmake and provide the path to the source code as its argument. Once you have edited the CMakeCache.txt file you rerun cmake, repeat this process until you are happy with the cache settings. The type make and your project should compile. Some projects will have install targets as well so you can type make install to install them.
When running cmake from the command line, it is possible to specify command line options to cmake that will set values in the cache. This is done with a -DVARIABLE:TYPE=VALUE syntax on the command line. This is useful for non-interactive nightly test builds.
What is the CMake cache?
The cache is best thought of as a configuration file. Indeed Unix users could consider the cache as equivalent to the set of flags passed to the configure command. The first time CMake is run, it produces a CMakeCache.txt file. This file contains things like the existence and location of native JPEG library. The entries are added in response to certain CMake commands (e.g. FIND_LIBRARY) as they are processed anywhere in CMakeLists files anywhere in the source tree. After CMake has been run, and created a CMakeCache.txt file – you may edit it. The CMake GUI, will allow you to edit the options easily, or you can edit the file directly. The main reason for editing the cache would be to give CMake the location of a native library such as JPEG, or to stop it from using a native library and use a version of the library in your source tree.
CMake will not alter an existing entry in the cache file itself. If your CMakeLists.txt files change significantly, you will need to remove the relevant entries from the cache file. If you have not already hand-edited the cache file, you could just delete it before re-running CMake.
Why do I have to edit the cache more than once for some projects?
Some projects are very complex and setting one value in the cache may cause new options to appear the next time the cache is built. For example, VTK supports the use of MPI for performing distributed computing. This requires the build process to determine where the MPI libraries and header files are and to let the user adjust their values. But MPI is only available if another option VTK_USE_PARALLEL is first turned on in VTK. So to avoid confusion for people who don’t know what MPI is, we hide those options until VTK_USE_PARALLEL is turned on. So CMake shows the VTK_USE_PARALLEL option in the cache area, if the user turns that on and rebuilds the cache, new options will appear for MPI that they can then set. The rule is to keep building the cache until it doesn’t change. For most projects this will be just once. For some complicated ones it will be twice.
Utility Targets produced
In addition to the targets and rules to build object files, libraries and executables of a project, CMake creates some additional targets and rules. For Visual Studio projects, two utility projects are automatically created: ALL_BUILD and RUN_TESTS.
 Preshing on Programming
 Preshing on Programming
CMake is a versatile tool that helps you build C/C++ projects on just about any platform you can think of. It’s used by many popular open source projects including LLVM, Qt, KDE and Blender.
All CMake-based projects contain a script named CMakeLists.txt , and this post is meant as a guide for configuring and building such projects. This post won’t show you how to write a CMake script – that’s getting ahead of things, in my opinion.
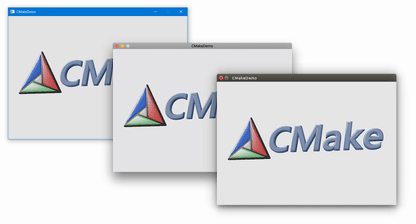
As an example, I’ve prepared a CMake-based project that uses SDL2 and OpenGL to render a spinning 3D logo. You can build it on Windows, MacOS or Linux.

The information here applies to any CMake-based project, so feel free to skip ahead to any section. However, I recommend reading the first two sections first.
If you don’t have CMake yet, there are installers and binary distributions on the CMake website. In Unix-like environments, including Linux, it’s usually available through the system package manager. You can also install it through MacPorts, Homebrew, Cygwin or MSYS2.
The Source and Binary Folders
CMake generates build pipelines. A build pipeline might be a Visual Studio .sln file, an Xcode .xcodeproj or a Unix-style Makefile . It can also take several other forms.
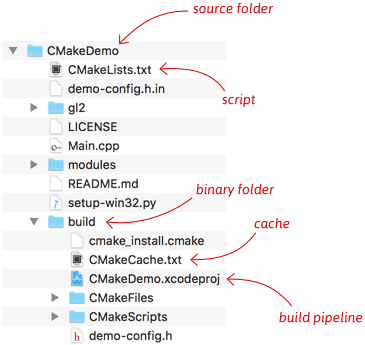
To generate a build pipeline, CMake needs to know the source and binary folders. The source folder is the one containing CMakeLists.txt . The binary folder is where CMake generates the build pipeline. You can create the binary folder anywhere you want. A common practice is to create a subdirectory build beneath CMakeLists.txt .
By keeping the binary folder separate from the source, you can delete the binary folder at any time to get back to a clean slate. You can even create several binary folders, side-by-side, that use different build systems or configuration options.
The cache is an important concept. It’s a single text file in the binary folder named CMakeCache.txt . This is where cache variables are stored. Cache variables include user-configurable options defined by the project such as CMakeDemo’s DEMO_ENABLE_MULTISAMPLE option (explained later), and precomputed information to help speed up CMake runs. (You can, and will, re-run CMake several times on the same binary folder.)
You aren’t meant to submit the generated build pipeline to source control, as it usually contains paths that are hardcoded to the local filesystem. Instead, simply re-run CMake each time you clone the project to a new folder. I usually add the rule *build*/ to my .gitignore files.
The Configure and Generate Steps
As you’ll see in the following sections, there are several ways to run CMake. No matter how you run it, it performs two steps: the configure step and the generate step.
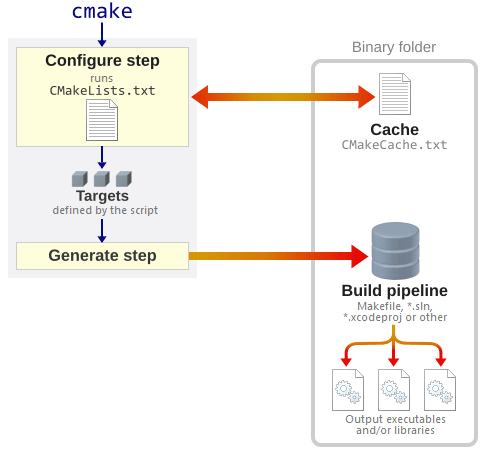
The CMakeLists.txt script is executed during the configure step. This script is responsible for defining targets. Each target represents an executable, library, or some other output of the build pipeline.
If the configure step succeeds – meaning CMakeLists.txt completed without errors – CMake will generate a build pipeline using the targets defined by the script. The type of build pipeline generated depends on the type of generator used, as explained in the following sections.
Additional things may happen during the configure step, depending on the contents of CMakeLists.txt . For example, in our sample CMakeDemo project, the configure step also:
- Finds the header files and libraries for SDL2 and OpenGL.
- Generates a header file demo-config.h in the binary folder, which will be included from C++ code.

In a more sophisticated project, the configure step might also test the availability of system functions (as a traditional Unix configure script would), or define a special “install” target (to help create a distributable package). If you re-run CMake on the same binary folder, many of the slow steps are skipped during subsequent runs, thanks to the cache.
Running CMake from the Command Line
Before running CMake, make sure you have the required dependencies for your project and platform. For CMakeDemo on Windows, you can run setup-win32.py . For other platforms, check the README.
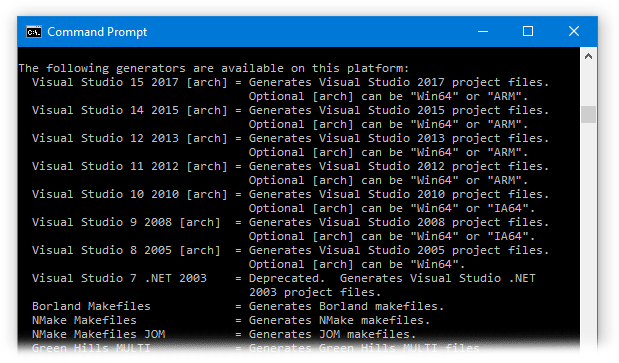
You’ll often want to tell CMake which generator to use. For a list of available generators, run cmake —help .
Create the binary folder, cd to that folder, then run cmake , specifying the path to the source folder on the command line. Specify the desired generator using the -G option. If you omit the -G option, cmake will choose one for you. (If you don’t like its choice, you can always delete the binary folder and start over.)
If there are project-specific configuration options, you can specify those on the command line as well. For example, the CMakeDemo project has a configuration option DEMO_ENABLE_MULTISAMPLE that defaults to 0. You can enable this configuration option by specifying -DDEMO_ENABLE_MULTISAMPLE=1 on the cmake command line. Changing the value of DEMO_ENABLE_MULTISAMPLE will change the contents of demo-config.h , a header file that’s generated by CMakeLists.txt during the configure step. The value of this variable is also stored in the cache so that it persists during subsequent runs. Other projects have different configuration options.
If you change your mind about the value of DEMO_ENABLE_MULTISAMPLE , you can re-run CMake at any time. On subsequent runs, instead of passing the source folder path to the cmake command line, you can simply specify the path to the existing binary folder. CMake will find all previous settings in the cache, such as the choice of generator, and re-use them.
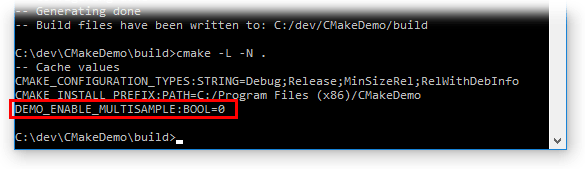
You can view project-defined cache variables by running cmake -L -N . . Here you can see CMakeDemo’s DEMO_ENABLE_MULTISAMPLE option left at its default 0 value:
Running cmake-gui
I prefer the command line, but CMake also has a GUI. The GUI offers an interactive way to set cache variables. Again, make sure to install your project’s required dependencies first.
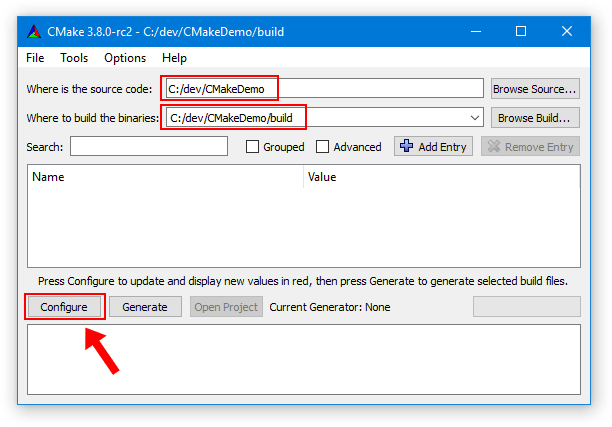
To use it, run cmake-gui , fill in the source and binary folder paths, then click Configure.
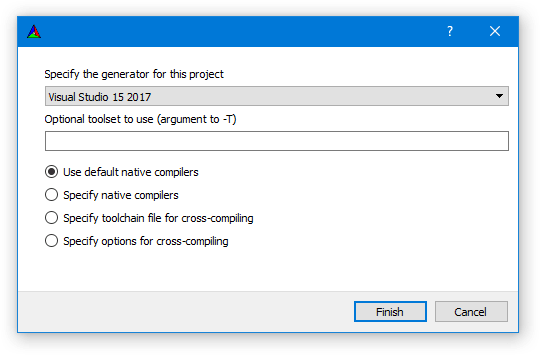
If the binary folder doesn’t exist, CMake will prompt you to create it. It will then ask you to select a generator.
After the initial configure step, the GUI will show you a list of cache variables, similar to the list you see when you run cmake -L -N . from the command line. New cache variables are highlighted in red. (In this case, that’s all of them.) If you click Configure again, the red highlights will disappear, since the variables are no longer considered new.
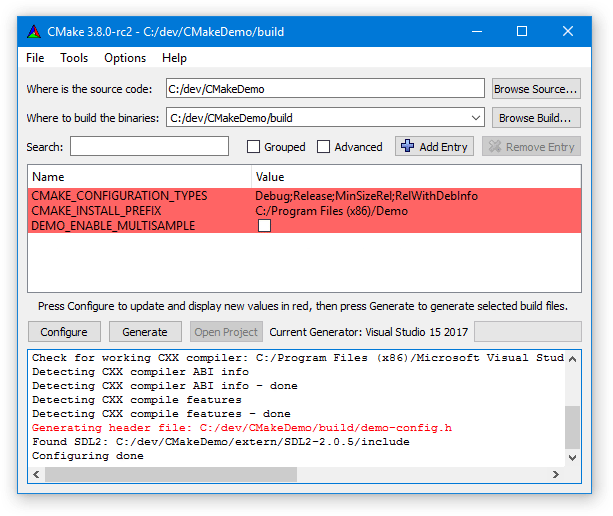
The idea is that if you change a cache variable, then click Configure, new cache variables might appear as a result of your change. The red highlights are meant to help you see any new variables, customize them, then click Configure again. In practice, changing a value doesn’t introduce new cache variables very often. It depends how the project’s CMakeLists.txt script was written.
Once you’ve customized the cache variables to your liking, click Generate. This will generate the build pipeline in the binary folder. You can then use it to build your project.
Running ccmake
ccmake is the console equivalent to cmake-gui . Like the GUI, it lets you set cache variables interactively. It can be handy when running CMake on a remote machine, or if you just like using the console. If you can figure out the CMake GUI, you can figure out ccmake .

Building with Unix Makefiles
CMake generates a Unix makefile by default when run from the command line in a Unix-like environment. Of course, you can generate makefiles explicitly using the -G option. When generating a makefile, you should also define the CMAKE_BUILD_TYPE variable. Assuming the source folder is the parent:
You should define the CMAKE_BUILD_TYPE variable because makefiles generated by CMake are single-configuration. Unlike a Visual Studio solution, you can’t use the same makefile to build multiple configurations such as Debug and Release. A single makefile is capable of building exactly one build type. By default, the available types are Debug, MinSizeRel, RelWithDebInfo and Release. Watch out – if you forget to define CMAKE_BUILD_TYPE , you’ll probably get an unoptimized build without debug information, which is useless. To change to a different build type, you must re-run CMake and generate a new makefile.
Personally, I also find CMake’s default Release configuration useless because it doesn’t generate any debug information. If you’ve ever opened a crash dump or fixed a bug in Release, you’ll appreciate the availability of debug information, even in an optimized build. That’s why, in my other CMake projects, I usually delete the Release configuration from CMakeLists.txt and use RelWithDebInfo instead.
Once the makefile exists, you can actually build your project by running make . By default, make will build every target that was defined by CMakeLists.txt . In CMakeDemo’s case, there’s only one target. You can also build a specific target by passing its name to make :
The makefile generated by CMake detects header file dependencies automatically, so editing a single header file won’t necessarily rebuild the entire project. You can also parallelize the build by passing -j 4 (or a higher number) to make .
CMake also exposes a Ninja generator. Ninja is similar to make , but faster. It generates a build.ninja file, which is similar to a Makefile . The Ninja generator is also single-configuration. Ninja’s -j option autodetects the number of available CPUs.
Building with Visual Studio
We’ll generate a Visual Studio .sln file from the CMake command line. If you have several versions of Visual Studio installed, you’ll want to tell cmake which version to use. Again, assuming that the source folder is the parent:
The above command line will generate a Visual Studio .sln file for a 32-bit build. There are no multiplatform .sln files using CMake, so for a 64-bit build, you must specify the 64-bit generator:
Open the resulting .sln file in Visual Studio, go to the Solution Explorer panel, right-click the target you want to run, then choose “Set as Startup Project”. Build and run as you normally would.
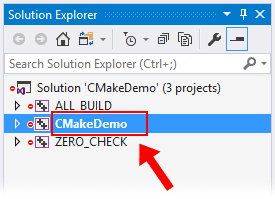
Note that CMake adds two additional targets to the solution: ALL_BUILD and ZERO_CHECK. ZERO_CHECK automatically re-runs CMake when it detects a change to CMakeLists.txt . ALL_BUILD usually builds all other targets, making it somewhat redundant in Visual Studio. If you’re used to setting up your solutions a certain way, it might seem annoying to have these extra targets in your .sln file, but you get used to it. CMake lets you organize targets and source files into folders, but I didn’t demonstrate that in the CMakeDemo sample.
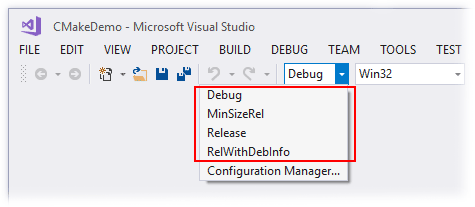
Like any Visual Studio solution, you can change build type at any time from the Solution Configuration drop-down list. The CMakeDemo sample uses CMake’s default set of build types, shown below. Again, I find the default Release configuration rather useless as it doesn’t produce any debug information. In my other CMake projects, I usually delete the Release configuration from CMakeLists.txt and use RelWithDebInfo instead.
Built-In CMake Support in Visual Studio 2017
In Visual Studio 2017, Microsoft introduced another way to use CMake with Visual Studio. You can now open the source folder containing CMakeLists.txt from Visual Studio’s File → Open → Folder menu. This new method avoids creating intermediate .sln and .vcxproj files. It also exposes 32-bit and 64-bit builds in the same workspace. It’s a nice idea that, in my opinion, falls short for a few reasons:
- If there are any source files outside the source folder containing CMakeLists.txt , they won’t appear in the Solution Explorer.
- The familiar C/C++ Property Pages are no longer available.
- Cache variables can only be set by editing a JSON file, which is pretty unintuitive for a Visual IDE.
I’m not really a fan. For now, I intend to keep generating .sln files by hand using CMake.
Building with Xcode
The CMake website publishes a binary distribution of CMake for MacOS as a .dmg file. The .dmg file contains an app that you can drag & drop to your Applications folder. Note that if you install CMake this way, cmake won’t be available from the command line unless you create a link to /Applications/CMake.app/Contents/bin/cmake somewhere. I prefer installing CMake from MacPorts because it sets up the command line for you, and because dependencies like SDL2 can be installed the same way.
Specify the Xcode generator from the CMake command line. Again, assuming that the source folder is the parent:
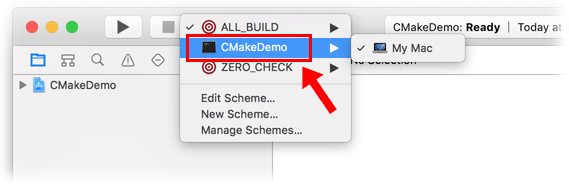
This will create an .xcodeproj folder. Open it in Xcode. (I tested in Xcode 8.3.1.) In the Xcode toolbar, click the “active scheme” drop-down list and select the target you want to run.
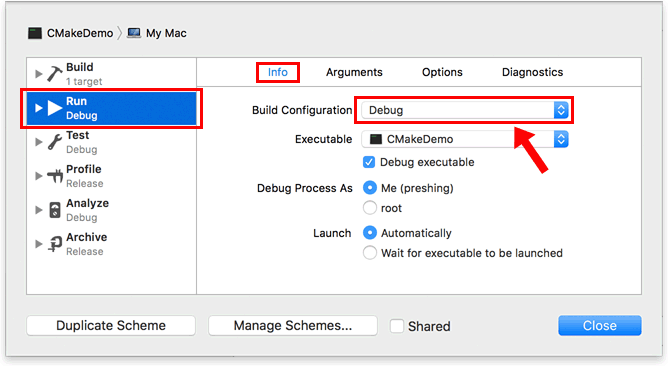
After that, click “Edit Scheme…” from the same drop-down list, then choose a build configuration under Run → Info. Again, I don’t recommend CMake’s default Release configuration, as the lack of debug information limits its usefulness.
Finally, build from the Product → Build menu (or the ⌘B shortcut), run using Product → Run (or ⌘R), or click the big play button in the toolbar.
It’s possible to make CMake generate an Xcode project that builds a MacOS bundle or framework, but I didn’t demonstrate that in the CMakeDemo project.
Building with Qt Creator
Qt Creator provides built-in support for CMake using the Makefile or Ninja generator under the hood. I tested the following steps in Qt Creator 3.5.1.
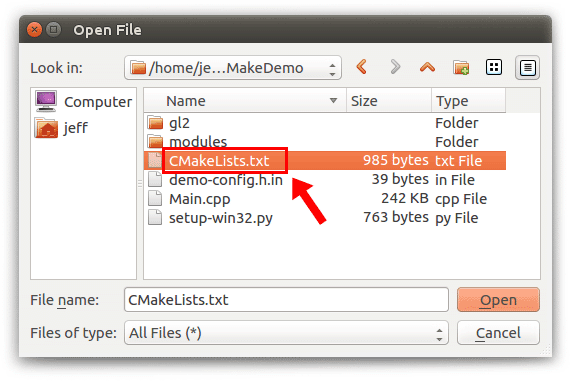
In Qt Creator, go to File → Open File or Project… and choose CMakeLists.txt from the source folder you want to build.
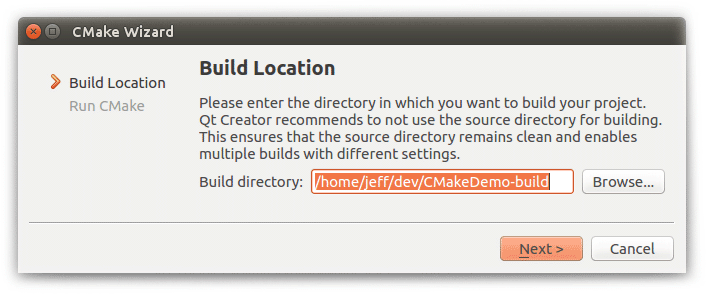
Qt Creator will prompt you for the location of the binary folder, calling it the “build directory”. By default, it suggests a path adjacent to the source folder. You can change this location if you want.
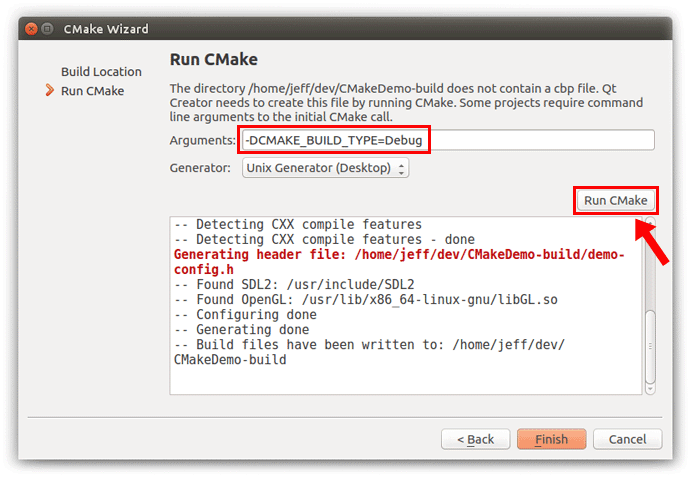
When prompted to run CMake, make sure to define the CMAKE_BUILD_TYPE variable since the Makefile generator is single-configuration. You can also specify project-specific variables here, such as CMakeDemo’s DEMO_ENABLE_MULTISAMPLE option.
After that, you can build and run the project from Qt Creator’s menus or using the Shift+Ctrl+B or F5 shortcuts.
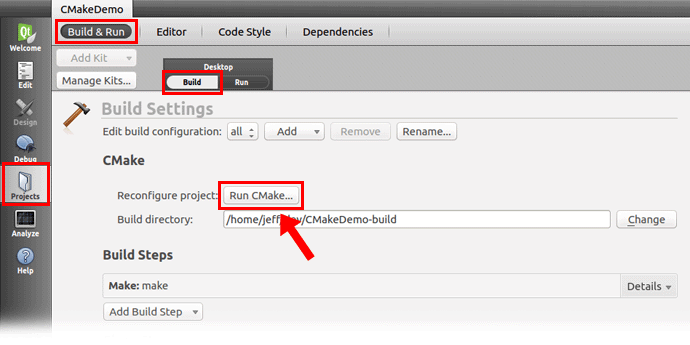
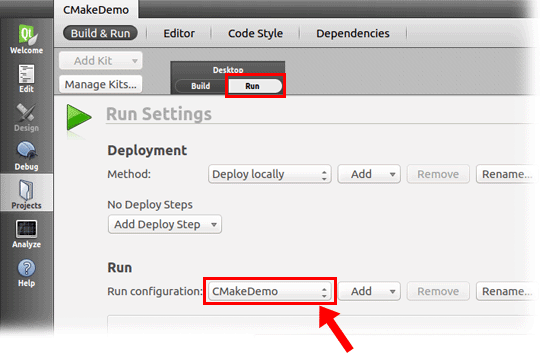
If you want to re-run CMake, for example to change the build type from Debug to RelWithDebInfo, navigate to Projects → Build & Run → Build, then click “Run CMake”.
The CMakeDemo project contains a single executable target, but if your project contains multiple executable targets, you can tell Qt Creator which one to run by navigating to Projects → Build & Run → Run and changing the “Run configuration” to something else. The drop-down list is automatically populated with a list of executable targets created by the build pipeline.
Other CMake Features
- You can perform a build from the command line, regardless of the generator used: cmake —build . —target CMakeDemo —config Debug
- You can create build pipelines that cross-compile for other environments with the help of the CMAKE_TOOLCHAIN_FILE variable.
- You can generate a compile_commands.json file that can be fed to Clang’s LibTooling library.
I really appreciate how CMake helps integrate all kinds of C/C++ components and build them in all kinds of environments. It’s not without its flaws, but once you’re proficient with it, the open source world is your oyster, even when integrating non-CMake projects. My next post will be a crash course in CMake’s scripting language.
 If you wish to become a power user, and don’t mind forking over a few bucks, the authors’ book Mastering CMake offers a big leap forward. Their article in The Architecture of Open Source Applications is also an interesting read.
Check out Plywood, a cross-platform, open source C++ framework:
Recent Posts
Copyright © 2021 Jeff Preshing — Powered by Octopress


