- Enable and Disable the Built-in Administrator Account
- Enabling the Built-in Administrator Account
- Use an answer file
- Log on by using audit mode
- Use the Local Users and Groups MMC (server versions only)
- Disabling the Built-in Administrator Account
- Configuring the Built-in Administrator Password
- Enable and Disable Built-in Administrator Account on Windows 10/8,8.1/7
- Part 1: Enable Built-in Administrator on Windows 7 in Local Users and Groups
- Part 2: Enable Hidden Administrator in Local Security Policy in Windows 8/8.1
- Part 3: Activate Hidden Administrator via Command Prompt in Windows10
- User Account Control: Admin Approval Mode for the Built-in Administrator account
- Reference
- Possible values
- Best practices
- Location
- Default values
- Policy management
- Restart requirement
- Security considerations
- Vulnerability
- Countermeasure
- Potential impact
Enable and Disable the Built-in Administrator Account
When manufacturing PCs, you can use the built-in Administrator account to run programs and apps before a user account is created.
NoteВ В This topic is about manufacturing PCs. For help with the admin account on your own PC, try one of these pages:
This account is used when you log into the system by using audit mode, or when you add scripts to the auditUser configuration pass.
Enabling the Built-in Administrator Account
You can use any of the following methods to enable the built-in Administrator account:
Use an answer file
You can enable the built-in Administrator account during unattended installations by setting the AutoLogon setting to Administrator in the Microsoft-Windows-Shell-Setup component. This will enable the built-in Administrator account, even if a password is not specified in the AdministratorPassword setting.
You can create an answer file by using Windows® System Image Manager (Windows SIM).
The following sample answer file shows how to enable the Administrator account, specify an Administrator password, and automatically log on to the system.
NoteВ В Both the Microsoft-Windows-Shell-Setup\ Autologon section and the Microsoft-Windows-Shell-Setup\ UserAccounts \ AdministratorPassword section are needed for automatic logon in audit mode to work. The auditSystem configuration pass must include both these settings.
The following XML output shows how to set the appropriate values:
To prevent having to enter a password for the built-in Administrator account after you complete the out-of-box experience, set Microsoft-Windows-Shell-Setup\ UserAccounts \ AdministratorPassword in the oobeSystem configuration pass.
The following XML output shows how to set the appropriate values:
For Windows Server® 2012, the built-in Administrator password must be changed at first logon. This prevents the built-in Administrator account from having a blank password by default.
Log on by using audit mode
If the computer has not yet gone through Out-Of-Box Experience (OOBE), you can enter the built-in Administrator account by re-entering audit mode. For more information, see Boot Windows to Audit Mode or OOBE.
Use the Local Users and Groups MMC (server versions only)
Change the properties of the Administrator account by using the Local Users and Groups Microsoft Management Console (MMC).
Open MMC, and then select Local Users and Groups.
Right-click the Administrator account, and then select Properties.
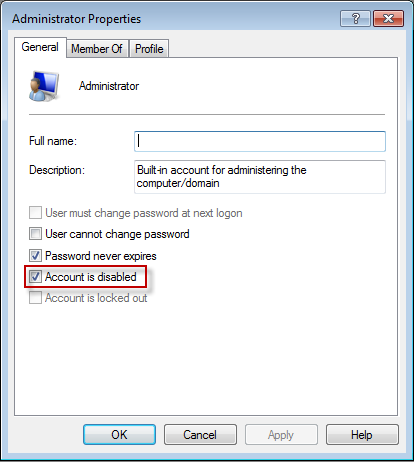
The Administrator Properties window appears.
On the General tab, clear the Account is Disabled check box.
Administrator access is now enabled.
Disabling the Built-in Administrator Account
For new installations, after the end user creates a user account in OOBE, the built-in Administrator account is disabled.
For upgrade installations, the built-in Administrator account remains enabled when there is no other active local administrator on the computer, and when the computer is not joined to a domain.
Use either of the following methods to disable the built-in administrator account:
Run the sysprep /generalize command
When you run the sysprep /generalize command, the next time that the computer starts, the built-in Administrator account will be disabled.
Use the net user command
Run the following command to disable the Administrator account:
You can run this command after you configure the computer and before you deliver the computer to a customer.
Original equipment manufacturers (OEMs) and system builders are required to disable the built-in administrator account before delivering the computers to customers. To do this, you can use either of the following methods.
Configuring the Built-in Administrator Password
Instructions
When you run the sysprep /generalize command on Windows Server 2012 and Windows Server 2008 R2, the Sysprep tool resets the built-in Administrator account password. The Sysprep tool only clears the built-in Administrator account’s password for server editions, not for client editions. The next time that the computer starts, Setup displays a prompt for a password.
NoteВ В In Windows ServerВ 2012, Windows ServerВ 2008В R2, and WindowsВ ServerВ 2008, the default password policy requires a strong password for all user accounts. To configure a weak password, you can use an answer file that includes the Microsoft-Windows-Shell-Setup\ UserAccounts \ AdministratorPassword setting. You cannot configure a weak password, either manually or by using a script such as the net user command.
Enable and Disable Built-in Administrator Account on Windows 10/8,8.1/7
Every Windows system is installed with an administrator account. At the time of final installation, you will be required to create it. Now the administrator account is there to ensure that all possible changes and programs can be installed on your computer. Through the administrator account, you can make sufficient changes that will enable you to have controlling aspects over the other users and guest accounts. Being in control of this account will provide you the role of accessing all files on the computer, install several hardware or software programs and even make alterations to security settings.
In fact, besides this administrator account, there is another hidden account named built-in Administrator, which was created while system installation in default. This built-in Administrator account give you full unrestricted access to your Windows. ForВ security, Windows will automatically make this built-in administrator accounts hidden and disabled by default, you need to activate it manually if you want. However, It’sВ worthВ mentioningВ thatВ the reason of MS windows disabled this account is to prevent harmful activities or malicious programs to user’s Windows system, that’s to say, any of special tasks and operations on Windows will need administrative privilege. If you can’t login to your Windows 7, you should bypass Windows 7 password first.
Now if you are wondering how to activate the administrator account if your computer or laptop is locked, then there are three easy and simple ways through which you can enable or disable built-administrator account on Windows 10, 8, 7and XP.
Part 1: Enable Built-in Administrator on Windows 7 in Local Users and Groups
Follow this steps blow, this method only works for Windows 7 Professional, Ultimate, and Enterprise editions.
Step 1: Go to control panel and navigate to Administrative tools and computer management.
Step 2: Open the Local Users and Groups manager. In the left pane, select Users.
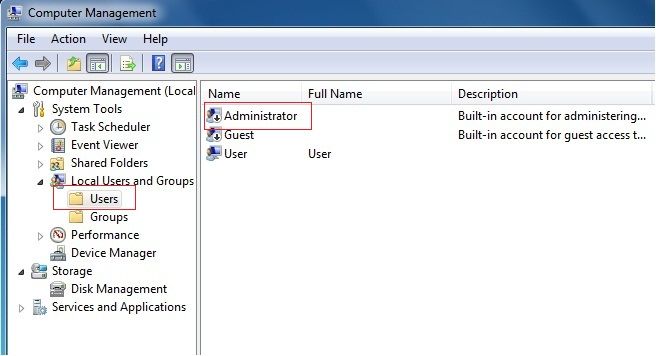
Step 3: In the right pane, double-click on the Administrator and Administrator properties pops up.
Step 4: Enable — To enable the built-in elevated Administrator account, just uncheck the «Account is disabled» box and OK. From here you can also disable the Administrator or other account.
Part 2: Enable Hidden Administrator in Local Security Policy in Windows 8/8.1
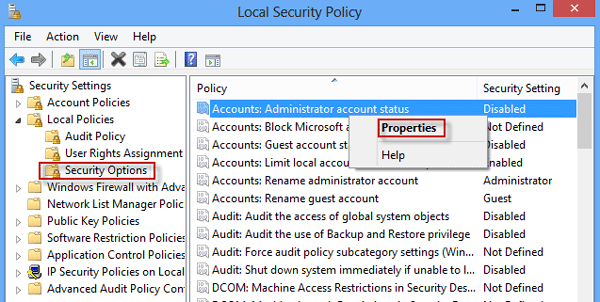
В Step 1: After you login Windows 8, 8.1, you should pressВ Win + RВ keys to open В ‘Run‘ dialog box first, then typeВ secpol.mscВ in the box and clickВ OK.

Step 2: This step you will see the Local Security Policy window pops up, in the left pane, just find and expand «Local Policies» tab > select «Security Options».
Step 3: In right-side pane, double-click on the policy «Accounts: Administrator account status» or right-click and go to «Properties» and set it toВ Enabled. Then the built-in administrator account will be activated. Sometimes you may need to restart your computer to allow the chances to take effect.
Part 3: Activate Hidden Administrator via Command Prompt in Windows10
The command prompt mode is one of the basic and most effective ways to enable or disable built-in administrator. Once you select the safe mode, you will be directed towards an interface with simple guidelines following which the administrators account will be shown on your screen just as you had hoped to see it. You can do it with administrator privilege.
Step 1: Login your Window 10 and run Command Prompt as administrator. You can directly press the «Windows Key + X» to enter «Quick access menu» and then select Command Prompt (Admin).

Step 2: Start to enable and disable the built-in Administrator on Win 10.
1) There is a command prompt window pops up, then you should enter the following command,


2). To Disable Built-in Administrator Account , just input «net user administrator /active:no» (no quotes) and hitВ EnterВ to disable it.

You will see thee is a messages appears the command completed successfully, log out and restart your computer,IfВ you didВ thisВ correctly, you should see the admin accounts lists on the pages, choose it and enter to your system, then you have the full right to change other account password and settings.
Considering the simplicity of the steps involved, there are several more guidelines that you can follow as well. One you have all the guiding rules at your disposal, getting back in control and enabling the administrators account will be as easy as anything. Even if you are not well versed with the system technicalities, there is no need for you to get apprehensive since the required measures are simple, easy and effective.

Vicky is a professional Windows technology author with many experience, focusing on computer technology. She’s very much enjoy helping people find solutions to their problems. Her knowledge and passion always drive her to discover everything about technology.
User Account Control: Admin Approval Mode for the Built-in Administrator account
Applies to
Describes the best practices, location, values, policy management and security considerations for the User Account Control: Admin Approval Mode for the Built-in Administrator account security policy setting.
Reference
This policy setting determines the behavior of Admin Approval Mode for the built-in administrator account. When the Admin Approval Mode is enabled, the local administrator account functions like a standard user account, but it has the ability to elevate privileges without logging on by using a different account. In this mode, any operation that requires elevation of privilege displays a prompt that allows the administrator to permit or deny the elevation of privilege. If Admin Approval Mode is not enabled, the built-in Administrator account runs all applications by default with full administrative privileges. By default, Admin Approval Mode is set to Disabled.
If a computer is upgraded from a previous version of the Windows operating system, and the administrator account is the only account on the computer, the built-in administrator account remains enabled, and this setting is also enabled.
Possible values
The built-in administrator account logs on in Admin Approval Mode so that any operation that requires elevation of privilege displays a prompt that provides the administrator the option to permit or deny the elevation of privilege.
If Admin Approval Mode is not enabled, the built-in Administrator account runs all applications by default with full administrative privileges
Best practices
It is recommended not to enable the built-in Administrator account on the client computer, but to use the standard user account and User Account Control (UAC) instead. If you want to enable the built-in Administrator account to carry out administrative tasks, for security reasons you should also enable Admin Approval Mode. See UAC-Admin-Approval-Mode-for-the-Built-in-Administrator-account
To enable Admin Approval Mode, you must also configure the local security policy setting: User Account Control: Behavior of the elevation prompt for administrators in Admin Approval Mode to Prompt for consent on the secure desktop and then click OK.
After enabling Admin Approval Mode, to activate the setting, you must first log in and out. Alternatively, You may perform gpupdate /force from an elevated command prompt.
Location
Computer Configuration\Windows Settings\Security Settings\Local Policies\Security Options
Default values
The following table lists the actual and effective default values for this policy. Default values are also listed on the policy’s property page.
| Server type or GPO | Default value |
|---|---|
| Default Domain Policy | Not defined |
| Default Domain Controller Policy | Not defined |
| Stand-Alone Server Default Settings | Disabled |
| DC Effective Default Settings | Disabled |
| Member Server Effective Default Settings | Disabled |
| Client Computer Effective Default Settings | Disabled |
Policy management
This section describes features and tools that are available to help you manage this policy.
Restart requirement
None. Changes to this policy become effective without a device restart when they are saved locally or distributed through Group Policy.
Security considerations
This section describes how an attacker might exploit a feature or its configuration, how to implement the countermeasure, and the possible negative consequences of countermeasure implementation.
Vulnerability
One of the risks that the UAC feature tries to mitigate is that of malicious software running under elevated credentials without the user or administrator being aware of its activity. An attack vector for malicious programs is to discover the password of the Administrator account because that user account was created for all installations of Windows. To address this risk, the built-in Administrator account is disabled in computers running at least WindowsВ Vista. In computers running at least Windows ServerВ 2008, the Administrator account is enabled, and the password must be changed the first time the administrator logs on. In a default installation of a computer running at least WindowsВ Vista, if the computer is not joined to a domain, the first user account you create has the equivalent permissions of a local administrator.
Countermeasure
Enable the User Account Control: Admin Approval Mode for the Built-in Administrator account setting if you have the built-in Administrator account enabled.
Potential impact
Users who log on by using the local administrator account are prompted for consent whenever a program requests an elevation in privilege.


