- Amlogic Burn Card Maker v2.0.2: Программа для прошивки устройств на базе SoC Amlogic
- Как сделать загрузочную SD карту для приставок на Amlogic
- Burn card maker linux
- Burn card maker linux
- Download Amlogic Burn Card Maker Tool
- How To Use the Amlogic Burn Card Maker Tool
- All comments
- Download Amlogic Burn_Card_Maker v2.0.2
- You can use Amlogic Burn Card Maker to flash firmwares from a micro SD card to Android devices powered by Amlogic processors.
- Did this article help you? If so, please tell me in a comment what do you think about it.
Amlogic Burn Card Maker v2.0.2: Программа для прошивки устройств на базе SoC Amlogic

Amlogic Burn Card Maker v2.0.2 это программа, с помощью которой вы сможете прошить с карты Micro SD ваше Android устройство на базе процессоров Amlogic.
Скачать Amlogic Burn_Card_Maker v2.0.2 здесь или здесь. Вы также можете скачать Amlogic BootcardMaker из этой статьи.

Как использовать Amlogic Burn Card Maker v2.0.2:
- Скачать Amlogic Burn Card Maker v2.0.2 (3.96 MB).
- Извлеките архив и запустите файл Burn_Card_Maker.exe для запуска инструмента.
- Нажмите на верхнем левом меню (на китайском) и выбирите второй вариант — ‘English Version’ и перезапустите приложение.
- Выберите нужный диск и затем — «Choose your image files», чтобы выбрать конкретную прошивку .img для вашего устройства Amlogic.
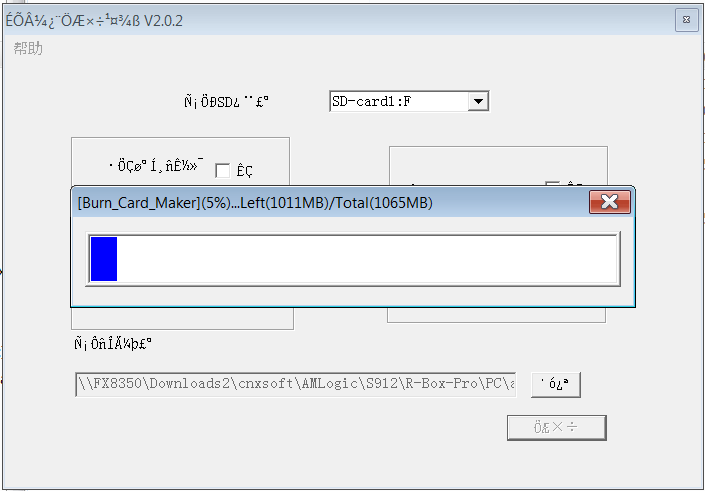
- Нажмите кнопку «Make» и ждите, пока закончится процесс записи. Теперь вставьте карту микро SD в устройстве Amlogic и включите питание. Вы сможете войти в меню восстановления и прошивка будет автоматически прошита. Когда TV Box перезагрузится, извлеките микро SD-карту, этот шаг очень важен, подождите 4-5 минут, и обновление будет завершено.
- Создания разделов и форматирование
- Стирание флэш
- Стирание загрузчика
- Перезагрузка
Источник
Как сделать загрузочную SD карту для приставок на Amlogic
Я рассматривал Rikomagic MK22 TV Box около двух недель назад, тогда же я сделал онлайн обновление прошивки. Компания выпустила новую прошивку .IMG для Amlogic USB Burning Tool , под управлением Windows и Burning tool, которые не очень хорошо работают.
Я начал обзор R-Box Pro TV Box также основанный на процессоре Amlogic S912,но онлайн обновление прошивки не работало и мне снова не удалось найти .IMG прошивку для приставки на GeekBuying. Тем не менее, я был проинформирован о том , что «USB burning Tool» теперь может быть прошита через микро SD карту или USB флэш — диск со всеми последними приставками на Amlogic, поэтому я попробовал этот метод вместо R-Box Pro, и решил рассказать о своем опыте после нескольких инструкций по Freaktab сделанных пользователем Calc. Я покажу как это сделать в Linux, а затем в Windows.
Метод для Linux
После загрузки и извлечения rar’ed файла прошивки (дважды), в конечном итоге я получил одиночные файлы микропрограмм (IMG aml_s912_q6330-R-BOX-PRO-3gddr-macintosh-20161015.img).
Во- первых , нам нужно иметь инструмент для извлечения некоторых файлов из прошивки. Создание AML-ТПиР-pack-extract.c при помощи кода, который я нашел на Freaktab и слегка модифицировал его для файла прошивки:
и запускаем файл прошивки:
будет извлекаться куча файлов:
/ edev / amlogic / s912 $ ls
Вам нужен aml_sdc_burn.ini и aml_sdc_burn.UBOOT , плюс сам файл IMG для создания загрузочного устройства.
Теперь нужно найти вашу микро SD карту (отформатированную с файловой системой FAT32) с lsblk:
В моем случае это / DEV / SDD, но я буду использовать / Dev / SDX в инструкции ниже:
и , наконец , нужно вновь смонтировать SD – карту / флэш — накопитель, скопируйте файл прошивки и aml_sdc_burn.ini в корень устройства, и переименуйте прошивку aml_upgrade_package.img , чтобы она соответствовала строке вaml_sdc_burn.ini :
Теперь убедитесь, что никакие другие устройства USB или SD-карта не вставлена в телевизор, и вставьте загрузочную (микро) SD-карту или USB флэш-накопитель в ТВ-приставку. Если всё сделали правильно, то обновление должно начаться, но если не начнется то вам нужно нажать кнопку восстановления, сначала нажать а потом отпустить кнопку для того, чтобы войти в режим восстановления. Обновление должно запуститься автоматически, как показано ниже.
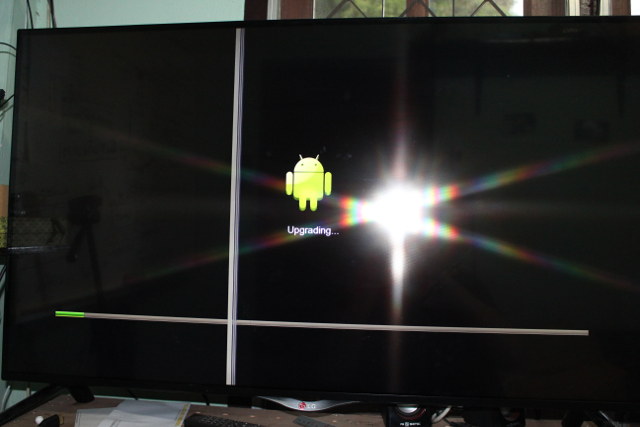
Терпеливо дождитесь завершения и всё должно заработать. Обратите внимание, что я попробовал установку с флэш-накопителя USB, но метод не работает. После завершения обновления, вы увидите логотип»Android».
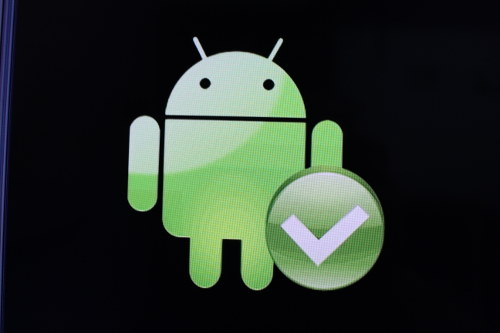
Удалите карту микро SD, выключите и снова включите плату, чтобы завершить обновление, и в течение одной или двух минут запустится Android. Если вместо этого, прошивка заканчивается логотипом с красным крестом, проверьте MD5 прошивки (например, с помощью md5sum в Linux), чтобы убедиться, что он не поврежден. Если поврежден, то повторно загрузите файл и / или повторно скопируйте файл на микро SD карту.
Метод для Windows
Если вы являетесь пользователем Windows , то это намного проще , так как вам просто нужно использовать Burn_Card_Marker инструмент, который вы можете скачать здесь.
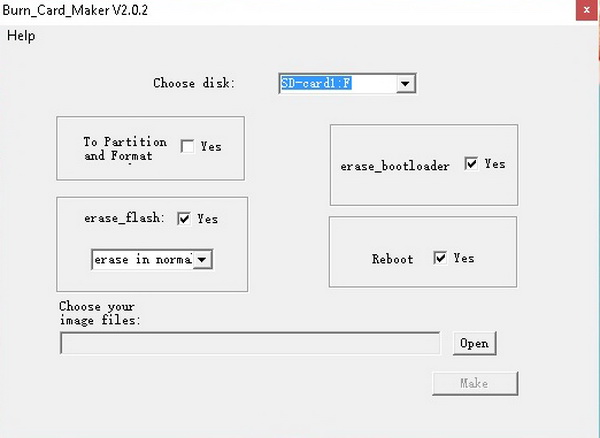
Но после запуска программы в Windows 7, и изменении языка в верхнем меню программа остаётся на китайском языке и была похожа на скриншот ниже
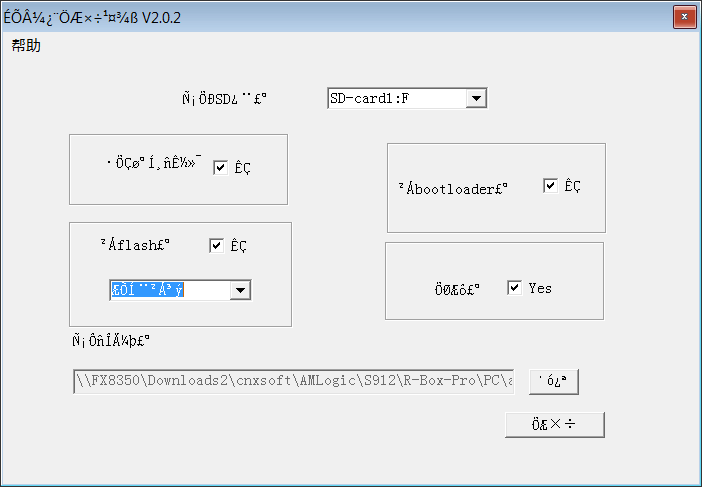
[ Update : Для изменения языка на английский, выберите третий вариант в верхнем меню, чтобы применить изменения … Перезапустите приложение, и оно будет на английском языке.]

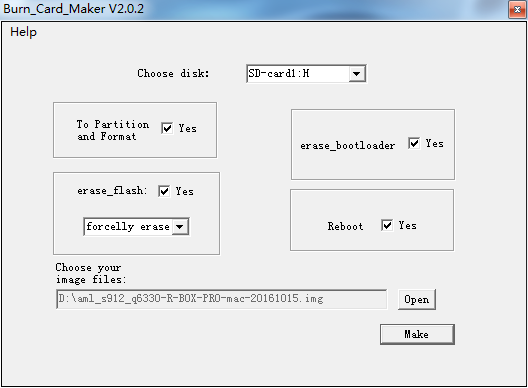
Это на самом деле не самая большая проблема, но вы все равно можете выбрать SD карту устройства (F: диск в моем случае), загрузите файл и нажмите кнопку «Сделать», чтобы начать создавать загрузочный диск из (микро) SD-карты.
Вы увидите сообщение «Success!» Всплывающее окно и кнопку завершения, и содержимое SD-карты будет отображаться как встроенное программное обеспечение, а также два aml_sdc_burn файла.

Теперь вы можете вставить карту микро SD в свой ТВ-бокс, войти в меню восстановления или с помощью какого-нибудь другого способа подходящего для вашего телевизора, и обновление прошивки запустится автоматически.
Источник
Burn card maker linux
Upgrade Introductions: Via a TF Burning Card
Preparations:
- Download the Burn Card Maker Tool and extract it.
- Prepare a TF card and a card reader, the card will be formatted, you might need to back up the data first.
- A HDMI supported display/monitor.
 2. Insert the TF card into your PC, it should appear as a new drive letter. Then:
- Select the TF card drive in the drop-down list of Choose the disk .
- [Optional] Enable To Partition and Format (Enable this when the first time you making the booting card for Vim).
- Click Open button and choose the image for Vim.
- Click Make button to create the burning card for Vim:


- When everything is done, click the Success button to quit current operation.
- Plug out the TF card from your PC and then insert it into the TF Card slot of Vim.
- Connect the USB-C & HDMI cables, and power on Vim.
- Let Vim enter into upgrade mode to complete the upgrading:
- Long press Power key without release
- Short press Reset key and release
- Count 2-3 seconds and release the Power key to enter into upgrade mode.
If everything goes fine, now your display/monitor should display like this:
Источник
Burn card maker linux
The process of flashing firmwares has been made easier thanks to the various tools that are available today. One such tool is the Amlogic Burn Card Maker. This tool is an app that you can use to flash firmwares from a micro SD card in an Android device. However, not all devices are supporting the tool. Only those Android phones which run on Amlogic processors can make use of this software.
In this post, we bring you the Amlogic Burn card maker tool. You can find the download link and installation guide below. It is quite simple to use. This tool can perform various actions like Partition and Format, Erase Flash, Erase Bootloader and Reboot the device.
Download Amlogic Burn Card Maker Tool
Here is the download link for the Amloic Burn. It is a very small file of 3.96 MB.
- Amlogic Burn Card maker Tool | Download | Mirror
You May Also Like,
How To Use the Amlogic Burn Card Maker Tool
Pre-Requisite
- This tool is exclusively for Android device running Amlogic chipset. Don’t try it on other devices.
- A PC/Laptop
- A microSD card
- GetDroidTips will not be responsible for the occurrence of any incidental bricking of your device.
Here is the guide that will help you use the Amlogic burn card maker.
Step-1 Download the Amlogic Burn card Maker from the download section above.
All comments
I have a T95z plus Sunvell 912, before uploading a new rom and after opening the USB Burn Tool, it found my box without any problems, but I unchecked Erase Botloader and it did not start anymore, only the LEDs are lit no reaction. I tried to repair the botloader with Burn Card Maker, everything is loaded on the sd card but it does not work. Please help
I have a T95z plus Sunvell 912, before uploading a new rom and after opening the USB Burn Tool, it found my box without any problems, but I unchecked Erase Botloader and it did not start anymore, only the LEDs are lit no reaction. I tried to repair the botloader with Burn Card Maker, everything is loaded on the sd card but it does not work. Please help
Источник
Download Amlogic Burn_Card_Maker v2.0.2
You can use Amlogic Burn Card Maker to flash firmwares from a micro SD card to Android devices powered by Amlogic processors.
Download Amlogic Burn_Card_Maker v2.0.2 from here, here or here. You can also download Amlogic BootcardMaker from this article.
How to use Amlogic USB Burning Tool
1. Download Burn_Card_Maker工具 v2.0.2 (3.96 MB).
2. Extract the archive and run Burn_Card_Maker.exe file to run the tool.
3. Click on upper left chinese menu and choose second option, check ‘English Version’ and restart the application.
4. Choose disk then ‘Choose your image files’ to open image and select your specific .img firmware for your Amlogic device.
5. Press ‘Make’ button and wait to finish. Now insert the micro SD card in your Amlogic device and power on. You will be able to enter into recovery and the firmware will be flashed automatically. When the TV BOX reboots, remove the micro SD Card, this step is very important, wait 4-5 minutes and the update will completed.
Tool Options:
– To Partition and Format
– Erase Flash
– Erase Bootloader
– Reboot
Follow the below video tutorial for more help.


Did this article help you? If so, please tell me in a comment what do you think about it.
Don’t miss any of our future video tutorials, follow us on Youtube. Like us on Facebook. Add us in your circles on Google+. Watch our photo albums on Flickr. Subscribe now to our newsletter.
hi guys i ve jst tried the card methos with lolipop and now my mini ms8 is not even turning on what should i do?
ho scaricato il firmware e inserito la micro sd.pero non si avvia nulla da solo.il tv box resta in bootloop..debo tenre pemtu il tasto per avviarlo in recovery.se si per qundo tempo
my x96 tv box not work
muy buena aplicacion
After so long time on searching or the good firmware i have found it here, and for this i have stop here to let the comment, i appreciate your’re work to make this video and all the step, i have folow the step with SD card and work perfect, im so happy, my box is now like a new.
For other people i have done this with MXq PRO 4K 64bit Amlogic S905
Thank you very very much’re time.
Greetings Danyel from Netherland.
I am glad to hear this, enjoy it, share is love!
after burning the SDcard, my mxq pro box does not upgrade automatically. It just enters the recovery and wait for something
update from sdcard can’t find any file
what am I doing wrong?
burn card maker stooped,not working
i realy need this
i use this methode to flash my X92 2gb with atvxperience v2f but untick “ERASE BOOTLOADER” as describe on site, and work ,thanks
I have a X96s, after i install SuperSU, my device cannot boot up already, i have try all the method above, but non of them working, it seem like is a dead end for me. Any other suggestion how to restore everything again?
Hello guys, can help me, I have a problem with Amlogic USB Burning Tool, when try to recovery Always error (Romcode/Initialize DDR/Download buffer/Read item data failed). Where, I can have article about this?
[03:36:19 478][Global][Inf]–USB_Burning_Tool soft Version: V2.1.6.8
[03:36:19 478][Global][Inf]–Windows Version: Microsoft Windows 10, Bit: 64
[03:36:19 557][Global][Inf]–Scan usb device
[03:36:19 557][Global][Inf]–Aml scan WorldCup Device
[03:36:19 650][Global][Inf]–Host: USB xHCI Compliant Host Controller
[03:36:19 650][Global][Inf]–DevPath:\\?\pci#ven_1022&dev_7814&subsys_397c17aa&rev_09#3&2411e6fe&0&80#<3abf6f2d-71c4-462a-8a92-1e6861e6af27>
[03:36:19 650][Global][Inf]—->Roothub:USB#ROOT_HUB30#4&1cfeae7e&1&0#
[03:36:19 650][Global][Inf]——–>[Port0]NoDeviceConnected
[03:36:19 650][Global][Inf]——–>[Port1]NoDeviceConnected
[03:36:19 650][Global][Inf]——–>[Port2]Other device
[03:36:19 650][Global][Inf]——–>[Port3]NoDeviceConnected
[03:36:19 713][Global][Inf]–Host: Standard Enhanced PCI to USB Host Controller
[03:36:19 713][Global][Inf]–DevPath:\\?\pci#ven_1022&dev_7808&subsys_397c17aa&rev_11#3&2411e6fe&0&92#<3abf6f2d-71c4-462a-8a92-1e6861e6af27>
[03:36:19 713][Global][Inf]—->Roothub:USB#ROOT_HUB20#4&2ec8d6e8&0#
[03:36:19 795][Global][Inf]——–>[Port0]NoDeviceConnected
[03:36:19 795][Global][Inf]——–>[Port1]NoDeviceConnected
[03:36:19 795][Global][Inf]——–>[Port2]NoDeviceConnected
[03:36:19 795][Global][Inf]——–>[Port3]Other device
[03:36:19 795][Global][Inf]——–>[Port4]NoDeviceConnected
[03:36:19 795][Global][Inf]–Host: Standard OpenHCD USB Host Controller
[03:36:19 795][Global][Inf]–DevPath:\\?\pci#ven_1022&dev_7807&subsys_397c17aa&rev_11#3&2411e6fe&0&90#<3abf6f2d-71c4-462a-8a92-1e6861e6af27>
[03:36:19 795][Global][Inf]—->Roothub:USB#ROOT_HUB#4&f878aed&0#
[03:36:19 832][Global][Inf]——–>[Port0]NoDeviceConnected
[03:36:19 832][Global][Inf]——–>[Port1]NoDeviceConnected
[03:36:19 832][Global][Inf]——–>[Port2]Other device
[03:36:19 832][Global][Inf]——–>[Port3]NoDeviceConnected
[03:36:19 832][Global][Inf]——–>[Port4]NoDeviceConnected
[03:36:19 832][Global][Inf]–Host: Standard OpenHCD USB Host Controller
[03:36:19 832][Global][Inf]–DevPath:\\?\pci#ven_1022&dev_7807&subsys_397c17aa&rev_11#3&2411e6fe&0&98#<3abf6f2d-71c4-462a-8a92-1e6861e6af27>
[03:36:19 832][Global][Inf]—->Roothub:USB#ROOT_HUB#4&1f1025e4&0#
[03:36:19 832][Global][Inf]——–>[Port0]NoDeviceConnected
[03:36:19 832][Global][Inf]——–>[Port1]NoDeviceConnected
[03:36:19 832][Global][Inf]——–>[Port2]NoDeviceConnected
[03:36:19 832][Global][Inf]——–>[Port3]NoDeviceConnected
[03:36:19 832][Global][Inf]——–>[Port4]NoDeviceConnected
[03:36:19 832][Global][Inf]–Host: Standard Enhanced PCI to USB Host Controller
[03:36:19 832][Global][Inf]–DevPath:\\?\pci#ven_1022&dev_7808&subsys_397c17aa&rev_11#3&2411e6fe&0&9a#<3abf6f2d-71c4-462a-8a92-1e6861e6af27>
[03:36:19 832][Global][Inf]—->Roothub:USB#ROOT_HUB20#4&15e77d3d&0#
[03:36:19 832][Global][Inf]——–>[Port0]NoDeviceConnected
[03:36:19 832][Global][Inf]——–>[Port1]NoDeviceConnected
[03:36:19 832][Global][Inf]——–>[Port2]NoDeviceConnected
[03:36:19 832][Global][Inf]——–>[Port3]NoDeviceConnected
[03:36:19 832][Global][Inf]——–>[Port4]NoDeviceConnected
[03:36:19 832][Global][Inf]–Scan USB host controller complete
[03:36:19 832][Global][Inf]–Update data center with HubMap
[03:36:19 832][Global][Inf]–Scan end
[03:37:02 968][Global][Inf]–OpenImg D:\My Indiehome\hg680p-ori.img
[03:37:14 750][Global][Inf]–Catch DBT_DEVICEARRIVAL
[03:37:14 750][Global][Inf]–Scan usb device
[03:37:14 750][Global][Inf]–Aml scan WorldCup Device
[03:37:14 750][Global][Inf]–Host: USB xHCI Compliant Host Controller
[03:37:14 750][Global][Inf]–DevPath:\\?\pci#ven_1022&dev_7814&subsys_397c17aa&rev_09#3&2411e6fe&0&80#<3abf6f2d-71c4-462a-8a92-1e6861e6af27>
[03:37:14 750][Global][Inf]—->Roothub:USB#ROOT_HUB30#4&1cfeae7e&1&0#
[03:37:14 750][Global][Inf]——–>[Port0]NoDeviceConnected
[03:37:14 750][Global][Inf]——–>[Port1]NoDeviceConnected
[03:37:14 750][Global][Inf]——–>[Port2]Other device
[03:37:14 766][Global][Inf]——–>[Port3]\\?\usb#vid_1b8e&pid_c003#5&4d133b3&0&4#
[03:37:14 766][Global][Inf]–Host: Standard Enhanced PCI to USB Host Controller
[03:37:14 766][Global][Inf]–DevPath:\\?\pci#ven_1022&dev_7808&subsys_397c17aa&rev_11#3&2411e6fe&0&92#<3abf6f2d-71c4-462a-8a92-1e6861e6af27>
[03:37:14 766][Global][Inf]—->Roothub:USB#ROOT_HUB20#4&2ec8d6e8&0#
[03:37:14 841][Global][Inf]——–>[Port0]NoDeviceConnected
[03:37:14 841][Global][Inf]——–>[Port1]NoDeviceConnected
[03:37:14 841][Global][Inf]——–>[Port2]NoDeviceConnected
[03:37:14 841][Global][Inf]——–>[Port3]Other device
[03:37:14 841][Global][Inf]——–>[Port4]NoDeviceConnected
[03:37:14 841][Global][Inf]–Host: Standard OpenHCD USB Host Controller
[03:37:14 841][Global][Inf]–DevPath:\\?\pci#ven_1022&dev_7807&subsys_397c17aa&rev_11#3&2411e6fe&0&90#<3abf6f2d-71c4-462a-8a92-1e6861e6af27>
[03:37:14 841][Global][Inf]—->Roothub:USB#ROOT_HUB#4&f878aed&0#
[03:37:14 880][Global][Inf]——–>[Port0]NoDeviceConnected
[03:37:14 880][Global][Inf]——–>[Port1]NoDeviceConnected
[03:37:14 880][Global][Inf]——–>[Port2]Other device
[03:37:14 880][Global][Inf]——–>[Port3]NoDeviceConnected
[03:37:14 880][Global][Inf]——–>[Port4]NoDeviceConnected
[03:37:14 880][Global][Inf]–Host: Standard OpenHCD USB Host Controller
[03:37:14 880][Global][Inf]–DevPath:\\?\pci#ven_1022&dev_7807&subsys_397c17aa&rev_11#3&2411e6fe&0&98#<3abf6f2d-71c4-462a-8a92-1e6861e6af27>
[03:37:14 880][Global][Inf]—->Roothub:USB#ROOT_HUB#4&1f1025e4&0#
[03:37:14 880][Global][Inf]——–>[Port0]NoDeviceConnected
[03:37:14 880][Global][Inf]——–>[Port1]NoDeviceConnected
[03:37:14 880][Global][Inf]——–>[Port2]NoDeviceConnected
[03:37:14 880][Global][Inf]——–>[Port3]NoDeviceConnected
[03:37:14 880][Global][Inf]——–>[Port4]NoDeviceConnected
[03:37:14 880][Global][Inf]–Host: Standard Enhanced PCI to USB Host Controller
[03:37:14 880][Global][Inf]–DevPath:\\?\pci#ven_1022&dev_7808&subsys_397c17aa&rev_11#3&2411e6fe&0&9a#<3abf6f2d-71c4-462a-8a92-1e6861e6af27>
[03:37:14 880][Global][Inf]—->Roothub:USB#ROOT_HUB20#4&15e77d3d&0#
[03:37:14 880][Global][Inf]——–>[Port0]NoDeviceConnected
[03:37:14 880][Global][Inf]——–>[Port1]NoDeviceConnected
[03:37:14 880][Global][Inf]——–>[Port2]NoDeviceConnected
[03:37:14 880][Global][Inf]——–>[Port3]NoDeviceConnected
[03:37:14 880][Global][Inf]——–>[Port4]NoDeviceConnected
[03:37:14 880][Global][Inf]–Scan USB host controller complete
[03:37:14 880][Global][Inf]–Update data center with HubMap
[03:37:14 880][Global][Inf]–Insert new hub1
[03:37:14 880][Global][Inf]–Update hub1 device data
[03:37:14 880][Global][Inf]–Update HUB1-1
[03:37:14 880][HUB1-1][Inf]–Update device path
[03:37:14 880][Global][Inf]–Update HUB1-2
[03:37:14 880][HUB1-2][Inf]–Update device path
[03:37:14 880][Global][Inf]–Update HUB1-3
[03:37:14 880][HUB1-3][Inf]–Update device path
[03:37:14 880][Global][Inf]–Update HUB1-4 \\?\usb#vid_1b8e&pid_c003#5&4d133b3&0&4#
[03:37:14 880][HUB1-4][Inf]–Update device path
[03:37:14 943][Global][Inf]–Begin thread for HUB1-4
[03:37:14 943][Global][Inf]–Burning thread HUB1-4 start
[03:37:14 943][Global][Inf]–Add Hub1: \\.\USB#ROOT_HUB30#4&1cfeae7e&1&0#
[03:37:14 943][Global][Inf]–Burning thread HUB1-4 begin run
[03:37:14 943][Global][Inf]–Scan end
[03:37:55 220][Global][Inf]–check img crc success!
[03:37:55 298]Parse platform.conf
[03:37:55 376][Global][Inf]–Parsing burning package
[03:37:55 376][Global][Inf]–Load configuration file C:\Program Files (x86)\Amlogic\USB_Burning_Tool\temp
[03:37:55 392][Global][Inf]–Parse burning configuration file C:\Program Files (x86)\Amlogic\USB_Burning_Tool\temp\burn_config.xml
[03:37:55 407][Global][Inf]–Get burning key
[03:38:03 110][Global][Inf]–User click start button
[03:38:03 110][Global][Inf]–SetErase
[03:38:03 110][Global][Inf]–Enable burning 1
[03:38:03 110][Global][Inf]–Scan usb device
[03:38:03 110][Global][Inf]–Aml scan WorldCup Device
[03:38:03 126][Global][Inf]–Host: USB xHCI Compliant Host Controller
[03:38:03 126][Global][Inf]–DevPath:\\?\pci#ven_1022&dev_7814&subsys_397c17aa&rev_09#3&2411e6fe&0&80#<3abf6f2d-71c4-462a-8a92-1e6861e6af27>
[03:38:03 126][Global][Inf]—->Roothub:USB#ROOT_HUB30#4&1cfeae7e&1&0#
[03:38:03 126][Global][Inf]——–>[Port0]NoDeviceConnected
[03:38:03 126][Global][Inf]——–>[Port1]NoDeviceConnected
[03:38:03 126][Global][Inf]——–>[Port2]Other device
[03:38:03 126][Global][Inf]——–>[Port3]\\?\usb#vid_1b8e&pid_c003#5&4d133b3&0&4#
[03:38:03 142][Global][Inf]–Host: Standard Enhanced PCI to USB Host Controller
[03:38:03 142][Global][Inf]–DevPath:\\?\pci#ven_1022&dev_7808&subsys_397c17aa&rev_11#3&2411e6fe&0&92#<3abf6f2d-71c4-462a-8a92-1e6861e6af27>
[03:38:03 142][Global][Inf]—->Roothub:USB#ROOT_HUB20#4&2ec8d6e8&0#
[03:38:03 142][HUB1-4][Inf]–Open device handle \\?\usb#vid_1b8e&pid_c003#5&4d133b3&0&4#
[03:38:03 214][Global][Inf]——–>[Port0]NoDeviceConnected
[03:38:03 214][Global][Inf]——–>[Port1]NoDeviceConnected
[03:38:03 214][Global][Inf]——–>[Port2]NoDeviceConnected
[03:38:03 214][Global][Inf]——–>[Port3]Other device
[03:38:03 214][Global][Inf]——–>[Port4]NoDeviceConnected
[03:38:03 214][Global][Inf]–Host: Standard OpenHCD USB Host Controller
[03:38:03 214][Global][Inf]–DevPath:\\?\pci#ven_1022&dev_7807&subsys_397c17aa&rev_11#3&2411e6fe&0&90#<3abf6f2d-71c4-462a-8a92-1e6861e6af27>
[03:38:03 214][Global][Inf]—->Roothub:USB#ROOT_HUB#4&f878aed&0#
[03:38:03 230][HUB1-4][Inf]–CloneImageProxy
[03:38:03 230][Global][Inf]–OpenImg D:\My Indiehome\hg680p-ori.img
[03:38:03 251][Global][Inf]——–>[Port0]NoDeviceConnected
[03:38:03 251][Global][Inf]——–>[Port1]NoDeviceConnected
[03:38:03 251][Global][Inf]——–>[Port2]Other device
[03:38:03 251][Global][Inf]——–>[Port3]NoDeviceConnected
[03:38:03 251][Global][Inf]——–>[Port4]NoDeviceConnected
[03:38:03 251][Global][Inf]–Host: Standard OpenHCD USB Host Controller
[03:38:03 251][Global][Inf]–DevPath:\\?\pci#ven_1022&dev_7807&subsys_397c17aa&rev_11#3&2411e6fe&0&98#<3abf6f2d-71c4-462a-8a92-1e6861e6af27>
[03:38:03 251][Global][Inf]—->Roothub:USB#ROOT_HUB#4&1f1025e4&0#
[03:38:03 251][Global][Inf]——–>[Port0]NoDeviceConnected
[03:38:03 251][Global][Inf]——–>[Port1]NoDeviceConnected
[03:38:03 251][Global][Inf]——–>[Port2]NoDeviceConnected
[03:38:03 251][Global][Inf]——–>[Port3]NoDeviceConnected
[03:38:03 251][Global][Inf]——–>[Port4]NoDeviceConnected
[03:38:03 251][HUB1-4][Inf]–Connect path=USB xHCI Compliant Host Controller/P0/P3
[03:38:03 251][HUB1-4][Inf]–Start burning…
[03:38:03 251][Global][Inf]–Host: Standard Enhanced PCI to USB Host Controller
[03:38:03 251][Global][Inf]–DevPath:\\?\pci#ven_1022&dev_7808&subsys_397c17aa&rev_11#3&2411e6fe&0&9a#<3abf6f2d-71c4-462a-8a92-1e6861e6af27>
[03:38:03 251][Global][Inf]—->Roothub:USB#ROOT_HUB20#4&15e77d3d&0#
[03:38:03 251][Global][Inf]——–>[Port0]NoDeviceConnected
[03:38:03 251][Global][Inf]——–>[Port1]NoDeviceConnected
[03:38:03 251][Global][Inf]——–>[Port2]NoDeviceConnected
[03:38:03 251][Global][Inf]——–>[Port3]NoDeviceConnected
[03:38:03 251][Global][Inf]——–>[Port4]NoDeviceConnected
[03:38:03 251][Global][Inf]–Scan USB host controller complete
[03:38:03 251][Global][Inf]–Update data center with HubMap
[03:38:03 251][Global][Inf]–Update hub1 device data
[03:38:03 251][Global][Inf]–Update HUB1-1
[03:38:03 251][HUB1-1][Inf]–Update device path
[03:38:03 251][Global][Inf]–Update HUB1-2
[03:38:03 251][HUB1-2][Inf]–Update device path
[03:38:03 251][Global][Inf]–Update HUB1-3
[03:38:03 251][HUB1-3][Inf]–Update device path
[03:38:03 251][Global][Inf]–Update HUB1-4 \\?\usb#vid_1b8e&pid_c003#5&4d133b3&0&4#
[03:38:03 251][HUB1-4][Inf]–Update device path
[03:38:03 251][Global][Inf]–Scan end
[03:38:03 346][HUB1-4][Inf]————–ERASE BOOTLOADER————
[03:38:03 348][HUB1-4][Inf]————-Download DDR.USB———–
[03:38:03 348][HUB1-4][Inf]–Download DDR.USB,size: 49152!
[03:38:03 348][HUB1-4][Inf]–Close device handle 0x000003d4
[03:38:03 405][HUB1-4][Inf]–Open device handle \\?\usb#vid_1b8e&pid_c003#5&4d133b3&0&4#
[03:38:03 483][HUB1-4][Inf]–2-2-0-0
[03:38:03 483][HUB1-4][Inf]–Control write pll reg1 0xd9000000:0x000000b1
[03:38:03 999][HUB1-4][Inf]–Control write pll reg1 0xd9000000:0x00005183
[03:38:04 514][HUB1-4][Inf]–Control write pll reg1 0xd9000000:0x000000b1
[03:38:05 030][HUB1-4][Inf]–Control write pll reg1 0xd9000000:0x00005183
[03:38:05 544][HUB1-4][Inf]–Write initial succeed
[03:38:05 544][HUB1-4][Inf]–Upload encrypt at 0xc8100228
[03:38:05 544][HUB1-4][Inf]–ulValue = 0xbdfd21bc
[03:38:05 544][HUB1-4][Inf]–File change to DDR_ENC.USB
[03:38:05 544][HUB1-4][Inf]–Read encrypt value succeed
[03:38:05 544][Global][Err]–DDR_ENC.USB
[03:38:05 544][Global][Err]–DDR_ENC.USB
[03:38:05 544][HUB1-4][Err]–Read item data error, code -1
[03:38:05 544][Global][Err]–DDR_ENC.USB
[03:38:05 654][HUB1-4][Err]–[0x10103005]Romcode/Initialize DDR/Download buffer/Read item data failed
[03:38:05 654][HUB1-4][Inf]–Close device handle 0x000003d4
I made the sd-card, but when i boot the beelink gt1-a it’s just boot into his normal os.
Источник


