- Скачать hnetcfg.dll для Windows XP, Vista, 7, 8.1, 10 бесплатно
- Другие версии файла hnetcfg.dll
- Как установить DLL файл?
- Как включить общий доступ к подключению к Интернету с помощью командной строки?
- Использование командной строки
- Использование Powershell
- DLL DOWNLOADER
- Download Hnetcfg.dll for Windows 10, 8.1, 8, 7, Vista and XP
- Hnetcfg.dll Explanation link
- Table of Contents
- Operating Systems Compatible with the Hnetcfg.dll File link
- All Versions of the Hnetcfg.dll File link
- How to Download Hnetcfg.dll link
- How to Install Hnetcfg.dll? How to Fix Hnetcfg.dll Errors? link
- Method 1: Solving the DLL Error by Copying the Hnetcfg.dll File to the Windows System Folder link
- Method 2: Copying the Hnetcfg.dll File to the Software File Folder link
- Method 3: Uninstalling and Reinstalling the Software that Gives You the Hnetcfg.dll Error link
- Method 4: Solving the Hnetcfg.dll Problem by Using the Windows System File Checker (scf scannow) link
- Method 5: Fixing the Hnetcfg.dll Error by Manually Updating Windows link
Скачать hnetcfg.dll для Windows XP, Vista, 7, 8.1, 10 бесплатно
Описание
: Home Networking Configuration Manager
Автор
Размер
: 344064 Byte ( 336 KB )
Дата
Другие версии файла hnetcfg.dll
| Версия файла | Размер | Дата | |
|---|---|---|---|
| 6.2.9200.16384 64 bit (x64) | 532992 Byte ( 520.5 KB ) | 2013-12-31 | Нажмите чтобы скачать |
| 6.0.6001.18000 64 bit (x64) | 433664 Byte ( 423.5 KB ) | 2014-2-28 | Нажмите чтобы скачать |
| 5.1.2600.5512 32bit | 347136 Byte ( 339 KB ) | 2013-12-31 | Нажмите чтобы скачать |
| 6.2.9200.16384 32bit | 416768 Byte ( 407 KB ) | 2013-12-31 | Нажмите чтобы скачать |
Как установить DLL файл?
Подробная инструкция по установке
- Загрузите файл hnetcfg.dll на компьютер.
- Поместите файл в папку с требующей его программой.
- Скопируйте файл dll file в следующие системные директории.
- (Windows XP, Vista, Windows 7, Windows 8.1, Windows 10) — C:\Windows\System32
- (Windows NT/2000) — C:\WINNT\System32
- (Windows 95/98/Me) — C:\Windows\System
В Windows x64 необходимо поместить файл в директорию C:\Windows\SysWOW64\
Проблемы связанные с файлом
 Наиболее распространенные проблемы связанные с файлом.
Как включить общий доступ к подключению к Интернету с помощью командной строки?
Я могу сделать это вручную, щелкнув правой кнопкой мыши сетевое соединение, открыв вкладку «Общий доступ» и установив флажок «Разрешить другим пользователям сети подключаться через интернет-соединение на этом компьютере».
Теперь мне нужно автоматизировать эту задачу. Для этого есть инструмент командной строки или командлет Powershell?
Вот чистое решение PowerShell (должно выполняться с правами администратора):
Смотрите также этот вопрос на social.msdn.microsoft.com :
Вы должны включить общедоступный интерфейс на адаптере, к которому вы подключаетесь, и разрешить общий доступ на частном интерфейсе для адаптера, который вы хотите использовать в сети.
Скачать и распаковать или git clone git@github.com:utapyngo/icsmanager.git
Построить, запустив build.cmd
Зарегистрируйте HNetCfg библиотеку COM: regsvr32 hnetcfg.dll (это стандартная библиотека, расположенная по адресу %WINDIR%\System32 )
Использование командной строки
Откройте командную строку как администратор
cd в icsmanager каталог (или icsmanager-master если вы скачали zip).
Это должно отобразить доступные сетевые подключения. Обратите внимание на атрибут GUID. Чтобы использовать этот инструмент, вам нужно иметь как минимум два соединения.
Это должно включить ICS.
Использование Powershell
Модуль импорта IcsManager.dll
Список сетевых подключений:
Запустите общий доступ к подключению к Интернету:
Enable-ICS «Соединение с общим доступом» «Домашнее соединение»
Остановить общий доступ к подключению к Интернету:
Отказ от ответственности: я еще не тестировал инструмент. Используйте его на свой страх и риск. Не стесняйтесь открывать вопрос на GitHub, если что-то не работает. Тяговые запросы также приветствуются.
Насколько я понимаю, возможности маршрутизации были удалены из Windows начиная с Vista и теперь доступны только в Windows Server.
В Интернете можно найти следующую уловку для повторного включения netsh routing , которую вы можете попробовать на свой страх и риск. Сначала я предлагаю обычные меры предосторожности, включая создание точки восстановления системы.
- Получить IPMONTR.DLL и IPPROMON.DLL с 2003 или из XP
- Скопируйте их в WINDOWS \ SYSTEM32
Запустите в командной строке (cmd) от имени администратора:
netsh add helper ipmontr.dll
netsh add helper ippromon.dll
Вам также может потребоваться установить для службы маршрутизации и удаленного доступа автоматический запуск.
Перезагрузитесь, прежде чем пытаться что-либо.
Бывший мой коллега делал это через собственный инструмент Windows netsh. Поскольку я никогда не делал этого сам, я могу порекомендовать вам взглянуть на документацию по Microsoft netsh .
Насколько я помню, это было довольно жалко и много netsh-вызовов, где это было необходимо, но в итоге это сработало .
Следующее должно работать
К сожалению, нет такой команды cmd для Windows 7 или более, поэтому я использовал эту функцию Visual Basic, чтобы сделать это:
Обратите внимание, что «» «» обязательно. Повеселись.
Исходя из того, что я прочитал, если те, кто написал netsh , не работают, начиная с 7 и выше, это неправильно. Теперь, если речь идет строго о « netsh routing », я думаю, вы могли бы быть правы, но это работает — я собираюсь показать содержимое созданного мной пакетного файла, который работает на Windows 8.1. Вместо того, чтобы получать обычные комментарии и фрагменты информации, я постараюсь помочь тем, у кого есть полная информация.
Во-первых, вы должны убедиться, что соединение, которым вы будете делиться, настроено на фактическое использование соединения. Эта ссылка должна помочь вам в этом:
Откройте «Сетевые подключения», нажав кнопку «Пуск» Изображение кнопки «Пуск», а затем нажмите «Панель управления». В поле поиска введите адаптер, а затем в разделе Центр управления сетями и общим доступом щелкните Просмотр сетевых подключений.
Щелкните правой кнопкой мыши соединение, которым вы хотите поделиться, и выберите Свойства. Требуется разрешение администратора. Если вас попросят ввести пароль администратора или подтверждение, введите пароль или предоставьте подтверждение.
Перейдите на вкладку «Общий доступ» и установите флажок «Разрешить другим пользователям сети подключаться через этот компьютер к интернет-соединению».
После того, как вы выполнили шаги, описанные выше, чтобы настроить ICS на хост-компьютере, внесите следующие изменения на всех других компьютерах (но не на хост-компьютере).
Откройте «Свойства обозревателя», нажав кнопку «Пуск» Изображение кнопки «Пуск», выберите «Панель управления», «Сеть и Интернет», а затем нажмите «Свойства обозревателя».
Перейдите на вкладку «Подключения» и нажмите «Никогда не набирать соединение».
Нажмите Настройки локальной сети.
В диалоговом окне «Параметры локальной сети» в разделе «Автоматическая настройка» снимите флажки «Автоматически определять параметры» и «Использовать сценарий автоматической настройки».
В разделе Прокси-сервер снимите флажок Использовать прокси-сервер для вашей локальной сети и нажмите кнопку ОК.
Насколько мне известно, я думаю, что это должно работать как для Windows 7, так и для 8.
Теперь, поскольку тема была о решении для командной строки, это содержимое пакетного файла о том, как настроить виртуальный беспроводной адаптер и готов к работе.
После его создания вам, возможно, придется воспользоваться приведенными выше инструкциями и убедиться, что вы используете общий доступ к исходному соединению с вновь созданным виртуальным адаптером, который будет виден вашим беспроводным устройствам.
Совместное использование файла .bat:
Я буду более чем счастлив ответить на вопросы по этому поводу, потому что будут некоторые уникальные ситуации, и я хотел бы помочь, так как мне пришлось собрать воедино то, что я нашел выше.
Но чтобы представить это наглядно, это работает в Windows 8.1 с использованием соединения Ethernet с ноутбуком, который использует свое соединение с виртуальным адаптером. Это может работать так же хорошо, если вы пытаетесь поделиться источником беспроводного соединения.
DLL DOWNLOADER
Download DLL and other System-Files for Windows

Download Hnetcfg.dll for Windows 10, 8.1, 8, 7, Vista and XP
Hnetcfg.dll Explanation link
The Hnetcfg.dll file is 0.13 MB. The download links are current and no negative feedback has been received by users. It has been downloaded 658 times since release.
Table of Contents
Operating Systems Compatible with the Hnetcfg.dll File link
All Versions of the Hnetcfg.dll File link
The last version of the Hnetcfg.dll file is the 5.1.2600.2180 version. Outside of this version, there is no other version released
How to Download Hnetcfg.dll link
- First, click the «Download» button with the green background (The button marked in the picture).
 Step 1:Download the Hnetcfg.dll file
 - When you click the «Download» button, the «Downloading» window will open. Don’t close this window until the download process begins. The download process will begin in a few seconds based on your Internet speed and computer.
 Step 1:Download the Hnetcfg.dll file
How to Install Hnetcfg.dll? How to Fix Hnetcfg.dll Errors? link
ATTENTION! Before starting the installation, the Hnetcfg.dll file needs to be downloaded. If you have not downloaded it, download the file before continuing with the installation steps. If you don’t know how to download it, you can immediately browse the dll download guide above.
Method 1: Solving the DLL Error by Copying the Hnetcfg.dll File to the Windows System Folder link
- The file you are going to download is a compressed file with the «.zip» extension. You cannot directly install the «.zip» file. First, you need to extract the dll file from inside it. So, double-click the file with the «.zip» extension that you downloaded and open the file.
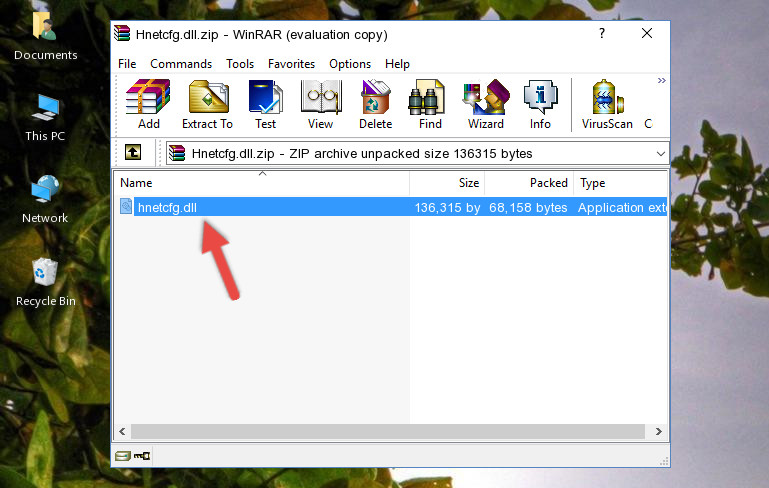
- You will see the file named «Hnetcfg.dll» in the window that opens up. This is the file we are going to install. Click the file once with the left mouse button. By doing this you will have chosen the file. Step 2:Choosing the Hnetcfg.dll file
- Click the «Extract To» symbol marked in the picture. To extract the dll file, it will want you to choose the desired location. Choose the «Desktop» location and click «OK» to extract the file to the desktop. In order to do this, you need to use the Winrar software. If you do not have this software, you can find and download it through a quick search on the Internet. Step 3:Extracting the Hnetcfg.dll file to the desktop
- Copy the «Hnetcfg.dll» file you extracted and paste it into the «C:\Windows\System32» folder. Step 4:Copying the Hnetcfg.dll file into the Windows/System32 folder
- If your operating system has a 64 Bit architecture, copy the «Hnetcfg.dll» file and paste it also into the «C:\Windows\sysWOW64» folder.
 Step 2:Choosing the Hnetcfg.dll file
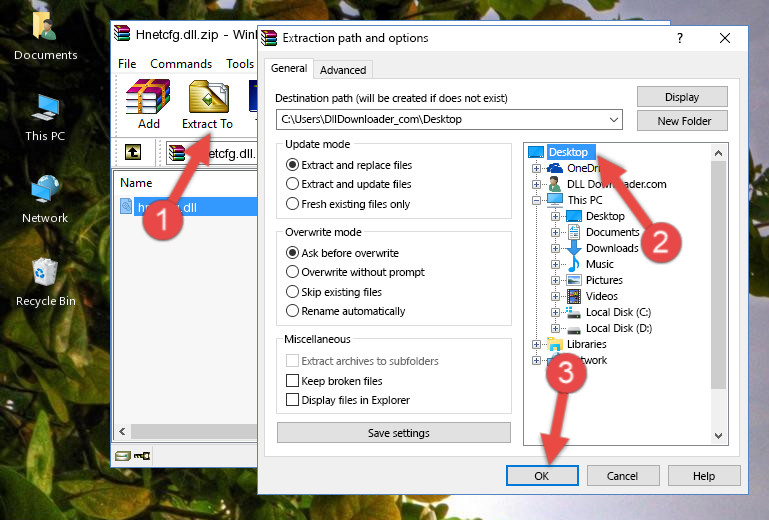 Step 3:Extracting the Hnetcfg.dll file to the desktop
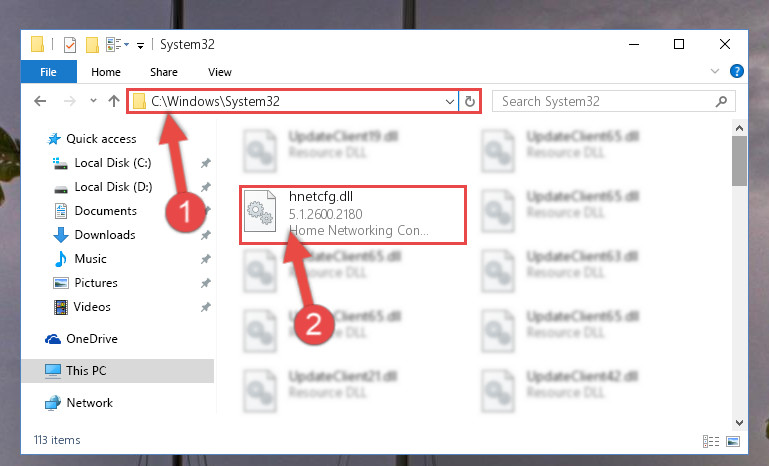 Step 4:Copying the Hnetcfg.dll file into the Windows/System32 folder
NOTE! On 64 Bit systems, the dll file must be in both the «sysWOW64» folder as well as the «System32» folder. In other words, you must copy the «Hnetcfg.dll» file into both folders.
NOTE! We ran the Command Prompt on Windows 10. If you are using Windows 8.1, Windows 8, Windows 7, Windows Vista or Windows XP, you can use the same methods to run the Command Prompt as an administrator.
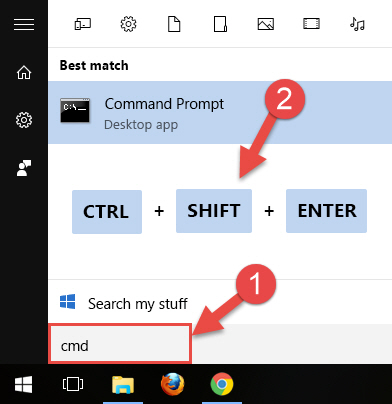
- Open the Start Menu and type in «cmd«, but don’t press Enter. Doing this, you will have run a search of your computer through the Start Menu. In other words, typing in «cmd» we did a search for the Command Prompt.
- When you see the «Command Prompt» option among the search results, push the «CTRL» + «SHIFT» + «ENTER » keys on your keyboard.
- A verification window will pop up asking, «Do you want to run the Command Prompt as with administrative permission?» Approve this action by saying, «Yes«.
 Step 6:Running the Command Prompt with administrative permission
%windir%\System32\regsvr32.exe /u Hnetcfg.dll
%windir%\System32\regsvr32.exe /i Hnetcfg.dll
%windir%\SysWoW64\regsvr32.exe /i Hnetcfg.dll
Method 2: Copying the Hnetcfg.dll File to the Software File Folder link
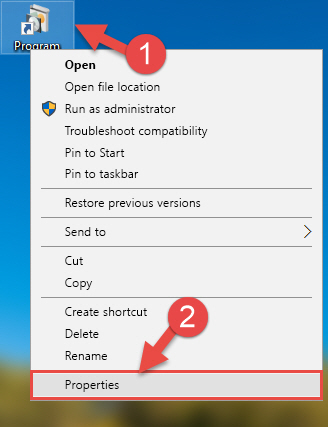
- In order to install the dll file, you need to find the file folder for the software that was giving you errors such as «Hnetcfg.dll is missing«, «Hnetcfg.dll not found» or similar error messages. In order to do that, Right-click the software’s shortcut and click the Properties item in the right-click menu that appears. Step 1:Opening the software shortcut properties window
- Click on the Open File Location button that is found in the Properties window that opens up and choose the folder where the application is installed. Step 2:Opening the file folder of the software
- Copy the Hnetcfg.dll file into the folder we opened. Step 3:Copying the Hnetcfg.dll file into the file folder of the software.
- The installation is complete. Run the software that is giving you the error. If the error is continuing, you may benefit from trying the 3rd Method as an alternative.
 Step 1:Opening the software shortcut properties window
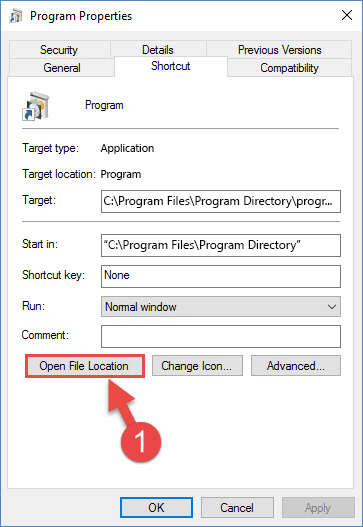 Step 2:Opening the file folder of the software
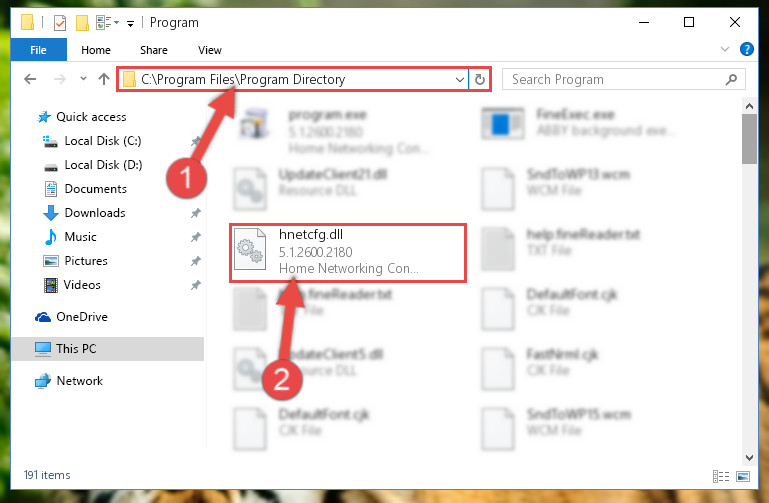 Step 3:Copying the Hnetcfg.dll file into the file folder of the software.
Method 3: Uninstalling and Reinstalling the Software that Gives You the Hnetcfg.dll Error link
- Press the «Windows» + «R» keys at the same time to open the Run tool. Paste the command below into the text field titled «Open» in the Run window that opens and press the Enter key on your keyboard. This command will open the «Programs and Features» tool.
Method 4: Solving the Hnetcfg.dll Problem by Using the Windows System File Checker (scf scannow) link
- First, we must run the Windows Command Promptas an administrator.
NOTE! We ran the Command Prompt on Windows 10. If you are using Windows 8.1, Windows 8, Windows 7, Windows Vista or Windows XP, you can use the same methods to run the Command Prompt as an administrator.
- Open the Start Menu and type in «cmd«, but don’t press Enter. Doing this, you will have run a search of your computer through the Start Menu. In other words, typing in «cmd» we did a search for the Command Prompt.
- When you see the «Command Prompt» option among the search results, push the «CTRL» + «SHIFT» + «ENTER » keys on your keyboard.
- A verification window will pop up asking, «Do you want to run the Command Prompt as with administrative permission?» Approve this action by saying, «Yes«.
Step 1:Running the Command Prompt with administrative permission
Method 5: Fixing the Hnetcfg.dll Error by Manually Updating Windows link
Some softwares need updated dll files. When your operating system is not updated, it cannot fulfill this need. In some situations, updating your operating system can solve the dll errors you are experiencing.
In order to check the update status of your operating system and, if available, to install the latest update packs, we need to begin this process manually.
Depending on which Windows version you use, manual update processes are different. Because of this, we have prepared a special article for each Windows version. You can get our articles relating to the manual update of the Windows version you use from the links below.


