- Внутренняя база данных Windows — Windows Internal Database
- Migrating the WSUS Database from WID to SQL
- Prerequisites
- Migrating the WSUS database
- Stop the IIS and WSUS services on the WSUS server
- Detach SUSDB from the Windows Internal Database
- Using SQL Management Studio
- Using Command Prompt
- Copy the SUSDB files to the SQL Server
- Attach SUSDB to the SQL Instance
- Verify SQL Server and Database Logins and Permissions
- SQL Server Login Permissions
- Database Permissions
- Edit the registry to point WSUS to the SQL Server Instance
- Start the IIS and WSUS services on the WSUS server
- Uninstalling the WID role (not recommended)
- C windows wid binn
- Answered by:
- Question
Внутренняя база данных Windows — Windows Internal Database
Внутренняя база данных Windows (кодовое название WYukon, иногда называемая SQL Server Embedded Edition) — это вариант SQL Server Express 2005–2014, который входит в состав Windows Server 2008 (SQL 2005), Windows Server 2008 R2 (SQL 2005), Windows Server 2012 (SQL 2012), Windows Server 2012 R2 (SQL 2012) и Windows Server 2016 (SQL 2014) и включен в другие бесплатные продукты Microsoft, выпущенные после 2007 года, для которых требуется серверная часть базы данных SQL Server. Службы Windows SharePoint Services 3.0 и Windows Server Update Services 3.0 включают внутреннюю базу данных Windows, которую можно использовать в качестве альтернативы использованию розничной версии SQL Server. WID был 32-битным приложением, даже как компонент 64-битной Windows Server 2008, который устанавливается по пути. C:\Windows\sysmsi\ssee\ В Windows Server 2012 и более поздних версиях это 64-битное приложение, установленное в C:\Windows\WID .
Внутренняя база данных Windows недоступна как отдельный продукт для использования приложениями конечных пользователей; Для этой цели Microsoft предоставляет SQL Server Express и Microsoft SQL Server . Кроме того, он предназначен для доступа только к службам Windows, работающим на том же компьютере.
Некоторые компоненты Windows Server 2008 и 2012 используют внутреннюю базу данных Windows для хранения данных: службы управления правами Active Directory , диспетчер системных ресурсов Windows , службы UDDI , службы федерации Active Directory 2.0, посредник подключений удаленного рабочего стола (автономный), IPAM и службы Windows SharePoint Services. . В Windows Server 2003 службы SharePoint и Windows Server Update Services устанавливают внутреннюю базу данных Windows и используют ее в качестве хранилища данных по умолчанию, если розничный экземпляр базы данных SQL Server не предоставлен. В статье базы знаний, опубликованной Microsoft, говорится, что внутренняя база данных Windows не идентифицирует себя как съемный компонент, и даются инструкции, как ее можно удалить, напрямую вызвав установщик Windows .
SQL Server Management Studio Express можно использовать для подключения к экземпляру внутренней базы данных Windows, используя \\.\pipe\MSSQL$MICROSOFT##SSEE\sql\query (2003–2008) или \\.\pipe\MICROSOFT##WID\tsql\query (2012) в качестве имени экземпляра. Но это будет работать только локально, так как удаленные подключения не могут быть включены для этого выпуска SQL Server. Также обратите внимание, что следует использовать «Аутентификацию Windows» (в отличие от Аутентификации SQL Server), и администраторы, похоже, имеют лучшие результаты успешной аутентификации при входе в систему с той же учетной записью администратора, которая была создана при установке Windows.
Migrating the WSUS Database from WID to SQL
Applies to: Windows Server 2012, Windows Server 2012 R2, Windows Server 2016
Use the following steps to migrate the WSUS database (SUSDB) from a Windows Internal Database instance to a Local or Remote instance of SQL Server.
Prerequisites
- SQL Instance. This can be the default MSSQLServer or a custom Instance.
- SQL Server Management Studio
- WSUS with WID role installed
- IIS (This is normally included when you install WSUS through Server Manager). It is not already installed, it will need to be.
Migrating the WSUS database
Stop the IIS and WSUS services on the WSUS server
From PowerShell (elevated), run:
Detach SUSDB from the Windows Internal Database
Using SQL Management Studio
- Right-click SUSDB ->Tasks -> click Detach:
 Tasks > Detach option selected.» data-linktype=»relative-path»/>
 - Check Drop Existing Connections and click OK (optional, if active connections exist).
 Tasks > Detach option selected.» data-linktype=»relative-path»/>
Using Command Prompt
These steps show how to detach the WSUS database (SUSDB) from the Windows Internal Database instance by using the sqlcmd utility. For more information about the sqlcmd utility, see sqlcmd Utility.
- Open an elevated command prompt
- Run the following SQL command to detach the WSUS database (SUSDB) from the Windows Internal Database instance by using the sqlcmd utility:
Copy the SUSDB files to the SQL Server
- Copy SUSDB.mdf and SUSDB_log.ldf from the WID Data Folder (%SystemDrive%\Windows\WID\Data) to the SQL Instance Data Folder.
For example, if your SQL Instance Folder is C:\Program Files\Microsoft SQL Server\MSSQL12.MSSQLSERVER\MSSQL, and the WID Data folder is C:\Windows\WID\Data, copy the SUSDB files from C:\Windows\WID\Data to C:\Program Files\Microsoft SQL Server\MSSQL12.MSSQLSERVER\MSSQL\Data
Attach SUSDB to the SQL Instance
- In SQL Server Management Studio, under the Instance node, right-click Databases, and then click Attach. Attach option selected.» data-linktype=»relative-path»/>
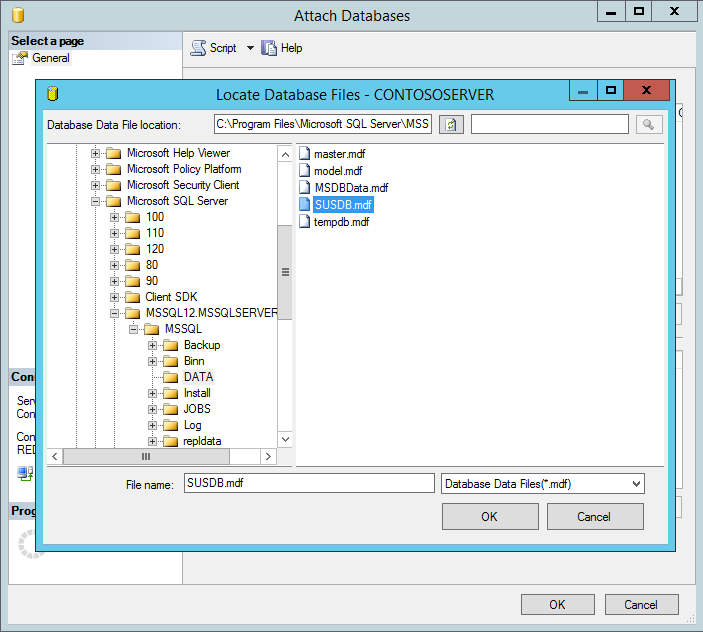
- In the Attach Databases box, under Databases to attach, click the Add button and locate the SUSDB.mdf file (copied from the WID Folder), and then click OK.
 Attach option selected.» data-linktype=»relative-path»/>
This is also able to be done using Transact-Sql. Please see the SQL documentation for attaching a database for its instructions.
Example (using paths from previous example):
Verify SQL Server and Database Logins and Permissions
SQL Server Login Permissions
After attaching the SUSDB, verify that NT AUTHORITY\NETWORK SERVICE has login permissions to the instance of SQL Server by doing the following:
- Go into SQL Server Management Studio
- Opening the Instance
- Click Security
- Click Logins
The NT AUTHORITY\NETWORK SERVICE account should be listed. If it is not, you need to add it by adding New Login Name.
If the SQL Instance is on a different machine from WSUS, the WSUS Server’s computer account should be listed in the format [FQDN]\[WSUSComputerName]$. If not, the steps below can be used to add it, replacing NT AUTHORITY\NETWORK SERVICE with the WSUS Server’s computer account ([FQDN]\[WSUSComputerName]$) This would be in addition to granting rights to NT AUTHORITY\NETWORK SERVICE
Adding NT AUTHORITY\NETWORK SERVICE and granting it rights
- Right Click Logins and click New Login…New Login option selected.» data-linktype=»relative-path»/>
- On the General page, fill out the Login name (NT AUTHORITY\NETWORK SERVICE), and set the Default database to SUSDB.
- On the Server Roles page, ensure public and sysadmin are selected.
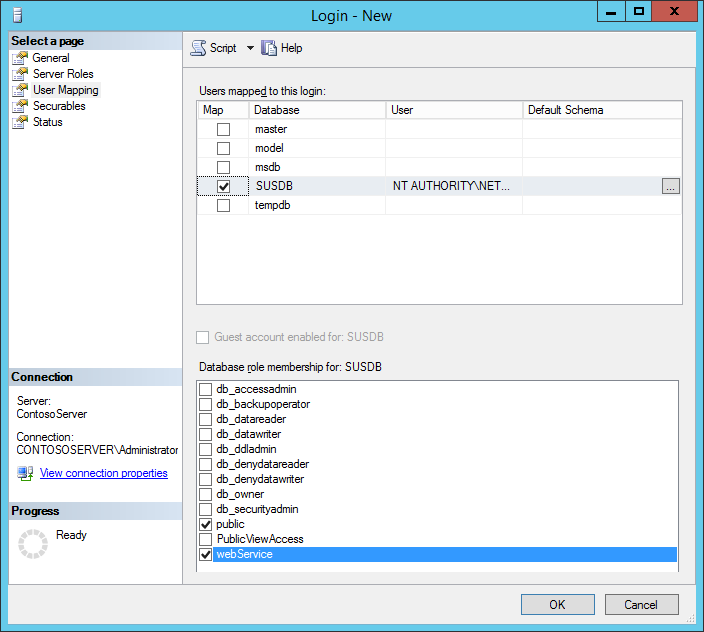
- On the User Mapping page:
- Under Users mapped to this login: select SUSDB
- Under Database role membership for: SUSDB, ensure the following are checked:
- public
- webService
- Click OK
 New Login option selected.» data-linktype=»relative-path»/>
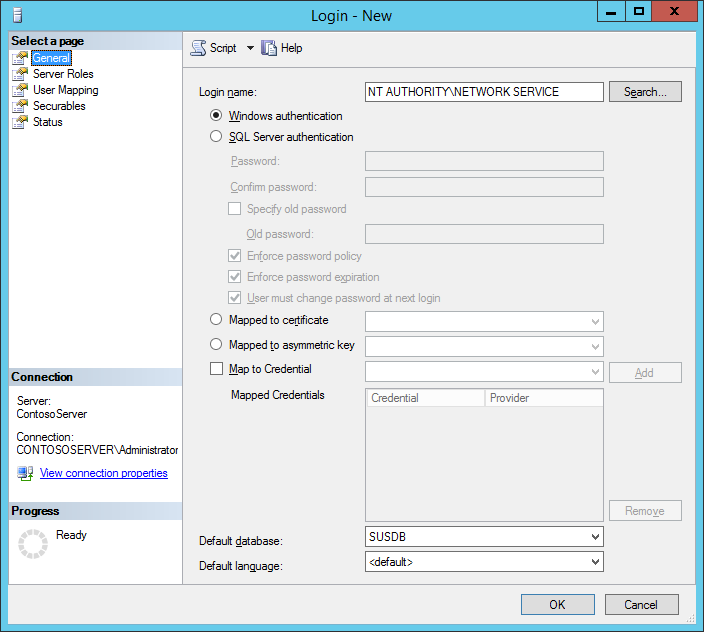

You should now see NT AUTHORITY\NETWORK SERVICE under Logins. 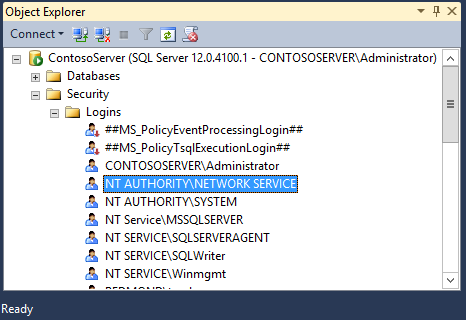
Database Permissions
- Right-click the SUSDB
- Select Properties
- Click Permissions
The NT AUTHORITY\NETWORK SERVICE account should be listed.
If it is not, add the account.
On the Login name textbox, enter the WSUS machine in the following format:
Verify that the Default database is set to SUSDB.
In the following example, the FQDN is Contosto.com and the WSUS machine name is WsusMachine:

On the User Mapping page, select the SUSDB Database under Users mapped to this login
Check webservice under the Database role membership for: SUSDB: 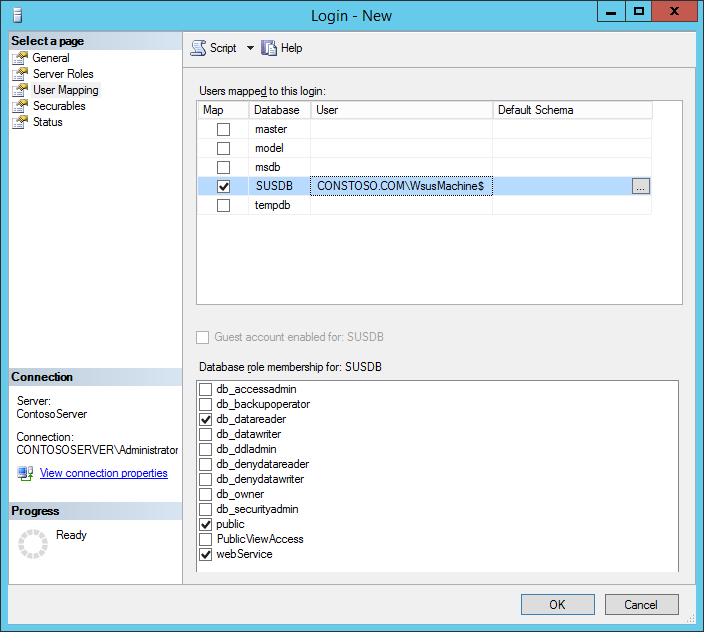
Click OK to save settings.
You may need to restart the SQL Service for the changes to take effect.
Edit the registry to point WSUS to the SQL Server Instance
Follow the steps in this section carefully. Serious problems might occur if you modify the registry incorrectly. Before you modify it, back up the registry for restoration in case problems occur.
Click Start, click Run, type regedit, and then click OK.
Locate the following key: HKEY_LOCAL_MACHINE\SOFTWARE\Microsoft\UpdateServices\Server\Setup\SqlServerName
In the Value text box, type [ServerName]\[InstanceName], and then click OK. If the instance name is the default instance, type [ServerName].
Locate the following key: HKEY_LOCAL_MACHINE\SOFTWARE\Microsoft\Update Services\Server\Setup\Installed Role Services\UpdateServices-WidDatabase 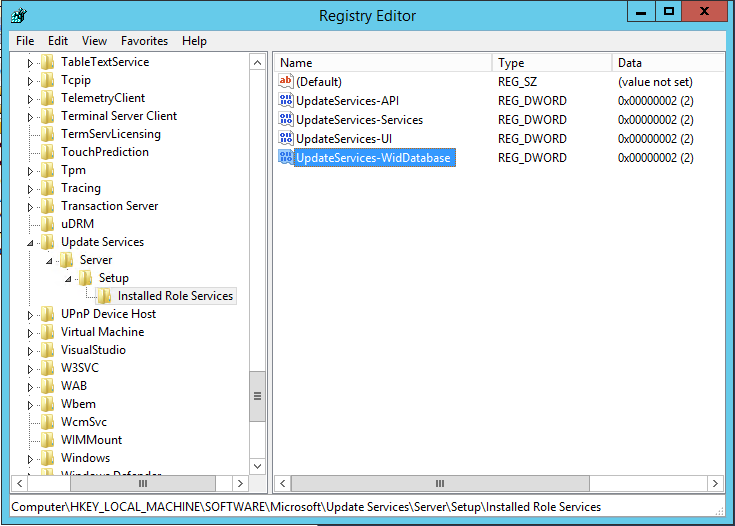
Rename the Key to UpdateServices-Database 
If you do not update this key, then WsusUtil will attempt to service the WID rather than the SQL Instance to which you have migrated.
Start the IIS and WSUS services on the WSUS server
From PowerShell (elevated), run:
If you are using the WSUS Console, close and restart it.
Uninstalling the WID role (not recommended)
Removing the WID role also removes a database folder (%SystemDrive%\Program Files\Update Services\Database) that contains scripts required by WSUSUtil.exe for post-installation tasks. If you choose to uninstall the WID role, make sure you back up the %SystemDrive%\Program Files\Update Services\Database folder beforehand.
After the WID role is removed, verify that the following registry key is present: HKEY_LOCAL_MACHINE\SOFTWARE\Microsoft\Update Services\Server\Setup\Installed Role Services\UpdateServices-Database
C windows wid binn
This forum has migrated to Microsoft Q&A. Visit Microsoft Q&A to post new questions.
Answered by:
![]()
Question
![]()
![]()
I got the task to install a new bunch of Server2012 R2 servers to replace our currently running win 2003 systems. Everything seemed fine until I promoted one of the new servers to DC. Now there a several services not starting. Everything seems to be linked to the server «internal windows database». This service can not start because «MSSQL$MICROSOFT##WID» can not log on. I found the solution with adding «NT Service/All Services» to the «Logon as a service» security role, but this does not solve the problem. I dont know this exactly but I think the «MSSQL$MICROSOFT##WID» does not exist at all in my domain. It should be visible in the «active directory users and computers», right?
The old DC is a Win Server 2003 SBS — Server. Is it possible that the «MSSQL$MICROSOFT##WID» has not been added to the domain as the new server has been promoted to dc?
Certainly I could start the «internal windows database» as a local service, but I do not know what this would bring with it.
Hope you can help me.
Oh additional info:
kaspersky server can not log on because the user can not log on
svchost throws errors because it can not access several files.
I think there are several users or privileges missing HELP please
Windows Internal Database штука, безусловно, полезная, и рекомендуется для всяких RMS, WSUS, Connection Broker и т.п. и сейчас я немного расскажу о ее администрировании.
По-сути WID это очередная кастрация SQL, но интересно другое — в отличии от Express версии отсутствуют ограничения по размеру базы.
Особо коварные товарищи на этом месте задались вопросом — значит ли это, что SharePoint Foundation теперь может хранить большое кол-во информации? Ответ: да, будет время — расскажу.
Я, лично, сторонник размещения инфраструктурных БД на полноценном SQL, но это дополнительная нагрузка по лицензиям, которая в ряде случаев неуместна.
Сэкономить немного денег это ок, но поставить сервис на WID и не позаботится о средствах управления было бы неправильно.
Конечно, Microsoft не был бы Microsoft если бы средство не было предусмотрено: это самая обычная Management Studio
После установки Management Studio требуется выполнить ровно два действия:
1. Запустить SQL Management Studio от имени Администратора.
2. Подключится по адресу .pipeMICROSOFT##WIDtsqlquery (в предыдущих версиях Windows Server это .pipeMSSQL$MICROSOFT##SSEEsqlquery)

Теперь можно работать, хотя многих привычных для себя вещей администраторы SQL не обнаружат.
Первое, что нужно бы сделать, это настроить резервное копирование, особенно, если речь все же о SharePoint.
Тут нам на помощь спешит замечательный HarshDeep_Singh с не менее замечательным скриптом, который можно положить в стандартный Планировщик, подправив нужные значения.
Пример батника для Планировщика:
sqlcmd -S.pipeMSSQL$MICROSOFT##SSEEsqlquery -i c:SQL_WIDB_Backup.sql -o c:SQL_WIDB_Backup_Report.txt
На этом с общей информацией все, будут вопросы — пишите.


