- Configure the file system cache in Windows NT
- File Caching
- How to Clear System Cache Windows 10 [2021 Updated] [Partition Manager]
- Summary :
- Quick Navigation :
- What Is A Cache
- Why do You Need to Clear System Cache Windows 10
- How to Clear System Cache on Your Windows 10 Computer
- How to Clear System Cache Windows 10
- Method 1: Clear the Temporary Files in Settings
- Method 2: Employ Disk Cleanup Utility
- Method 3: Clear the Windows Store Cache
- Method 4: Clear Browser Cache
- Method 5: Clear Cache in File Explorer
- Method 6: Clear System Restores Cache
- Method 7: Clear DNS Cache
- Method 8: Clear System Cache Windows 10 Using MiniTool Partition Wizard
- Bottom Line
- Clear System Cache Windows 10 FAQ
- ABOUT THE AUTHOR
Configure the file system cache in Windows NT
Windows has a file caching mechanism which is tightly integrated with the memory manager. It helps disk performance by keeping the most recent files in memory, whether is is EXE or DLL files loaded by the memory manager or data files loaded by the running applications.
The filesystem cache can work in two different modes:
- The default mode is that the filesystem cache only grows to a certain limit (8 MByte).
- The other mode is that the file system cache can grow until it has taken all memory (Up to 1 GByte depending on available memory).
One should not change from the default mode on standard workstations as a single application can trigger the file system cache to take all available RAM (Ex. by copying a large file), and the memory of other applications will be paged to disk (Even more I/O)
To allow the file system cache to make use of «all» available memory:
- WinNT4: Open Control Panel -> Network -> Change properties for «Server» service to use «Maximize Throughput for File Sharing» (Will also change Server service memory usage).
- Win2k: Open Control Panel -> Network and Dial-up Connections -> Right-click Local Area Connection and select Properties -> Press Properties for service «File and Print Sharing for Microsoft Networks» to set «Maximize Data Throughput for File Sharing» (Will also change Server service memory usage)..
- WinXP/Win2k3: Open Control Panel -> System-Applet -> Advanced-Tab -> Performance-Settings-Button -> Advanced-Tab and select «System Cache»-Option.
- Registry:
[HKEY_LOCAL_MACHINE \System \CurrentControlSet \Control \Session Manager \Memory Management]
LargeSystemCache=1 (Default Srv. = 1, Default Prof. = 0)
[HKEY_LOCAL_MACHINE \System \CurrentControlSet \Control \SessionManager \MemoryManagement]
SystemCacheDirtyPageThreshold = 100 (MByte; Default = 0; 0 = Half of physical memory)
More Info MS KB920739 (Doesn’t limit the size of the read cache)
Note the LargeSystemCache is allocated from kernel memory area, which is shared with the pagedpoolsize and systempages. So when limiting these from using max size, then it will allow the filesystem cache to reach its max size of 960 MByte (WinNT4 512 MByte), else it will be limited to 512 MByte.
Note not all applications will benefit from a large system cache. Many disk intensive applications (Like database systems) includes their own cache manager, and doesn’t make use of the operating system controlled file cache. For MS SQL and Exhange the optimal value is to disable the large system cache.
Note enabling the large system cache can give stability issues, because it will configure the kernel area to allocate max memory for the file cache, while sacrificing the size of memory pools and number of page table entries. If using Unified Memory Architecture (UMA)-based video hardware or an Accelerated Graphics Port (AGP), then it will require page table entries to address the video memory. ATI recommends one doesn’t enable large system cache to avoid data corruption. More Info MS KB895932
File Caching
By default, Windows caches file data that is read from disks and written to disks. This implies that read operations read file data from an area in system memory known as the system file cache, rather than from the physical disk. Correspondingly, write operations write file data to the system file cache rather than to the disk, and this type of cache is referred to as a write-back cache. Caching is managed per file object.
Caching occurs under the direction of the cache manager, which operates continuously while Windows is running. File data in the system file cache is written to the disk at intervals determined by the operating system, and the memory previously used by that file data is freed—this is referred to as flushing the cache. The policy of delaying the writing of the data to the file and holding it in the cache until the cache is flushed is called lazy writing, and it is triggered by the cache manager at a determinate time interval. The time at which a block of file data is flushed is partially based on the amount of time it has been stored in the cache and the amount of time since the data was last accessed in a read operation. This ensures that file data that is frequently read will stay accessible in the system file cache for the maximum amount of time.
This file data caching process is illustrated in the following figure.
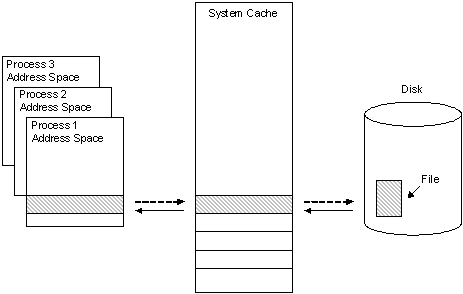
As depicted by the solid arrows in the previous figure, a 256 KB region of data is read into a 256 KB cache «slot» in system address space when it is first requested by the cache manager during a file read operation. A user-mode process then copies the data in this slot to its own address space. When the process has completed its data access, it writes the altered data back to the same slot in the system cache, as shown by the dotted arrow between the process address space and the system cache. When the cache manager has determined that the data will no longer be needed for a certain amount of time, it writes the altered data back to the file on the disk, as shown by the dotted arrow between the system cache and the disk.
The amount of I/O performance improvement that file data caching offers depends on the size of the file data block being read or written. When large blocks of file data are read and written, it is more likely that disk reads and writes will be necessary to finish the I/O operation. I/O performance will be increasingly impaired as more of this kind of I/O operation occurs.
In these situations, caching can be turned off. This is done at the time the file is opened by passing FILE_FLAG_NO_BUFFERING as a value for the dwFlagsAndAttributes parameter of CreateFile. When caching is disabled, all read and write operations directly access the physical disk. However, the file metadata may still be cached. To flush the metadata to disk, use the FlushFileBuffers function.
The frequency at which flushing occurs is an important consideration that balances system performance with system reliability. If the system flushes the cache too often, the number of large write operations flushing incurs will degrade system performance significantly. If the system is not flushed often enough, then the likelihood is greater that either system memory will be depleted by the cache, or a sudden system failure (such as a loss of power to the computer) will happen before the flush. In the latter instance, the cached data will be lost.
To ensure that the right amount of flushing occurs, the cache manager spawns a process every second called a lazy writer. The lazy writer process queues one-eighth of the pages that have not been flushed recently to be written to disk. It constantly reevaluates the amount of data being flushed for optimal system performance, and if more data needs to be written it queues more data. Lazy writers do not flush temporary files, because the assumption is that they will be deleted by the application or system.
Some applications, such as virus-checking software, require that their write operations be flushed to disk immediately; Windows provides this ability through write-through caching. A process enables write-through caching for a specific I/O operation by passing the FILE_FLAG_WRITE_THROUGH flag into its call to CreateFile. With write-through caching enabled, data is still written into the cache, but the cache manager writes the data immediately to disk rather than incurring a delay by using the lazy writer. A process can also force a flush of a file it has opened by calling the FlushFileBuffers function.
File system metadata is always cached. Therefore, to store any metadata changes to disk, the file must either be flushed or be opened with FILE_FLAG_WRITE_THROUGH.
How to Clear System Cache Windows 10 [2021 Updated] [Partition Manager]
By Amanda | Follow | Last Updated January 13, 2021
Summary :
![]()
This article aims to give a detailed information about Windows 10 cache. Besides, you will also learn about how to clean up your computer by clearing system cache with some effective methods provided by MiniTool Solution.
Quick Navigation :
What Is A Cache
Most Windows users might have heard about cache. But what is a cache exactly?
Windows cache is a special high-speed storage mechanism. It can be either a reserved section of main memory or an independent high-speed storage device. In other words, a cache is a hardware or software component which is used to store data. The cached data can be either the result of an earlier request or a copy of the existing data stored in other places.
With a cache, the future requests for the specific data can be responded faster. For example, when you visit a webpage for the first time, the information of this page will be cached on your computer. Then, you can reach this page faster next time, as the requested data can be found easily and quickly in the cache.
The location for Windows cache is not fixed. The cached data from different resources might be saved in different paths. The best-known storage path of cache in Windows should be C:\Windows\Temp, which stores a lot of system temporary files.
Why do You Need to Clear System Cache Windows 10
As you can see in the last part, the cached data is a set of temporary files used by apps, programs or the operating system on your computer. It’s true that your Windows could store a significant amount of cache, making your system run faster and be more responsive.
However, the cached data might bring some problems to your computer, and you need to clear system cache from time to time. Here are some reasons why you need to do this:
- The cache brings convenience only when you have enough free storage space and free RAM, or a high-performance CPU on your computer. If your computer cannot meet the requirement, the cache might slow your PC down in a short period of time.
- If you don’t clear cache regularly but let it cumulated overtime, the disk space might run out quickly and your computer might run into dreaded problems like Windows 10 blue screen of death or other unforeseen issues.
- Sometimes, certain cached data used to help your operating system function might get corrupted. If you don’t clear the corrupted cache on time, your PC might crash and the performance will be affected.
Therefore, it should be a routine for Windows users to clear cache regularly to get some fresh and intact data.
How to Clear System Cache on Your Windows 10 Computer
After learning about why we need to clear cache, it’s time to take action if you haven’t managed cache for long time. Do you know how to clear cache on Windows 10 computer?
Actually, there are several types of cache, and they are stored in different place. So, you might use different ways to delete these cached files. Fortunately, this post displays how to delete cache of different type, and you can have a try.
How to Clear System Cache Windows 10
- Clear the Temporary Files in Settings
- Employ Disk Cleanup Utility
- Clear the Windows Store Cache
- Clear Browser Cache
- Clear Cache in File Explorer
- Clear System Restores Cache
- Clear DNS Cache
- Clear System Cache Windows 10 Using MiniTool Partition Wizard
Method 1: Clear the Temporary Files in Settings
Temporary file is a common type of cache in your computer. By default, temporary files are stored in the path of C:\Users\Admin\AppData\Local\Temp. To clear them, you can press Windows + R to open Run window, input %temp% and click OK to open the Temp folders. Then, delete all the temporary files and folders in it.
![]()
However, if you want to clear other system cache together with temporary files, it should be a better choice to make it in Windows Settings. This is also a commonly-used method to remove cache for Windows users. Here’s how to do it.
Step 1: Right-click Start button and click Settings to open it.
Step 2: Choose System category.
Step 3: Turn to Storage tab in the left pane and click Free up space now under Storage sense section in the right pane. It will start scanning the data on your hard drive and you need to wait for the process to be completed.
![]()
Step 4: Check the items you want to delete and click Remove files button.
![]()
After that, just wait patiently until the cleaning process is finished. This is an effective way to clear various cache and is also a nice method to free up disk space.
Method 2: Employ Disk Cleanup Utility
Disk Cleanup is a built-in feature in your Windows 10. You can also use this tool to clear different types of system cache and other unnecessary files. Here’s a simple guide for you.
Step 1: Press Windows + S, search for Disk Cleanup and double-click the search result to open this tool.
Step 2: In the pop-up window, select the drive you want to clean up from the drop-down menu and click OK.
Step 3: Wait patiently until the tool finishes scanning this drive. The files that can be cleared will be listed here, and you just need to check the items you want to delete.
![]()
Step 4: Now, click Clean up system files in the same window to scan for more system cache. When you back to the window above, click OK button to clear all the selected files.
Method 3: Clear the Windows Store Cache
Windows Store will create temporary files when you are downloading apps. Sometimes, you might run into certain problems while using your Windows Store. Chances are that the Windows Store cache is corrupted or faulty. Thus, one of the methods to solve issues related Store app is to clear its cache.
To remove your Windows Store cache, just type wsreset.exe in Run dialog and click OK. Then, the Command Prompt will appear without text. You need wait patiently, as it is deleting Store cache in background. Once it’s done, the Store app will launch and the Command Prompt window will disappear automatically.
Method 4: Clear Browser Cache
When you visit websites on your browser, some cached files will be created. You can delete these cached data within your browser. How to delete cache in browser? Here, I take Google Chrome as an example:
Step 1: Open your Chrome, click the three-dot icon, and choose More tools > Clear browsing data.
Step 2: Set the Time range to All time, check Cached images and files, and click Clear data button to clear all your browser cache. Of course, you can choose other items to clear.
![]()
Then, the cached files related to your browser will be removed soon.
Method 5: Clear Cache in File Explorer
As most cached files can be found in File Explorer, you can also go to File Explorer to clear certain types of cache in a targeted way. Except the temporary files mentioned before, some other cache that are commonly managed in File Explorer are listed here.
- Windows thumbnail cache: To clear Windows thumbnail cache, you can go to «C:\Users\Username\AppData\Local\Microsoft\Windows\Explorer». Then, open Explorer folder and delete all the files with the word thumbcache in their names.
- Windows icon cache: This is a hidden file named IconCache.db under the directory of «C:\Users\Username\AppData\Local». Besides, you can also find this type of cache in Explorer folder and these files have iconcache in their names.
- Windows update cache: This is also hidden by default. You can go to «C:\Windows\SoftwareDistribution\Download» and delete all the content of Download folder to clear Windows update cache.
- File Explorer history: Besides the cache created by your system or from other resources, File Explorer also maintains its own cache. You can also clear it to improve performance or free up disk space. Just go to View tab and click Options in the ribbon. In the General tab, click Clear button in Privacy section.
![]()
Method 6: Clear System Restores Cache
It is a nice choice to create a system restore point before big events like Windows update for system protection. Because certain operations might be risky and bring some issue to your computer, and even may crash your system down. With the stem restore point, you can restore your computer to earlier date to resolve various problems.
You are allowed to set the maximum disk space used for system protection. When the assigned space is running out, you might need to delete the older restore points to spare room for new one. You can follow the steps below to clear your system restores cache.
Step 1: Type restore in the Search bar and double-click Create a restore point from the search result.
Step 2: Under System Protection tab, choose your system drive and click Configure button.
Step 3: In the new window, click Delete button.
![]()
This operation will delete all the restore points for this drive, and then you can create a new restore point.
Method 7: Clear DNS Cache
If you are experiencing certain problems during browsing on the internet, clearing DNS cache is another great solution. This is also a rather simple operation.
You just need to open Command Prompt, type the command ipconfig/flushdns, and press Enter. To get more detailed information on flushing DNS cache, you can read this post: How to Flush DNS Resolver Cache in Windows 10/8.1/7
Method 8: Clear System Cache Windows 10 Using MiniTool Partition Wizard
After learning about some types of cache in Windows 10 and how to clean up your computer by clearing these cached data, you might want to clear cache for your PC immediately. But wait for a moment. I will introduce a useful third-party program – MiniTool Partition Wizard to help you remove cache more conveniently.
This is an all-in-one disk manager designed for Windows users. It offers a feature of Space Analyzer to help you view the hard drive space usage intuitively. You can also use this tool to help you clear system cache. Just download and install it on your computer to have a try.
Step 1: Launch MiniTool Partition Wizard and click Space Analyzer in the tool bar to activate the feature.
![]()
Step 2: Select a hard drive to scan from the drop-down menu and click Scan button.
Step 3: After the scanning process is completed, all the files or folders stored on this drive will be displayed. To clear certain cached files, choose File View and input file name in the empty box. Then, check Match file name only or Match entire path as your needs and click Apply button to filter the files you want.
![]()
Step 4: Now, right-click the cached files you want to remove and choose either Delete (to Recycle Bin) or Delete (Permanently).
Bottom Line
This post has introduced how to clean up your computer by clearing cache. If you are running out of the storage space, or notice some problems on your computer, don’t hesitate to clear the cache. Now, it’s your turn. Just choose one method to clear a specific type of cache as your needs.
If you have any problems with this post, please let us know. You can either leave a message on the comment zone below or send an email to [email protected] .
Clear System Cache Windows 10 FAQ
To run a disk cleanup from Command Prompt, follow the steps below:
- Press Windows + R to open Run.
- Type cmd and press Enter to open Command Prompt.
- Input the command cleanmgr.exe and press Enter to invoke the tool.
- Choose your desired drive to perform a disk cleanup.
You need to delete Run history in Windows 10 in your Registry, as follows:
- Open Run window, type regedit and click OK to open Registry Editor.
- Navigate to the following path: HKEY_CURRENT_USER\Software\Microsoft\Windows\CurrentVersion\Explorer\RunMRU
- In the right pane, delete all the strings except the Default string.
ABOUT THE AUTHOR

Position: Columnist
Amanda has been working as English editor for the MiniTool team since she was graduated from university. She enjoys sharing effective solutions and her own experience to help readers fix various issues with computers, dedicated to make their tech life easier and more enjoyable.
She has published many articles, covering fields of data recovery, partition management, disk backup, and etc. In order to provide more useful tips and information, she is still committed to expand her technical knowledge.


