- Cannot do system restore
- Replies (4)
- Cannot do a system restore. Windows 10. Get error 0xc0000043
- Replies (2)
- FIX: Restore Point not working in Windows 10
- How to fix Restore point problems in Windows 10?
- 1. Check if System Restore is enabled
- 2. Use a dedicated restore tool
- Restoro
- 3. Try creating restore point manually
- 4. Disable your antivirus software
- 5. Run System Restore from Safe Mode
- 6. Check your hard drive for errors
- 7. Perform sfc scan
- 8. Perform the SFC scan before Windows starts
- 9. Make sure at least 300MB is used for System Restore by each partition
- 10. Check if services are running properly
- 11. Run DISM
- 12. Modify the registry
Cannot do system restore
I have a Dell Inspiron with Windows 10.
Recently I get error messages when I try to do system restore. How can I fix this.
Replies (4)
Was this reply helpful?
Sorry this didn’t help.
Great! Thanks for your feedback.
How satisfied are you with this reply?
Thanks for your feedback, it helps us improve the site.
How satisfied are you with this reply?
Thanks for your feedback.
![]()
Was this reply helpful?
Sorry this didn’t help.
Great! Thanks for your feedback.
How satisfied are you with this reply?
Thanks for your feedback, it helps us improve the site.
How satisfied are you with this reply?
Thanks for your feedback.
Was this reply helpful?
Sorry this didn’t help.
Great! Thanks for your feedback.
How satisfied are you with this reply?
Thanks for your feedback, it helps us improve the site.
How satisfied are you with this reply?
Thanks for your feedback.
Are you attempting a Reset or a System Restore?
Please note that System Restore is disabled by default in Windows 10. So, you will have to create new system restore points if you are setting up a new Windows 10 PC. Upgrading to Windows 10 from a previous version will also delete previous system restore points.
Was this reply helpful?
Sorry this didn’t help.
Great! Thanks for your feedback.
How satisfied are you with this reply?
Thanks for your feedback, it helps us improve the site.
Cannot do a system restore. Windows 10. Get error 0xc0000043
Cannot do a system restore. Windows 10. Get error 0xc0000043 My security package is turned off.
Please can any one help
Replies (2)
This may probably be due to some system file conflicts or corruptions. Can you try the solution provided by Gokul T on this link .
Was this reply helpful?
Sorry this didn’t help.
Great! Thanks for your feedback.
How satisfied are you with this reply?
Thanks for your feedback, it helps us improve the site.
How satisfied are you with this reply?
Thanks for your feedback.
Hello Anne, my name is Marco and I am an Independent Advisor. I will do my best to help you.
Try these steps to fix this error.
Step 1.
— Click Start and start typing on your keyboard for «services.msc»
— In your search results «services.msc» should show up. Open it with a click.
— A new windows will open containing all Windows services on your system.
— Search for «Windows Update»
— Right-click the «Windows Update» and then click Stop.
Step 2.
— Hold your windows-key pressed and hit «R» key simultanous.
— A small new windows will appear.
— Type %windir%\SoftwareDistribution\DataStore in this new window and click OK.
— This will open Windows Explorer on the correct location.
— Delete all contents of this folder. (Hint: Use Ctrl + A to select all files and folders)
Step 3.
Return to services.msc and instead of stop, select start.
Check if it ok now.
Was this reply helpful?
Sorry this didn’t help.
Great! Thanks for your feedback.
How satisfied are you with this reply?
Thanks for your feedback, it helps us improve the site.
FIX: Restore Point not working in Windows 10

- Sometimes using System restore is our only option left when dealing with PC problems.
- However, when System Restore is not working in Windows 10, troubleshooting is needed.
- This mostly happens when the drive is not in the selected restore point, but there are other causes as well.
- Continue reading below if you cannot restore Windows 10 properly.

If you run into a major problem on Windows 10, it’s advised you use System Restore to fix the problem by restoring your computer to a certain restore point.
System Restore is quite useful feature, but users complained that restore point isn’t working on Windows 10, and today we’re going to fix that.
Here are some more examples of this problem:
- System restore did not complete successfully Windows 10
- If you can’t complete the process of creating a restore point in Windows 10, try some of the solutions listed below.
- Windows 10 System restore stuck
- There’s also a chance for System Restore to get stuck, and therefore prevent you from creating a restore point.
- System restore not working Windows 8
- Even though we’re talking about Windows 10 here, you can easily perform most of these solutions in Windows 8, as well.
- System restore failed Windows 7
- The same thing applies to Windows 7.
How to fix Restore point problems in Windows 10?
1. Check if System Restore is enabled
- Press Windows Key + R and type gpedit.msc.

- In the left pane navigate to Computer Configuration -> Administrative Templates -> System -> System Restore.
- Check the state of Turn off Configuration and Turn off System Restore settings. If they aren’t set to Not configured, double click each setting and set it to Not Configured.
- Click Apply and OK to save changes.

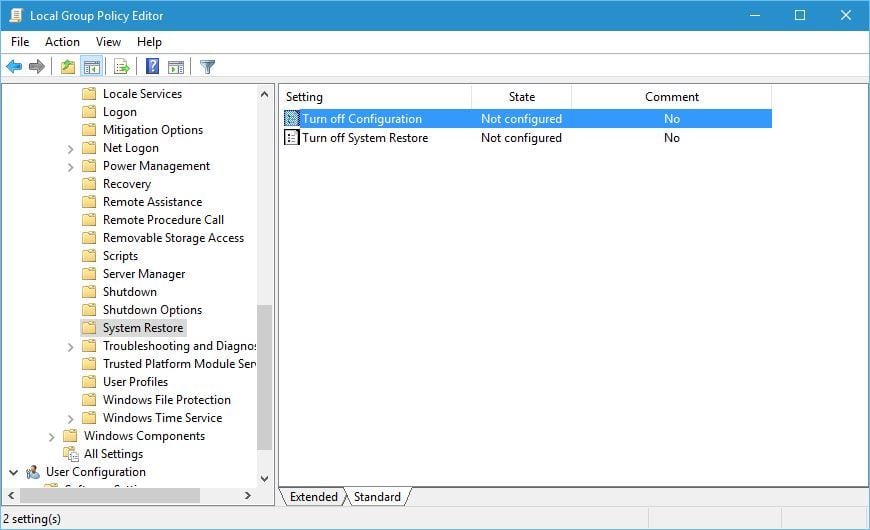
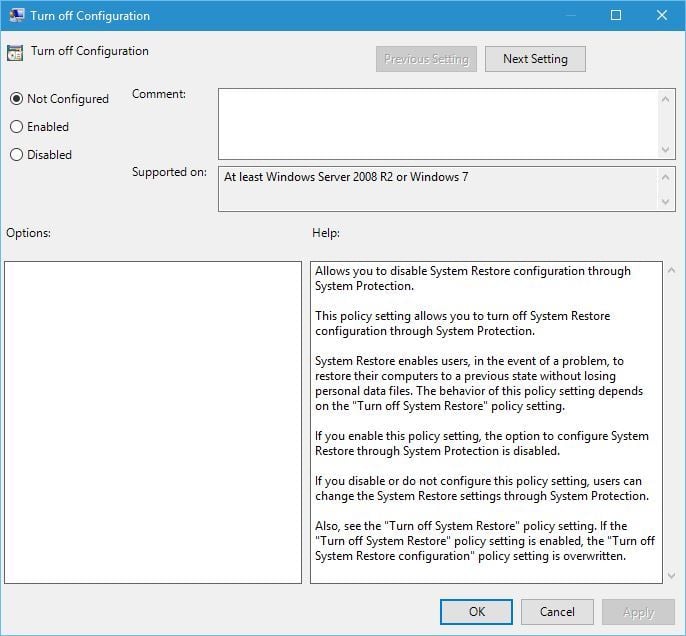
Before we start, make sure that System Restore is enabled on your PC.
2. Use a dedicated restore tool
 One downside to using Windows own Restore point is that while it does create an exact image of your PC’s files from any given moment, you may end up making a copy of data that may already be faulty or damaged.
Additionally, creating a restore point is something that needs to be scheduled beforehand, or done manually.
The last major downside or using traiditonal restore points is that they are used for restoring registry hives as opposed to actual files.
Given the downsides, using a dedicated third-party tool suddenly becomes the better option, and few software tools are as good as Restoro.
First of all, Restoro is fully automated, so no scheduling or manual input is required.
Secondly, Restoro fixes registry keys and files using its own repositories before creating creating its own restore points, so you always know that whatever restore point you choose during a rollback will always be a fully functional one.

Restoro
3. Try creating restore point manually
- Press Windows Key + S and enter Create a restore point. Choose Create a restore point from the list of results.
- System Properties window will open. Click Create button and enter the name for your new restore point.
- Check if the restore point is created, and if so, use manually created restore points in the future.

If the restore point isn’t working, you might want to try setting the restore point manually.
4. Disable your antivirus software
Your antivirus software can sometimes interfere with System Restore, so it’s advised that you disable your antivirus software before trying to create or restore to a certain restore point.
5. Run System Restore from Safe Mode
- Open Start Menu and click on Power button.
- Hold Shift on your keyboard and click on Restart.
- When your computer restarts choose Troubleshoot > Advanced options > Startup Settings and click Restart.
- When your computer restarts again, press F5 to select Safe Mode with Networking.
- After you enter Safe Mode try to perform System Restore.
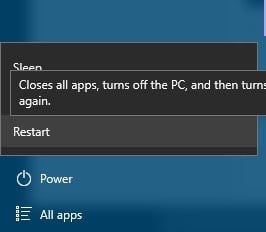
Certain software can sometimes create errors while using System Restore, therefore, it’s advised that you run System Restore from Safe Mode.
6. Check your hard drive for errors
- Press Windows Key + X and choose Command Prompt (Admin) from the menu.
- When Command Prompt opens enter the following and press Enter:
- chkdsk /f /r X:
- chkdsk /f /r X:
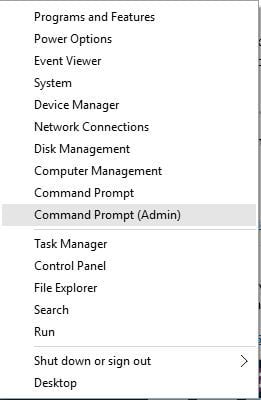
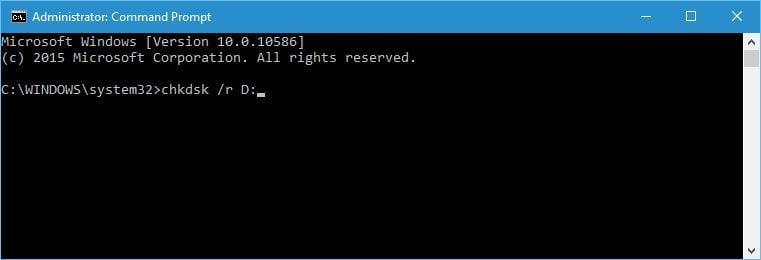
Remember to replace X with the correct letter that represents a hard drive partition on your PC.
Sometimes restore point might not work due to corrupted files and folders on your drive, and in order to fix the corrupted files, you might need check your hard drive.
This process can take a while so be patient. You might have to restart your computer in order to complete the disk checking process.
7. Perform sfc scan
- Press Windows Key + X and select Command Prompt (Admin) from the menu.
- When Command Prompt opens, enter the following and press Enter to run it:
- sfc /scannow
- sfc /scannow
- Follow the instructions and wait for the process to complete.
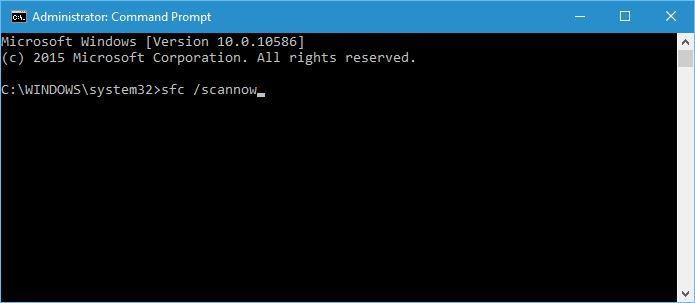
If your Windows 10 is corrupted, System Restore might not work properly, and in order to fix that you’ll have to run sfc scan.
8. Perform the SFC scan before Windows starts
The scanning process will now start. Wait while your system files are scanned. After the scan is completed, close Command Prompt and start Windows 10 normally.
9. Make sure at least 300MB is used for System Restore by each partition
- Press Windows Key + S and type Create a restore point.
- Choose Create a restore point from the list of results.
- When System Properties window opens, select a hard drive partition and click Configure.
- Move the slider in order to adjust the amount of space that System Restore will use.
In order for System Restore to work properly, each partition that has System Restore enabled requires at least 300MB in order to work.
10. Check if services are running properly
- Press Windows Key + S and type services.msc. Press Enter or click OK.
- When Services window starts, locate the following services:
- Volume Shadow Copy
- Task Scheduler
- Microsoft Software Shadow Copy Provider Service
- System Restore Service.
- Double click each of these services and make sure that Startup type is set to Automatic and that Service status is set to Running.
- Click Apply and OK to save changes, close Services window and restart your computer.
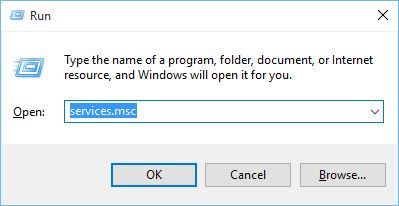
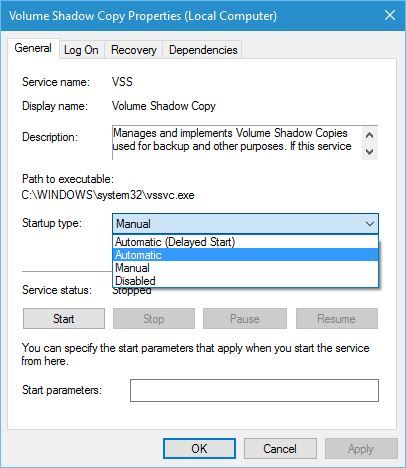
System Restore relies on specific services, and if certain restore point isn’t working, it might be because certain services aren’t running.
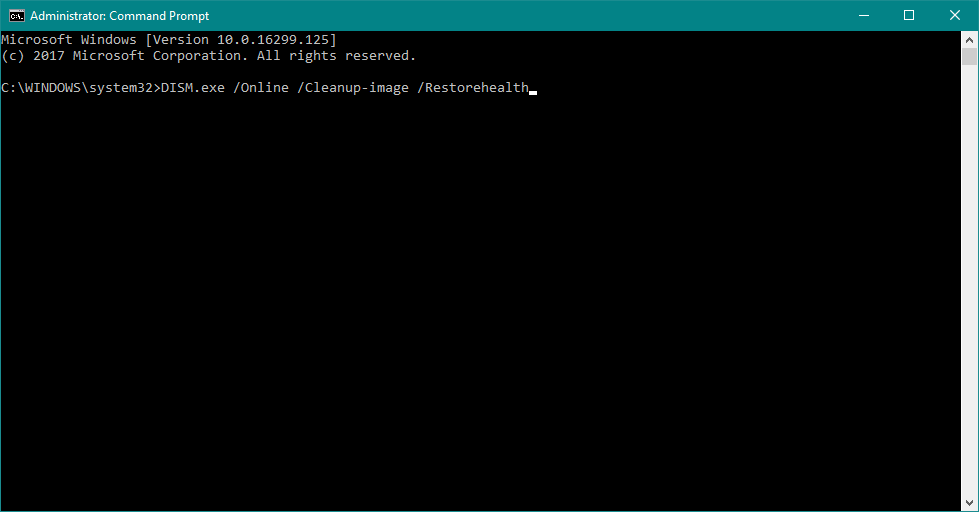
11. Run DISM
Once again, if running the SFC scan in any way didn’t get the job done, try with DISM, which is a more advanced troubleshooting solution:
- Type cmd in Search, right-click on the Command Prompt and run it as an administrator.
- In the command line, copy-paste these lines one by one and press Enter after each:
- DISM /online /Cleanup-Image / ScanHealth
- DISM /Online /Cleanup-Image /RestoreHealth
- DISM /online /Cleanup-Image / ScanHealth
- Wait until the procedure ends (it might take up to 10 minutes).
- Restart your PC.
12. Modify the registry

And finally, if none of the solutions from above resolved the problem, let’s try one registry tweak:
- Go to Search, type regedit, and open Registry Editor
- Navigate to this registry path: HKEY_LOCAL_MACHINE\SOFTWARE\Microsoft\Windows NT\CurrentVersion\Schedule\TaskCache .
- First, back up the TaskCache registry key. Right-click TaskCache and select Export on its context menu.
- Enter a title for the backup file, select a folder for it and press the Save button.
- Next, navigate to this key in the Registry Editor HKEY_LOCAL_MACHINE\SOFTWARE\Microsoft\Windows NT\CurrentVersion\Schedule\TaskCache\Tree\Microsoft\Windows
- Right-click the Windows key and click Delete on its context menu.
- Press the Yes button to confirm, and then you can close the Registry Editor.
- Restart your computer.
That’s about it. As you can see, System Restore might have certain issues on Windows 10, but we hope you solved these problems by following our solutions. If you have any comments, questions or suggestions, make sure to let us know in the comments below.


