- How to record the screen on your Mac
- Use the Screenshot toolbar
- Record the entire screen
- Record a selected portion of the screen
- Trim, share, and save
- Change the settings
- Take screenshots or screen recordings on Mac
- Take pictures or screen recordings using Screenshot
- Take pictures using keyboard shortcuts
- 16 Best Screen Recording & Capture Software for Mac (2018)
- Free or Open Source Screen Recording Software for Macs
- 1. OBS Studio
- 2 . Monosnap
- 3. Apowersoft
- 4. TinyTake
- 5. Screencast-o-matic
- 6. Jing
- 7. Recordit: Instant Screencasts
- 8. QuickTime Player
- 9. ActivePresenter
- 10. IceCream Screen Recorder
- Premium Screen Recording Software for Macs
- 1. Camtasia
- 2. ScreenFlow
- 3. SnagIt
- 4. filmora scrn
- 5. Screen Record — Screen Recorder
- 6. AV Recorder & Screen Capture
- Next Step: Choose Your Own Mac Screen Recording Software
How to record the screen on your Mac
You can make a video recording of the entire screen or just a selected portion of it.
Use the Screenshot toolbar

To view the Screenshot toolbar, press these three keys together: Shift, Command, and 5. You will see onscreen controls for recording the entire screen, recording a selected portion of the screen, or capturing a still image of your screen:
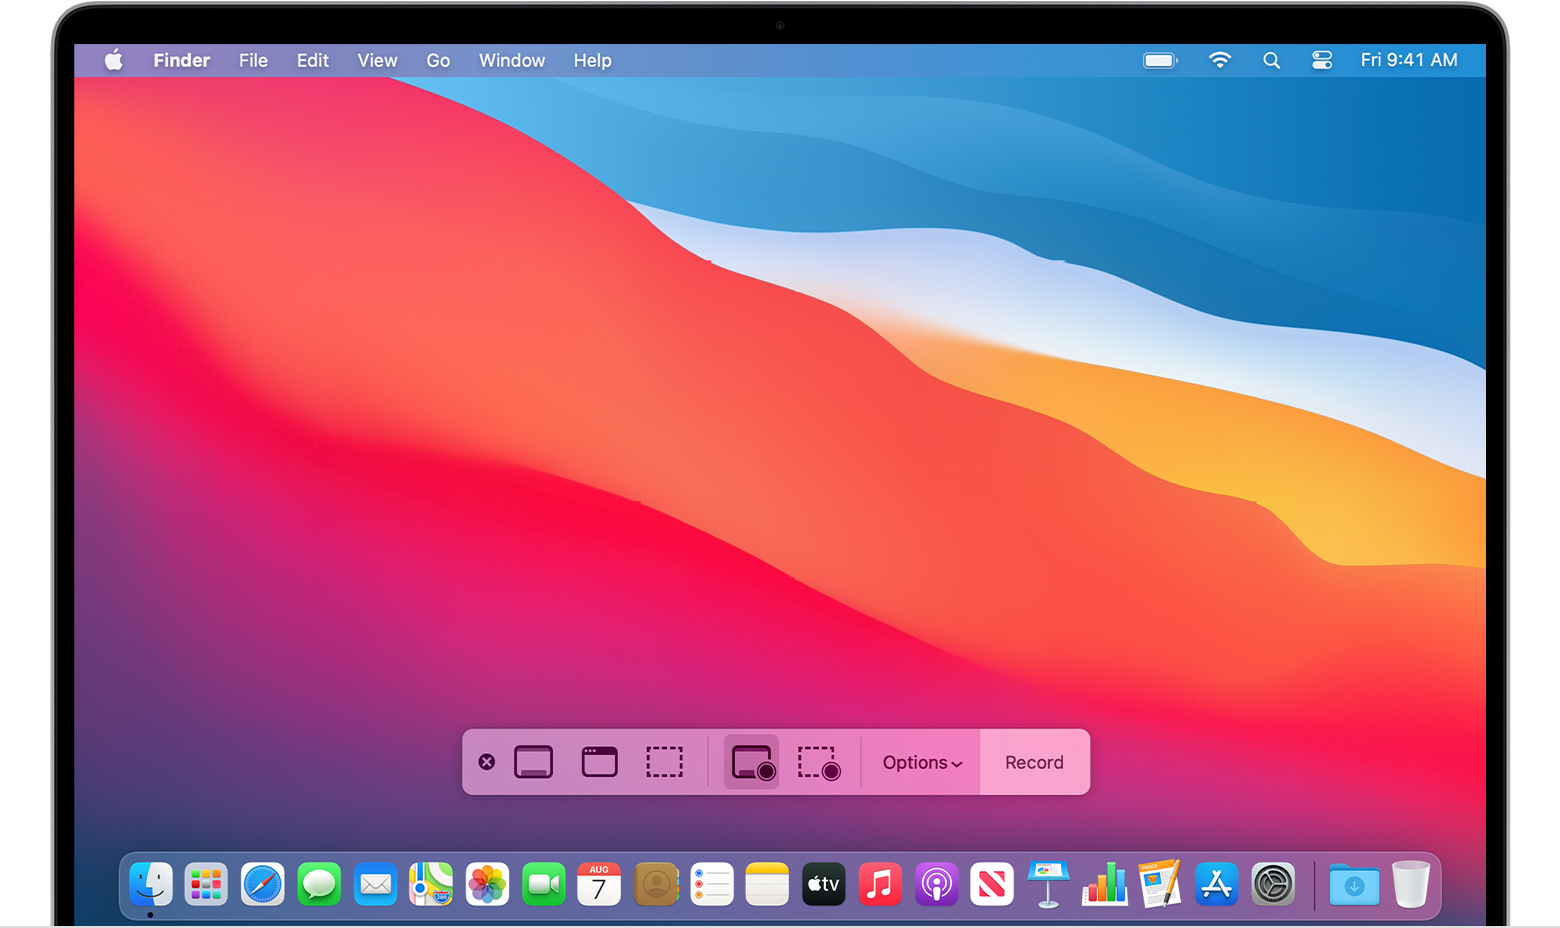
Record the entire screen
- Click in the onscreen controls. Your pointer changes to a camera .
- Click any screen to start recording that screen, or click Record in the onscreen controls.
- To stop recording, click in the menu bar. Or press Command-Control-Esc (Escape).
- Use the thumbnail to trim, share, save, or take other actions.
Record a selected portion of the screen
- Click in the onscreen controls.
- Drag to select an area of the screen to record. To move the entire selection, drag from within the selection.
- To start recording, click Record in the onscreen controls.
- To stop recording, click in the menu bar. Or press Command-Control-Esc (Escape).
- Use the thumbnail to trim, share, save, or take other actions.
Trim, share, and save
After you stop recording, a thumbnail of the video appears briefly in the lower-right corner of your screen.
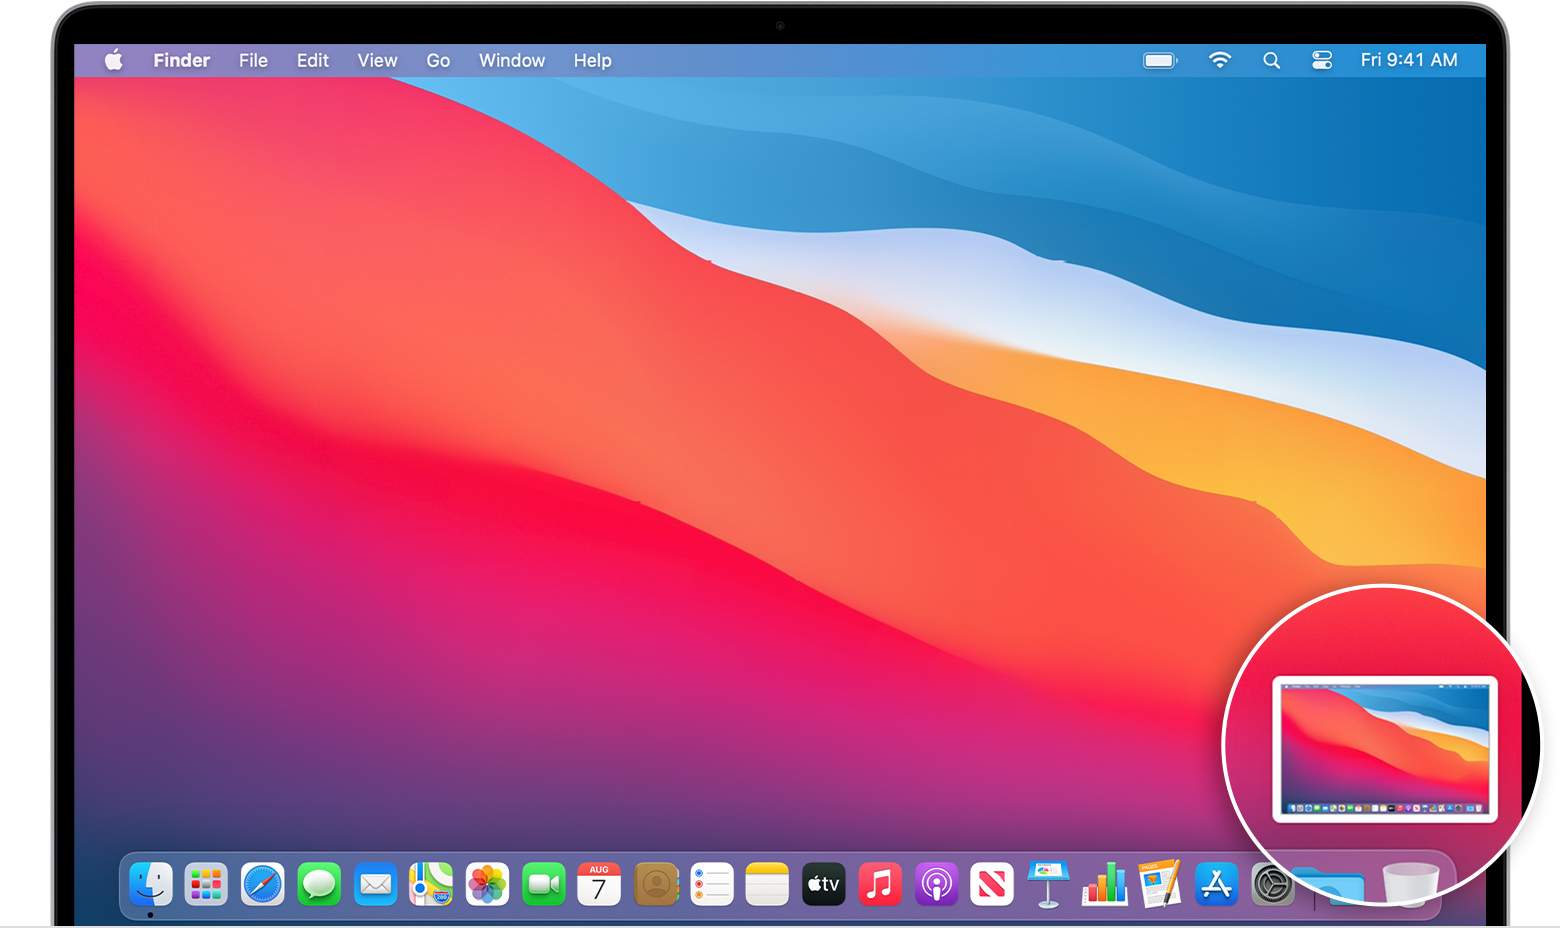
- Take no action or swipe the thumbnail to the right and the recording is automatically saved.
- Click the thumbnail to open the recording. You can then click to trim the recording, or click to share it.
- Drag the thumbnail to move the recording to another location, such as to a document, an email, a Finder window, or the Trash.
- Control-click the thumbnail for more options. For example, you can change the save location, open the recording in an app, or delete the recording without saving it.
Change the settings
Click Options in the onscreen controls to change these settings:
- Save to: Choose where your recordings are automatically saved, such as Desktop, Documents, or Clipboard.
- Timer: Choose when to begin recording: immediately, 5 seconds, or 10 seconds after you click to record.
- Microphone: To record your voice or other audio along with your recording, choose a microphone.
- Show Floating Thumbnail: Choose whether to show the thumbnail.
- Remember Last Selection: Choose whether to default to the selections you made the last time you used this tool.
- Show Mouse Clicks: Choose whether to show a black circle around your pointer when you click in the recording.
Источник
Take screenshots or screen recordings on Mac
You can take pictures (called screenshots) or recordings of the screen on your Mac using Screenshot or keyboard shortcuts. Screenshot provides a panel of tools that let you easily take screenshots and screen recordings, with options to control what you capture — for example, you can set a timer delay or include the pointer or clicks.
Take pictures or screen recordings using Screenshot
On your Mac, press Shift-Command-5 (or use Launchpad) to open Screenshot and display the tools.

Click a tool to use to select what you want to capture or record (or use the Touch Bar).
For a portion of the screen, drag the frame to reposition it or drag its edges to adjust the size of the area you want to capture or record.
Capture the entire screen

Capture a window

Capture a portion of the screen

Record the entire screen

Record a portion of the screen

Click Options if you want.
The available options vary based on whether you’re taking a screenshot or a screen recording. For example, you can choose to set a timed delay or show the mouse pointer or clicks, and specify where to save the file.
The Show Floating Thumbnail option helps you work more easily with a completed shot or recording — it floats in the bottom-right corner of the screen for a few seconds so you have time to drag it into a document, mark it up or share it before it’s saved to the location you specified.
Start the screenshot or screen recording:
For the entire screen or a portion of it: Click Capture.
For a window: Move the cursor to the window, then click the window.
For recordings: Click Record. To stop recording, click the Stop Recording button  in the menu bar.
When the Show Floating Thumbnail option is set, you can do any of the following while the thumbnail is briefly displayed in the bottom-right corner of the screen:
Swipe right to immediately save the file and make it disappear.
Drag the thumbnail into a document, an email, a note or a Finder window.
Click the thumbnail to open a window where you can mark up the screenshot or trim the recording, or share it.
Depending on where you chose to save the screenshot or recording, an app may open.
Take pictures using keyboard shortcuts
You can use various keyboard shortcuts on your Mac to take pictures of the screen. The files are saved to the desktop.
Tip: To copy a screenshot so you can paste it somewhere — like in an email or to another device — press and hold the Control key while you press the other keys. For example, to copy the whole screen, press Shift-Command-Control-3.
Capture the entire screen
Capture a portion of the screen
Press Shift-Command-4, then move the crosshair pointer to where you want to start the screenshot. Press the mouse or trackpad button, drag over the area you want to capture, then release the mouse or trackpad button.
Capture a window or the menu bar
Press Shift-Command-4, then press the Space bar. Move the camera pointer over the window or the menu bar to highlight it, then click.
Capture a menu and menu items
Open the menu, press Shift-Command-4, then drag the pointer over the menu items you want to capture.
Press Shift-Command 5.
Capture the Touch Bar
You can customise these keyboard shortcuts in the Shortcuts pane of Keyboard preferences. On your Mac, choose Apple menu

> System Preferences, click Keyboard, then click Shortcuts.
Screenshots are saved as .png files and screen recordings are saved as .mov files. Filenames begin with “Screenshot” or “Screen Recording” and include the date and time.
You may not be able to take pictures of windows in some apps, such as DVD Player.
Источник
16 Best Screen Recording & Capture Software for Mac (2018)
Screen recording and screen capture software is popular. Mac users are no different. Many Mac users make screen recordings professionally. In fact, high quality screen captures or videos can be useful for training or marketing. Or, perhaps you want to stream games online—screen recording software can help with that too.
Note: It’s a good idea to check with a video game’s terms of service before streaming a video game or other copyrighted content. Check with an attorney if you’re not sure. This VentureBeat article has more information on the legalities of video game streaming.
Also, it’s becoming popular to create screen recordings or screen captures for personal use. For example, you may want to take a screenshot of a software problem you’re having to show it to technical support.
Whatever the need, the Mac recording software you choose to invest in is important. You’ll want the best screen capture or screen recording software for your Mac to ensure that it meets your needs. If you’re a Mac user, you may wonder what your options are when it comes to recording software for Macs. The answer is: there are plenty of options!
We’ve already discussed screen recording software in general, but in this article we want to focus on Mac recording software as well as Mac screen capture software. First, I’ll provide an overview of some of the best free screen recorder software for Macs and some free screen capture software as well. Next, I’ll list some premium options for Mac recording software and screen capture software so that you can choose the best package for your needs.
Free or Open Source Screen Recording Software for Macs
If your project is on a tight budget, you may not be able to spend much on Mac recording software. But don’t give up. There are plenty of free and open source screen capture and screen recording software options for the Mac. Here’s a great list of options to try:
1. OBS Studio
.jpg)
.jpg)
.jpg)
OBS Studio is a popular open source Mac recording software tool that works well for live streaming games on Twitch and recording other information as well. Mix material from more than one source to create a single recording. If you’re not live streaming, it also includes some good edit options.
One drawback to OBS Studio is the learning curve. Users report that there’s not much training material included with the download. Fortunately, the software seems to be catching on—so third-party tutorials and videos are available.
2 . Monosnap
.jpg)
.jpg)
.jpg)
Monosnap is a free and highly-rated screenshot editor that you can download from the Mac App Store. You’ll find that it includes many screen capture features that you’d find in more expensive software such as editing and annotation capabilities. While you may think of Monosnap as primarily screen capture software for Macs, there’s also a video tool that lets you use it as Mac recording software. One helpful feature is the ability to stop your recording and then start again.
This tool has good basic functionality that’ll work well for many projects. If you need more advanced capabilities, you may wish to look at one of the premium tools.
3. Apowersoft
.jpg)
.jpg)
.jpg)
Apowersoft is another option for free Mac screen capture software. Here are some key features:
- Perform real-time editing.
- Convert videos to MPEG, MOV, WMV, AVI, ASF, FLV, and more.
- Customize keyboard shortcuts (and save time).
This browser-based tool does not support streaming, so if you’re wanting to use Mac screen recording software to broadcast games or other information this tool may not be for you. But for other screen recording projects, this tool could work.
If you need more than the free version offers, there’s also a premium version called Apowersoft Unlimited that includes all Apowersoft products.
4. TinyTake
.jpg)
.jpg)
.jpg)
For a free screen capture tool, TinyTake comes with a lot of perks. It’s easy to use and has some useful features. It includes a free cloud storage service with 2GB of storage. You can annotate videos. And if you create a lot of screen recordings, bulk file sharing is available. If you need more features, there’s also a premium version.
There are a few drawbacks to this Mac screen capture software though. First, your screen recordings are limited to five minutes. Secondly, you can’t stream games using this tool (important to know if that’s the reason you’re wanting screen capture software for a Mac).
5. Screencast-o-matic
.jpg)
.jpg)
.jpg)
Like so many other Mac screen recording software tools, there’s a premium version of the software available too. However, this basic tool may be enough for some projects. Plus, there are quite a few tutorials right on their website to make learning it easier.
This free version is hosted on their site and has a watermark, which could be annoying. Also, free users can’t use the computer audio system or record the full screen. And, you’re limited to a 15-minute recording with the free version.
6. Jing
.jpg)
.jpg)
.jpg)
Jing is a basic screen capture tool from TechSmith, a company which also developed Camtasia and Snagit (see our discussion of Premium Screen Recording Software for Macs below). Although it’s an older tool, Jing still has a following and it’s still useful.
TechSmith is known for having excellent training materials, and Jing is no exception. You’ll find plenty of written and video tutorials on their site. Plus, there’s some nifty features like the Capture Hotkey and the ability to copy an image from your screen into an email or document. Plus, it plays nicely with other TechSmith products—you can edit a Jing image in Snagit or edit a Jing video in Camtasia Studio.
7. Recordit: Instant Screencasts
This free Mac screen recording app has a four-star rating on the Mac App store. It was designed to allow you to make and share GIF screen recordings quickly through application’s server. One drawback is that this tool doesn’t record audio. Another drawback is that your recordings are limited to five minutes. If you can work within those constraints, this tool might be for you.
8. QuickTime Player
.jpg)
.jpg)
.jpg)
Quick Time Player comes installed on your Mac—so you probably already have it. Although you’d think it can only play videos from its name, it does have some basic recording abilities and can be a good tool for that purpose. It even has some limited editing capabilities, or you can use iMovie (also free) to edit it.
9. ActivePresenter
.jpg)
.jpg)
.jpg)
ActivePresenter is a Mac screen recorder that bills itself as an all-in-one tool. The free edition lets you record your screen as a full-motion video, complete with audio. You’ll also have access to a range of annotations such as shapes, zoom-n-pan, closed caption, and more. However, it’ll add a watermark to non-supported file formats. To get rid of the watermark, you’ll need to upgrade to one of the premium versions.
10. IceCream Screen Recorder
.jpg)
.jpg)
.jpg)
The IceCream Screen Recorder is part of a suite of apps for Mac and Windows. This screen recorder app lets you take screenshots or videos quickly and easily. You can even add shapes and text as you record.
With the free version, however, your file format output is limited to WEBM. Also, your video recording time is limited. If you find yourself needing more features, you can upgrade to the Pro version.
Premium Screen Recording Software for Macs
If your screen recording project needs a more full-featured tool, you may want to consider a premium Mac screen recording software tool. These tools tend to have more functionality, suitable for most professional projects. Many of these tools offer a trial version try-before-you-buy option—I’ll point those out as we go. Here are some of the best screen recorders for Mac that you can buy:
1. Camtasia
.jpg)
.jpg)
.jpg)
As someone who creates tutorials professionally, I’ve found Camtasia from TechSmith to meet my screen recording needs. The Mac version of this recording software is just as full-featured as the Windows version. You’ll find you’ve got a full set of editing and special effect features including the ability to draw on the screen, do annotations, blur, add captions, and more. Plus, you’ll be record and edit audio—and much more! The company also offers quite a few training videos.
The one downside is that Camtasia can be expensive. At the time I wrote this article it was $249 for up to four users—although there are discounts available for academic and government users. Fortunately, Camtasia is one of those packages that offers a free trial, so you can try out the features before you make the purchase.
2. ScreenFlow
.jpg)
.jpg)
.jpg)
ScreenFlow gives you the capability to create high-quality screen recordings, making it the professional choice of Mac screen recording software for many businesses and educators. You can also use it to create iOS recordings, which is nice to know in today’s digital world. It has professional editing options such as the ability to do annotations, blur, add captions, and more. One cool feature is the ability to zoom into a focal point on your screen. Plus, you can switch between a webcam recording and a screen capture. Plus, you can download a free trial if you’re not sure whether it’s for you.
3. SnagIt
.jpg)
.jpg)
.jpg)
Snagit is another TechSmith product that I often use for screen captures, but what many people don’t know is that you can also use it to record a simple short video and share it in GIF or MPEG-4 format. You can even record audio with your video. Of course, if you need more advanced editing tools for your screen captures, you’ll want to use Camtasia. And, there’s a free trial available if you want to try it.
4. filmora scrn
.jpg)
.jpg)
.jpg)
This Mac screen recording software is becoming popular with gamers. It lets you record from your computer and webcam at the same time. Plus, you can record sound. Here are some key features:
- Change the size of your cursor.
- Control frames per second (fps), with range setting varying from 15 to 120.
- Export files to MP4, MOV, GIF, MP3 and more.
If you think this tool might be for you, a free trial version is available.
5. Screen Record — Screen Recorder
You can find this basic Mac screen recorder in the Mac App store. With a low cost (under $5.00 at the time of writing) and relatively high ratings, it’s worth a look if your screen recording or screen capture needs are simple. Not only can you record your screen, you can also record audio and even add some text and a logo. When you’re done, trim and compress your recording.
6. AV Recorder & Screen Capture
This is another screen recorder and screen capture tool for Macs from the Mac App store. As such, you’ll pay a relatively low price to get some core recording features such as the ability to record voice and system audio simultaneously. You can also choose between recording the full screen or part of the screen. Best of all, your recording length isn’t limited.
Next Step: Choose Your Own Mac Screen Recording Software
Now that we’ve reviewed some of the best screen recording and capture software for Macs, you’re ready to make your choice. Whether you’re making screen recordings for personal use or professionally, we’ve just examined some great options for screen recording software for Macs. Best wishes on your next screen recording project.
Источник


