- Screen capture
- Add the screen capture capability
- Launch the system UI to start screen capture
- Create a capture frame pool and capture session
- Acquire capture frames
- Process capture frames
- Take a screenshot
- React to capture item resizing or device lost
- Putting it all together
- How to Capture Screen on Windows 10?
- Where to find Snipping Tool on Windows 10?
- How to Capture Screen on Windows 10?
- Record screen videos in Windows 10
- How to record your screen in Windows 10
- How to record your screen in Windows 10
Screen capture
Starting in Windows 10, version 1803, the Windows.Graphics.Capture namespace provides APIs to acquire frames from a display or application window, to create video streams or snapshots to build collaborative and interactive experiences.
With screen capture, developers invoke secure system UI for end users to pick the display or application window to be captured, and a yellow notification border is drawn by the system around the actively captured item. In the case of multiple simultaneous capture sessions, a yellow border is drawn around each item being captured.
The screen capture APIs are only supported on desktop and Windows Mixed Reality immersive headsets.
This article describes capturing a single image of the display or application window. For information on encoding frames captured from the screen to a video file, see Screen capture to video
Add the screen capture capability
The APIs found in the Windows.Graphics.Capture namespace require a general capability to be declared in your application’s manifest:
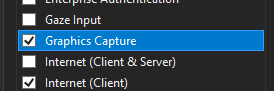
- Open Package.appxmanifest in the Solution Explorer.
- Select the Capabilities tab.
- Check Graphics Capture.
Launch the system UI to start screen capture
Before launching the system UI, you can check to see if your application is currently able to take screen captures. There are several reasons why your application might not be able to use screen capture, including if the device does not meet hardware requirements or if the application targeted for capture blocks screen capture. Use the IsSupported method in the GraphicsCaptureSession class to determine if UWP screen capture is supported:
Once you’ve verified that screen capture is supported, use the GraphicsCapturePicker class to invoke the system picker UI. The end user uses this UI to select the display or application window of which to take screen captures. The picker will return a GraphicsCaptureItem that will be used to create a GraphicsCaptureSession:
Because this is UI code, it needs to be called on the UI thread. If you’re calling it from the code-behind for a page of your application (like MainPage.xaml.cs) this is done for you automatically, but if not, you can force it to run on the UI thread with the following code:
Create a capture frame pool and capture session
Using the GraphicsCaptureItem, you will create a Direct3D11CaptureFramePool with your D3D device, supported pixel format (DXGI_FORMAT_B8G8R8A8_UNORM), number of desired frames (which can be any integer), and frame size. The ContentSize property of the GraphicsCaptureItem class can be used as the size of your frame:
On systems with Windows HD color enabled, the content pixel format might not necessarily be DXGI_FORMAT_B8G8R8A8_UNORM. To avoid pixel overclipping (i.e. the captured content looks washed out) when capturing HDR content, consider using DXGI_FORMAT_R16G16B16A16_FLOAT for every component in the capturing pipeline, including the Direct3D11CaptureFramePool, the target destination such as CanvasBitmap. Depends on the need, additional processing such as saving to HDR content format or HDR-to-SDR tone mapping might be required. This article will focus on SDR content capturing. For more information, please see Using DirectX with high dynamic range Displays and Advanced Color.
Next, get an instance of the GraphicsCaptureSession class for your Direct3D11CaptureFramePool by passing the GraphicsCaptureItem to the CreateCaptureSession method:
Once the user has explicitly given consent to capturing an application window or display in the system UI, the GraphicsCaptureItem can be associated to multiple CaptureSession objects. This way your application can choose to capture the same item for various experiences.
To capture multiple items at the same time, your application must create a capture session for each item to be captured, which requires invoking the picker UI for each item that is to be captured.
Acquire capture frames
With your frame pool and capture session created, call the StartCapture method on your GraphicsCaptureSession instance to notify the system to start sending capture frames to your app:
To acquire these capture frames, which are Direct3D11CaptureFrame objects, you can use the Direct3D11CaptureFramePool.FrameArrived event:
It is recommended to avoid using the UI thread if possible for FrameArrived, as this event will be raised every time a new frame is available, which will be frequent. If you do choose to listen to FrameArrived on the UI thread, be mindful of how much work you’re doing every time the event fires.
Alternatively, you can manually pull frames with the Direct3D11CaptureFramePool.TryGetNextFrame method until you get all of the frames that you need.
The Direct3D11CaptureFrame object contains the properties ContentSize, Surface, and SystemRelativeTime. The SystemRelativeTime is QPC (QueryPerformanceCounter) time that can be used to synchronize other media elements.
Process capture frames
Each frame from the Direct3D11CaptureFramePool is checked out when calling TryGetNextFrame, and checked back in according to the lifetime of the Direct3D11CaptureFrame object. For native applications, releasing the Direct3D11CaptureFrame object is enough to check the frame back in to the frame pool. For managed applications, it is recommended to use the Direct3D11CaptureFrame.Dispose (Close in C++) method. Direct3D11CaptureFrame implements the IClosable interface, which is projected as IDisposable for C# callers.
Applications should not save references to Direct3D11CaptureFrame objects, nor should they save references to the underlying Direct3D surface after the frame has been checked back in.
While processing a frame, it is recommended that applications take the ID3D11Multithread lock on the same device that is associated with the Direct3D11CaptureFramePool object.
The underlying Direct3D surface will always be the size specified when creating (or recreating) the Direct3D11CaptureFramePool. If content is larger than the frame, the contents are clipped to the size of the frame. If the content is smaller than the frame, then the rest of the frame contains undefined data. It is recommended that applications copy out a sub-rect using the ContentSize property for that Direct3D11CaptureFrame to avoid showing undefined content.
Take a screenshot
In our example, we convert each Direct3D11CaptureFrame into a CanvasBitmap, which is part of the Win2D APIs.
Once we have the CanvasBitmap, we can save it as an image file. In the following example, we save it as a PNG file in the user’s Saved Pictures folder.
React to capture item resizing or device lost
During the capture process, applications may wish to change aspects of their Direct3D11CaptureFramePool. This includes providing a new Direct3D device, changing the size of the frame buffers, or even changing the number of buffers within the pool. In each of these scenarios, the Recreate method on the Direct3D11CaptureFramePool object is the recommended tool.
When Recreate is called, all existing frames are discarded. This is to prevent handing out frames whose underlying Direct3D surfaces belong to a device that the application may no longer have access to. For this reason, it may be wise to process all pending frames before calling Recreate.
Putting it all together
The following code snippet is an end-to-end example of how to implement screen capture in a UWP application. In this sample, we have two buttons in the front-end: one calls Button_ClickAsync, and the other calls ScreenshotButton_ClickAsync.
This snippet uses Win2D, a library for 2D graphics rendering. See their documentation for information about how to set it up for your project.
How to Capture Screen on Windows 10?
Windows 10 comes with a bunch of useful small tools, such as the Windows movie maker, voice recorder, snipping tool, steps recorder, etc. Today we will discuss how to find Snipping Tool and capture screen on Windows 10? At the bottom of this post, we will also recommend several third-party screen recorders that can help us record desktop screen videos on Windows 10 computer.

Where to find Snipping Tool on Windows 10?

Windows has this built-in utility since Windows 7. There are different ways you can find Snipping tool on Windows 10. You can access the screen capture software on Win 10 from the Start menu >> All Apps >> Windows Accessories >> Snipping Tool. When you select the All Apps option, this will brings up a very long alphabetical list of programs and folders, scroll down to the W section to find Windows Accessories and Snipping Tool beneath. If you’re a frequent Snipping Tool user, right-click on the Snipping Tool to get the pop-up context menu, then choose ‘Pin to Start’ or ‘Pin to Task bar’. You can choose to pin Snipping Tool to Windows 10 task bar, so in the future, you can quick launch snapping tool on windows 10 in just one click.
Another quick way to find the Snipping tool on Win 10 is to make use of the search. There is a big search box besides the Start menu, type in ‘snipping tool‘, you will find it from the top of the search result. Click on it to launch the snipping tool on Windows 10.
How to Capture Screen on Windows 10?
There are basically three steps to capture screen or take screenshots on Windows 10. Firstly choose the screen capturing mode, you can choose to create a free-form snip, rectangular snip, window snip or full-screen snip.
- Free-form Snip: draw and captures any irregular part of the screen
- Rectangular Snip: drag the cursor around an object to form a rectangle
- Window Snip: select an open window, such as a browser window or dialog box and let you capture it
- Full-screen snip: capture the entire screen when you select this type of snip.

After that, click the New button to capture anything on your Windows screen. Finally save the screenshot on Windows 10. You will also have the option to edit captured snip before saving on to your PC. You can also set to screen capturing for a few seconds which is new in Snipping tool for Windows 10.
When we find there are many new features being added to Windows 10, we also noticed that some features are missing, such as the DVD player. Although you can buy Windows DVD player from Windows Store, it however is not free any more. Here, we recommend you download this free DVD player to play DVDs on Win 10.
Record screen videos in Windows 10
If you want also record desktop or any thing displays on your computer screen, you can follow this guide to record desktop on Windows 10 computer using a third-party screen recorder app. Other than that, Format Factory is a great option which has the screen recorder built-in. We can use it to record screen videos on Windows PC without any fee.
How to record your screen in Windows 10
By Melanie Pinola 22 December 2020
Save your actions by learning how to record your screen in Windows 10
Did you know Windows 10 has a screen recording utility called the Xbox Game Bar? With it, you can record a video of your actions in just about any Windows app on your laptop, whether you want to capture gameplay or create a tutorial for someone on using Microsoft Office. To make it easier for you, we’ve outlined a few simple steps on how to record your screen in Windows 10.

The screen recording tool is part of the Xbox app that comes installed by default in Windows 10. Xbox Game Bar recently received some major updates to make it more useful, so you can now take screenshots and even make memes.
How to record your screen in Windows 10
1. Open the app you want to record. Unfortunately, the screen recorder tool can’t capture some programs, such as File Manager, or the entire desktop, but it does work in regular apps, whether from the Windows Store or desktop apps.
2. Press the Windows key + G at the same time to open the Game Bar dialog.
3. Check the «Yes, this is a game» checkbox to load the Game Bar. This is the procedure whether you are screen recording a game or another kind of app.
4. Click on the Start Recording button (or Win + Alt + R) to begin capturing video.
5. Stop the recording by clicking on the red recording bar that will be on the top right of the program window. (If it disappears on you, press Win + G again to bring the Game Bar back.)
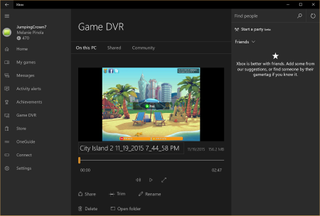
That’s it! You’ll find your recorded videos, which are MP4 files, under the Videos folder in a subfolder called Captures. You’ll also find them in the Xbox app under the Game DVR menu, where you can trim a video and share it on Xbox live (if it’s a game).
Note that you can also use the Xbox screen recording tool to take screenshots. Instead of clicking the recording button, click the camera icon on the Game Bar or Win+Alt+PrtScn.
We hope that this helped, and you could even teach someone else how to screen record in Windows 10.


