- Drivers >>> CareFusion Spiro USB driver
- Common questions for CareFusion Spiro USB driver
- DriverIdentifier Tool
- Spiro USB (CareFusion / Vyaire)
- Carefusion SpiroUSB Spirometer device set-up, software installation and troubleshooting guide
- Carefusion SpiroUSB Device Setup
- Carefusion SpiroUSB Software Setup
- Now to the nitty-gritty.
- Carefusion Software Usage
- Practice Management Software Integrations
- Electronic Instructions For Use & e-training
Drivers >>> CareFusion Spiro USB driver
CareFusion Spiro USB driver is a windows driver .
Common questions for CareFusion Spiro USB driver
Q: Where can I download the CareFusion Spiro USB driver’s driver?
Please download it from your system manufacturer’s website. Or you download it from our website.
Q: Why my CareFusion Spiro USB driver doesn’t work after I install the new driver?
1. Please identify the driver version that you download is match to your OS platform.
2. You should uninstall original driver before install the downloaded one.
3. Try a driver checking tool such as DriverIdentifier Software .
As there are many drivers having the same name, we suggest you to try the Driver Tool, otherwise you can try one by on the list of available driver below.
Please scroll down to find a latest utilities and drivers for your CareFusion Spiro USB driver. Be attentive to download software for your operating system.
If none of these helps, you can contact us for further assistance.
Description: CareFusion Spiro USB driver setup
Version: 4.2.8
Date: 09 Sep 2014
Filesize: 0.81 MB
Operating system: Windows XP, Visa, Windows 7,8 (32 & 64 bits)
Download Now
DriverIdentifier Tool
Find the drivers quickly
Download directly from OEM
Designed for Windows 8, 7, Vista, XP
Spiro USB (CareFusion / Vyaire)
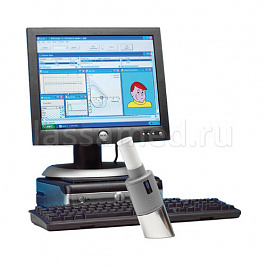

Компьютеризированный спирометр (спирограф).
Спирометр Spiro USB — портативная многофункциональной спирометрическая система на базе ПК с возможностями проведения спирометрического тестирования в полном объеме у детей и взрослых и создания большой базы данных.
Спирометр(спирограф) подключается непосредственно к USB-порту ПК. Программное обеспечение выполнено на основе программы PC Spirometry с дружественным и мульти-экранным интерфейсом.
Программа позволяет определять 41 спирометрический показатель, проводить спирометрию с построением открытой и закрытой петель, выполнять наложение текущих петель на петли предыдущих тестов для сравнения, а также предоставляет возможность легкого поиска и построения трендов результатов вместе с определением возраста легких и интерпретацией результатов.
При проведении массового обследования рекомендуется для каждого пациента вместо обычного одноразового загубника использовать одноразовый однонаправленный загубник или одноразовый фильтр для избежания инфицирования.
Датчик потока стерилизуют по необходимости. Для этого датчик отсоединяют от прибора и помещают либо в теплую мыльную воду, либо в холодный стерилизационный раствор на 10 минут (следует избегать стерилизационных растворов, в состав которых входит спирт или хлориды). После стерилизации датчик необходимо промыть в дистиллированной воде и высушить.
Датчик нечувствителен к изменениям влажности и температуры. Это позволяет избежать ежедневной калибровки прибора.
Точность измерений остается стабильной при условии правильного обращения с прибором. Тем не менее, фирма Micro Medical – в настоящее время Care Fusion рекомендует периодически проверять калибровку спирометра. Это можно сделать самостоятельно с помощью 3-х литрового калибровочного насоса или передать прибор в сервисной центр.
Принадлежности и расходный материал Spiro USB:
- Картонные одноразовые загубники (100 шт/уп);
- Картонные одноразовые загубники (500 шт/уп);
- Картонные одноразовые однонаправленные загубники (500 шт/уп);
- Педиатрические загубники (250 шт/уп);
- Адаптер для педиатрических загубников;
- Антибактериальные фильтры;
- Носовые зажимы.
Carefusion SpiroUSB Spirometer device set-up, software installation and troubleshooting guide
Please note that this blog is intended for Australian / New Zealand customers who have purchased the device from Stark Medical Australia. Your product may function slightly differently and also be packaged differently if you have purchased from any other distributor.
If you have not purchased from us directly, please contact your original distributor or contact Vyaire / Carefusion representatives in your country directly. 
Carefusion SpiroUSB Device Setup
The Carefusion SpiroUSB comes with two boxes.
The first of which contains the physical product and accompanying accessories. These include an e-manual on the orange USB, 6 single-use cardboard mouthpieces, USB cable and various instruction manuals and validation certificates.

The second box will contain the software required for the device to communicate with a Windows PC. It comes with a Vyaire CD Software suite and a smaller box which contains a Software License Key on a USB.

DO NOT LOSE THIS. Your software will not function otherwise.
Do not try to copy-paste any data off of the USB, it is not designed for storage.
There isn’t a Mac version available, although you can use Boot Camp, VMware or Parallels for example as a work around with Mac Computers.

First thing you may ask is what is this thing? I did too. It serves simply as a stand on which you can place the SpiroUSB.

The other (working) portion of the SpiroUSB has a cable attached to it with a USB connection. Plug this into your USB socket in order to power on the SpiroUSB. No batteries are required!

If your device is working correctly, you should see a blue light appear above the mouthpiece insertion which is characterised by the honeycomb grill.
Do not breathe directly into this mouthpiece. Use the Microgard IIb filters or one-way mouth-pieces that can be purchased here.
Carefusion SpiroUSB Software Setup

On this disc, you can find the Carefusion SpiroUSB Software for PC. Yes, I know — it’s almost 2020 and we’re using CDs. We recommend copy and pasting the files from the CD onto a USB in order to future proof your clinic for backward and forward device compatibility. If you really don’t have a device with a disc reader or you’re not too sure how to move the software off the disc, we’ve done it for you here.
On the back of the case, you will find a 9 digit serial number needed to install the SpiroUSB software. Probably a good idea to take a photo of this and store it somewhere safe. See the right-most photo for an idea of where you will find your code.
Now to the nitty-gritty.
I will be using a Windows Surface book, running Windows 10.
Step 1.
Run the «Spirometry PC Software — InstallShield Wizard».

Step 2.
Accept the terms & conditions to proceed with the installation.

Step 3.
Once you reach this serial page, you’ll need to find that 9 digit number I mentioned earlier. (on the back of the Vyaire software case). Fill in the details for User Name, Company Name and the Serial number. You can choose who has access to this software from the two options at the bottom of the window.

Step 4.
If you’ve made it this far, your installation is probably complete. The only road bump you might have had thus far would involve the 9-digit serial key or computer storage space. If it wasn’t the former, delete some stuff off your computer and try again.
You can start up your program now. The icon is a Monitor and the SpiroUSB.

Carefusion PC Software Homepage • Sentinel Hardware Key
After starting the software you should find yourself on this homepage.

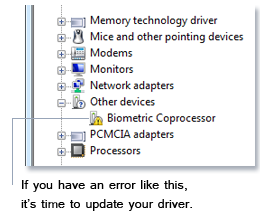
If you haven’t inserted your Sentinel USB Hardware Key into your computer — the Carefusion page will immediately display this warning. (Status code 226 or 206).

Plug-In the Sentinel USB key and the warning should go away. The USB key will have a green light displaying if the device is working correctly.
 But wait! My USB light isn’t on? My warning also didn’t go away?
If this is the case, then we’re going to need to install a driver for the Sentinel key.
Click on the link above to download the Sentinel Key Driver for PC. The file contains several other programs for the sentinel key, however, we only require one program — feel free to delete the file after installation.
The file will contain StartHere.exe • «Windows» Folder • StartHere.exe.manifest • autorun.inf
Use these next images to guide you through the installation pathway.


Carefusion Software Usage
Once the Sentinel Key Driver has been installed, restart your computer in order to ensure the computer successfully implements the installation.
After the PC has restarted, plug in your Sentinel Key and start the Carefusion Program again. You will notice the Status 226 / 206 notice has disappeared.
If your Carefusion software is out of date, there will be a notice on the upper right corner of the screen prompting you to update. This is recommended for proper device function.

Clicking the installation prompts and following its instructions will bring up the installation wizard once more.

Once updating is complete. Your Carefusion software is finally ready to go. The next few images will show you various software options and capabilities. I suggest having a play around with the software and using the e-manual (orange usb).
Verify Calibration

Perform Tests

Review Tests

Customise
The customise section will allow users to set up printing, spirometry settings as well as manage variables

Practice Management Software Integrations
Best Practice Software
BP Bond Integration Utility — Click Here
Customer Support — 1300 822 667
Medical Director Software
Clinical User Guide — Click Here
Customer Support — 1300 300 161
Electronic Instructions For Use & e-training
Videos are supplied on this USB Drive.
Caution: Read the manual before use.
Access IFU & eTraining
1. Remove Cap
2. Plug into your computer
3. Choose your operating system by double-clicking on the «WIN» or «MAC» Folder
4. Launch the program by double-clicking on the «eManualsAndTraining» file.
Minimum System Requirements:
Windows XP, Windows Server 2008, 2012, Windows 7, Windows 8, Windows 10, Mac OS X
Internet Explorer 8, 9, 10, 11; Adobe Flash Player;
Firefox Extended Support Release
For opening the IFU or manuals, Acrobat Reader needs to be installed. Please download your free version: https://get.adobe.com/reader/
E-labelling
All IFUs can be found on the internet. Click here to download the SpiroUSB user manual.
SpiroUSB Specifications
Power supply: Input 5V 0.1A
Dimensions: 50x60x90mm
Weight: 130g
Operating Temperature: 0 + 40ºC
Operating Humidity: 30% to 90% RH
Storage Temperature: -20 to +70º
Storage Humidity: 10% to 90% RH
Predicted Value: Various — depends upon national preference.
Transducer: Carefusion Bi-Directional Digital Volume
Accuracy: +/-3%. To ATS recommendations – Standardisation of spirometry 1994 update for flows and volumes.
Measurements: See SPCS operating manual for details of all the spirometry measurements available.
If you require more assistance, please email us at contact@starkmed.com.au or call direct on 1300 938 63.
Please note that this blog is intended for Australian / New Zealand customers who have purchased the device from Stark Medical Australia. Your product may function slightly differently and also be packaged differently if you have purchased from any other distributor.
If you have not purchased from us directly, please contact your original distributor or contact Vyaire / Carefusion representatives in your country directly.


