- Загрузить ISO образы CentOS
- Заметки о выпуске
- Конечный срок поддержки
- Новые выпуски
- Различные варианты ISO образов
- 🐧 CentOS ISO / DVD Ссылки для скачивания на разные версии
- История выпусков CentOS
- Скачать CentOS Зеркала
- Версии CentOS ISO / DVD и ссылки для скачивания
- Архитектура процессора
- x86_64
- aarch64
- ppc64le
- Размер DVD / ISO и способ установки
- Netinstall или Boot ISO
- Live DVD или установочный DVD
- Download
- CentOS Linux
- CentOS Stream
- Cloud and container images
- Geographical mirrors
- Sources
- Older Versions
- Preparing for your installation
- Recommended steps
- Check system requirements
- Additional resources
- Choose an installation boot method
- Additional Resources
- Select the required installation image
- Additional Resources
- Downloading the installation ISO image
- Creating installation media
- Creating a bootable DVD or CD
- Creating a bootable USB device on Linux
- Prerequisites
- Procedure
- Creating a bootable USB device on Windows
- Prerequisites
- Procedure
- Creating a bootable USB device on Mac OS X
- Prerequisites
- Procedure
- Preparing an installation source
- Types of installation source
- Specify the installation source
- Ports for network-based installation
Загрузить ISO образы CentOS
| Версии | Малый релиз | CD и DVD образ | Пакеты | Выпуск | Заметки о выпуске | Конечный срок поддержки |
|---|---|---|---|---|---|---|
| CentOS-Stream | x86_64 | RPMs | CentOS | CentOS-Stream | *** | |
| CentOS-8 | 8.4 (2105) | x86_64 | RPMs | CentOS | CentOS RHEL | 31 декабрь 2021** |
| CentOS-7 | 7.9 (2009) | x86_64 | RPMs | CentOS | CentOS RHEL | 30 июня 2024 |
| CentOS-6 | 6.10 | i386 x86_64 | RPMs | CentOS | CentOS RHEL | 30 ноября 2020** |
| CentOS-5 | 5.11 | i386 x86_64 | RPMs | CentOS | CentOS RHEL | 31 марта 2017*** |
Bittorent ссылки можно также получить из приведенных выше ссылок.
Заметки о выпуске
Вы можете получить все исходные сведения о выпуске всех версий Red Hat со страницы Red Hat’s Update Release Notes.
Конечный срок поддержки
Для каждого релиза, после выпуска в течении 4 лет выходят исправления ошибок и дополнения, направленные на лучшую работу аппаратных средств и новых устройств. Так же исправления по безопасности выходят в течении 7 лет после релиза.
Для получения дополнительной информации о поддержке жизненного цикла CentOS, взгляните на страницу Red Hat’s Errata Policy.
Новые выпуски
Новые крупные и мелкие релизы доступны спустя 4 — 6 недель после выхода (Red Hat) SRPMs (пакетов исходных кодов) компании поставщика. Это время требуется для сборки продукта из полученного кода, его проверки, тестирования, перевода и интеграции новых возможностей. Мы понимаем, что многим нашим пользователям хотелось бы пораньше получить новые обновления, но мы просим Вас проявить терпение и этим тоже помочь будущему релизу.
Различные варианты ISO образов
Помимо основных DVD и CD ISO образов, проект CentOS выпускает специальные ISO образы:
- LiveCD — загрузочный диск запускающий готовую рабочую систему непосредственно с компакт диска
- ServerCD — инсталяционный диск с необходимым только набором пакетов для установки сервера
- netinstall — минимальный CD образ для запуска установки через сеть ( <10M)
Источник
🐧 CentOS ISO / DVD Ссылки для скачивания на разные версии

История выпусков CentOS
Номера версий CentOS начинаются с 3, где это был клон RHEL 3.
- CentOS 3 выпущен 19 марта 2004 года.
- CentOS 4 выпущен 9 марта 2005 года.
- CentOS 5 выпущен 12 апреля 2007 года.
- CentOS 6 выпущен 10 июля 2011 года.
- CentOS 7 выпущен 7 июля 2014 года.
- CentOS 8 выпущен 24 сентября 2019 года.
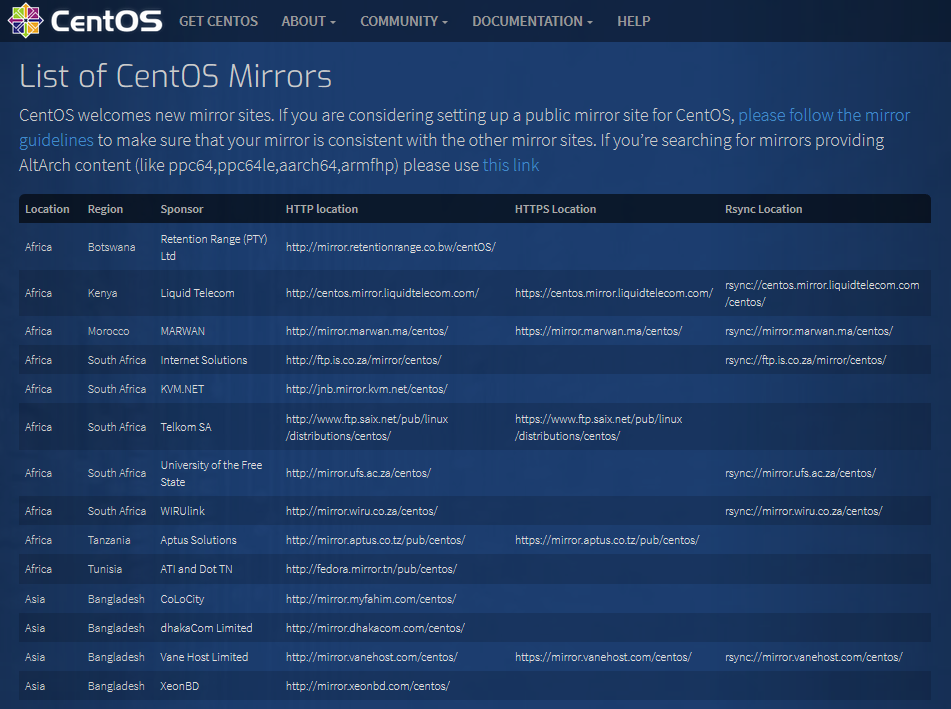
Скачать CentOS Зеркала
CentOS – очень популярный проект, который поддерживается многими различными организациями.
Чтобы ускорить загрузку и облегчить загрузку основных серверов CentOS, во всем мире используются зеркала.
Эти поддерживающие организации, такие как университеты, компании, частные лица, интернет-провайдеры и т. д, создают зеркало для загрузки образов CentOS.
Мы можем перечислить образа в зависимости от местоположения, региона или спонсора по следующей ссылке.
Версии CentOS ISO / DVD и ссылки для скачивания
Проект CentOS предоставляет различные варианты дистрибутива CentOS Linux для разных вариантов использования.
Давайте рассмотрим загрузочные версии CentOS ISO.
Архитектура процессора
Архитектура сервера, ПК или системы, которая должна быть выбрана правильно.
x86_64 – это наиболее часто используемая и популярная архитектура ЦП, которая чаще всего загружается для обычных ПК, серверов, ноутбуков, рабочих станций и т. д.
x86_64
aarch64
ppc64le
Размер DVD / ISO и способ установки
В CentOS 8 предоставляются две основные версии, которые можно настроить для различных сред рабочего стола или установки.
Netinstall или Boot ISO
Netinstall содержит только базовые пакеты для загрузки и установки последних пакетов CentOS.
В данных версиях предусмотрена возможность их настройки для различных сред рабочего стола или установки.
Live DVD или установочный DVD
Мы можем использовать Live DVD или установочный DVD из единого образа ISO, который снабжен следующими ссылками.
Источник
Download
CentOS Linux
| ISO | Packages | Others |
|---|---|---|
| x86_64 | RPMs | Cloud | Containers | Vagrant |
| ARM64 (aarch64) | RPMs | Cloud | Containers | Vagrant |
| IBM Power (ppc64le) | RPMs | Cloud | Containers | Vagrant |
| ISO | Packages | Others |
|---|---|---|
| x86_64 | RPMs | Cloud | Containers | Vagrant |
| ARM64 (aarch64) | RPMs | Cloud | Containers | Vagrant |
| IBM Power BE (ppc64) | RPMs | Cloud | Containers | Vagrant |
| IBM Power (ppc64le) | RPMs | Cloud | Containers | Vagrant |
| ARM32 (armhfp) | RPMs | Cloud | Containers | Vagrant |
| i386 | RPMs | Cloud | Containers | Vagrant |
CentOS Stream
| Release Notes | Release Email | Documentation |
|---|
| End-of-life |
|---|
| End of RHEL9 «full support» phase |
| ISO | Packages | Others |
|---|---|---|
| x86_64 | RPMs | Cloud | Containers | Vagrant |
| ARM64 (aarch64) | RPMs | Cloud | Containers | Vagrant |
| IBM Power (ppc64le) | RPMs | Cloud | Containers | Vagrant |
| Release Notes | Release Email | Documentation |
|---|
| Converting from CentOS Linux 8 to CentOS Stream 8 |
|---|
As you download and use CentOS Linux or CentOS Stream (What’s the difference?), the CentOS Project invites you to be a part of the community as a contributor. There are many ways to contribute to the project, from documentation, QA, and testing to coding changes for SIGs, providing mirroring or hosting, and helping other users.
ISOs are also available via Torrent.
How to verify your iso
If you plan to create USB boot media, please read this first to avoid damage to your system.
If the above is not for you, alternative downloads might be.
The CentOS Linux 8 release notes and CentOS Stream release notes are continuously updated to include issues and incorporate feedback from users.
Cloud and container images
We build, maintain and update Cloud images that you can find on our Cloud Images server.
These images are built and made available for all the architectures that corresponding version supports.
People interested in importing ‘GenericCloud’ images into their own cloud solution can find corresponding images on the link above.
Worth knowing that you can also import (through Skopeo or other methods) container images the same way, and such .tar.xz files can be found on the same mirror.
Parallel to that, we have also official images that are available directly to be deployed for the following solutions:
If the above is not for you, alternative downloads might be.
Geographical mirrors
If you’re looking for a specific (or geographically local) mirror, please check out our list of current mirrors.
To check the status of a mirror, please visit mirror-status.centos.org.
Sources
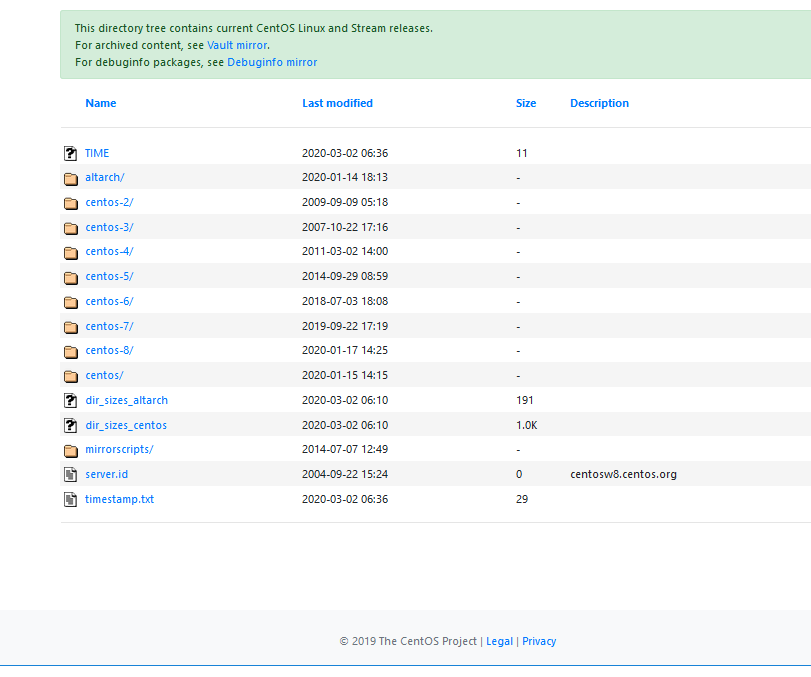
The CentOS project hosts our sources at git.centos.org. This is documented in greater detail in the CentOS wiki.
In order to help ease the workload for our primary mirror network, the source rpms are not kept in the same tree as the binary packages. If you need the source packages used to build CentOS, you can find them in our vault vault.centos.org.
Older Versions
Legacy versions of CentOS are no longer supported. For historical purposes, CentOS keeps an archive of older versions. If you’re absolutely sure you need an older version then click here.
Источник
Preparing for your installation
If you are new to CentOS, it is important to prepare for your installation by reviewing system requirements, downloading the required installation image, and creating installation media.
Recommended steps
Preparing for your installation consists of several steps.
If you are new to CentOS, complete steps 1 to 5.
If you are familiar with CentOS, complete steps 3 to 5.
Check system requirements.
Choose an installation boot method.
Select and download the installation image.
Create bootable installation media.
Prepare the installation source*
*Only required for the Boot ISO (minimal install) image.
Check system requirements
If this is a first-time installation of CentOS it is recommended that you review the guidelines provided for system, hardware, security, memory, and RAID before installing. See System requirements reference for more information.
Additional resources
For more information about securing CentOS, see the Security hardening in RHEL 8 document.
Choose an installation boot method
There are several methods to boot the CentOS installation program. The method you choose depends on your installation media.
Create a full installation DVD or USB flash drive using the DVD1 ISO image. The DVD or USB flash drive can be used as a boot device and as an installation source for installing software packages. Due to the size of the DVD1 ISO image, a DVD or USB flash drive are the recommended media types.
Minimal installation DVD, CD, or USB flash drive
Create a minimal installation CD, DVD, or USB flash drive using the Boot ISO image, which contains only the minimum files necessary to boot the system and start the installation program. The Boot ISO image requires an installation source that contains the required software packages.
A preboot execution environment (PXE) server allows the installation program to boot over the network. After a system boot, you must complete the installation from a different installation source, such as a local hard drive or a network location.
Additional Resources
For instructions on how to create an installation DVD or USB flash drive, see Creating installation media for more information.
For instructions on how to create a bootable DVD, CD, and USB flash drive, see Preparing an installation source for more information.
For more information about PXE servers, see the Performing an advanced installation document.
Select the required installation image
Two CentOS 8 installation images are available from the Downloads page.
A full installation program that contains the BaseOS and AppStream repositories and allows you to complete the installation without additional repositories. Installing CentOS from the DVD1 ISO is the easiest and the recommended method of performing a standard CentOS 8 installation.
It is recommended that you use the DVD1 ISO image file to install CentOS 8.
The Boot ISO image is a minimal installation that requires access to the BaseOS and AppStream repositories to install software packages. The repositories are part of the DVD1 ISO image that is available for download from https://wiki.centos.org/Download. Download and unpack the DVD1 ISO image to access the repositories.
The following table contains information about the images that are available for the supported architectures.
| Architecture | Installation DVD | Boot DVD |
|---|---|---|


