- Certificate Revocation Lists
- How to Examine any Certificate Revocation List in Windows with Certutil
- How to Examine any Certificate Revocation List in Windows with Certutil
- Publish Certificate Revocation Lists for ISE on a Microsoft CA Server Configuration Example
- Available Languages
- Download Options
- Contents
- Introduction
- Prerequisites
- Requirements
- Components Used
- Conventions
- Configure
- Configurations
- Section 1. Create and Configure a Folder on the CA to House the CRL Files
- Section 2. Create a Site in IIS to Expose the New CRL Distribution Point
- Section 3. Configure Microsoft CA Server to Publish CRL Files to the Distribution Point
- Section 4. Verify the CRL File Exists and is Accessible via IIS
- Section 5. Configure ISE to use the New CRL Distribution Point
- Verify
- Troubleshoot
Certificate Revocation Lists
This topic describes how to examine the certificate revocation list (CRL) for revoked drivers when using Certified Output Protection Protocol (COPP).
The CRL contains digests of revoked certificates and can be provided and signed only by Microsoft. The CRL is distributed through digital rights management (DRM) licenses. The CRL can revoke any certificate in the driver’s certificates chain. If any certificate in the chain is revoked, then that certificate and all of the certificates below it in the chain are also revoked.
To get the CRL, the application must use the Windows Media Format SDK, version 9 or later, and perform the following steps:
- Call WMCreateReader to create the Windows Media Format SDK reader object.
- Query the reader object for the IWMDRMReader interface.
- Call IWMDRMReader::GetDRMProperty with a value of g_wszWMDRMNet_Revocation to get the CRL. You must call this method twice: Once to get the size of the buffer to allocate, and once to fill the buffer. The second call returns a string that contains the CRL. The entire string is base-64 encoded.
- Decode the base-64 encoded string. You can use the CryptStringToBinary function to do this. This function is part of CryptoAPI.
To use the IWMDRMReader interface, you must obtain a static DRM library from Microsoft and link your application to this library file. For more information, see the topic «Obtaining the Required DRM Library» in the Windows Media Format SDK documentation.
If the CRL is not present on the user’s computer, the GetDRMProperty method returns NS_E_DRM_UNSUPPORTED_PROPERTY. Currently, the only way to obtain the CRL is to acquire a DRM license.
The following code shows a function that returns the CRL:
Next, the application must verify that the CRL is valid. To do so, verify that the CRL certificate, which is part of the CRL, is directly signed by the Microsoft Root Certificate and has the SignCRL element value set to 1. Also, verify the signature of the CRL.
After the CRL is verified, the application can store it. The CRL version number should also be checked before storing so that the application always stores the newest version.
The CRL has the following format.
| Section | Contents |
|---|---|
| Header | 32-bit CRL version32-bit number of entries |
| Revocation Entries | Multiple 160-bit revocation entries |
| Certificate | 32-bit certificate lengthVariable-length certificate |
| Signature | 8-bit signature type16-bit signature lengthVariable-length signature |
All integer values are unsigned and are represented in big-endian (network byte order) notation.
CRL Section Descriptions
The header contains the version number of the CRL and the number of revocation entries in the CRL. A CRL can contain zero or more entries.
Each revocation entry is the 160-bit digest of a revoked certificate. Compare this digest with the DigestValue element within the certificate.
The certificate section contains a 32-bit value indicating the length (in bytes) of the XML certificate and its certificate chain, along with a byte array that contains both the XML certificate of the Certificate Authority (CA) and the certificate chain that has Microsoft as the Root. The certificate must be signed by a CA that has the authority to issue CRLs.
The certificate must not be null-terminated.
The signature section contains the signature type and length, and the digital signature itself. The 8-bit type is set to 2 to indicate that it uses SHA-1 with 1024-bit RSA encryption. The length is a 16-bit value containing the length of the digital signature in bytes. The digital signature is calculated over all prior sections of the CRL.
The signature is calculated using the RSASSA-PSS digital signature scheme that is defined in PKCS #1 (version 2.1). The hash function is SHA-1, which is defined in Federal Information Processing Standard (FIPS) 180-2, and the mask generation function is MGF1, which is defined in section B.2.1 in PKCS #1 (version 2.1). The RSASP1 and RSAVP1 operations use RSA with a 1024-bit modulus with a verification exponent of 65537.
How to Examine any Certificate Revocation List in Windows with Certutil
How to Examine any Certificate Revocation List in Windows with Certutil
Lots of different systems and platforms use certificates and Public Key Infrastructure (PKI). Many companies have decided to implement an internal Certification Authority to issue certificates to computers, users, and other Certification Authorities.
As you probably already know, when a certificate is considered untrustworthy it is listed in the issuing CA’s Certificate Revocation List (CRL). This is just a small file located somewhere accessible by URL, and is frequently hosted on Internet-facing web servers. This file is not in plaintext, so just dropping it into Notepad isn’t going to do you much good. But you may well need to examine a CRL to ensure a specific certificate is listed, to get an idea of the trustworthiness of a PKI provider, etc.
Here’s how to display the contents of a Certificate Revocation List in Windows.
Special Note: this technique works with Certificate Revocation Lists from any PKI issuer like VeriSign, GTE, GoDaddy, DigiCert, etc. It can come from a Linux PKI server, a Windows Certification Authority, or a hand-built system. Every CRL uses a standard format that this technique supports.
Steps to displaying a Certificate Revocation List
The steps to back up a Windows Certificate Server running on any version of Windows since Windows Server 2003 are the same. This includes Windows XP, Windows 7, Windows 8, as well as Windows Server 2008 and R2 and Windows Server 2012 and R2. They are:
Obtain the Certificate Revocation List from the CRL Distribution Point (CDP)
This is easier than you think. Open up almost any certificate issued from a CA and look for the CDP field. For example, here’s a VeriSign certificate that chains to a common VeriSign Enhanced Validation root. I’m displaying this by clicking the padlock in Google Chrome, but any browser will do.
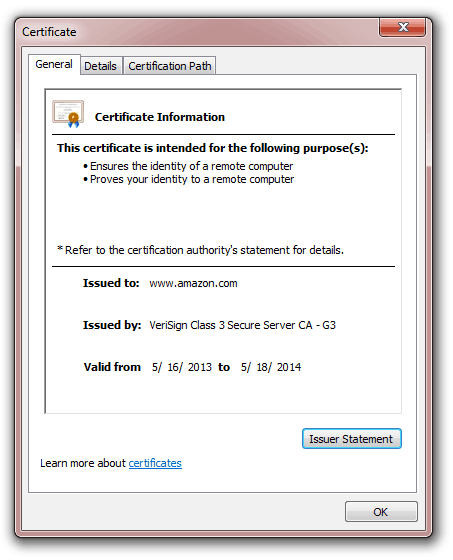
On the Details tab, the CRL Distribution Point field should always contain at least one URL that I can access from anywhere I’m expected to trust the certificate.
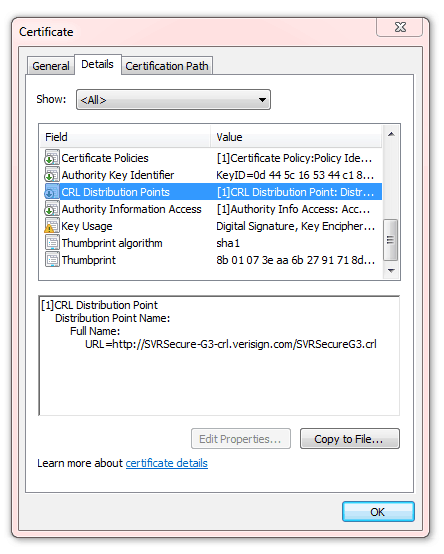
So the CDP is on a public web server. I pop that URL into my browser and choose Save Attachment to put the CRL on my local computer.

Notice the cool icon! I’m sure the little red X is for naughty untrustworthy certificates.
Decode the Certificate Revocation List With Certutil
Now I open a Command Prompt, change to the directory that contains the CRL, and use the Certutil –dump command. In this case, I type Certutil –dump SVRSecureG3.crl and see the following results:
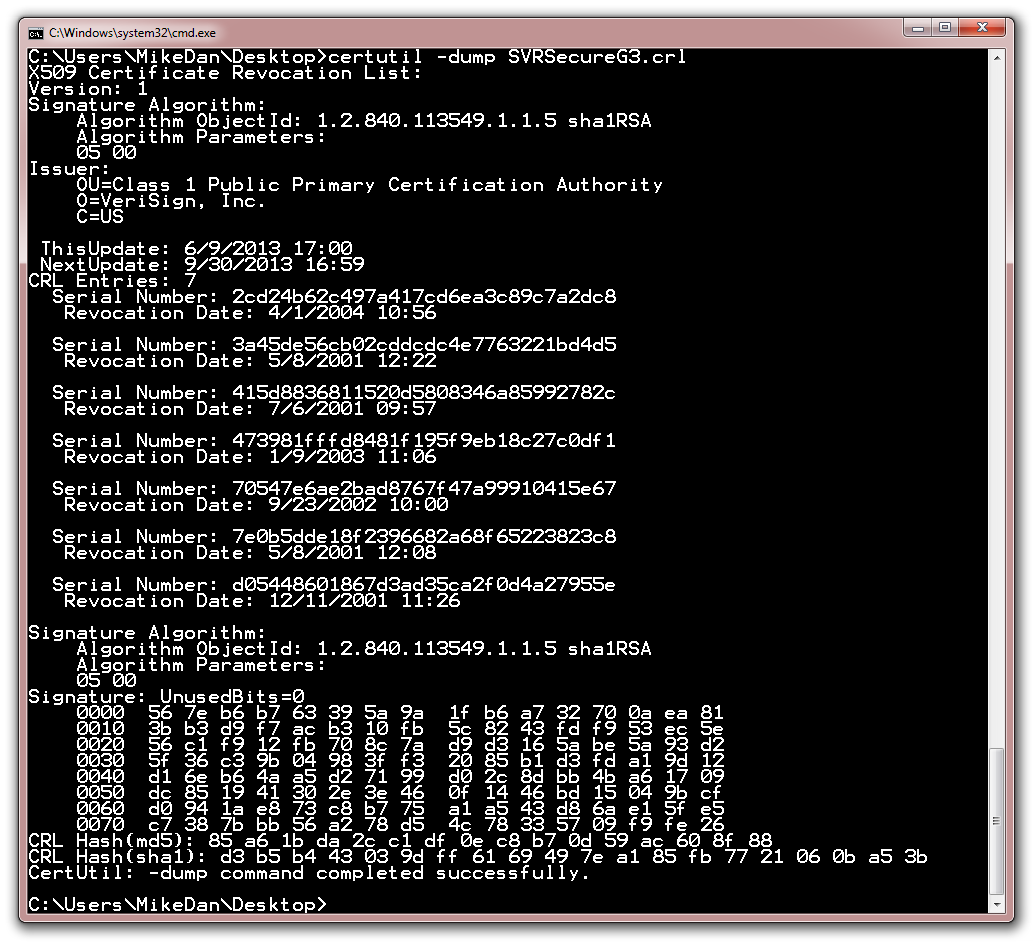
Boom goes the dynamite! I see the serial number of each revoked certificate and the date of revocation along with appropriate crypto information including the issuer, date of issuance, and CRL signature. That’s pretty much all the information that’s in a CRL.
If you want more Windows PKI articles please be sure to drop me a comment.
Take care!
Mike Danseglio -CISSP / CEH
Interface Technical Training – Technical Director and Instructor
Publish Certificate Revocation Lists for ISE on a Microsoft CA Server Configuration Example
Available Languages
Download Options
Contents
Introduction
This document describes the configuration of a Microsoft Certificate Authority (CA) server that runs Internet Information Services (IIS) to publish Certificate Revocation List (CRL) updates. It also explains how to configure Cisco Identity Services Engine ( ISE) (versions 1.1 and later) to retrieve the updates for use in certificate validation. ISE can be configured to retrieve CRLs for the various CA root certificates it uses in certificate validation.
Prerequisites
Requirements
There are no specific requirements for this document.
Components Used
The information in this document is based on these software and hardware versions:
Cisco Identity Services Engine Release 1.1.2.145
Microsoft Windows ® Server ® 2008 R2
The information in this document was created from the devices in a specific lab environment. All of the devices used in this document started with a cleared (default) configuration. If your network is live, make sure that you understand the potential impact of any command.
Conventions
Refer to the Cisco Technical Tips Conventions for more information on document conventions.
Configure
In this section, you are presented with the information to configure the features described in this document.
Note: Use the Command Lookup Tool (registered customers only) to obtain more information on the commands used in this section.
Configurations
This document uses these configurations:
Section 1. Create and Configure a Folder on the CA to House the CRL Files
Section 2. Create a Site in IIS to Expose the New CRL Distribution Point
Section 3. Configure Microsoft CA Server to Publish CRL Files to the Distribution Point
Section 4. Verify the CRL File Exists and is Accessible via IIS
Section 5. Configure ISE to use the New CRL Distribution Point
Section 1. Create and Configure a Folder on the CA to House the CRL Files
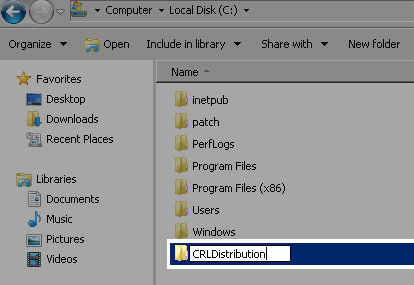
The first task is to configure a location on the CA server to store the CRL files. By default, the Microsoft CA server publishes the files to C:\Windows\system32\CertSrv\CertEnroll\ . Rather than use this system folder, create a new folder for the files.
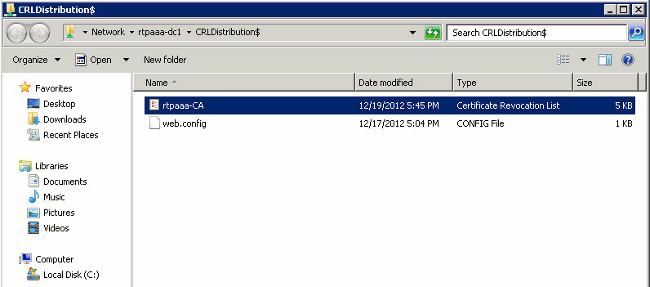
On the IIS server, choose a location on file system and create a new folder. In this example, the folder C:\CRLDistribution is created.
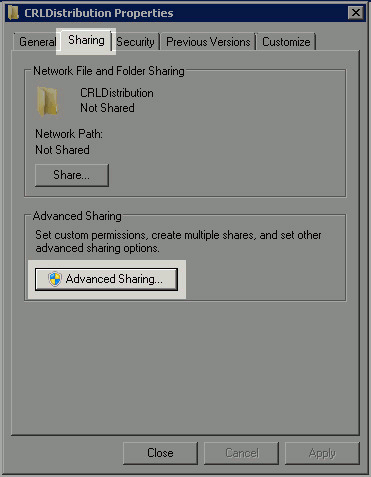
In order for the CA to write the CRL files to the new folder, sharing must be enabled. Right-click the new folder, choose Properties, click the Sharing tab, and then click Advanced Sharing.
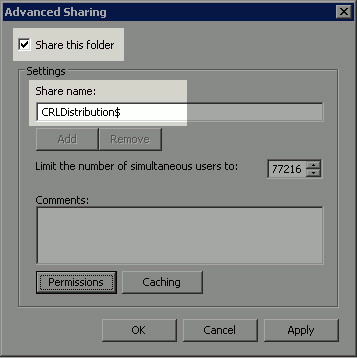
In order to share the folder, check the Share this folder check box and then add a dollar sign ($) to the end of the share name in the Share name field to hide the share.
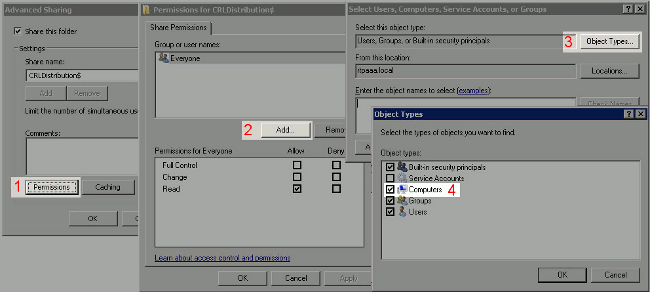
Click Permissions (1), click Add (2), click Object Types (3), and check the Computers check box (4).
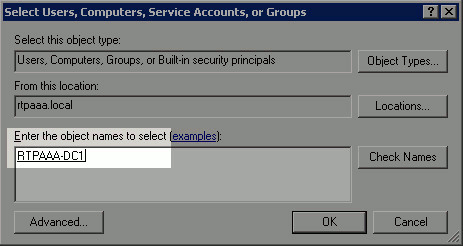
In order to return to the Select Users, Computers, Service Accounts, or Groups window, click OK. In the Enter the object names to select field, enter the computer name of the CA server and click Check Names. If the name entered is valid, the name refreshes and appears underlined. Click OK.
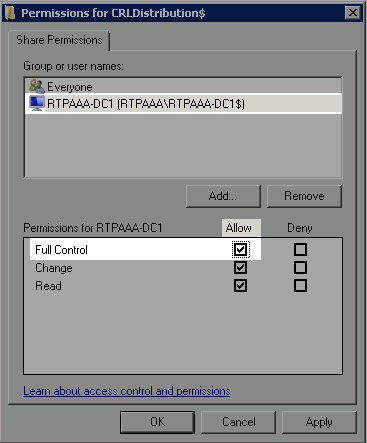
In the Group or user names field, choose the CA computer. Check Allow for Full Control to grant full access to the CA. Click OK. Click OK again to close the Advanced Sharing window and return to the Properties window.
In order to allow the CA to write the CRL files to the new folder, configure the appropriate security permissions. Click the Security tab (1), click Edit (2), click Add (3), click Object Types (4), and check the Computers check box (5).
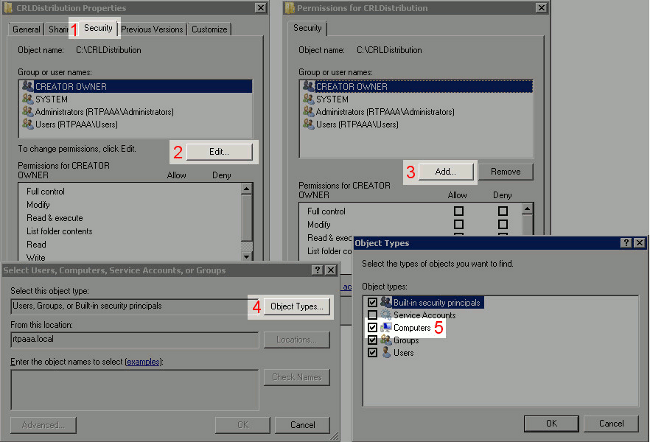
In the Enter the object names to select field, enter the computer name of the CA server and click Check Names. If the name entered is valid, the name refreshes and appears underlined. Click OK.
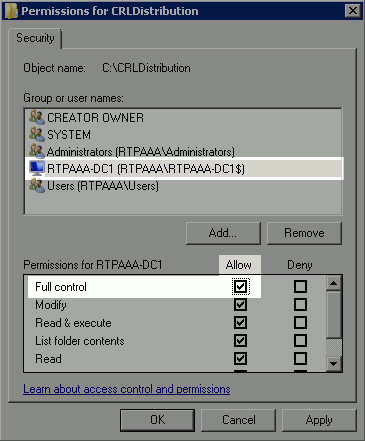
Choose the CA computer in the Group or user names field and then check Allow for Full control to grant full access to the CA. Click OK and then click Close to complete the task.
Section 2. Create a Site in IIS to Expose the New CRL Distribution Point
In order for ISE to access the CRL files, make the directory that houses the CRL files accessible via IIS.
On the IIS server taskbar, click Start. Choose Administrative Tools > Internet Information Services (IIS) Manager.
In the left pane (known as the Console Tree), expand the IIS server name and then expand Sites.
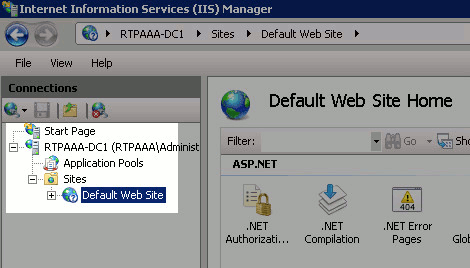
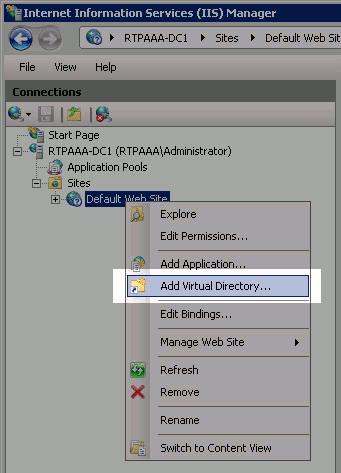
Right-click Default Web Site and choose Add Virtual Directory.
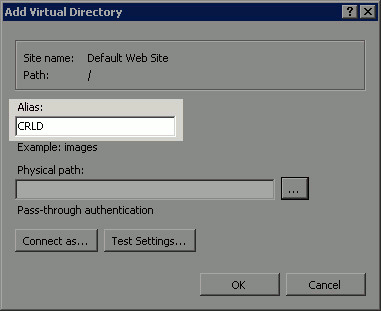
In the Alias field, enter a site name for the CRL Distribution Point. In this example, CRLD is entered.
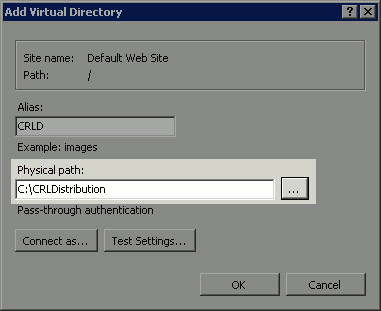
Click the ellipsis (. . .) to the right of the Physical path field and browse to the folder created in section 1. Select the folder and click OK. Click OK to close the Add Virtual Directory window.
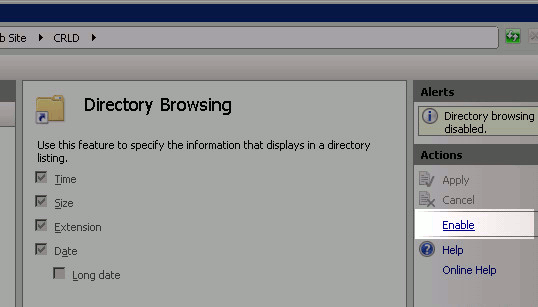
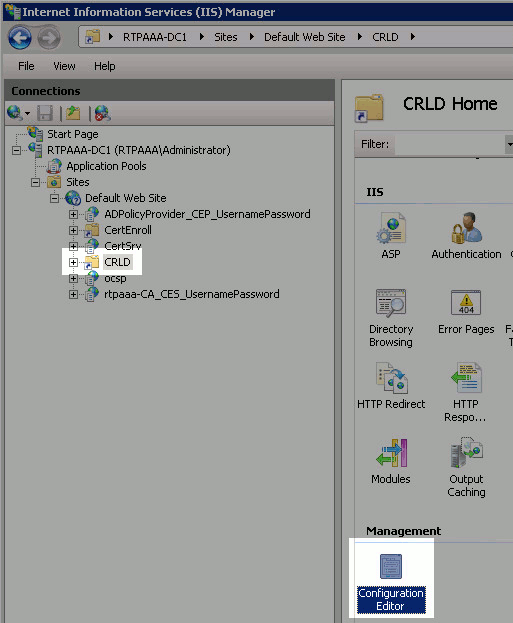
The site name entered in step 4 should be highlighted in the left pane. If not, choose it now. In the center pane, double-click Directory Browsing.

In the right pane, click Enable to enable directory browsing.
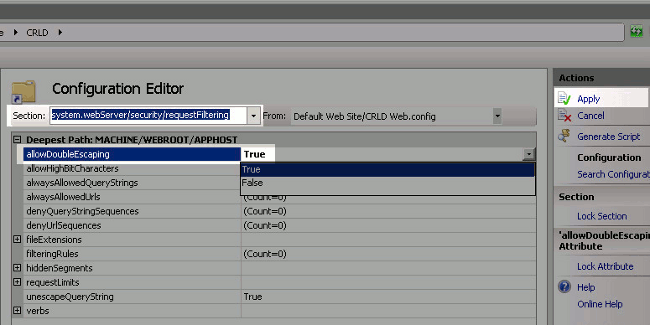
In the left pane, choose the site name again. In the center pane, double-click Configuration Editor.
In the Section drop-down list, choose system.webServer/security/requestFiltering. In the allowDoubleEscaping drop-down list, choose True. In the right pane, click Apply.
The folder should now be accessible via IIS.
Section 3. Configure Microsoft CA Server to Publish CRL Files to the Distribution Point
Now that a new folder has been configured to house the CRL files and the folder has been exposed in IIS, configure Microsoft CA server to publish the CRL files to the new location.
On the CA server taskbar, click Start. Choose Administrative Tools > Certificate Authority.
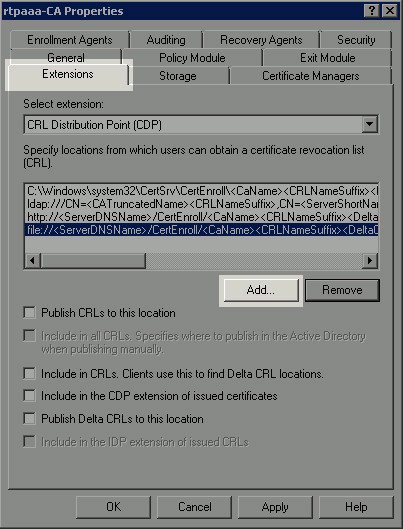
In the left pane, right-click the CA name. Choose Properties and then click the Extensions tab. In order to add a new CRL distribution point, click Add.
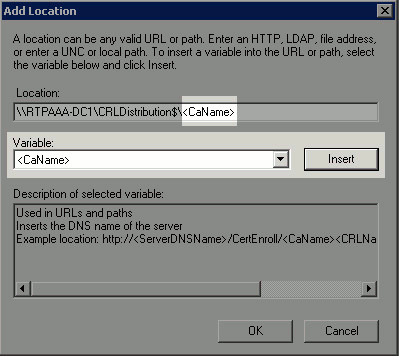
In the Location field, enter the path to the folder created and shared in section 1. In the example in section 1, the path is:
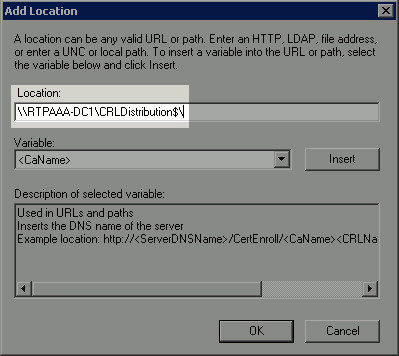
With the Location field populated, choose from the Variable drop-down list and then click Insert.
From the Variable drop-down list, choose and then click Insert.
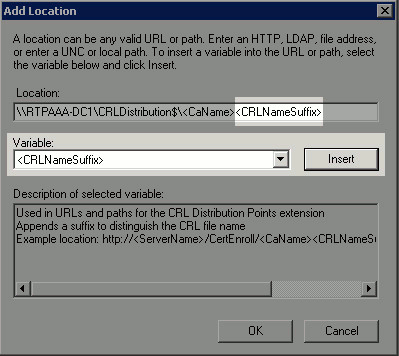
In the Location field, append .crl to the end of the path. In this example, the Location is:

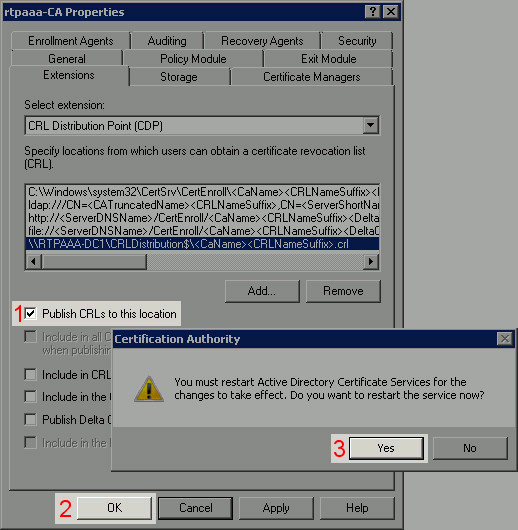
Click OK to return to the Extensions tab. Check the Publish CRLs to this location check box (1) and then click OK (2) to close the Properties window. A prompt appears for permission to restart Active Directory Certificate Services. Click Yes (3).
In the left pane, right-click Revoked Certificates. Choose All Tasks > Publish. Ensure that New CRL is selected and then click OK.
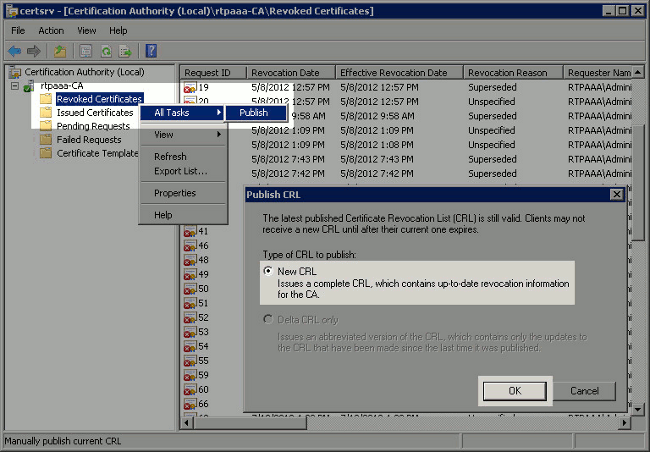
The Microsoft CA server should create a new .crl file in the folder created in section 1. If the new CRL file is created successfully there will be no dialog after OK is clicked. If an error is returned in regards to the new distribution point folder, carefully repeat each step in this section.
Section 4. Verify the CRL File Exists and is Accessible via IIS
Verify the new CRL files exist and that they are accessible via IIS from another workstation before you start this section.
On the IIS server, open the folder created in section 1. There should be a single .crl file present with the form .crl where is the name of the CA server. In this example, the filename is:
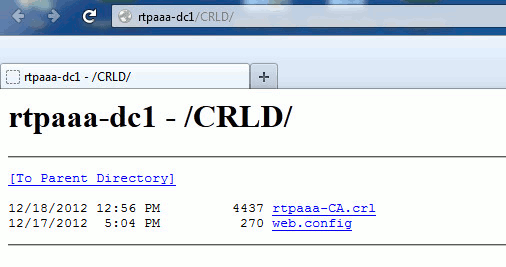
From a workstation on the network (ideally on the same network as the ISE primary Admin node), open a web browser and browse to http:// / where is the server name of the IIS server configured in section 2 and is the site name chosen for the distribution point in section 2. In this example, the URL is:
The directory index displays, which includes the file observed in step 1.
Section 5. Configure ISE to use the New CRL Distribution Point
Before ISE is configured to retrieve the CRL, define the interval to publish the CRL. The strategy to determine this interval is beyond the scope of this document. The potential values (in Microsoft CA) are 1 hour to 411 years, inclusive. The default value is 1 week. Once an appropriate interval for your environment has been determined, set the interval with these instructions:
On the CA server taskbar, click Start. Choose Administrative Tools > Certificate Authority.
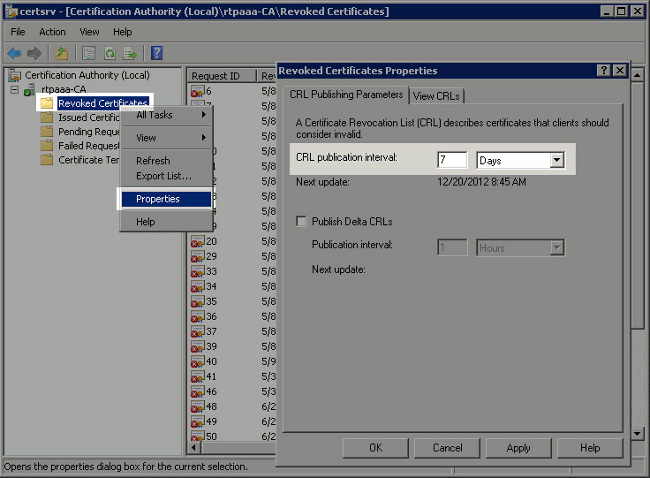
In the left pane, expand the CA. Right-click the Revoked Certificates folder and choose Properties.
In the CRL publication interval fields, enter the required number and choose the time period. Click OK to close the window and apply the change. In this example, a publication interval of 7 days is configured.
You should now confirm several registry values, which will help determine the CRL retrieval settings in ISE.
Enter the certutil -getreg CA\Clock* command to confirm the ClockSkew value. The default value is 10 minutes.
Enter the certutil -getreg CA\CRLov* command to verify whether the CRLOverlapPeriod has been manually set. By default the CRLOverlapUnit value is 0, which indicates that no manual value has been set. If the value is a value other than 0, record the value and units.
Enter the certutil -getreg CA\CRLpe* command to verify the CRLPeriod, which was set in step 3.
Calculate the CRL Grace Period as follows:
If CRLOverlapPeriod was set in step 5: OVERLAP = CRLOverlapPeriod, in minutes;
Else: OVERLAP = (CRLPeriod / 10), in minutes
If OVERLAP > 720 then OVERLAP = 720
If OVERLAP CRLPeriod, in minutes then OVERLAP = CRLPeriod in minutes
Grace Period = 720 minutes + 10 minutes = 730 minutes
The grace period calculated is the amount of time between when the CA publishes the next CRL and when the current CRL expires. ISE needs to be configured to retrieve the CRLs accordingly.
Log in to the primary Admin node and choose Administration > System > Certificates. In the left pane, select Certificate Store.
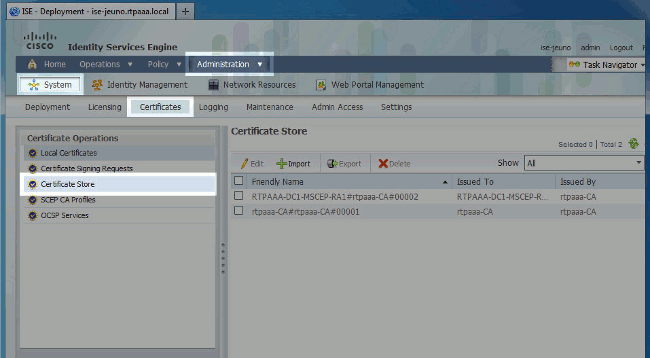
Check the Certificate Store check box next to the CA certificate for which you intend to configure CRLs. Click Edit.
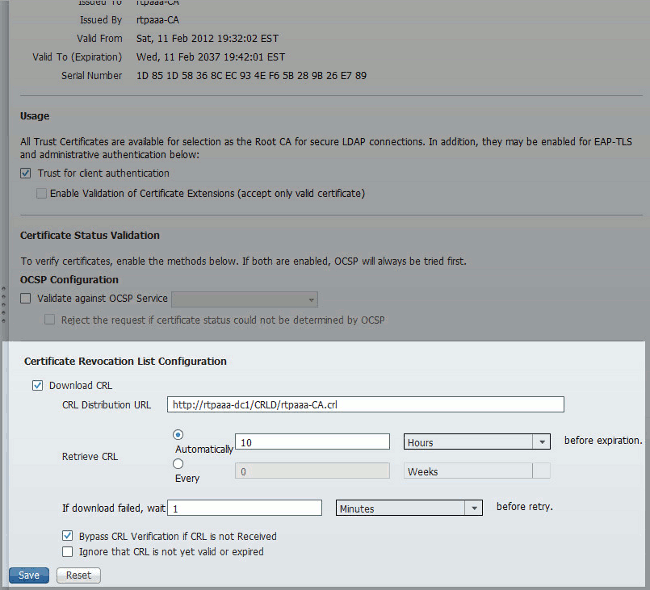
Near the bottom of the window, check the Download CRL check box.
In the CRL Distribution URL field, enter the path to the CRL Distribution Point, which includes the .crl file, created in section 2. In this example, the URL is:
ISE can be configured to retrieve the CRL at regular intervals or based on the expiration (which, in general, is also a regular interval). When the CRL publish interval is static, more timely CRL updates are obtained when the latter option is used. Click the Automatically radio button.
Set the value for retrieval to a value less than the grace period calculated in step 7. If the value set is longer than the grace period, ISE checks the CRL distribution point before the CA has published the next CRL. In this example, the grace period is calculated to be 730 minutes, or 12 hours and 10 minutes. A value of 10 hours will be used for the retrieval.
Set the retry interval as appropriate for your environment. If ISE cannot retrieve the CRL at the configured interval in the previous step, it will retry at this shorter interval.
Check the Bypass CRL Verification if CRL is not Received check box to allow certificate-based authentication to proceed normally (and without a CRL check) if ISE was unable to retrieve the CRL for this CA in its last download attempt. If this check box is not checked, all certificate-based authentication with certificates issued by this CA will fail if the CRL cannot be retrieved.
Check the Ignore that CRL is not yet valid or expired check box to allow ISE to use expired (or not yet valid) CRL files as though they were valid. If this check box is not checked, ISE considers a CRL to be invalid prior to their Effective Date and after their Next Update times. Click Save to complete the configuration.
Verify
There is currently no verification procedure available for this configuration.
Troubleshoot
There is currently no specific troubleshooting information available for this configuration.


